
Python is ubiquitous.
Whether the demand is scalability, stability, processing, and I/O speed, or just simplicity and readability to make maintenance and onboarding new personnel easier, Python has stood out time and time again. Its libraries are some of the best documented, best-maintained code resources out there, and the object-oriented, dynamically typed, interpreted, interactive programming language excels at enabling rapid, iterative development.
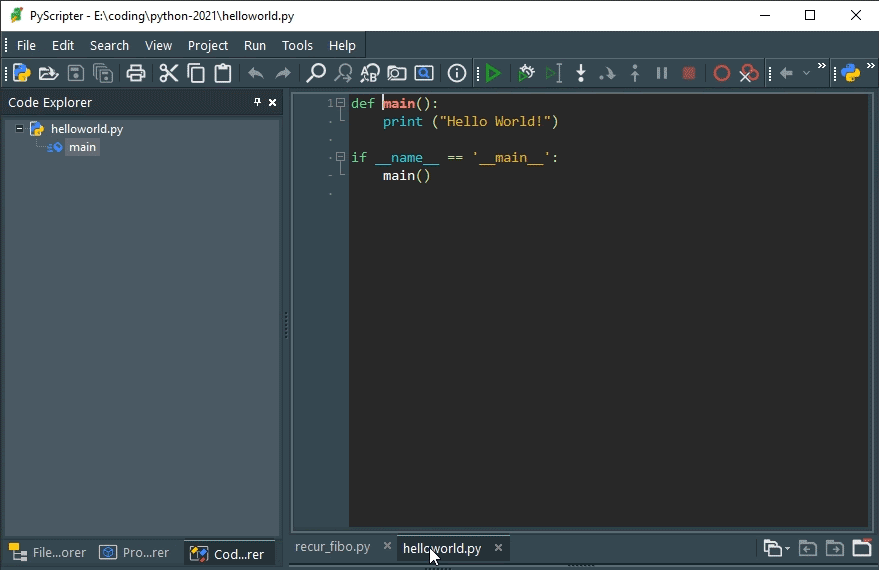
When it comes to writing Python code, the bare essentials begin with a text editor that can create and edit plain-text Python (.py) files, and the Python interpreter. However, a full-featured Integrated Development Environment (IDE) that packages a text editor with code completion and robust search features, a Python interpreter, Python shell, filesystem explorer, and debugging features into one window on the screen, could make your life a lot easier.
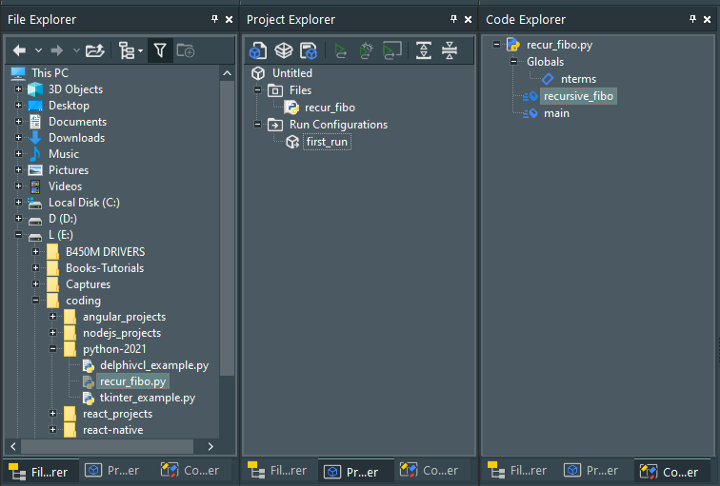
Enter PyScripter, a light, feature-rich, free, and open-source Python-specific IDE published under the MIT license. PyScripter was developed by Kiriakos Vlahos (who also developed Python4Delphi, a bridge library between Delphi's Object Pascal and Python), and since 2015 has seen around 1.2 million downloads from the project's SourceForge page alone. It was developed in Delphi, using SynEdit, an advanced multi-line edit control written in Pascal.
In the post we'll set up PyScripter, take a look at what it offers, and test drive it using Embarcadero's DelphiVCL4Python, a free library wrapping the Delphi Visual Component Library (VCL) in a Python module.
Getting Started
This guide will assume you have a relatively modern system with a 64-bit version of Windows 8 and upwards. Please download the 32-bit (x86) versions of both PyScripter and Python 3 itself if you know you have a 32-bit Windows installation.
We'll get the latest version of Python 3 here (as of the time of writing, this is version 3.10.1). The installation itself is straightforward, the default settings will suit us just fine.
Then, go ahead and get PyScripter itself from here.
Once we have both Python 3 and PyScripter installed, we're ready to dive in!
First Look
At first glance, this is a clean, lean IDE. A modern GUI with docked forms and fully resizable sections, and a tabbed workspace. As you'd expect of any modern IDE, robust search features (find, find and replace, find in files) are available, as are powerful debug tools (breakpoint management, step-into, step-over, step-out, pause, abort). Let's take a closer look at each of the major sections.
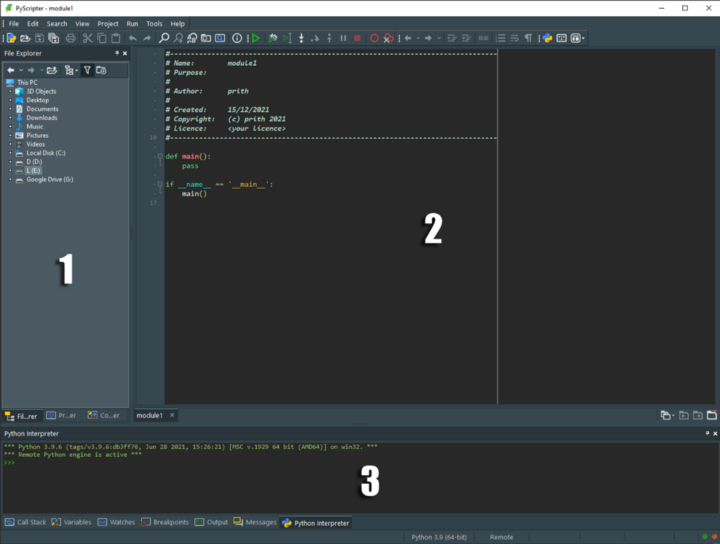
1. File, Project, and Code Explorer
A split view of all three tabs on the left
File Explorer
- Windows-like file explorer, with the same context menus as Windows.
- Provides easy, intuitive navigation through your filesystem and Python library paths.
- Can serve as a Git client with Windows shell extensions like Tortoise-git.
Project Explorer
- The hierarchical organization of your project. A logical view of your files, as they are stored physically in your filesystem, or further organized based on your project structure and style guide.
- Choice of multiple Run Configurations, defined by you. You could designate local or remote scripts to run as servers, some to run as clients, and define sequences of these.
- Run Configurations are customizable, with a choice of Python engine and interpreter to use (local or remote), command line parameters that will be placed in the argvlist of the Python sys module before running or debugging scripts, and output logging.
- Can also easily import contents of entire directories, and search and replace project files as needed.
Code Explorer
- A structured tree view of your source code. It lists globals, classes, functions, and local variables in the currently selected .py file.
- In synchronization with the active editor, both ways. Clicking on any of the identifiers in the Code Explorer causes the editor caret to automatically move to the place of that function, variable, or class in the file, and vice versa.
- Right-clicking on any identifier brings up a context menu that lets you move to its definition or any references in the Editor.
- Right-clicking on empty space brings up a context menu that lets you alphabetically sort the Code Explorer.
The Code Explorer is endlessly useful.
2. Editor
Tabbed workspace to aid productivity
The Editor is where you type and edit code. It is a tabbed workspace that lets you have multiple files open and editable at once and provides features that are essential to any modern IDE, such as:
- Syntax highlighting
- Code folding
- Context-aware indentation
- Search and replace
- Go-to definition and find references with back-forward navigation
- IntelliSense
- Code and parameter (function signatures) completion
- Code hints
- Information about the definition of the identifier under the mouse i.e. module name and line number in which the identifier is defined.
- Additional information is displayed according to the type of the identifier, e.g. parameters of functions, superclasses of classes, or the type of variables.
- When the source code of the module in which the identifier was defined is available, the hint presents a hyperlink which, if clicked, takes you to the definition.
- And many more.
A major feature of PyScripter is a Split Editor in the View menu that lets you work on different views of the same file, with a choice of a horizontal (top and bottom) or vertical (side by side) split.

Even more productivity!
The Split Editor enables synchronized editing. Both views work on the same text buffer, and changes are reflected in both regardless of cursor position or which view currently has mouse focus.
The Split Workspace feature works the same way, except with two different files side by side as opposed to the same file.
3. Integrated Python Interpreter and Debugger Window
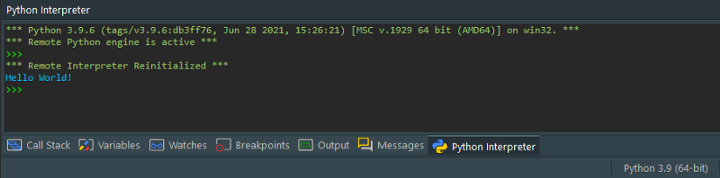
An interactive Python Interpreter serves as the standard output of any script you write, edit, and run.
- Includes syntax highlighting, code completion, command history via the UP and DOWN arrow keys
- Works as a general system shell that can execute system commands like !dir to view the contents of the current PyScripter install directory, for example.
The Debugger Window includes tools such as:
- A view of the Call Stack and Variables for postmortem analysis. When a program crashes with an exception, these tabs will let you inspect local and global variables, function name, and the corresponding source code position at each frame of the call stack.
- A manageable list of all Breakpoints in your program. Each breakpoint can also be managed with logical conditions by specifying a Python expression using the context menu.
...and that's it for our basic look at the IDE! Now, let's get into some fun stuff.
A Proper Test Drive
So far, we've got Python 3 up and running, we have familiarized ourselves with PyScripter, we know it's powerful, customizable, and flexible enough for a project of any complexity we might undertake. So why not take it out for a spin? HelloWorld's are boring. We'll make a GUI-driven app. It doesn't have to be anything complex; a simple To-Do app would be perfect. Along the way, we'll put some of PyScripter's features to good use.
High-Performance GUI Development in Windows: DelphiVCL4Python & DelphiFMX4Python

Python's included Tkinter GUI package works in a pinch but is hardly suitable for creating visually appealing apps, or for large-scale use. It also does not provide native Windows controls or platform integration.
Delphi's Visual Component Library (VCL), on the other hand, is a GUI framework that provides:
- High-end performance, since Windows provides hardware acceleration for native controls, and OS integration.
- Far better visual design and consistency, using native Windows controls.
- Native controls also allow Microsoft Active Accessibility (MSAA) Framework integration, enabling the use of accessibility aids like screen readers.
Wouldn't it be perfect if we could somehow use Delphi's VCL in Python?
DelphiVCL4Python (https://github.com/Embarcadero/DelphiVCL4Python) is the answer, a free Python module developed by Embarcadero Technologies in collaboration with the creator of PyScript, Kiriakos Vlahos. It is a wrapping of existing Delphi objects and container classes for use in Python scripts, making them available for use in Windows with exposed custom events, methods, and variables.
DelphiFMX4Python (https://github.com/Embarcadero/DelphiFMX4Python) brought to you by the same people, is a similar wrapper for FireMonkey components, providing a free, cross-platform GUI framework for Python development on Android, Windows, macOS, and Linux.
Harnessing the Power of VCL for Our App
As a capstone project in our brief journey with PyScripter, we're going to use the powerful DelphiVCL4Python module to develop a performant, natively Windows-styled app with a GUI, complete with all Windows OS integrations.
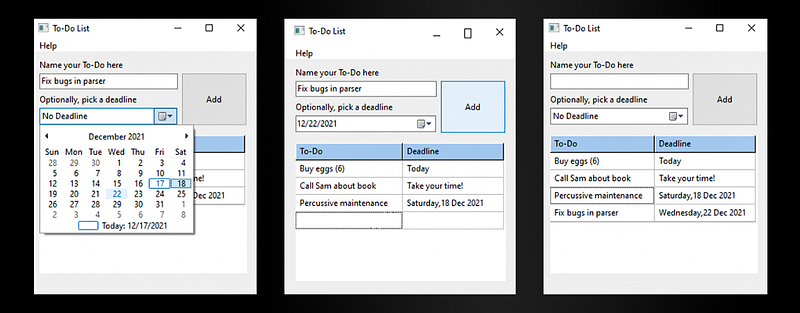
The final result.
...and it'll look something like this. Let's get started!
Installing The Package
One of PyScripter's handiest features is a built-in package installation menu, and we'll use this instead of pip to install our package. We'll be typing in the package name here ("delphivcl") and PyScripter will do the rest.
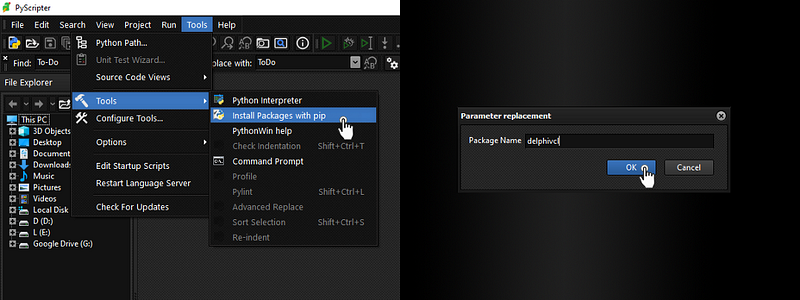
Our project can import and use the DelphiVCL package now.
Project Structure
We'll create a separate directory and put in it our primary .py file, and an Utils.py which will contain any utility/helper functions we may choose to import. To denote this directory as a Python package, we'll also create an empty init.py file here.
Imports
Our imports are going to be simple. We're importing the DelphiVCL package itself, our utility functions, and Python's built-in datetime package for quick conditional checks.
Designing The App
We're leveraging DelphiVCL4Python's implementations of Embarcadero VCL classes. Our Form includes an Edit to name our To-do task, a DateTimePicker to optionally set a deadline, and a Button to add the user's To-do's to a StringGrid with two columns: one for the task name, and one for the deadline associated with it. The number of rows is dynamic and will expand as we add more To-do's.
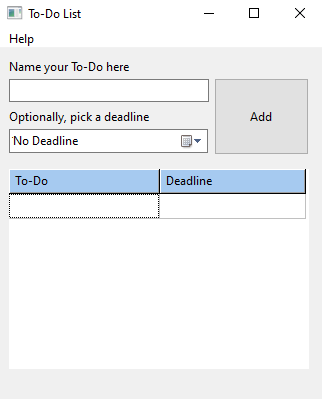
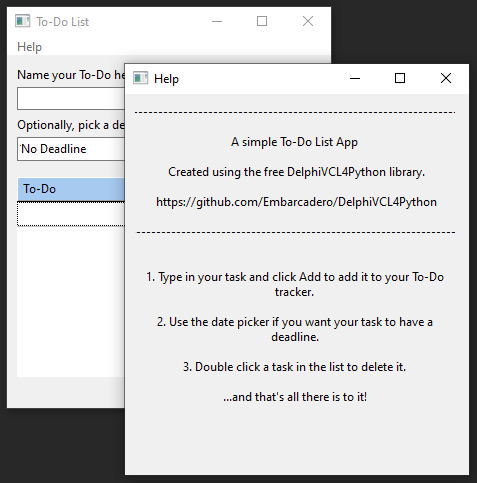
Additionally, we have a MainMenu with a Help item ( MenuItem), that pops up in this simple tutorial.
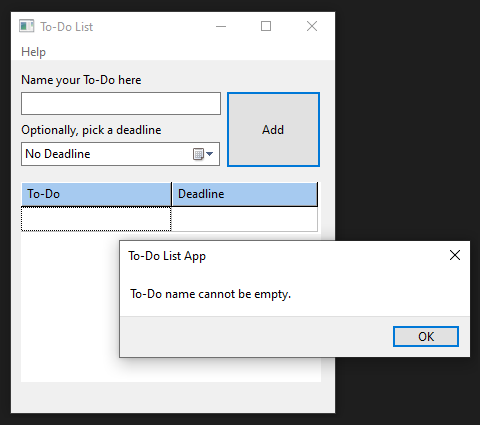
Setting a deadline for a To-do is optional, but if we try to add a To-do without a name (which we obviously shouldn't be able to do) we'll have a helpful pop-up reminding us of the fact.
Let's take a look at the code for all of this.
# deriving our form from VCL's TForm class, called Form in the DelphiVCL library

class ToDoForm(Form):

def **init**(self, Owner):

self.Caption = "To-Do List"

self.SetBounds(10,10,340,410) # x, y, width, height

# inits for our task name and task deadline

self.str_taskname = ""

self.str_taskdeadline = ""

# VCL TMainMenu and TMenuItem classes

self.menu_main = MainMenu(self)

self.menuitem_help = MenuItem(self)

self.menuitem_help.SetProps(Caption="Help", OnClick=self.HelpMenuClick)

self.menu_main.Items.Add(self.menuitem_help)

# VCL TLabel class

self.lbl_taskname = Label(self)

self.lbl_taskname.SetProps(Parent=self, Caption="Name your To-Do here")

self.lbl_taskname.SetBounds(10,10,200,24) # x , y, width, height

self.lbl_taskdeadline = Label(self)

self.lbl_taskdeadline.SetProps(Parent=self, Caption = "Optionally, pick a deadline")

self.lbl_taskdeadline.SetBounds(10,60,200,24)

# VCL TEdit class

self.edt_taskname = Edit(self)

self.edt_taskname.SetProps(Parent=self, OnChange=self.TaskNameHandler)

self.edt_taskname.SetBounds(10,30,200,24) # x , y, width, height

# VCL TDateTimePicker class

self.dtpicker_taskdeadline = DateTimePicker(self)

self.dtpicker_taskdeadline.SetProps(Parent=self)

self.dtpicker_taskdeadline.SetProps(Kind="dtkDate",DateFormat="dfShort") # MM/dd/yyyy format

self.dtpicker_taskdeadline.SetBounds(10,80,199,24)

self.dtpicker_taskdeadline.SetProps(OnChange = self.TaskDeadlineHandler)

# visual embellishment for our DateTimePicker

self.dummy = Edit(self)

self.dummy.SetProps(Parent=self, Text = "No Deadline")

self.dummy.SetBounds(14,84,150,15) # positioned just right

self.dummy.SetProps(BorderStyle="bsNone", ReadOnly="True", Visible="True") # visible = True
initially

# VCL TButton class

self.btn_add = Button(self)

self.btn_add.SetProps(Parent=self, Caption=f"Add", OnClick=self.AddTaskHandler)

self.btn_add.SetBounds(215,29,95,77) # x , y, width, height

# VCL TStringGrid class

self.grid = StringGrid(self)

self.grid.SetProps(Parent=self, ColCount=2, RowCount=2, FixedRows=1, FixedCols=0,
ScrollBars="ssVertical")

self.grid.SetProps(BorderStyle="bsNone", DrawingStyle = "gdsClassic", FixedColor = "$F0CAA6")

self.grid.SetProps(OnDblClick=self.DeleteTaskHandler)

self.grid.SetBounds(10,120,300,200) # x, y, width, height

self.grid.SetCells(0,0,"To-Do") # header1

self.grid.SetColWidths(0,150) # default colwidth is 150, rowwidth=24

self.grid.SetCells(1,0,"Deadline") # header2

self.grid.SetColWidths(1,145) # default colwidth is 150, rowwidth=24
Don't worry about the exact values used for dimensions, colors, or formatting choices for these components. Here's what you need to know :
-
The
SetBounds()method is ubiquitous throughout this block, we use it to position each GUI component on our form with coordinates and dimensions. -
The
SetProps()method is how DelphiVCL4Python exposes the properties of VCL components to us to fit our needs, programmatic or visual. You'll need to read VCL documentation for the specific component to see its properties, methods, and events so you can use them. This is the documentation for the StringGrid class we've used, for example. -
Some components have DelphiVCL4Python-specific implementations to access their attributes. For
example, to set header text for our first column here, using the
SetCells()method asStringGrid.SetCells(0,0,"To-Do")is the Python equivalent of the Delphi Object PascalStringGrid.Cells[0,0]:= Str("To-Do");and the C++StringGrid->Cells[0][0] = Str("To-Do");
Event Handlers: Part I
# handler for our Edit box OnChange event

def TaskNameHandler(self, Sender):

self.str_taskname = self.edt_taskname.Text # our task name is whatever was entered in the editbox

# handler for our DateTimePicker OnChange event

def TaskDeadlineHandler(self, Sender):

# we want the dummy gone when a non-default date is picked

self.dummy.SetProps(Visible="False")

# if today, replace with 'today'

day_number = f'{self.dtpicker_taskdeadline.Date[7]}' # Day number of year 001--366

today = f'{datetime.datetime.now().strftime("%j")}' # Day number of year 001--366

if(day_number == today):

self.str_taskdeadline = "Today"

else:

# construct a "Friday, 17 Dec 2021" format

# DayOf(int) and MonthOf(int) are our imported utility functions

self.str_taskdeadline = (f'{DayOf(self.dtpicker_taskdeadline.Date[6])}\n' # weekday, 0--6, 0 is
Monday

f',\n'

f'{self.dtpicker_taskdeadline.Date[2]}\n' # date, ranges 1--31

f' {MonthOf(self.dtpicker_taskdeadline.Date[1])}\n' # month, ranges 1--12

f' {self.dtpicker_taskdeadline.Date[0]}') # year

- `TaskNameHandler()`Takes the text contents of our Edit and stores it in an instance variable
  `str_taskname` This is the name of our task, ready to be added to our To-do list.
- `TaskDeadlineHandler()` Uses Python's built-in `datetime` package and our helper functions to
  construct a human-readable date string and stores it in an instance variable `str_taskdeadline`
  and this is the deadline of our task, ready to be added to our To-do list.

#### Event Handlers: Part II

# handler for our Add button OnClick event

def AddTaskHandler(self, Sender):

# check if trying to add an empty string as task

if(self.str_taskname == ""):

# error popup

self.errorText = "To-Do name cannot be empty."

# use a built-in dialog to show a simple message box

ShowMessage(self.errorText)

else:

# show prev row

self.grid.RowHeights[self.grid.RowCount-1] = 24

if(self.dummy.Visible):

self.str_taskdeadline = "Take your time!"

# add

self.grid.SetCell(0, self.grid.RowCount-1, self.str_taskname) # the task

self.grid.SetCell(1, self.grid.RowCount-1, self.str_taskdeadline) # and its deadline

# increment rows

self.grid.RowCount = self.grid.RowCount + 1

# hide final row

self.grid.RowHeights[self.grid.RowCount-1] = 0

# clear name input

self.edt_taskname.Clear()

# and "clear" the date

self.dummy.SetProps(Visible="True")

# handler for our StringGrid's OnDblClick event

def DeleteTaskHandler(self, Sender):

# get selected cell

selected_row = self.grid.Row

# delete it

if(selected_row == self.grid.RowCount):

# it's the last row, just delete it

self.grid.RowCount = self.grid.RowCount --- 1

else:

# copy content of each row to the row above

# at the end of the loop, the row to be deleted already has its contents overwritten by the one immediately below it

# just delete the last row after

for i in range(selected_row, self.grid.RowCount-1):

self.grid.SetCell(0,i,self.grid.GetCell(0,i+1))

self.grid.SetCell(1,i,self.grid.GetCell(1,i+1))

self.grid.RowCount = self.grid.RowCount-1
-
AddTaskHandler()fires our Error pop-up if needed, performs final sanitization on the deadline date, and finally adds the To-do to our list, expanding our StringGrid rows by one. -
DeleteTaskHandler()Double-clicking on a To-do in our list represented by StringGrid deletes it. This function implements it, shrinking our StringGrid rows by one.
Event Handlers: Part III
# handler for our only Main menu item's OnClick event

def HelpMenuItemClickHandler(self, Sender):

# help popup

help_menu = HelpMenuForm(Application)

help_menu.Show()

`HelpMenuItemClickHandler()` fires our Help pop-up on a click.

#### Pop-ups

We have only one of these, and it's a derivation of the base Form class. Let's quickly run through
it.

# our help popup

class HelpPopUpForm(Form):

def init(self, Owner):

self.help_string = (f'\# --- --- --- --- --- --- --- --- --- --- --- --- --- --- --- --- --- --- ---
--- --- --- --- --- --- --- --- --- --- --- --- --- --- --- --- --- --- --- -\n'

f'A simple To-Do List App\n'

f'\n Created using the free DelphiVCL4Python library.\n'

f'\n
[https://github.com/Embarcadero/DelphiVCL4Python\n'](https://github.com/Embarcadero/DelphiVCL4Python%5Cn%27)

f'\n# --- --- --- --- --- --- --- --- --- --- --- --- --- --- --- --- --- --- --- --- --- --- ---
--- --- --- --- --- --- --- --- --- --- --- --- --- --- --- -\n'

f'\n1. Type in your task and click Add to add it to your To-Do tracker.\n'

f'\n2. Use the date picker if you want your task to have a deadline.\n'

f'\n3. Double click a task in the list to delete it.\n'

f'\n...and that\'s all there is to it!')

self.Caption = 'Help'

self.SetBounds(10,10,360,420) # x, y, width, height

self.help_text = Label(self)

self.help_text.SetProps(Parent=self, Alignment="taCenter", WordWrap = "True", Caption =
self.help_string)

self.help_text.SetBounds(10,10,320,420) # x , y, width, height
-
HelpPopUpFormdisplays a primer on how to use our To-do app, using a large Label made up of a series of Python f-Strings.
The Entry Point
The conventional Python main() function serves as the logical entry point for our app,
instantiating our ToDoForm and getting this show on the road.
def main():

Application.Initialize()

Application.Title = "To-Do List App"

Todo = ToDoForm(Application)

Todo.Show()

FreeConsole()

Application.Run()

Todo.Destroy()

main()

#### Helper/Utility Functions

These utility functions are imported and used in `TaskDeadLineHandler()`

# accepts an int as the day part of a Delphi VCL Date tuple

# returns human readable day

def DayOf(day):

return{

0 : "Monday",

1 : "Tuesday",

2 : "Wednesday",

3 : "Thursday",

4 : "Friday",

5 : "Saturday"

}.get(day,"Sunday")

# accepts an int as the month part of a Delphi VCL Date tuple

# returns human readable month

def MonthOf(month):

return{

1 : "Jan",

2 : "Feb",

3 : "Mar",

4 : "Apr",

5 : "May",

6 : "Jun",

7 : "Jul",

8 : "Aug",

9 : "Sep",

10 : "Oct",

11 : "Nov"

}.get(month,"Dec")
...and that's all, folks! Hope you've enjoyed the test drive.
Conclusion
That about does it for our basic look at PyScripter (and, by extension, DelphiVCL4Python). Feel free to explore, however, because the IDE has even more useful features on offer:
- Custom themes/styles
- On-the-fly Python version switching
- A powerful built-in regex tester
- Thread-specific debugging
- Unit testing support
- Integration of external tools: linters, code checkers, format checkers.
- Remote development using SSH
TL;DR: PyScripter is fantastic. Feature-rich, lean, customizable, and extensible. Being built from the ground up for Windows platforms, it's much quicker and responsive there than bloated text editors, general-purpose IDE's, or other Python cross-platform IDEs.