
Introduction
Axios is a promise-based HTTP client that works both in the browser and in a NodeJS environment. It provides a single API for dealing with XMLHttpRequests and the node's HTTP interface. Axios is similar to the fetch API and it can be used in plain JavaScript as well as in modern JavaScript frameworks like React, Angular, and Vue.
In this article, we will learn about how to use Axios in Vanilla JavaScript. Let's get right into it.
Installation
Before installing anything, create a project folder with two files: index.html and index.js file.
Inside that project folder, you can install Axios with the node package manager(NPM), or by just using a CDN on your HTML file where you linked the JavaScript file.
If you prefer to use the node package manager, run the following command in your terminal:
// Install axios
npm i axios -S
It will download the library in the node_modules folder from where you can add it to your project:
<script src="./node_modules/axios/dist/axios.min.js"></script>
If you want to do it quickly, you can just use the CDN in HTML.
<script src="https://unpkg.com/axios/dist/axios.min.js"></script>
Using Axios to GET data from an API
After installing Axios in your project folder, you can use it to do some get requests. We will use JSONplaceholder to get fake data from their API.
Let's open our index.js file and create a function that will print some user information in the console by using Axios.
Have a look at the example below:
const getUsers = () => {
axios
.get("https://reqres.in/api/users")
.then((response) => {
const users = response.data.data;
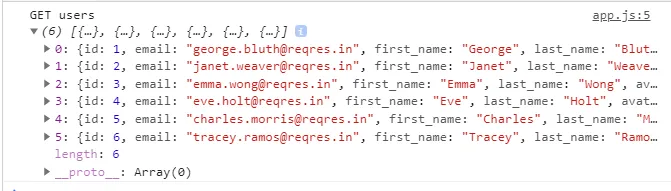
console.log(`GET users`, users);
})
.catch((error) => console.error(error));
};
getUsers();
As you can see, since Axios is a promise-based HTTP client, we use then() and catch() methods to handle the result.
When the promise is resolved successfully, you will get an object response back. This object has information about the response such as headers, data, config, status and even complete the request object. In our case, we used data to access the user's information in the console.
Here are the console results:
Now, you can easily display this information on the page using the DOM.
POST Request
We can add a new user to our REST API with the axios.post() method. Just add a new function createUser() inside of index.js .
Here is an example:
const createUser = (user) => {
  axios
    .post("https://reqres.in/api/users", user)
    .then((response) => {
      const addedUser = response.data;
      console.log(`POST: user is added`, addedUser);
      // append to DOM
      appendToDOM([addedUser]);
    })
    .catch((error) => console.error(error));
};
To create a new user, you need to add a