
Last December (2019) I bought a Raspberry Pi computer. For the uninitiated, Raspberry Pi is a “computer” with the size of a credit card. Nowadays, you may have forgotten that some people used to have a full fledged desktop PC that can take like 1/4 of your desk, so having a very small computer like that is pretty interesting for me.
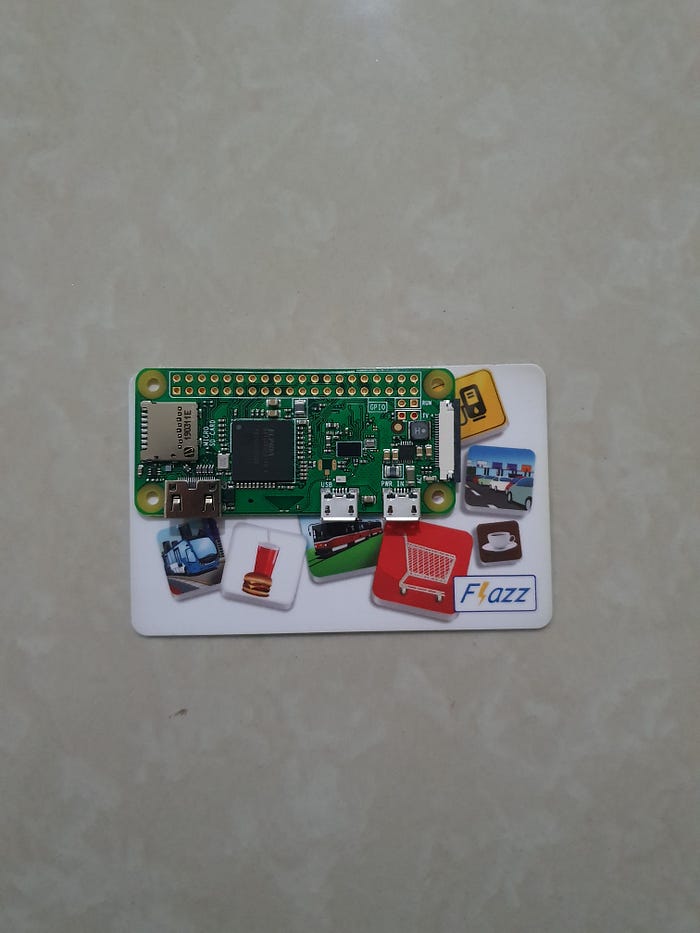
This is the Raspberry Pi Zero W. the one I used for the car (mk1 — mk2). It's even smaller than the card.
Of course, being so small, it lacks the monster computational power that standard desktop PC has. But it's useful in its own way. Such as, you can use them to make robots. In this story, I'll walk you through how I, an accountant by trade, made a relatively simple “RC Car”. Why an RC Car? I've always wanted one but mom wouldn't buy me back then.
The Mk1: The Original Car
Since I'm not a genius or anything, all I did was follow an online tutorial. The tutorial website is so colorful I'm beginning to think that this tutorial is meant for kids, and this kid-tutorial stumped me. Anyways, I'm also going to walk you through the costs, in IDR.
Here's what you need, and how much they costed:
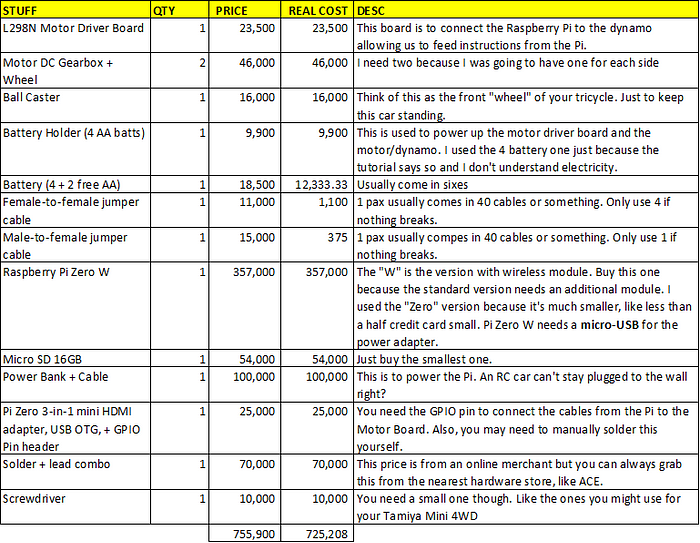
Some of the things I listed are not “materials” but more to “equipment” though. The solder, screwdriver, and power bank can be used for other stuff. The Pi Zero (Pi, Micro SD, and the GPIO pins/adapters) can be repurposed for other projects as well! You might also already have some stuff lying around, like the solder, screwdriver, batteries, and power bank
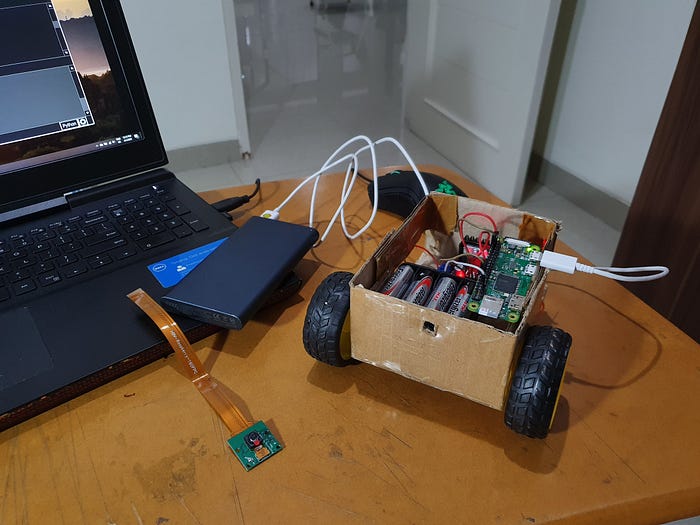
For the car's body/chassis, I just used a cardboard box I had lying around.
Okay so the tutorial itself is already pretty clear, so I won't bother to explain again. What you are making is a car that is controlled by typing in some Python commands. Here is how it works:
-
You need another PC/Laptop! Set up a remote connection from your PC/laptop to the Raspberry Pi you are using for the car. The idea is to use you PC/Laptop to “control” the Raspberry Pi remotely. You need to enable VNC (Virtual Network Computing) on the Pi, and install realVNC on your other PC/Laptop. Here is a guide how to.
-
Power on the Raspberry Pi using a power bank as the power source. If it's still plugged to the wall it can't go anywhere.
-
With your PC/Laptop, using remote connection (I'm using Advanced IP Scanner to find the Pi's IP), control the Raspberry Pi to open Python and type the code below to let Python know that you are going to use which cable to control each wheels. Run the command.
from gpiozero import Robot bot = Robot(left=(12,21), right=(18,15)) #please be noted that the numbers next to the left and right code is dependent on where did you connect the cables to in the Pi (there are lots of pins to latch them to) -
In the console, type the command to direct where you want the car to go, such as:
bot.forward()
bot.left()
bot.right()
bot.backward()
That's it! In the original tutorial, you control the car by typing Python commands every time you want the car to move, change direction, or stop (stopping also have to be keyed in manually). Having the car do a U turn and then turn left is more Typer Shark than racing.
Below is what the 1st version of the car looked like (Mom dubbed it Mobil Bodoh). I run the Python Code to give it a pre-defined route: go straight; turn right (I entered a random number to determine how long should the car turn right. As shown, it resulted in the car doing a U-turn because it is too long); go straight again, and stop.
Mobil Bodoh mk1. You can see me not typing anything because I had entered commands for a pre-defined route.
That's not very practical isn't it? You can't exactly go racing with a car that needs Python code keyed in every move you want it to make. Luckily there is another tutorial that allows alternative method of controlling the car:
- Create a home brew remote control. This requires a second Raspberry Pi. It's pricey, so I didn't do this.
- Use Google Voice AIY kit to control the car with voice command. This is also pricey, so didn't do that also.
- Use an android phone to connect with the Raspberry Pi via bluetooth. This is actually the best option, I decided do go with this idea.
However, due to reasons unknown, I can't connect my android phone with the Pi via bluetooth. That's where I opted for a 4th option: use PC/Laptop to control the car, but instead of typing commands manually, bind each command (forward, left, right, backward) to the arrow key. So imagine it's like playing a racing game on computer using the keyboard.
The Mk2: Arrow Key Controlled Car
This is shaping up to be quite similar to the RC of our youth isn't it?
To do this, I did what people call “GUI Programming” (Graphic User Interface). The idea is to create an interface in the computer (the Pi) that allows bind certain keyboard keys to a certain Python command. So for example, I can make the Pi run the Python command “bot.forward()” if I press the up arrow button, making the car go as straight as it allows. Or you can bind the space key to run the Python command to take picture if you have a camera installed in the Pi.
We use the tkinter Python package for that. Below is the Python code I used to bind the arrow key to run the command instructing the car (named “bot” in my code) to go in the four directions, plus a stop button.
from gpiozero import Robot
from tkinter import *

bot = Robot(left=(12,21),right=(18,15))

main =Tk()
def leftKey(event):
    bot.left()
    print("kiri")
def rightKey(event):
    bot.right()
    print("kanan")
def upKey(event):
    bot.forward()
    print("maju")
def downKey(event):
    bot.backward()
    print("mundur")
def ctrlKey(event):
    bot.stop()
    print("stop")
def escKey(event):
    import sys; sys.exit()

frame = Frame(main,width=100,height=100)
frame.bind('<Left>',leftKey)
frame.bind('<Right>',rightKey)
frame.bind('<Up>',upKey)
frame.bind('<Down>',downKey)
frame.bind('<Control_L>',ctrlKey)
frame.bind('<Escape>',escKey)
frame.focus_set()
frame.pack()
main.mainloop()
And below is the result!
Mobil Bodoh mk2. it's now front wheel drive.
You can notice that the car's body/chassis (cardboard) begin to…deteriorate and the left-hand side seemed heavier than the right hand side. Making it favors turning to the left and putting more pressure there. I had some problems with the dynamo motors as well because it now refuses to go forward. So what I did was I just flipped the orientation. If you noticed, the Mk1 was a rear wheel drive (wheels an the rear), now it's front wheel drive (wheels at the front). I just switched the motors position to cover for the….damage.
Anyways this is where I'm beginning to think that the components are too heavy for the cardboard body/chassis.
The Mk3: Added Camera Module to the Car
If any of you plays Call of Duty (an action first person shooter game, if you don't already know), you might be familiar with the “RC-XD”. It's an RC that you can control and drive to chase down enemies, and explode right on their face.
For illustration purposes. Video is not mine.
The concept is….it's an RC with dashboard cam, so you can actually see what's in front of the car. And that's the upgrade I did. Minus the explosion of course.
At first, I used this random tutorial to make the camera I installed on the Pi. What it did, was use the Pi to run Python codes to create a “website” that can be accessed within local network. The website serve to stream whatever the camera is looking at. However, it caused heavy lag.
I switched the Raspberry Pi Zero with the more powerful Raspberry Pi 4 (the standard sized Pi) for more computing power. Here is how it goes!
Streaming the camera that is attached to the front of the car
Mobil Bodoh mk3, see on my laptop screen is the camera streaming until it crashed into the printer
So there were two sets of Python code running, one for the robot as in the Mk2, and one for the camera streaming.
At this point, it became more apparent that the cardboard body/chassis is struggling to bear the weight of the components, especially on the left hand side. It…crashed into the printer, and that's when the dynamo had a problem. The car is not yet able to detect obstacle in front and stop (might be a future upgrade for Mk4 or Mk5), so what it did was it's trying to force to go through the obstacle. This hurts the dynamo motor and the chassis.
And now, Mk3 sits broken until I get a new chassis and new dynamo motors. But I'd say it's quite satisfying!
I did this while imagining a robot or drone that I can order to do…..stock counts for me (heh, accountants). It's still far away, for that to happen I need to make the car actually able to recognize objects such as obstacles or SKUs to be counted. But for now, I'm content with an RC toy car.
But first I need to work on the cardboard body. I kinda suck at making handicrafts since as long as I can remember. Mom did most of the handicraft homework for me.
I doubt she'd help me this time though, since she called the car Mobil Bodoh/Dumb Car and all.