In this article, we will explore how to build a simple object detection project using YOLO (You Only Look Once) and OpenCV - PYTHON.
This project allows us to detect and label objects in a video stream, making it a great starting point for those interested in computer vision and deep learning. We will break down the code step by step to ensure a clear understanding.
Introduction: 🎇
In this article, we’ll embark on an exciting journey into the world of computer vision and deep learning by creating a beginner-friendly object detection project.
Understanding Key Terms:
- Object Detection: Object detection is a computer vision task that involves identifying and locating objects within images or video frames.
- YOLO (You Only Look Once): YOLO is a popular deep learning algorithm for real-time object detection. It’s widely used in various applications, including self-driving cars and surveillance systems.
- OpenCV: OpenCV (Open Source Computer Vision Library) is an open-source computer vision and machine learning software library. It provides tools and functions for a wide range of image and video processing tasks, making it an essential tool for this project.
- Pre-trained Model: A pre-trained model is a deep learning model that has been trained on a large dataset to perform a specific task, such as object detection. Using pre-trained models saves time and computational resources, as the model has already learned to recognize various objects.
- Weights and Configuration Files: In the context of YOLO, weights and configuration files contain the learned parameters and the network architecture. These files are essential for the model to perform object detection accurately. You can obtain pre-trained YOLO files from official sources.
- Class Names File (coco.names): This file contains the names of the objects or classes that YOLO can detect. YOLO is trained on a dataset like COCO (Common Objects in Context), which includes a wide range of objects, and this file provides labels for those objects.
- Bounding Box: In object detection, a bounding box is a rectangular box drawn around a detected object. It specifies the object’s location in the image and is often accompanied by a label to identify the object.
- Frame Rate: The frame rate is the number of video frames displayed per second. In our project, we extract frames from the video at a specified interval defined by the frame rate.
Setup: 🔨
To get started with this project, we’ll need the following:
- Python: Ensure that you have Python installed on your system. [I have used Python3].
- OpenCV: Install the OpenCV library, a powerful tool for computer vision. RUN:
pip install opencv-python`
- YOLO Weights and Configuration Files: You’ll need the YOLO pre-trained model files, which include
yolov3.weightsandyolov3.cfg. [in my repo] - Class Names File: The
coco.namesfile contains the names of the classes YOLO can detect. Download it from the official YOLO website or similar sources. [in my repo] - Video Source: Prepare a video file or stream you want to analyze. In our example, we’re using a video file named
video.mp4.
Code: 👨💻
import cv2
import numpy as np
import time

# Load YOLO model
net = cv2.dnn.readNet("yolov3.weights", "yolov3.cfg")
classes = []

# Load class names from coco file
with open("coco.names", "r") as f:
    classes = f.read().strip().split("\n")

# Load video
video_path = "video.mp4"
cap = cv2.VideoCapture(video_path)

# Initialize variables for frame extraction
frame_rate = 60  # Extract one frame per minute
frame_count = 0

while True:
    ret, frame = cap.read()
    if not ret:
        break

    frame_count += 1

    if frame_count % frame_rate == 0:
        # Preprocess the frame for YOLO
        blob = cv2.dnn.blobFromImage(frame, 0.00392, (416, 416), (0, 0, 0), True, crop=False)
        net.setInput(blob)
        outs = net.forward(net.getUnconnectedOutLayersNames())

        # Process YOLO output
        for out in outs:
            for detection in out:
                scores = detection[5:]
                class_id = np.argmax(scores)
                confidence = scores[class_id]

                if confidence > 0.5:
                    # Extract detection details
                    center_x = int(detection[0] * frame.shape[1])
                    center_y = int(detection[1] * frame.shape[0])
                    width = int(detection[2] * frame.shape[1])
                    height = int(detection[3] * frame.shape[0])

                    x = int(center_x - width / 2)
                    y = int(center_y - height / 2)

                    # Draw a box and label on the frame
                    cv2.rectangle(frame, (x, y), (x + width, y + height), (0, 255, 0), 2)
                    label = f"{classes[class_id]}: {confidence:.2f}"
                    cv2.putText(frame, label, (x, y - 10), cv2.FONT_HERSHEY_SIMPLEX, 0.5, (0, 255, 0), 2)

        # Display the frame with detections
        cv2.imshow("DISPLAYING: FRAME | Detections", frame)
        cv2.waitKey(0)

cap.release()
cv2.destroyAllWindows()
Understanding the Code:
- We start by importing the necessary libraries, including OpenCV (cv2) and NumPy.
- We load the YOLO model using pre-trained weights and configuration files.
- Class names are read from the
coco.namesfile to label detected objects. - The video file (in our case, “video.mp4”) is loaded for processing.
- Frames are extracted from the video at a specified interval (frame_rate).
- Each frame is preprocessed for YOLO, and object detection is performed.
- Detected objects are labeled, and bounding boxes are drawn around them.
- The annotated frame is displayed in real-time.
- The process continues until the video ends.
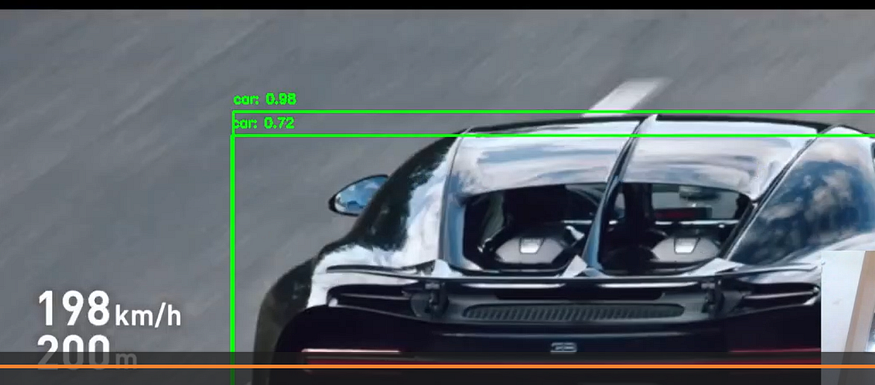
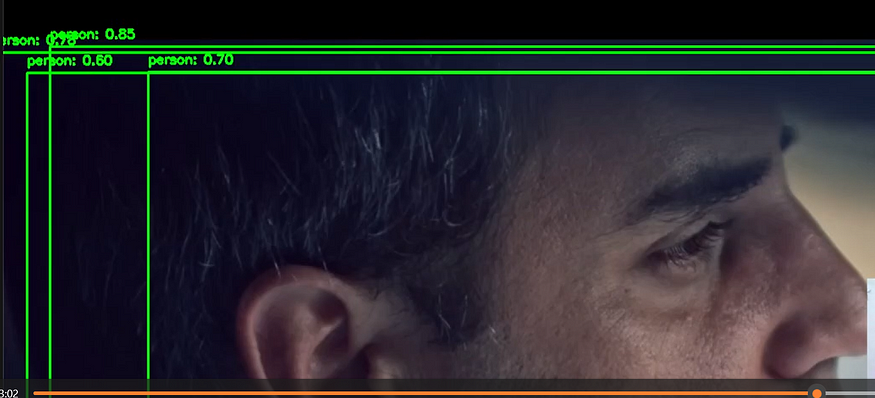
OUTCOME: 👌
When you run this code, for every frame in the video that matches the specified interval (frame_rate), a window will pop up showing the frame with bounding boxes and labels drawn around detected objects. You can take your time to examine each frame before closing the window and moving on to the next frame.
The output is an interactive way to visualize the object detection results in the video, making it easier to understand how the YOLO model is performing and what objects it’s recognizing.
SAMPLES:
Resources: 📚
MY REPOSITORY : yashrajmani/OpenCV_Yolo3_Object_Detection-from-Video (github.com)
OPEN CV : OpenCV — Open Computer Vision Library
YOLO Officail : https://pjreddie.com/darknet/yolo/
Coco Dataset for Class Names : COCO — Common Objects in Context (cocodataset.org)
Conclusion: 🙋♂️
By following this code and explanation, you can create a simple object detection system using YOLO and OpenCV.
Feel free to explore more advanced applications and customizations based on this foundation.
Also you can push updates and features on my repository. Thanks!
Happy Coding! ✨
Comments
Loading comments…