
Why put in the effort?
Before getting into the whole process, let us first think about the why behind this work? Why would you, or anyone want to make a React component library? Well, the answer would be straightforward and simple, would you like to put in the effort to make something as simple as a Button, or complex as a Navigation bar, again and again, or would prefer to put in the effort once and then simply use it again and again? I know what your answer would be; the latter obviously.
Getting Started
Whenever I start a new React project, I like to identify all the components that would be needed and make a separate components folder, like my own local component library. If you do something like this too, I'm sure you'd be interested to make your own library, like I was.
Prerequisites
It only makes sense to use TypeScript to create these components. Using TypeScript will help us create the types for these components, which will surely come in handy when we use them later. To bundle up these components, we'll use Rollup. Though it is a bit new for me — I'm more used to using Webpack — but after using Rollup, I surely was amazed. For styling, I used CSS to keep things simple. Based on what is needed here, it is a good idea to know a bit about TypeScript and how it is used with React. Knowing a lot about Rollup is not a big requirement but of course, having some idea will be a good thing.
Directory Structure
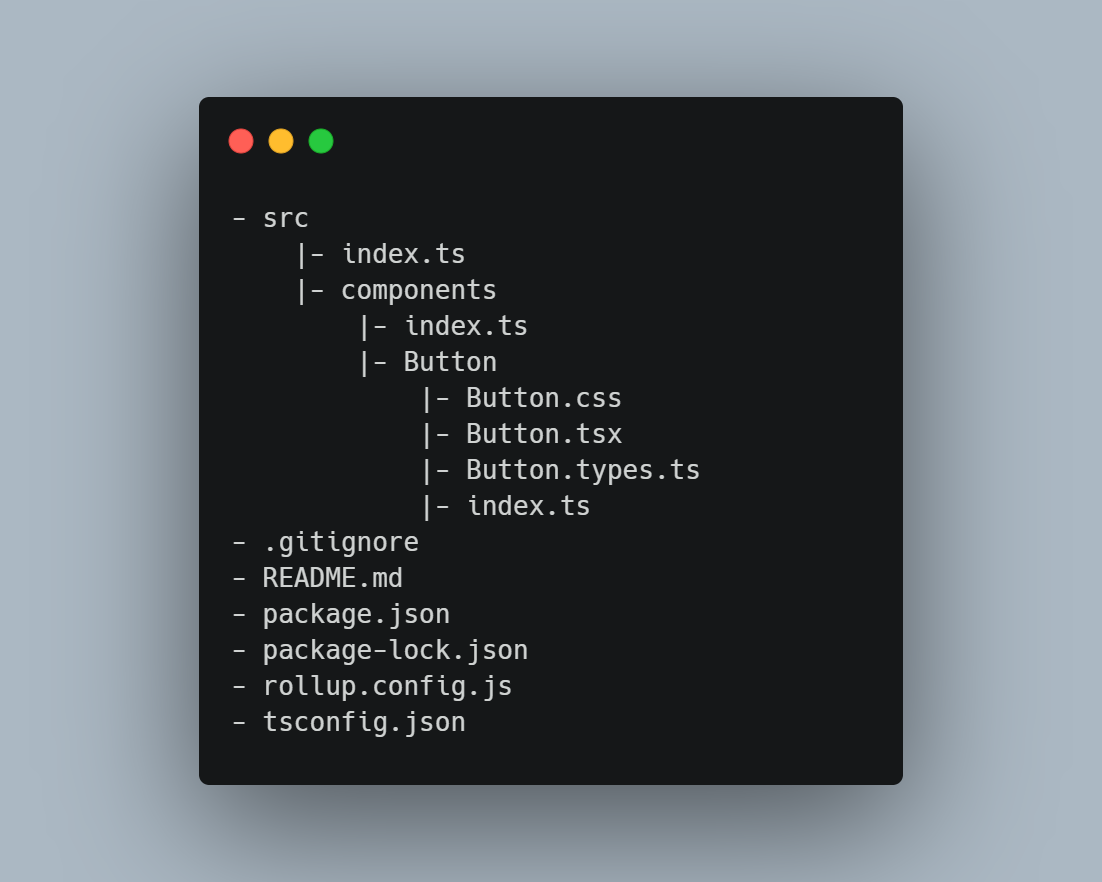
Let's keep it simple by starting with just a Button component. Project root has all the configuration files and the src directory. Every directory has a index.ts file to handle imports and exports so that when the bundle is created and someone uses this library, they can directly import the component from the library and not have to dig inside.
src directory then has a components directory which again has an index.ts file and folders for every component - right now, just a Buttons folder.
Building the Button Component
Button.tsx
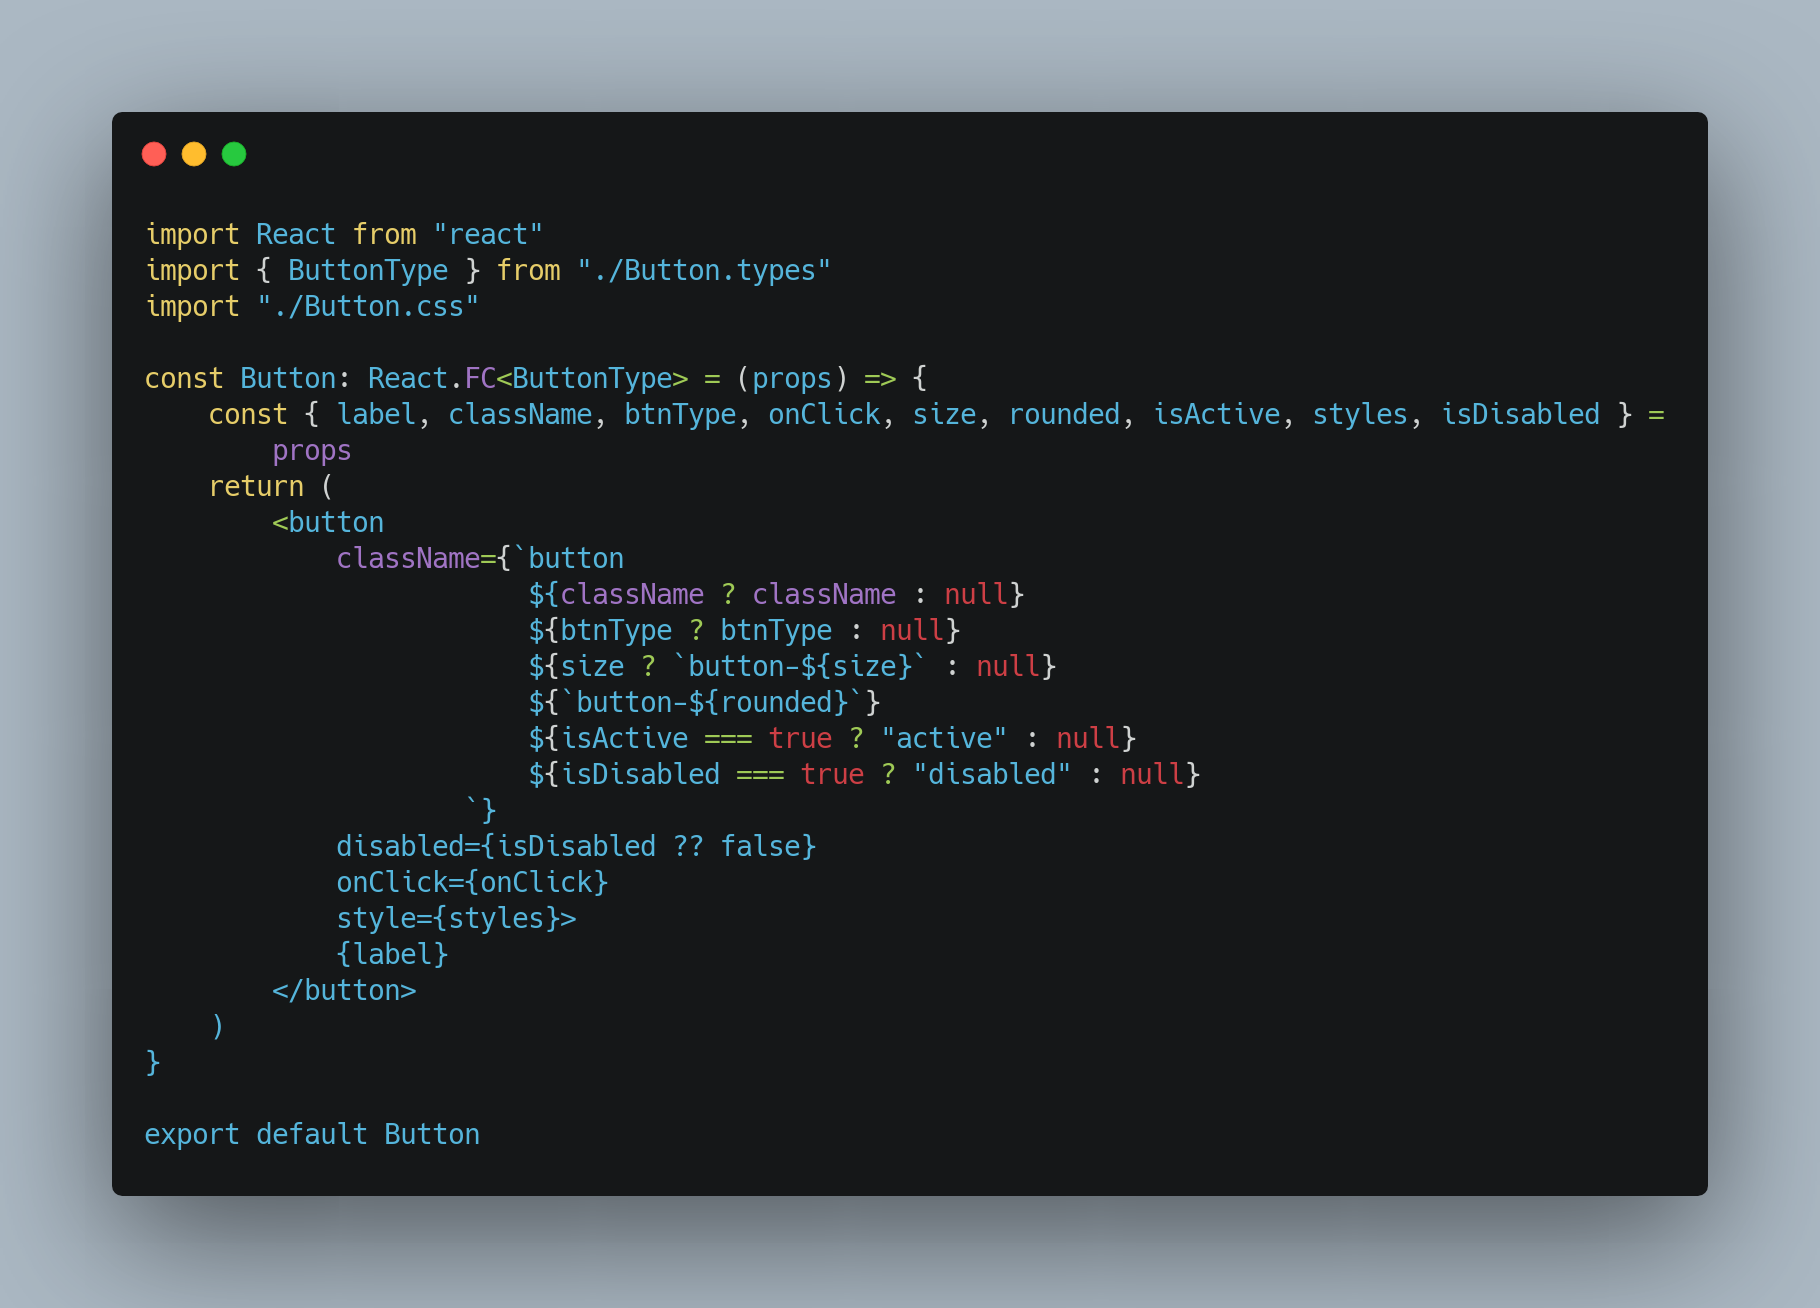
If you're familiar with React and TypeScript, nothing here is new for you. But if you're not, we need to use @types here, to tell TypeScript what this Button is - a React Functional Component. And so we specify the type as Button: React.FC
Button.types.ts
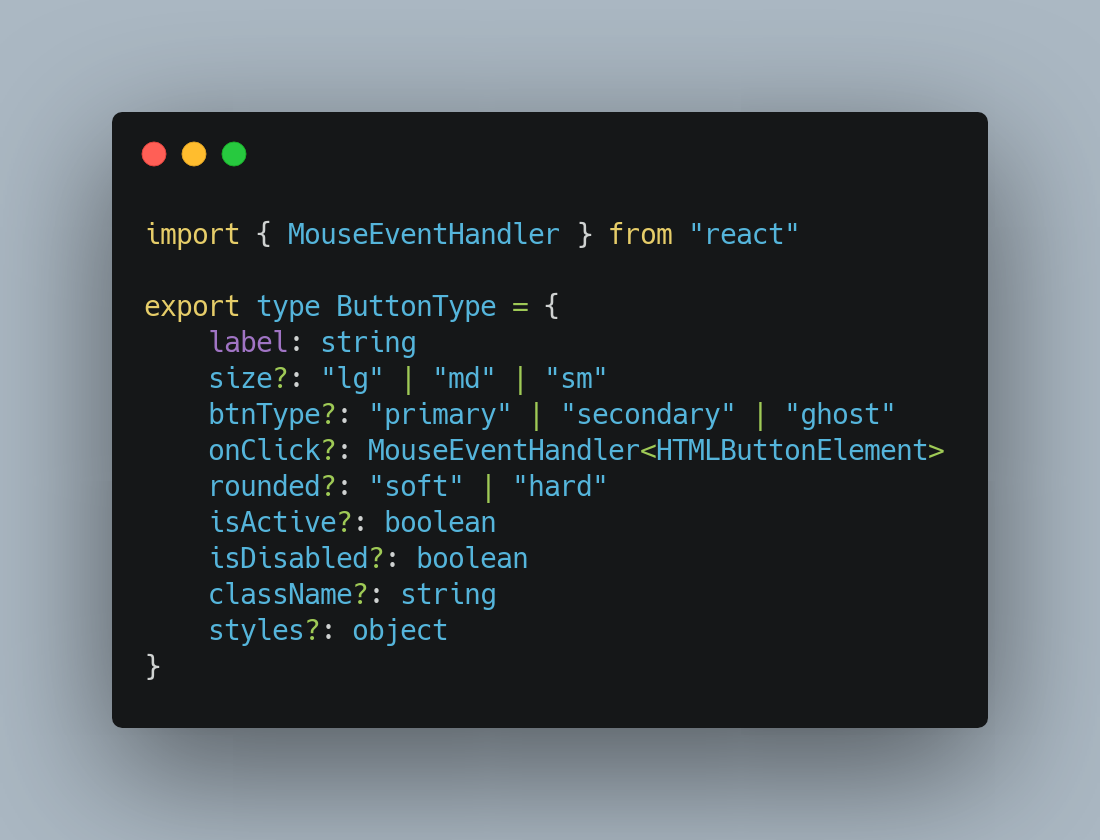
Here, again, we specify the type for each prop. This is what we will see later, as intelliscence, when we start using this component.
Button.css
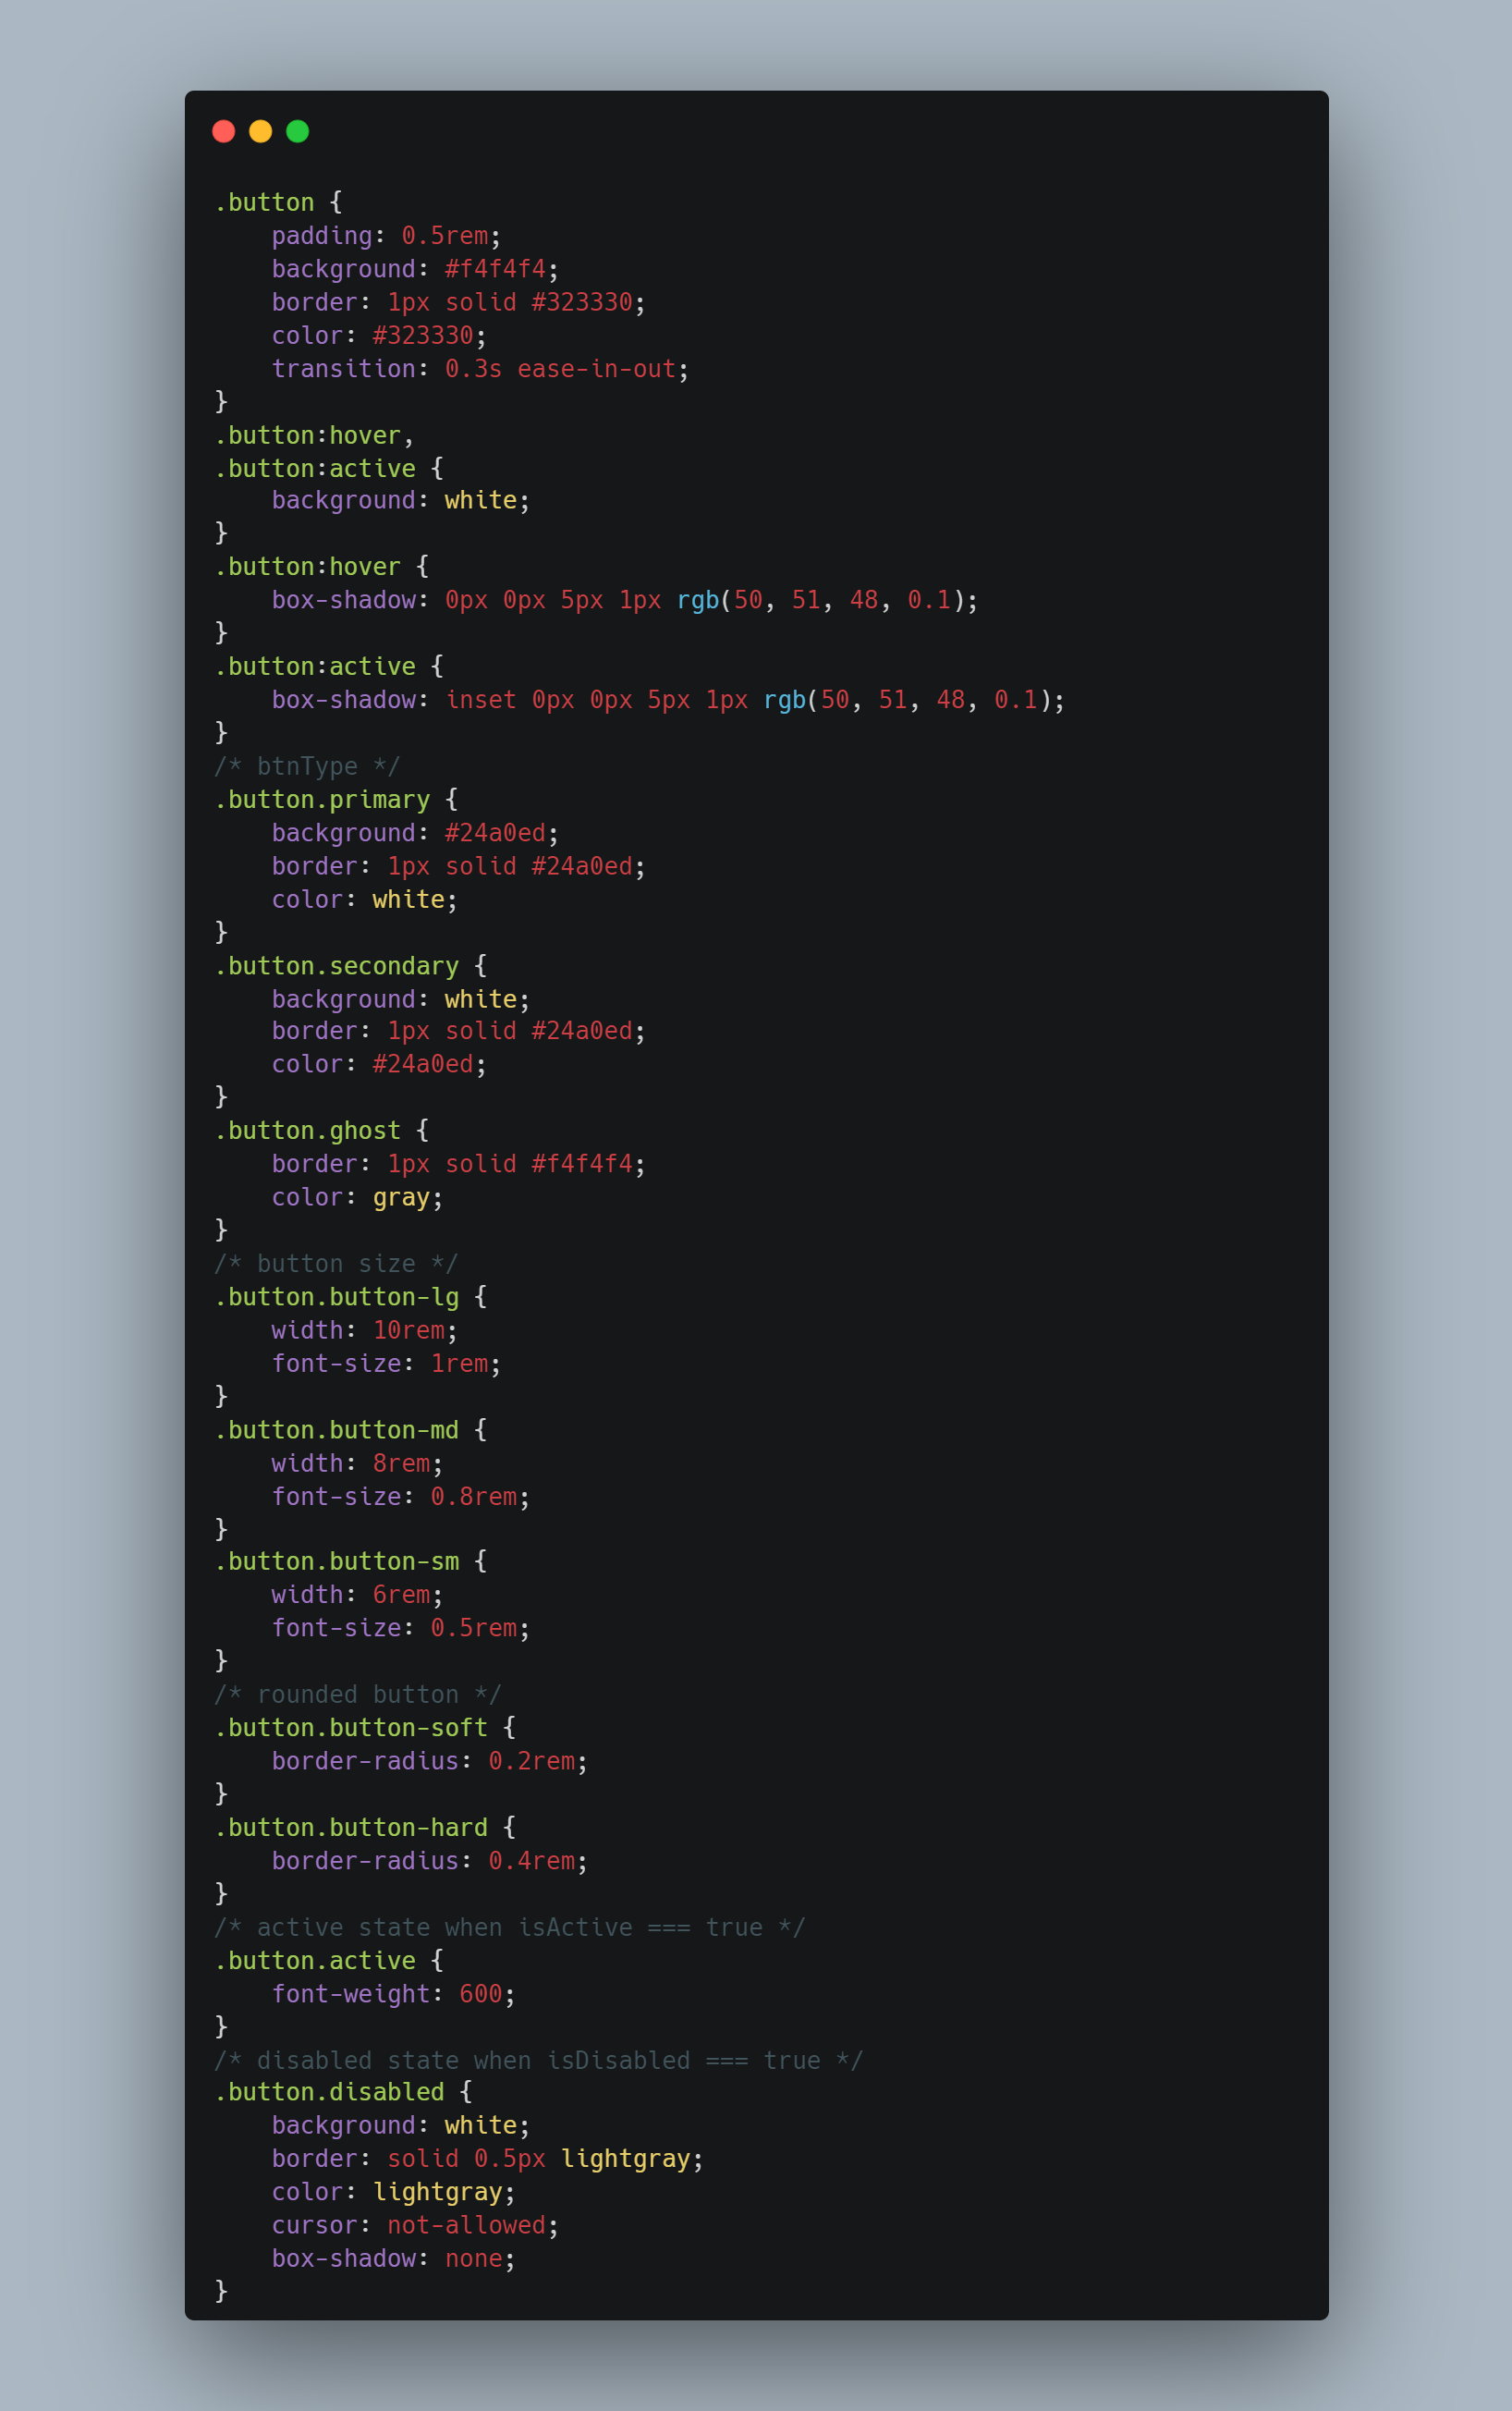 Button.css
A simple button, with no styling, would be boring to use; even to look at. Here we see a default .button class that is applied to the button at all times. And then we have a lot of other classes which is added/removed based on the props that are passed.
Till now, everything is straightforward and looks simple and familiar. But what about the index.ts files that I talked about before? How are they used?
The index.ts files
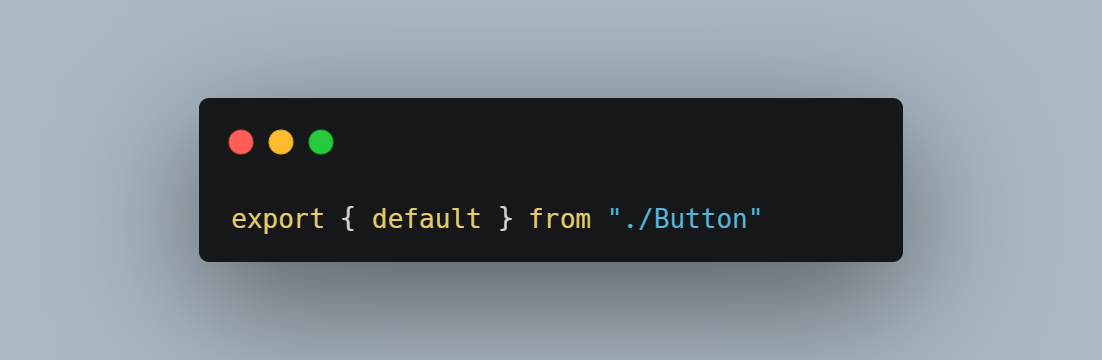 ./src/components/Button/index.ts
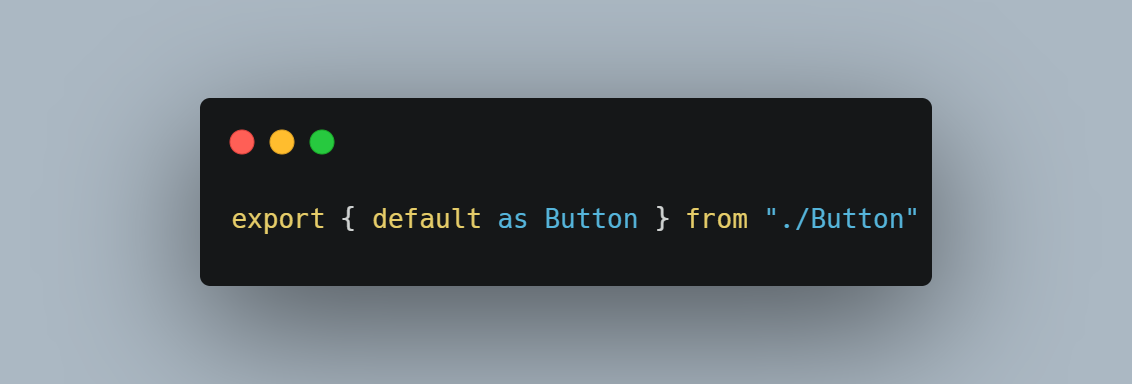 ./src/components/index.ts
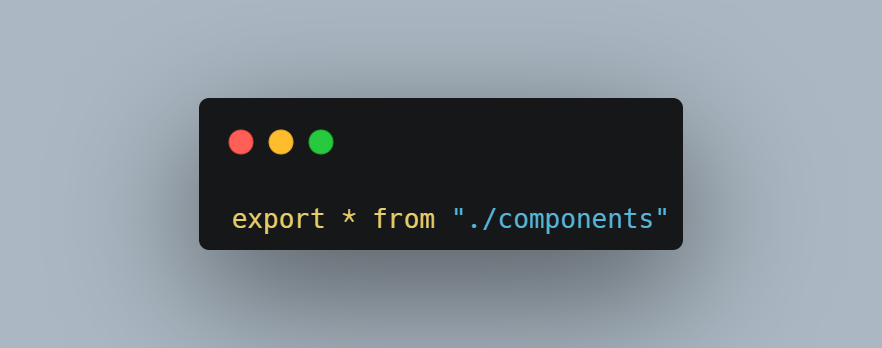 ./src/index.ts
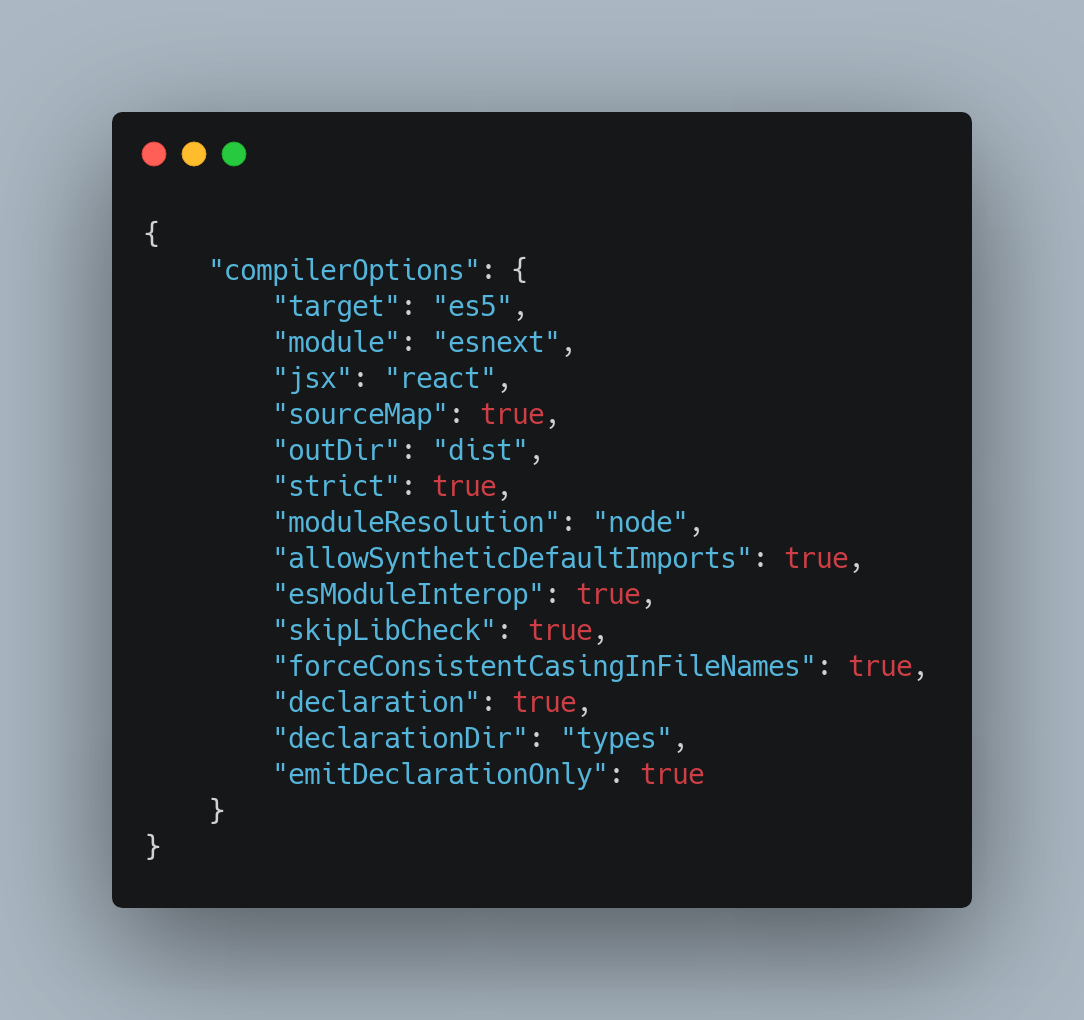
TypeScript Configurations
There are a few things that we need TypeScript to do, and generate when it is compiled into JavaScript — generate map files for all .ts files.
This is all that we need to do, at least on the React side, to make a component and take us to the next step of bundling everything together. Now, Rollup takes over.
Bundling with Rollup
To get a better understanding of all the bundlers available to use developers, I suggest you read this article by Paul Sweeney. What I found a bit odd with Rollup, which also fascinated me was this, as Paul says:
*It doesn't understand Node.js module imports, it doesn't know what to do with CSS, it certainly can't understand images. Instead, rather than trying to implement what it thinks is the best way to bundle different type of assets, it leaves that entirely up to the developer to decide.*
Installing Rollup
It is very simple, just run npm i --save-dev rollup. More on this here. As for rollup.config.json, the following snippet is all that we will need, to take care of stylesheets, type definitions, maps, cjs, and ES6 module creation.
rollup.config.js

Modifying the package.json file
If you did not change or add, the build script in your package.json, or had tsc in your build script, it is time to change it so that rollup can take over.
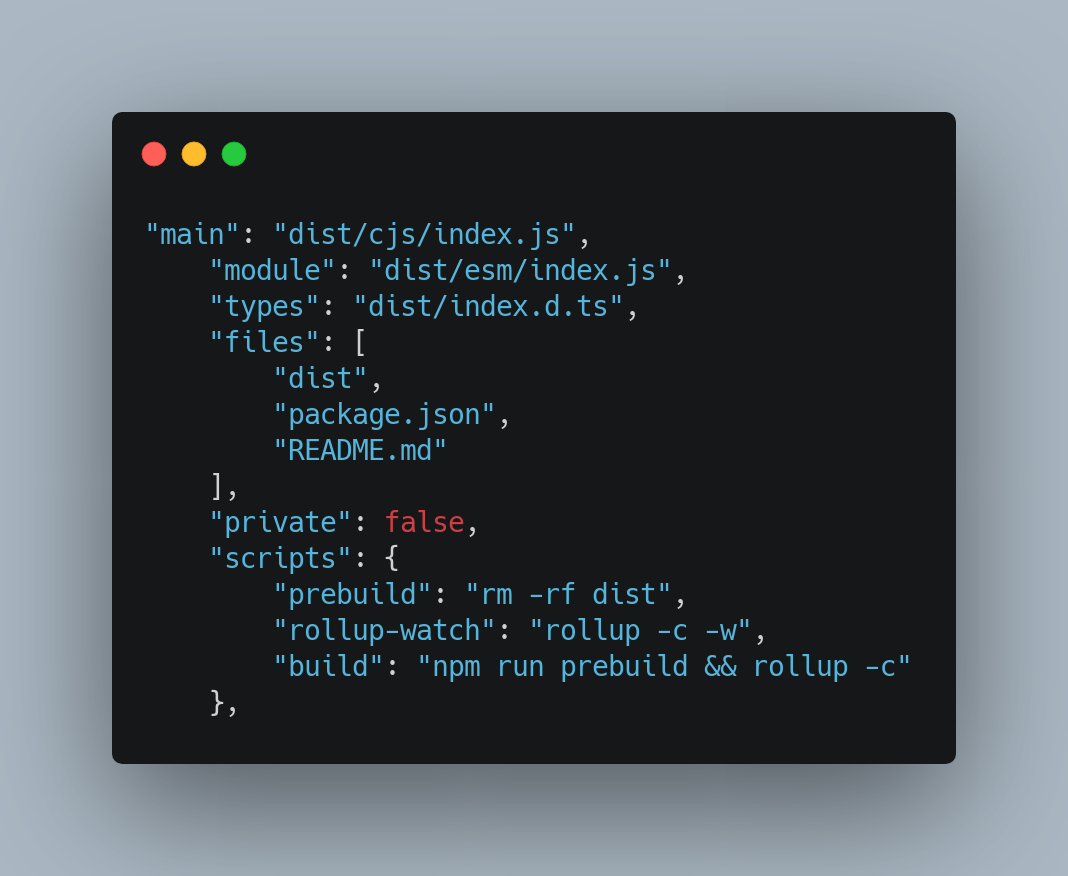
There are a few things that are needed for our library to work properly. With reference to the directory structure shown earlier, these few fields are a must in our package.json.
-
main - location of the entry file for this library.
-
modules - location for the es6 module entry file.
-
types - location of the entry file for all other type definition files.
-
files - list of all files and folders that npm must include when bundled for publishing.
-
peerDependencies - since using this library will naturally need React, it is best to place the version that our library uses as a peerDependency, just to avoid any conflicts with the version that the user might be using.
-
scripts - the main script is the build script that uses our rollup.config.json (just as we would specify if we were using webpack). There is also a rollup-watch script that keeps rollup running in watch mode, to look out for changes that we make.
Final Step, build
All that we need to do now is run the npm run build command in our terminal, sit back and hope we did not make any mistakes, and watch the magic happen. If you and I didn't make a silly typo or miss any configuration, you'd see a dist folder at the root of the library. If yes, take a deep breath and celebrate! We did it!
Consuming The Library
Locally
Using your library locally is a 2-step process. First, open up a new terminal window, navigate to your project root and run npm link . Then, open another terminal window and navigate to the project you'd like to use your library in. Then run npm run <package_name>. The package name will be the same as in your package.json. Voila! We did it, again! More on npm link here
Publishing to the npm registry
Pushing your library to npm will need you to have an account with npmjs.com If you do not, you can always create it for free here. Remember, a free account will only allow you to publish public packages — that private field in your package.json should be set to false. The next thing to keep in mind is, every time you decide to push your package to npm, you'll have to change the version number in your package.json or else you'll get an error. With all this in mind,
-
build your project with npm build
-
run npm publish which will use the files field, that we added earlier in our package.json, to decide on the files that should be pushed to the registry.
And, voila! Once again, we did it!!
Thank you for taking the time to read this long article. I hope this was helpful for you and you did create your library.
In case you faced any issue, or there was an issue with the code part of this article, do not hesitate to let me know and I'll make sure to correct it.
If you know a better way of doing what we just did, hit me up because I'd like to learn it, too. Who wouldn't want to do things in better ways?
Signing off. Thank you again.
Further Reading
Extracting and Reusing Pre-existing Components using bit add
Comments
Loading comments…