I have written about deploying a 3 tier AWS Architecture using the AWS console before. If you have missed this — you can find the link to my blog post on how to do this here.
Now we are going to learn how to deploy a 2 Tier architecture in AWS but this time using Terraform instead of the AWS console. I will mainly focus on the terraform codes and what the codes will represent in AWS.
You can learn more about Terraform and how to connect Terraform to AWS in my previous blog post. Using Terraform with AWS is convenient and fun at the same time. Instead of doing everything manually in your AWS console, you can just update your code in Terraform and the infrastructure will be automatically updated.
For me it is almost like playing video games and designing your own world. I recommend reading my two previous blog posts I referred above to make this exercise easier to follow (unless you are already familiar with AWS infrastructures and Terraform).
We will also set up a CI/CD (Continuous integration and Continuous deployment) pipeline using GitHub & Terraform Cloud for this 2 tier architecture. CI/CD pipeline is a set of tools designed to automate the update and deployment process of an application. This streamlines the process of developing, testing and deploying applications.
You will need a VCS (version control system) to track the changes made to the source code of the application. This is where we will use GitHub & Terraform cloud where multiple developers can collaborate on the source code and provide consistent workflow and enhance security.
Let’s get into it.
Prerequisites:
- AWS Account with IAM Access
- Basic knowledge of AWS Core Services
- Basic Terraform knowledge
- Terraform Cloud account
- AWS Cloud9 IDE or VS Studio
- Basic Terraform knowledge
- GitHub Account
Step 1 — Setting up Terraform Cloud
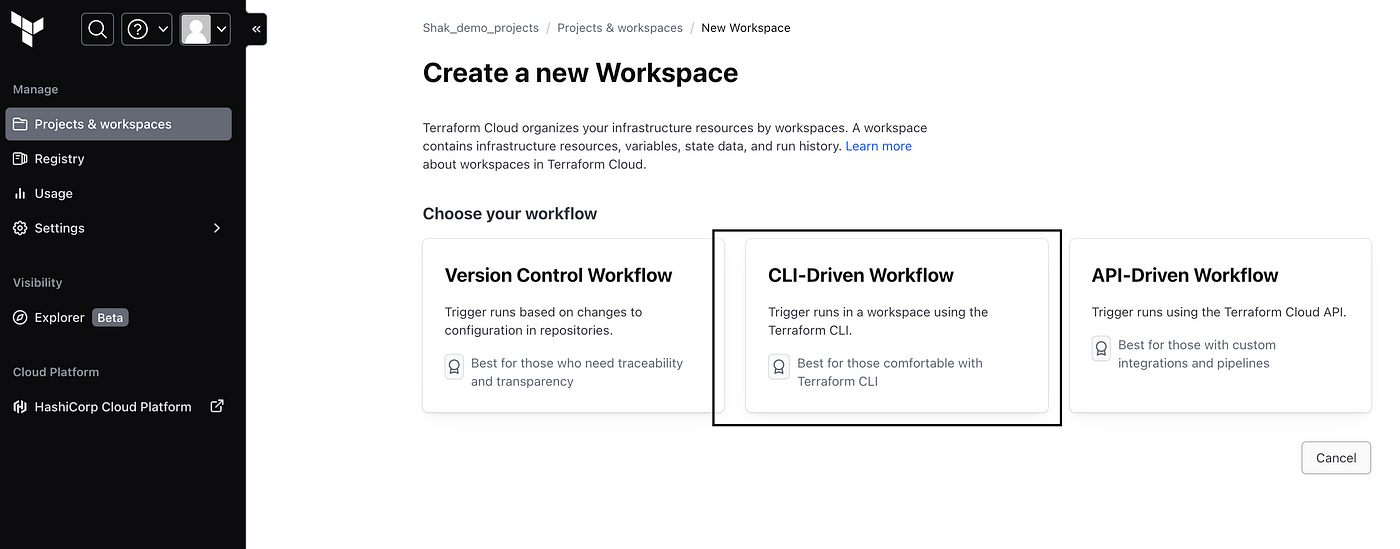
If you don’t already have a terraform cloud account you can set up your free Terraform cloud account here — https://app.terraform.io/app/getting-started. After you have set up your account you have to create an organization where you will have your terraform backend initialized. Create an organization with a unique name and choose your workflow. We will be using “CLI-driven workflow”. See below for reference
Give your workspace a name in the next window and leave the project under “default project” and click create.

Now you will see the configuration file that we will use at some point and will be included in the terraform.tf file.

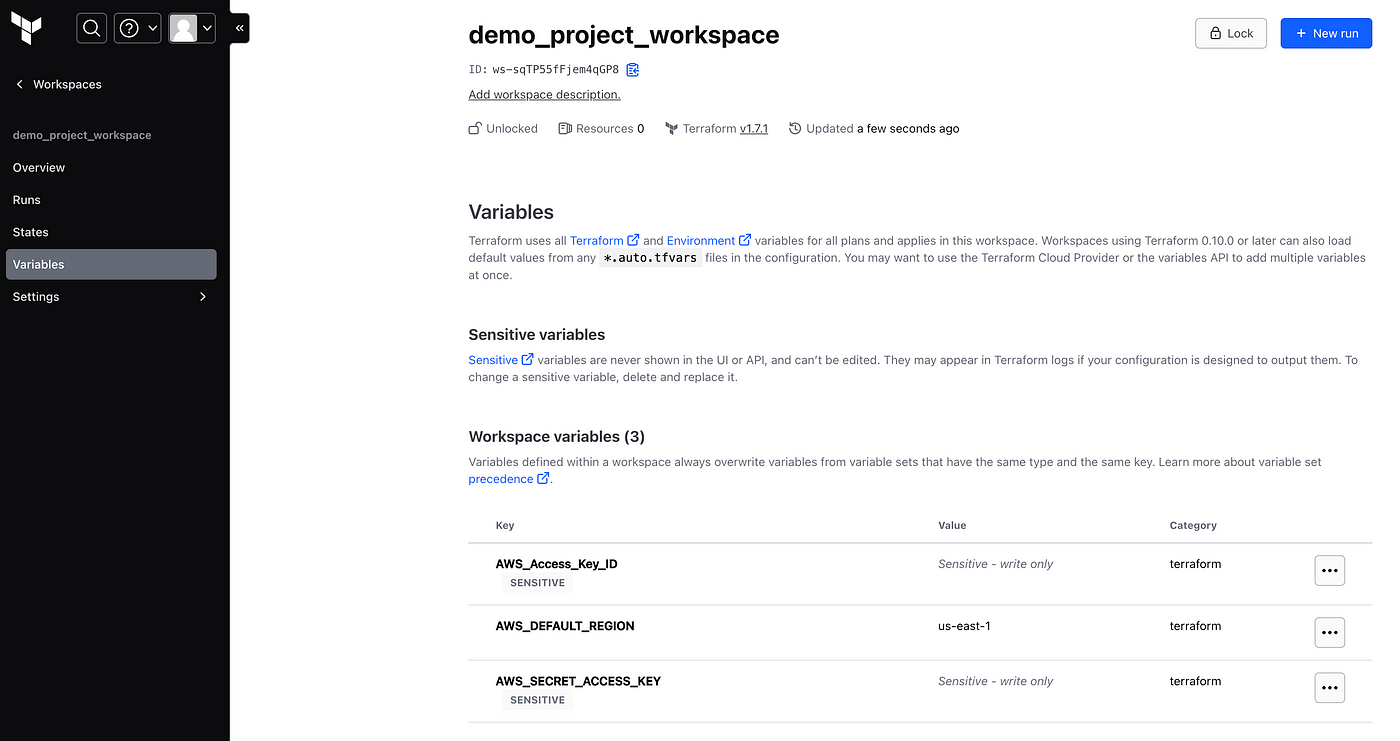
Go to “variables” tab on the left hand side of the dashboard. This is where we will include the AWS credentials so Terrafom Cloud can access our AWS account. Click on add variable and add the following variables below. Make sure to click the sensitive button when adding the Access Key and Secret Access Key. See below for reference
Now we have to set up our API token. Go to your user settings under your profile image and select “Tokens” and “Create an API Token” as shown in the diagram below
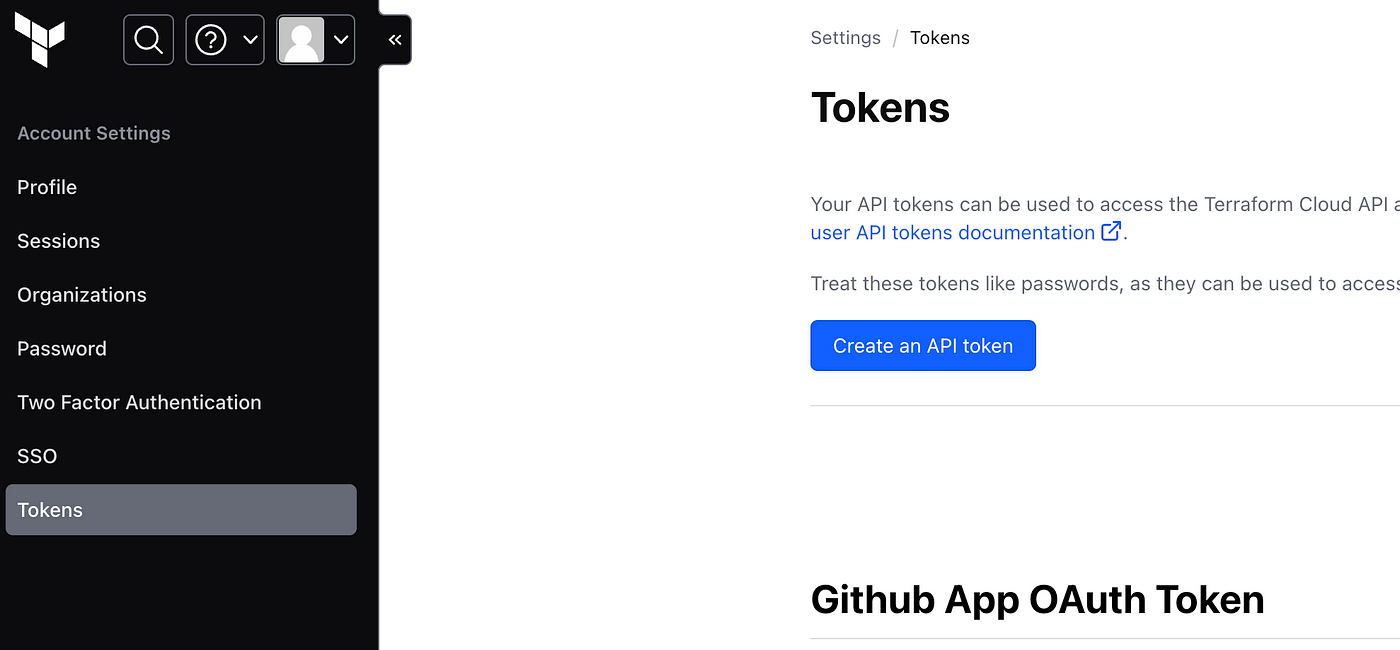
Give it a description and click “generate token”. Copy and paste your token somewhere secure as you will not be able to access this again.
Step 2 — Set up your IDE (Integrated development environment)
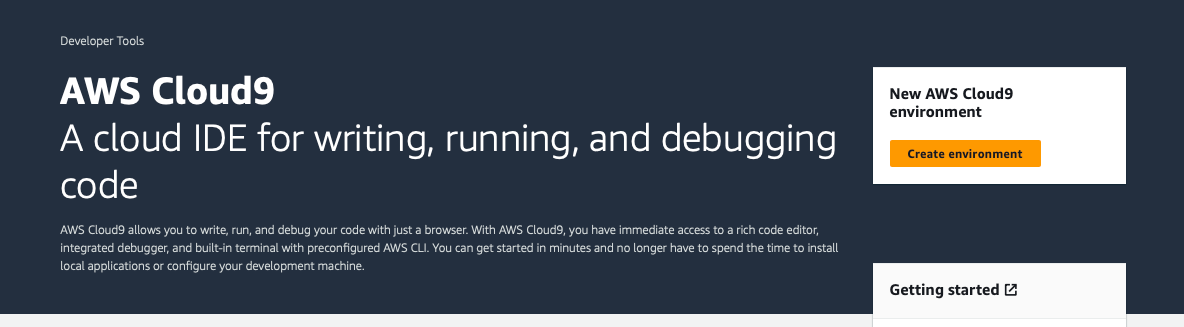
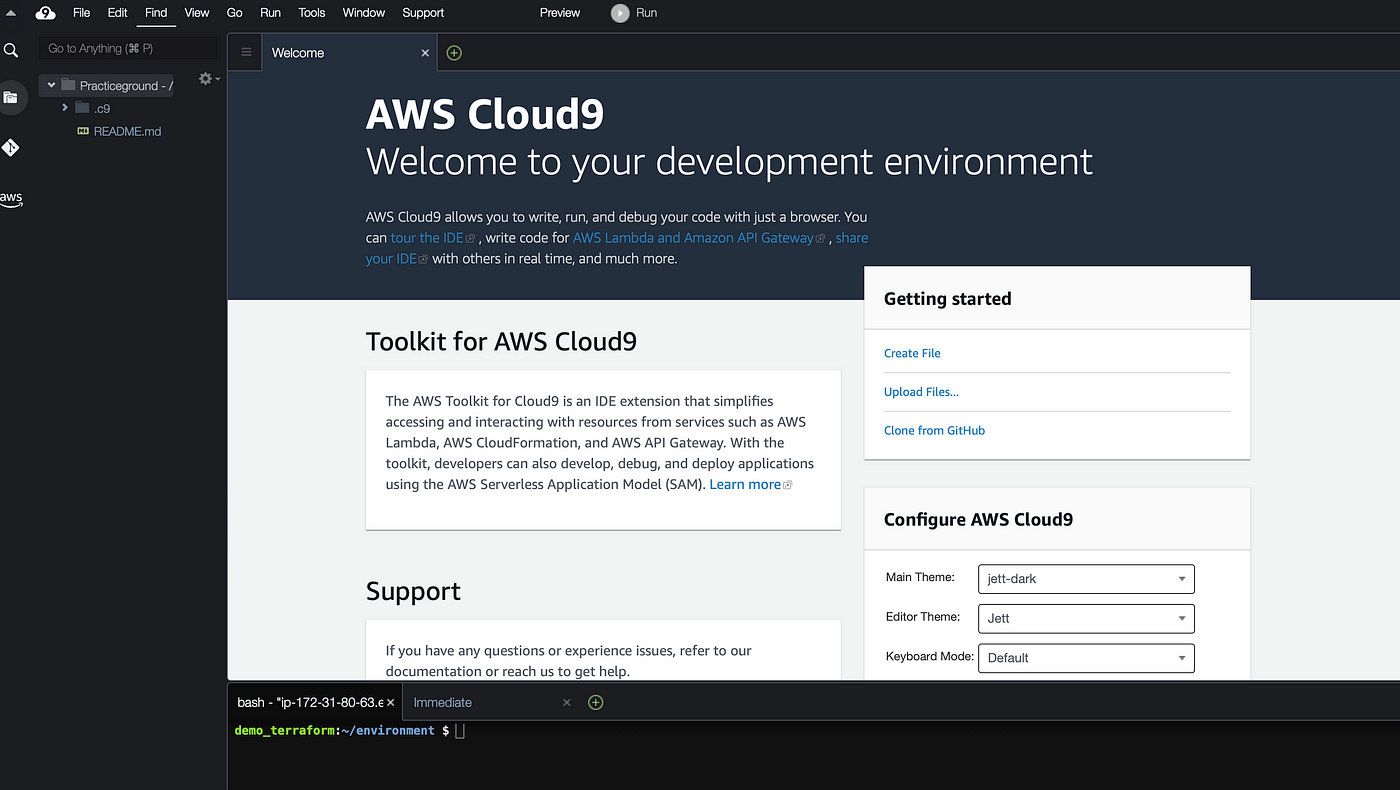
Now you have your Terraform cloud environment set up for this project. The next step is to set up the environment that we will be running Terraform in. You can use any IDE, but for this project we will be using AWS Cloud9 console as it has Terraform pre-installed. Sign in to your AWS console and go to Cloud9 console in your AWS. Click on “Create environment” as shown below.
Give your environment a name and then select “New EC2 Instance” and for instance type select “t2 micro”. This is the instance that will run the Cloud9 application for us. Under Network Settings select AWS Systems manager and everything else leave to default. The creation may take some time but you will a green success banner when it is completed.
Now click on the “open” link under cloud 9 IDE like shown above and this will open a new Cloud9 window with your environment. See below for reference
Before Cloud9 can interact with the resources that we will create in our AWS account we have to make sure to configure Cloud9 with proper credentails. I have explained in detail how this can be done in three different ways in my previous blog. For this project we are using Terraform Cloud as our remote backend and we have already saved our AWS credentials in Terraform cloud. Now that Cloud9 can communicate with Terraform cloud and AWS we can start building our configuration files.
Step 3 — Write Terraform configuration files.
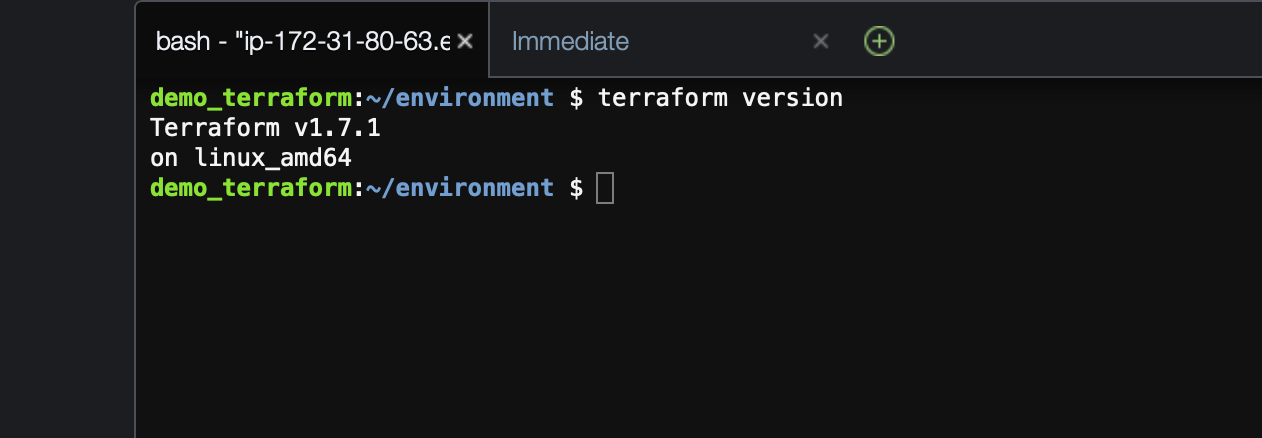
Terraform will build infrastructure based on the codes declared in configuration files. You can code everything in one file or if it is a large complicated infrastructure you can break the codes under different file to organize the files and make them easier to follow. All terraform files have to end with a “.tf” extension for Terraform to recognize it as a configuration file. Terraform should be automatically installed in AWS Cloud9 and you can check this running the “terraform version” command
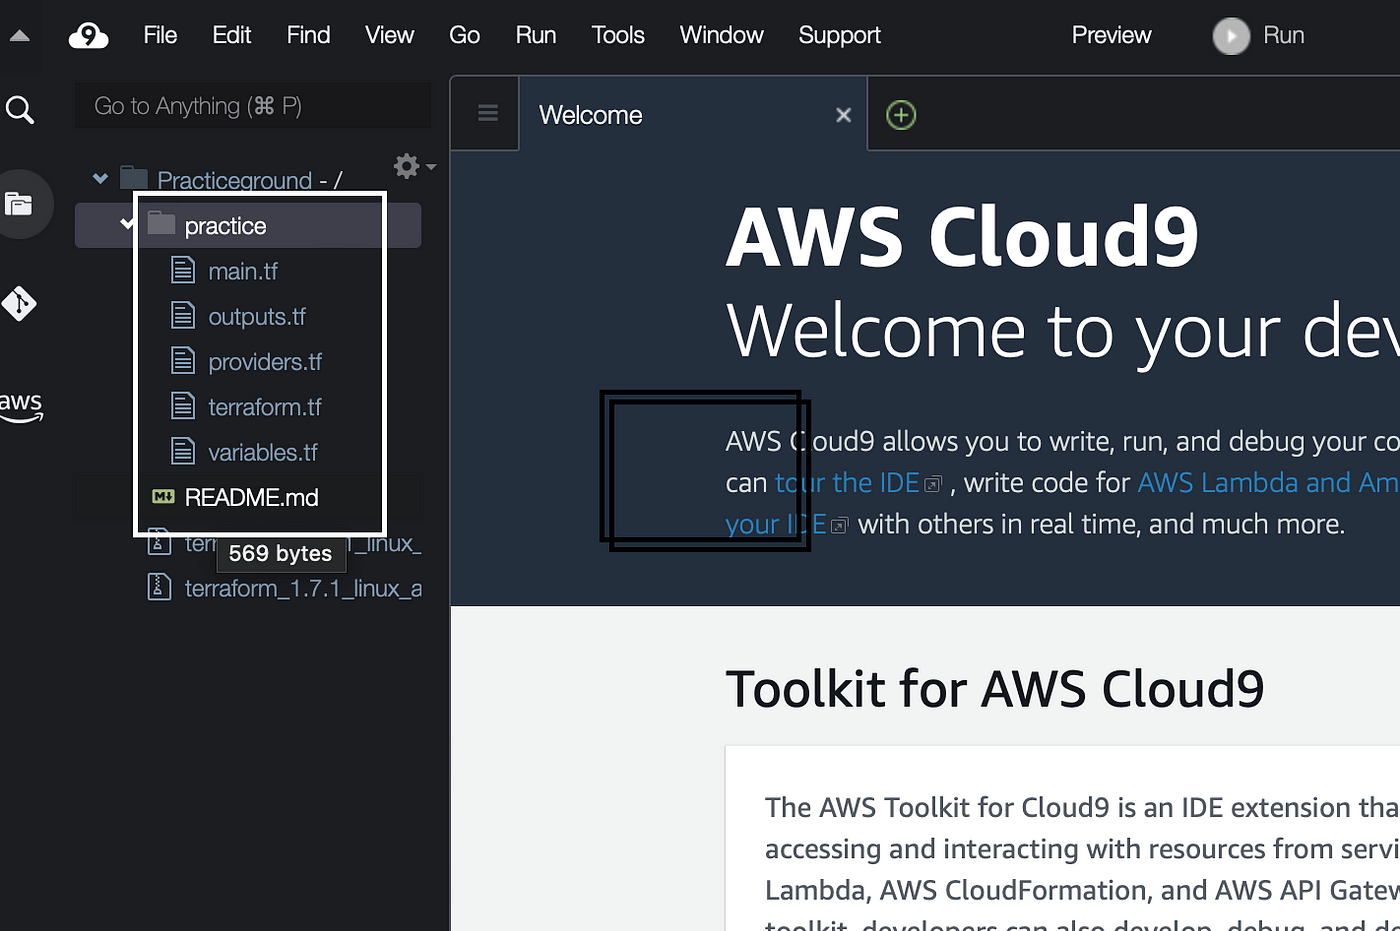
Now I will make a directory called “practice” using the mkdir command and create our configuration files where we will write the codes. See diagram below for reference.

You will see all of these configuration file under the practice folder on the top left side of Cloud9
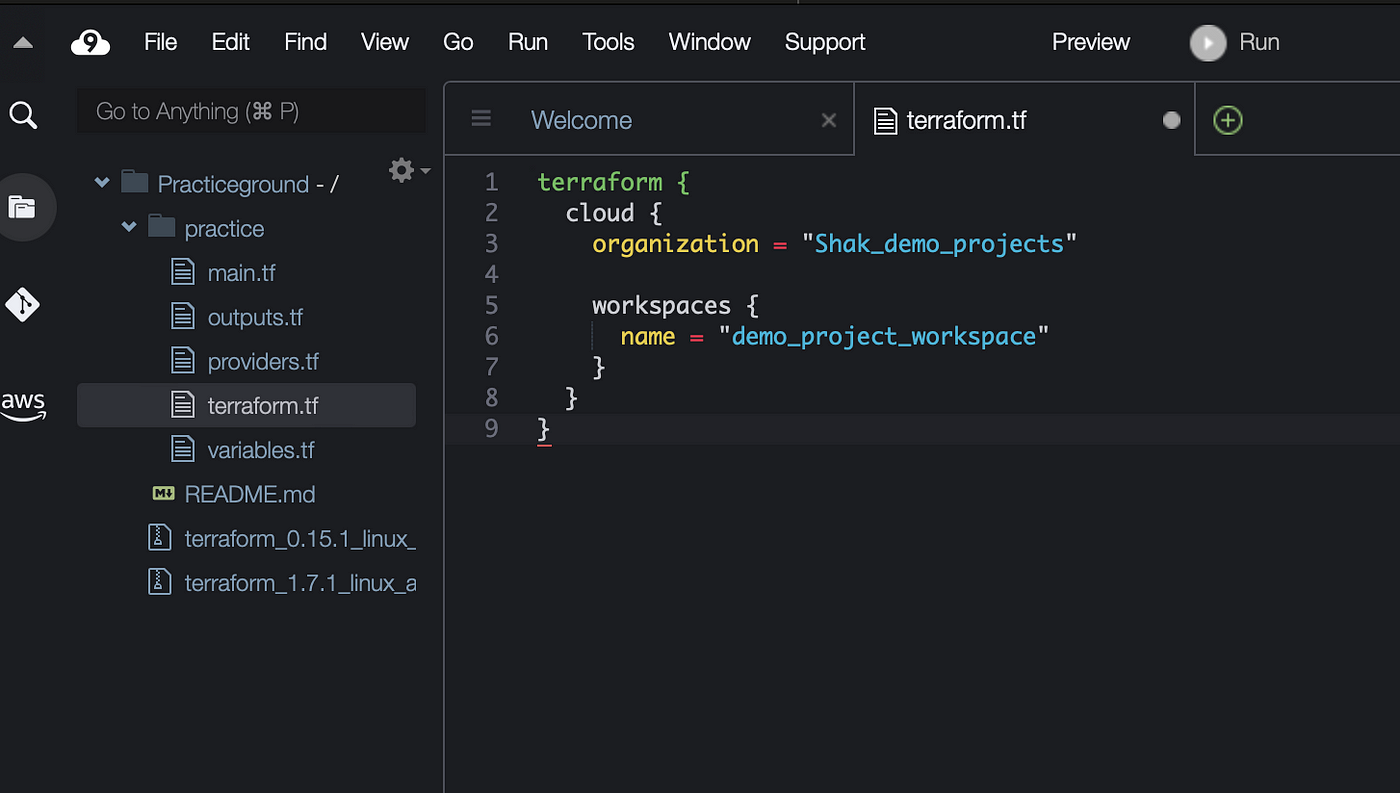
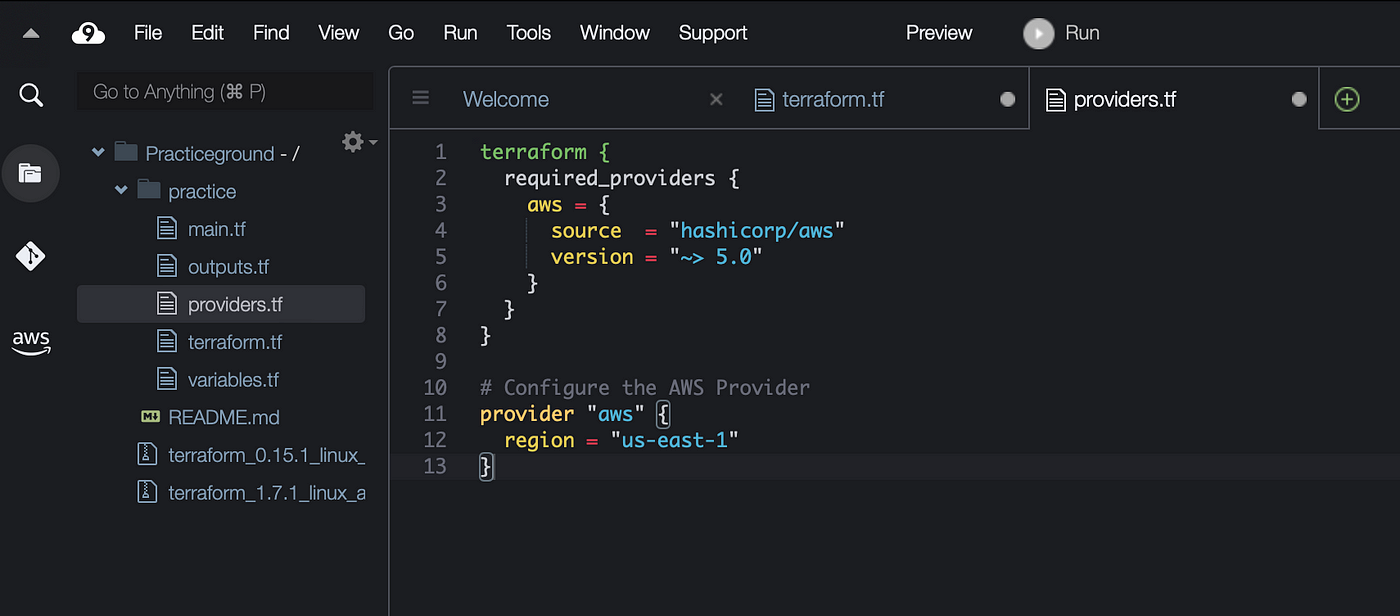
Click on terraform.tf file to configure the terraform cloud provider and declare Terraform cloud as our remote backend. If you are relatively new to Terraform and need guidance on how to write Terraform code you can use Terraform registry to see how the codes should be written in your configuration files. Just Google Terraform code with any resources you want to create. For example you can google “AWS VPC Terraform code” and you will see the links to Terraform registry that will show you the code to create a VPC in Terraform. To configure Terraform cloud provider in Cloud9 your code should look like this below with your cloud environment name you have chosen. Mine is called shak_demo_projects. We will also have to declare a workspace for this project. We have already made one in Terraform cloud called “demo_project_workspace”. See below for reference.
Now we will have to configure our provider that will tell terraform which provider to create resource in (eg. AWS, Azure, GCP etc). This should be done under the provider.tf file. See below for reference.
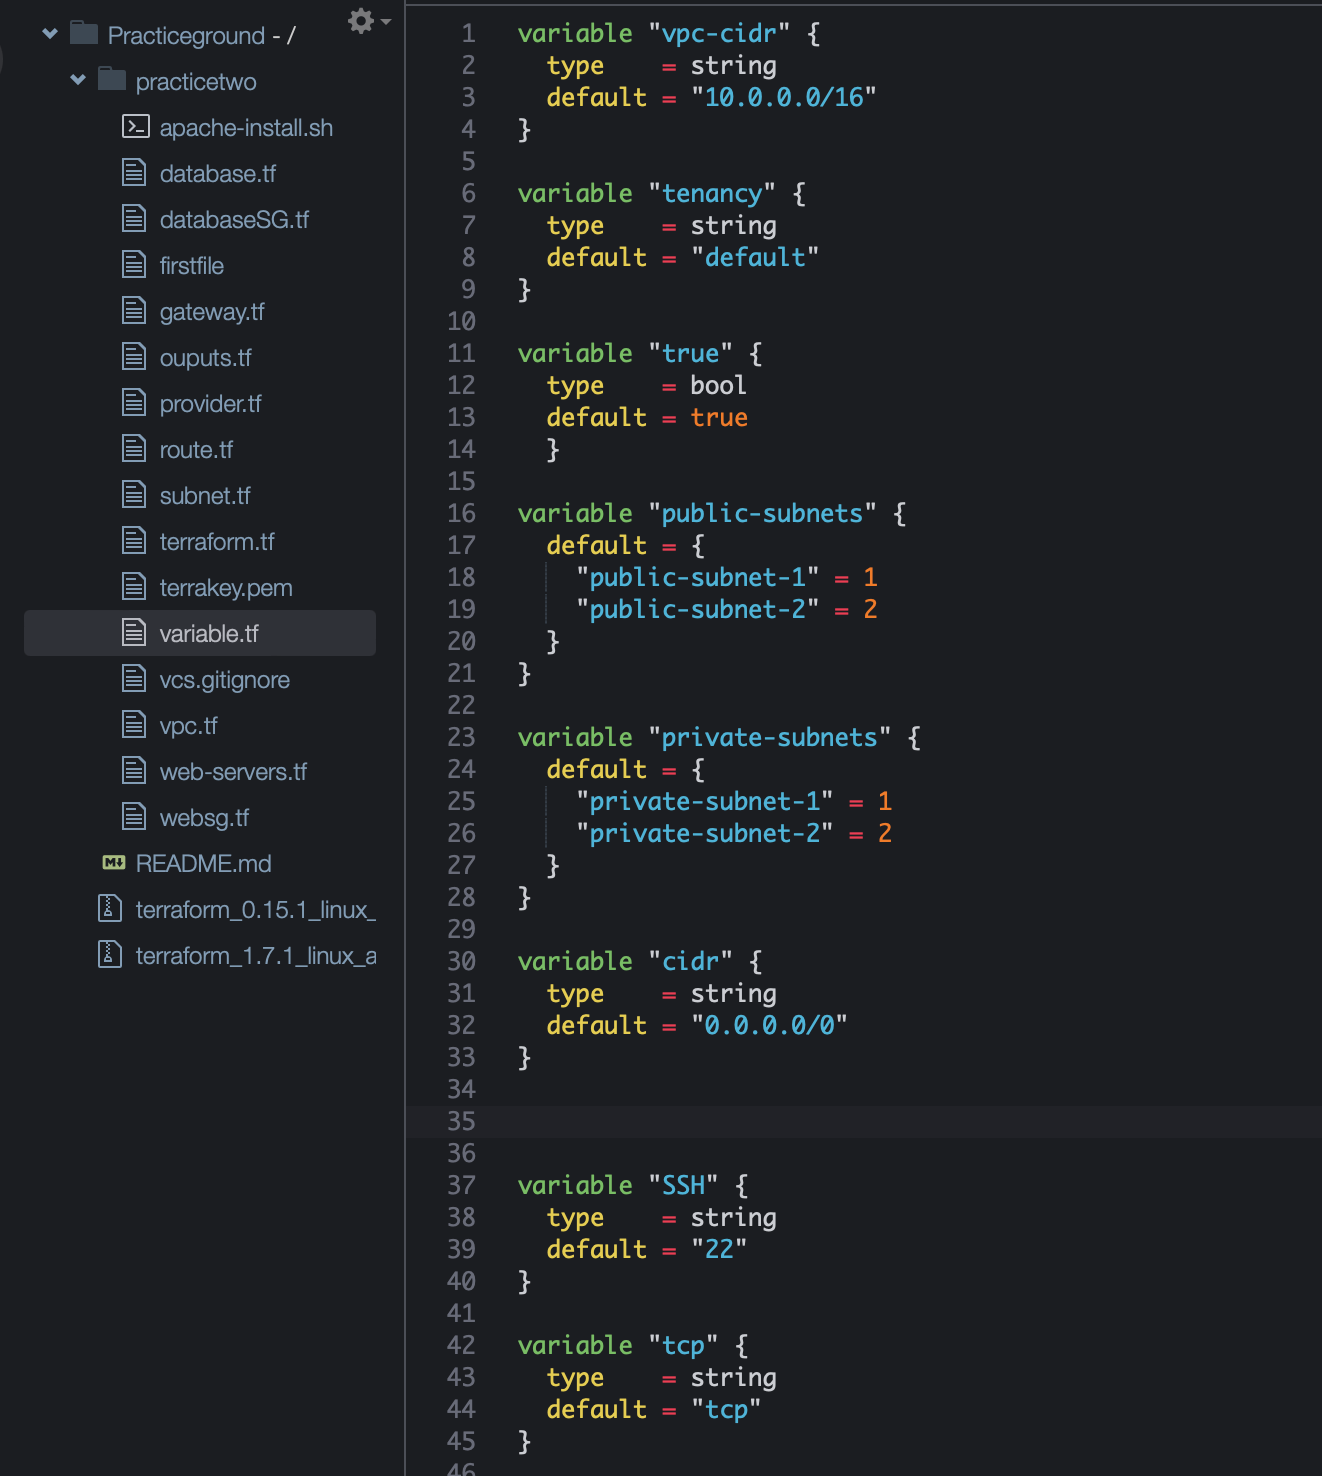
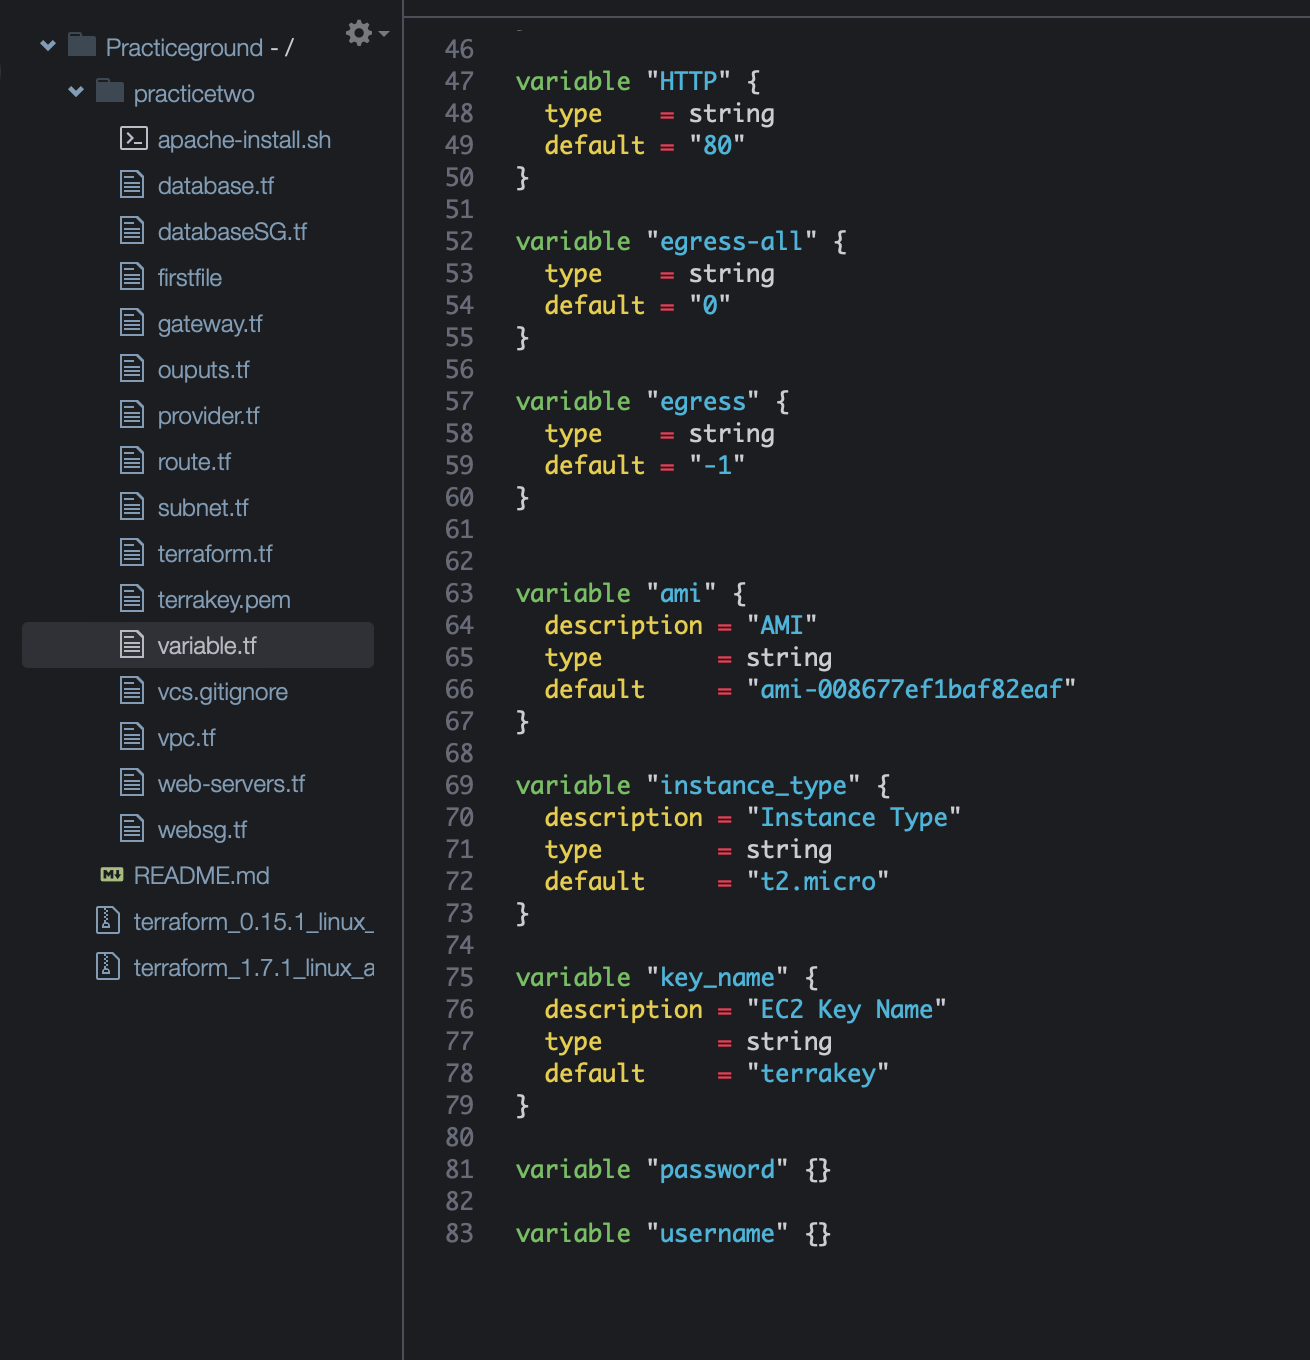
Variables are used to customize the AWS resources that we will create in our “main.tf” file. These variable values will help simplify our code. For example, instead of specifying each and every time what kind of AMI to use every time we create an instance, we can just point to the variable when we need an AMI value. This also makes it easier to read your configuration when you break down the code in different files instead of putting everything in one file. We will create a custom VPC and subnets and we will specify certain parameters in the variables.tf file. Here is the code below for our variable.tf file. Note that I am using the AMI available in the region where I am building this AWS architecture — which is U.S EAST -1. If you are using a different region you will have to use the ami available in that particular region. Also the key pair is my own account’s key pair. You have to use your own. I have included all the codes for my variable.tf file below for the whole infrastructure but you can skip this and set them up one by one as we go if that is easier.
variable.tf file is completed and now let’s build our main.tf file. This is where we will declare the primary configuration for our infrastructure and define our resources, data sources, variables and providers. Note once I complete the main.tf file, I create individual files for each component of the architecture. For example I will create a vpc.tf file to cut and paste the code for the vpc resource from the main.tf file. This makes it easier to follow the full terraform code once completed. You will see the different .tf files in the reference screen shot above. You can create the different files now or you can write everything in main.tf file first and organize them once you are finished. I have broken down the codes in chunks so it is easier to read and follow.
Create a custom VPC — We will need to create a VPC and define resources for the VPC (like subnets, security groups, routing tables etc.) and I have broken them down in chunks below.

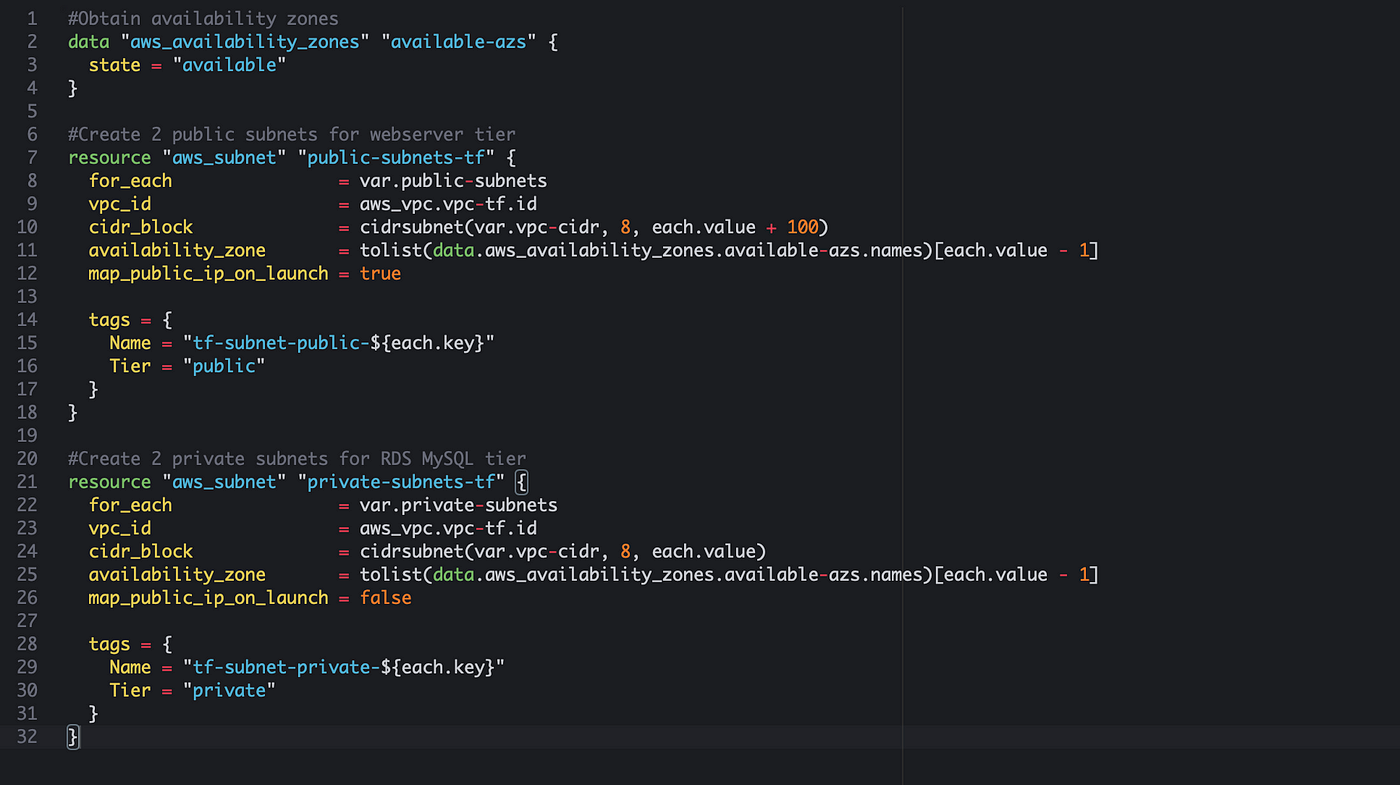
Create a public subnet to house our front end tier and a private subnet to house our back end tier. Public subnet will be accessible to everyone but the private subnet will have restricted accessibility. We also want to make sure our subnets are created in at least two availability zone to make this infrastructure fault tolerant. The way to do this is to use the data source “aws_availability_zone” like on top of the picture below. This performs an API call to AWS to determine the AZs in the current region. To let Terraform know that we want to create two subnets, each in a different availability zone, we can use “for_each = var.public-subnets”. See below for reference. We are telling Terraform that we want to define two different subnets. This type of variable is called “map” and it is a collection of key:value pairs. We have defined these subnets in our variable.tf file. For the cider_block argument, we use the cidrsubnet function to crate different CIDR block for each subnet, so as to prevent them from overlapping. The cidrsubnet function calculates a subnet address within a given VPC network address prefix and is written with cidrsubnet(prefix, newbits, netnum). The prefix is the prefix used by the VPC that we are creating and the newbits is the number of additional bits we want to extend the prefix by. The netnum is the whole number that can be represented as a binary integar. It must be less than newbits binary digits. The +100 adds 100 to the subnet for each iteration, so the CIDR blocks do not overlap. We also have map_public_ip_on_launch to be “true” as this is a public subnet and we want to assign a public ip for the instances created in this subnet. We can also create the private subnet using similar arguments except configuring them “private” and not including public ip addresses for instances launched in the private subnet.
Create Public and Private Route tables: We have to configure route tables to define how the traffic will be routed within the VPC. See code below for reference to our public and private route table. There is a NAT Gateway that is referenced below. We will make this resource in the next few steps.

Now that the route tables are created we will have to associate the public and private route table to configure the routing behaviour. For example, when associating a subnet within a public route table, instances within the subnet can send and receive traffic from the internet. When associating a subnet within a private route table, instances within the private subnet can not be reached from the internet directly, but can still be accessed for updates and pertinent outbound traffic. The route table depends_on the creation of subnet resources indicated by aws_subnet.public-subnet-tf the private-tf. By specifying this argument Terraform will know it needs to create the subnets before creating the route tables. See below for reference.

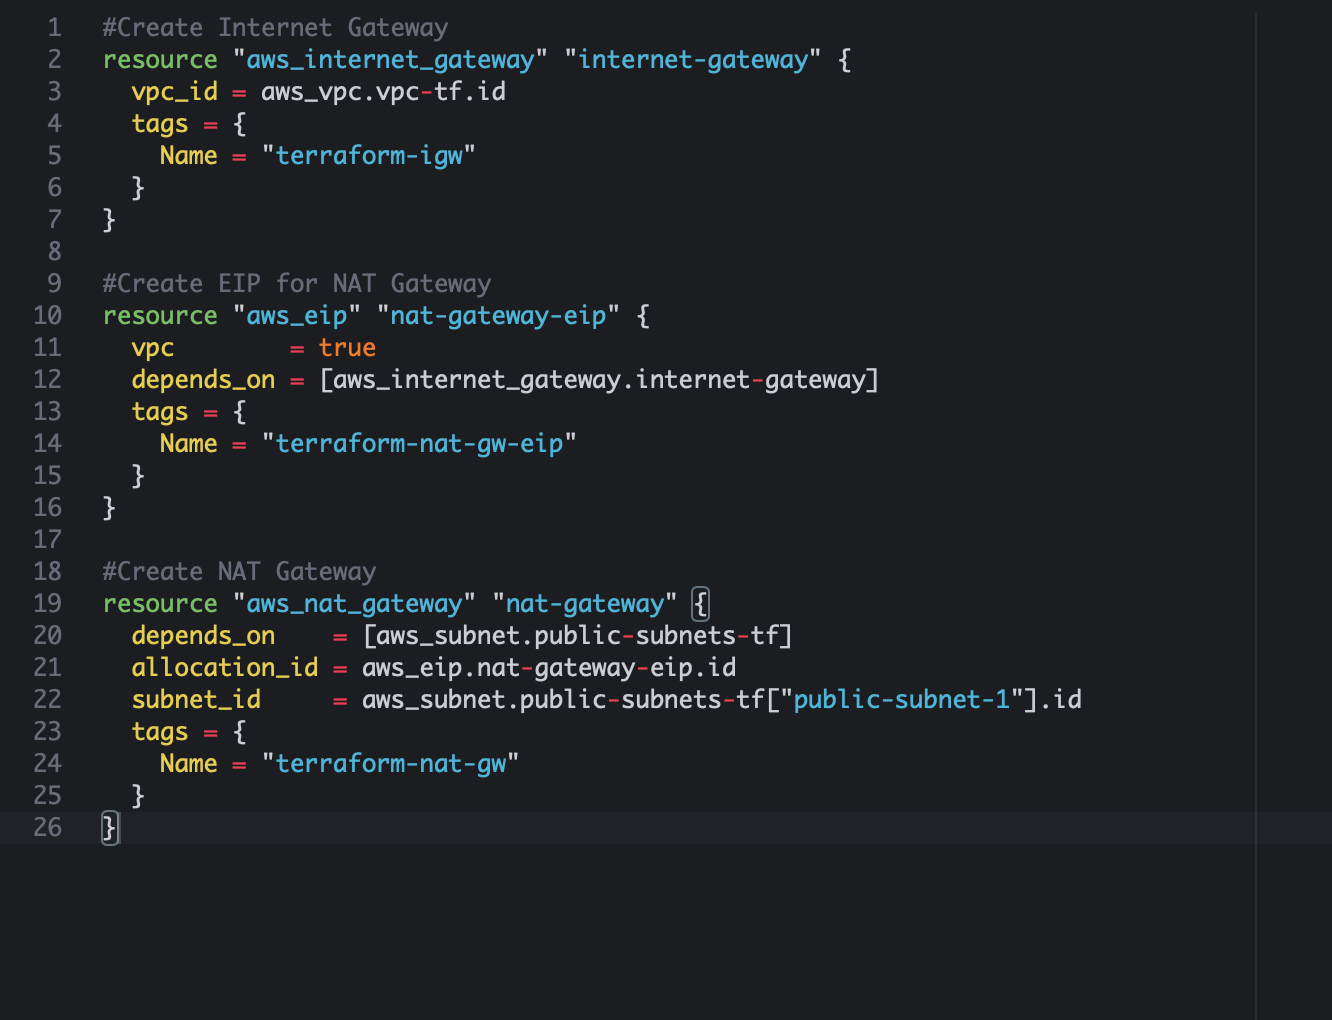
Now we will create the Internet gateway and NAT Gateway. These resources will enable internet access for resources within our VPC. The internet gateway will be used for our public subnet (public route table) and the NAT Gateway will be used so our private subnet (database tier) can have secured internet access. The NAT gateway is actually deployed in a public subnet and prevents the internet from initiating a connection directory to the private subnet. An Elastic IP (EIP) is a static, public IPv4 address provided by AWS that we can use to associate our EC2 instance or NAT Gateway. If you are not familiar with these resources you can read up on them more in AWS. See below for reference.
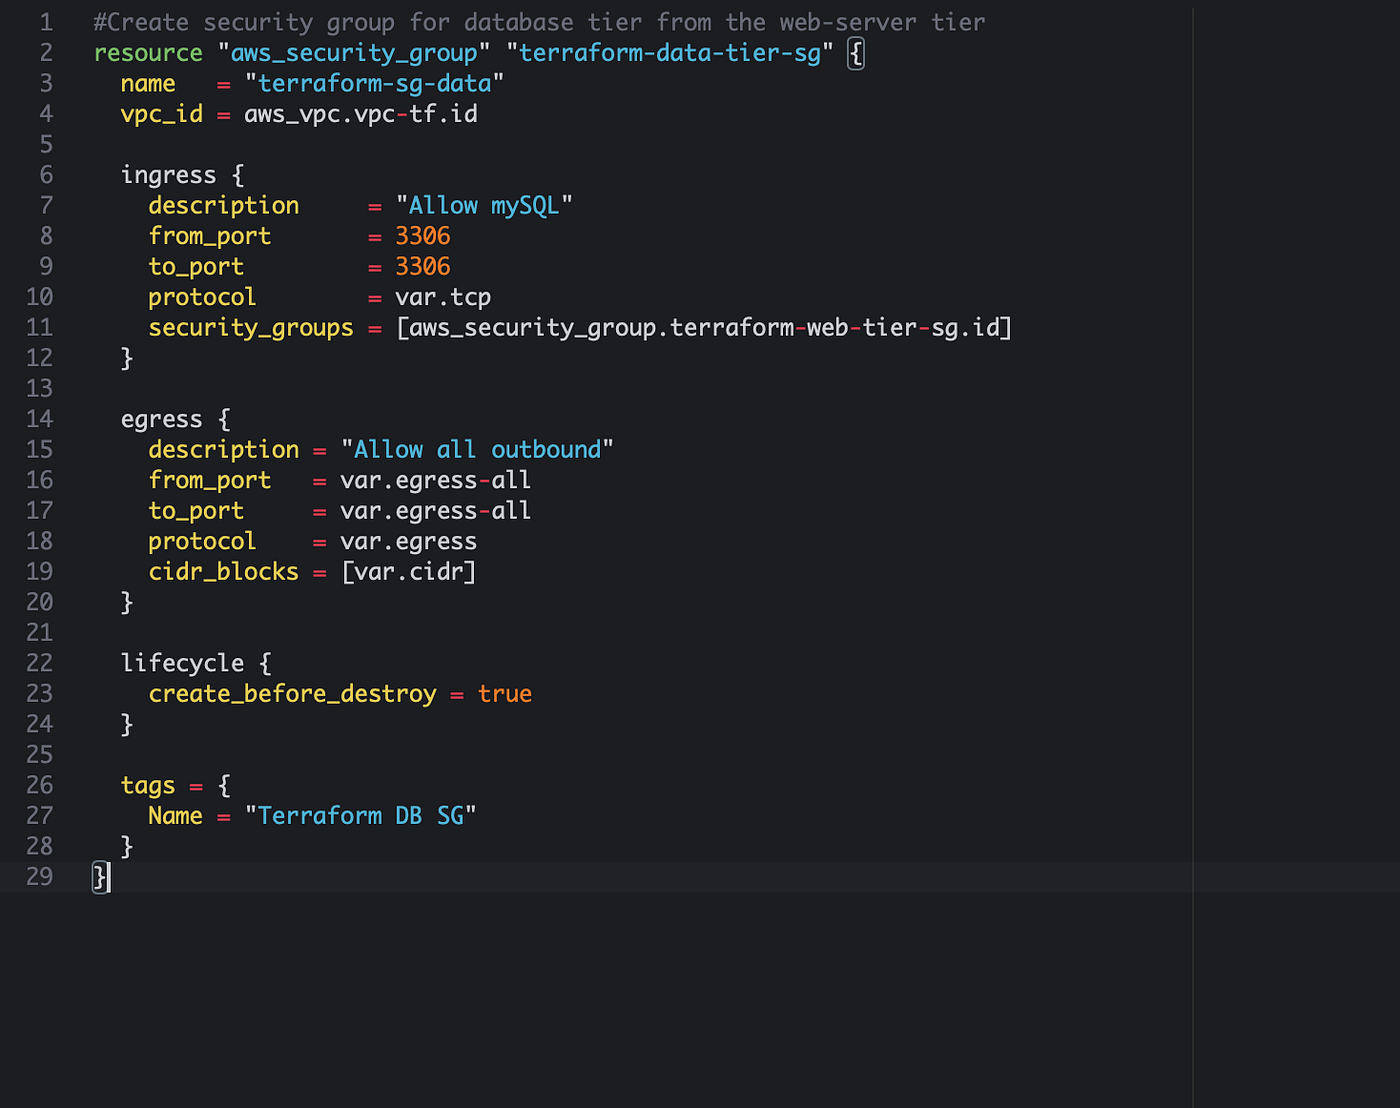
Now we have to create security groups for our web tier (front end) and our database tier (back end). These security groups will define which ports should remain open for different kind of traffic. For the front end tier we will allow ingress (inbound) traffic from the internet and for our database tier we will not allow any ingress traffic from the internet because this will be in the private subnet where our data will be stored.

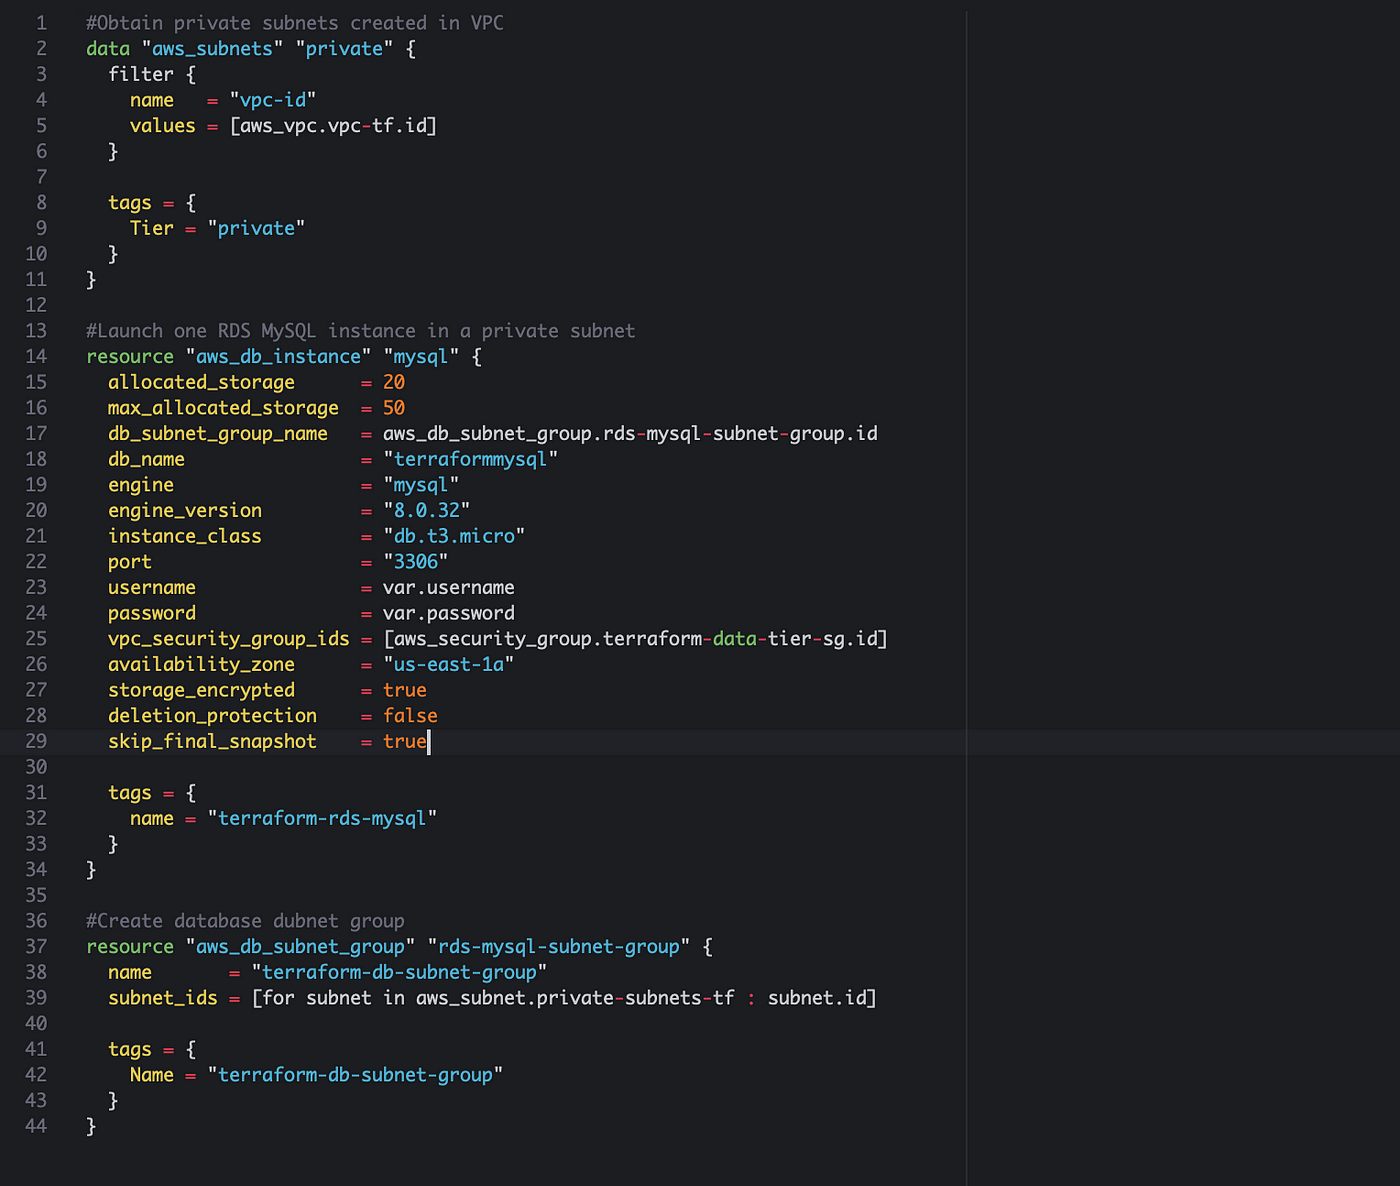
Create Amazon Relational Database Service (RDS) Instance. This is a relational database in AWS that automates hardware provisioning, database setup, patching and backups. It supports multiple database engines including MySQL, PostreSQL and Amazon Aurora. We will provision a MySQL database engine.
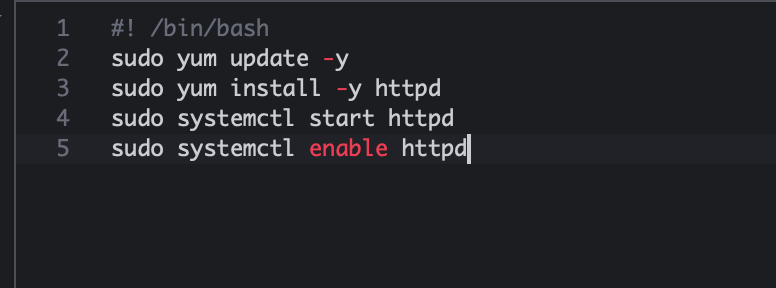
Now we will declare codes for EC2 instance with Bootstrapped Apache. Bootstrapping will help provide the necessary software installations and configuration to function as desired at instance launch. I have included the code to install apache in a different file called “apache.sh”

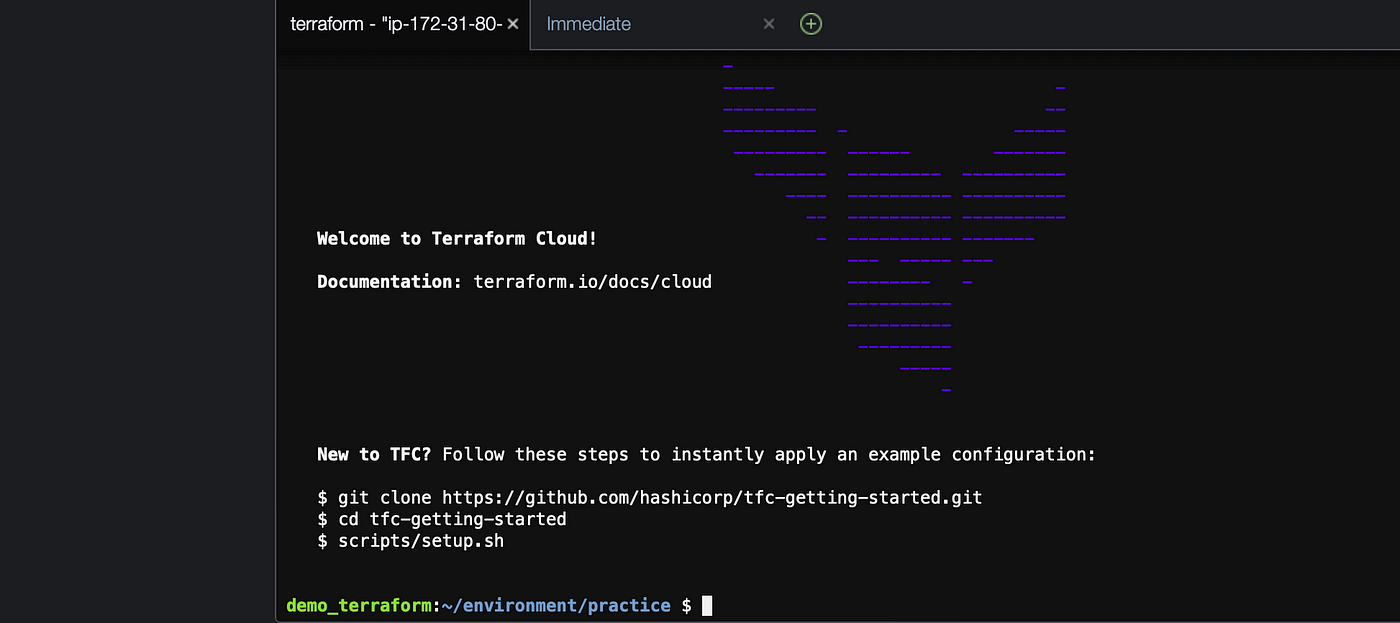
All our resources have been created in our configuration files. Now we can spin up our Terraform Cloud environment and run the CLI-driven workflow. In AWS Cloud9, run the command “terraform login” in the terminal. This will connect your local environment and Terraform cloud. Once prompted, Terraform will request the API token we have saved earlier when we created our Terraform cloud workspace. See diagram below for reference.

Once you type in “yes” and copy and paste the token you should see the “Welcome to Terraform Cloud!” screen as shown below
Now we have to initialize our working directory that contains all our configuration files. Run the terraform init command and you should see the following screen if there aren’t any errors.

Now let’s apply our configuration with the “terraform apply” command. Now it will show you the number of resources that it is planning to create and will prompt you to type “yes” to proceed. See below for reference. Type “yes” and press enter

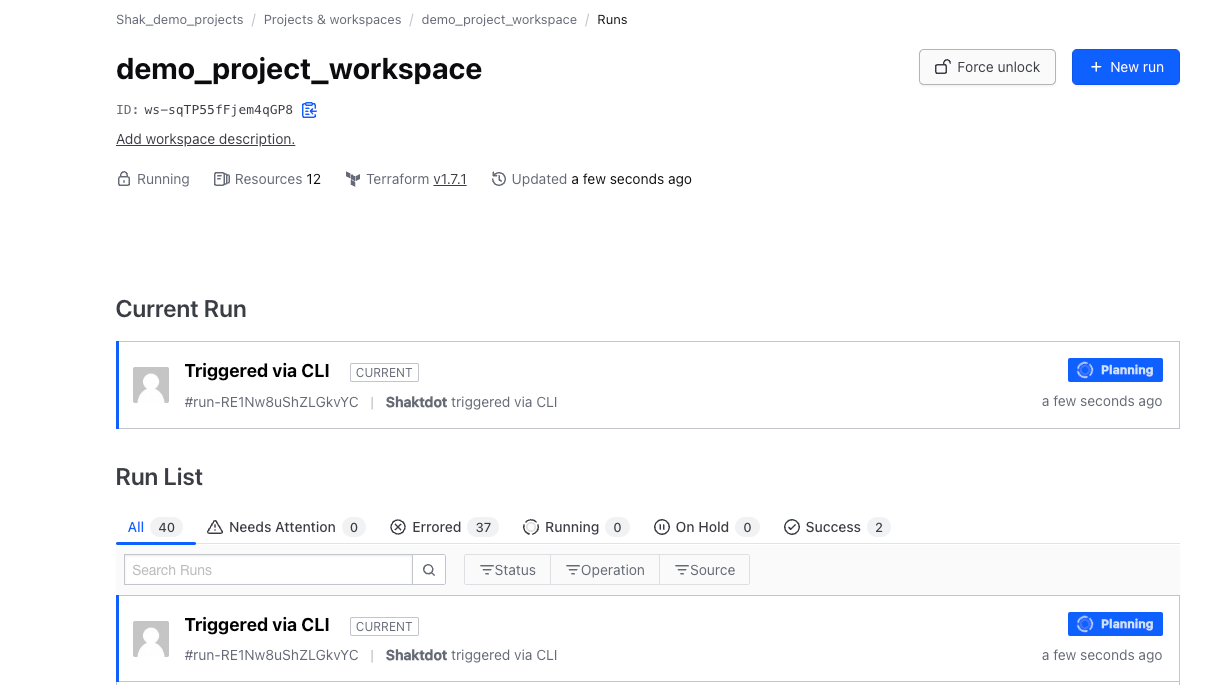
Once you prompted “yes” you will be able to see in your Terraform cloud account that the request is being processed and finally applied. See below for reference

All our terraform configuration files were applied and our resources are created. Let’s go to our AWS console and verify our resources. You can go to VPC console to check the VPC we just created along with the subnets and security groups. See below for reference


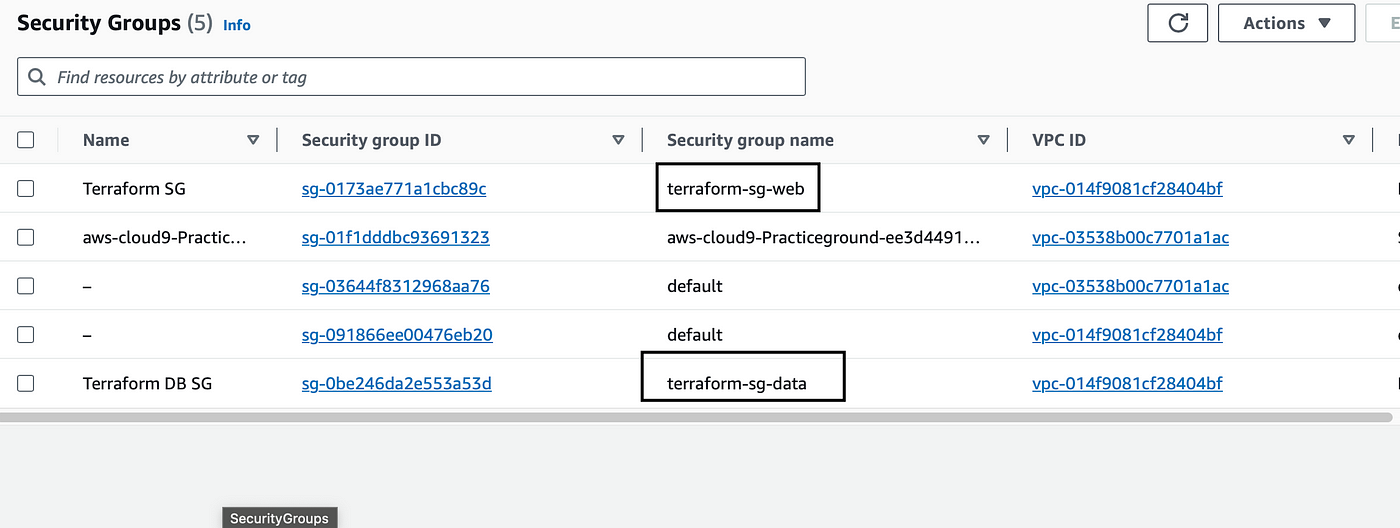
Our VPC, subnets and security groups were launched successfully. Now let’s go to our EC2 instance console and check if our instance was launched successfully.
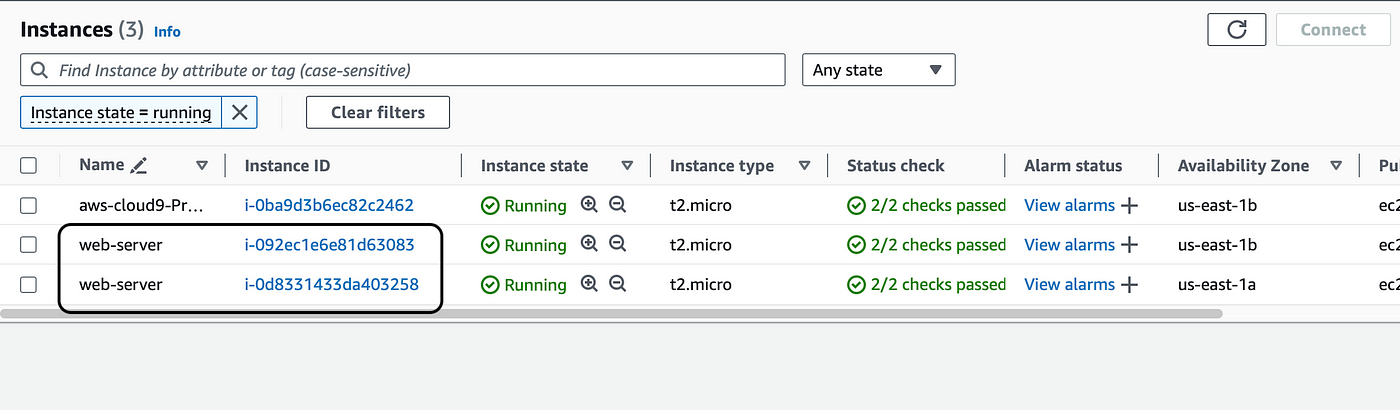
It was! Now let’s choose one of the web servers and select their public ip address to check if the apache server was installed correctly. See below for reference. Copy and paste the public ip into a browser.

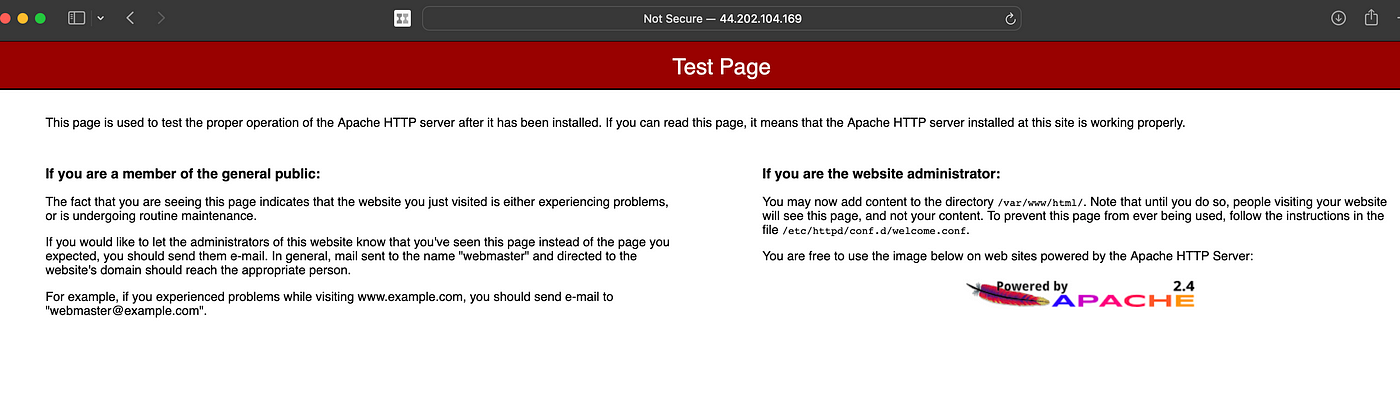
It works! Our IP address launches the default apache page. Let’s go to our RDS database console and check if our database was launched correctly.
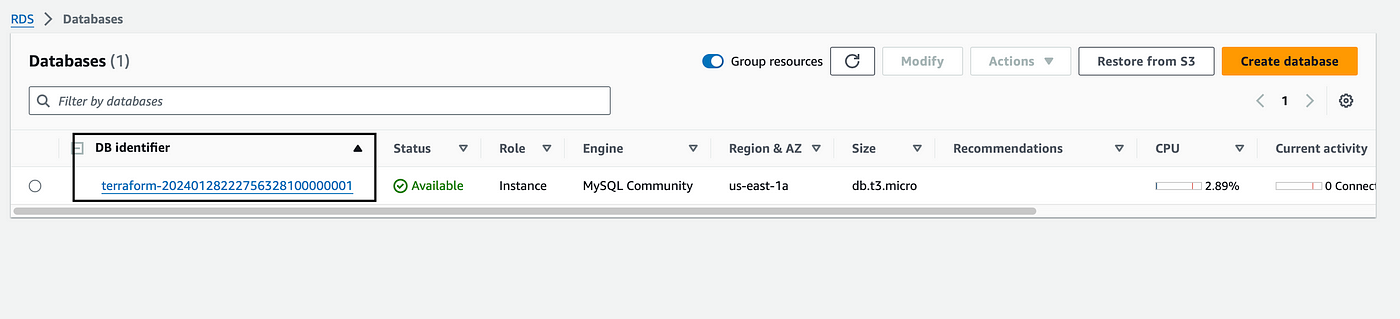
Our database was launched! Let’s check if we can SSH into our EC2 instance and connect to our database. Go to your AWS EC2 console and select an instance and then click on connect on the top right. You will see the steps to SSH into your instance. I have also explained this process in my blog post here. Once you SSH from your Cloud9 terminal you should see this as referenced below that shows your instances’ public IP address along with the success message that it has been added.

Now to connect to your database run the following commands
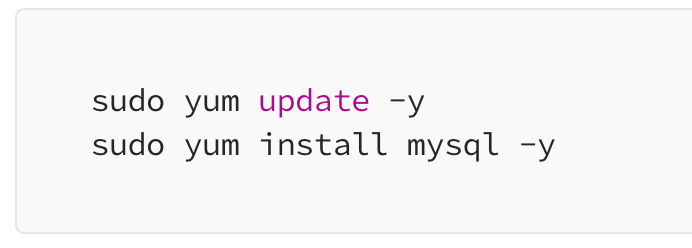
MySql has been successfully installed and now we can connect to our database.
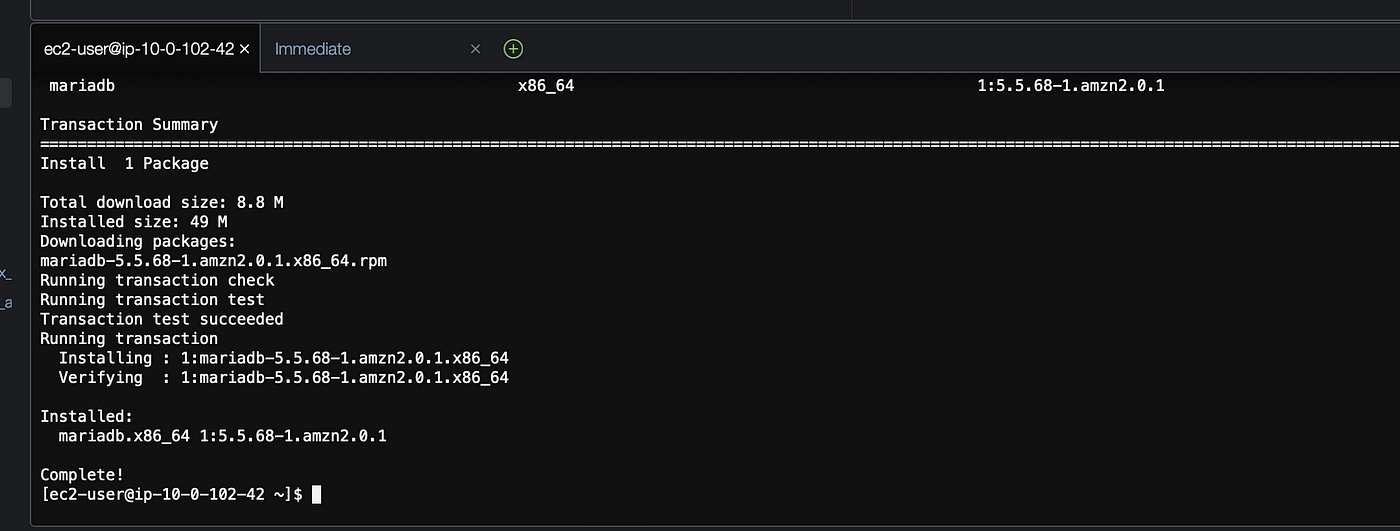
Now we can connect to our database using the database endpoint. I have included the process to connect to you database in details here. You run this command below and it should prompt for your database password and you will be connected.

CI/CD pipeline using GitHub
With Github we can have multiple people collaborate on a project simultaneously. For example, the architecture we designed above can be updated by another person in my team once I set up this CI/CD pipeline. We will use Github to include our Terraform configuration files and then connect Github to Terraform cloud. You will need a Github account for this which is free to create. Once you log-in to your account, click on “create a new repository”. Give your repository a name and click on public and then create a new repository.

Once you have created a repository in Github, navigate to your Terraform cloud console and click on Version control under settings.

Now choose “Version Control Workflow” on the next screen and then select GitHub.

I already have GitHub connected to my terraform cloud but you should see a screen which will ask for your permission to authorize Terraform to connect with Github. Make sure your pop-up blockers are disabled just in case. Choose a repository in your github account that you want to use for this project. I already have one called terraformpracticetwo. Under Apply method you can choose Auto apply which will automatcially apply changes when a terraform plan succeeds. Under VCS triggers select Always trigger runs. This will tell terraform to trigger a run any time a change is pushed into any of the files in the Github repo. Then click on “update vcs settings” see below for reference.


If you don’t have Git installed in your terraform cloud it might ask you to authenticate using your using your Github password. My Github is already connected to my Terraform cloud account. Now we can start using Github with our Terrafrom cloud and AWS Cloud9. These are the components that will make up our CI/CD pipeline. We will commit changes in cloud9 and these changes will be realized by our Github repository which will trigger a run in Terraform cloud and in our AWS account. All we have to do is commit the changes to Github using Cloud9 (IDE that we are using for this project). Enter the following commands below to initialize Github

You will be asked to enter your Github username and password. This password is the personal access token for Github that you can get here. Once this is completed you should all your files uploaded in your Github repository.

This concludes our project. This was a lot of fun and I was able to apply so many concepts I learned only in theory while completing my AWS certifications. Don’t forget to clean up after you are done by using the Terraform Destroy command. Thank you for reading this post and I will be posting more on DevOps and Terraform.
Comments
Loading comments…