Introduction:
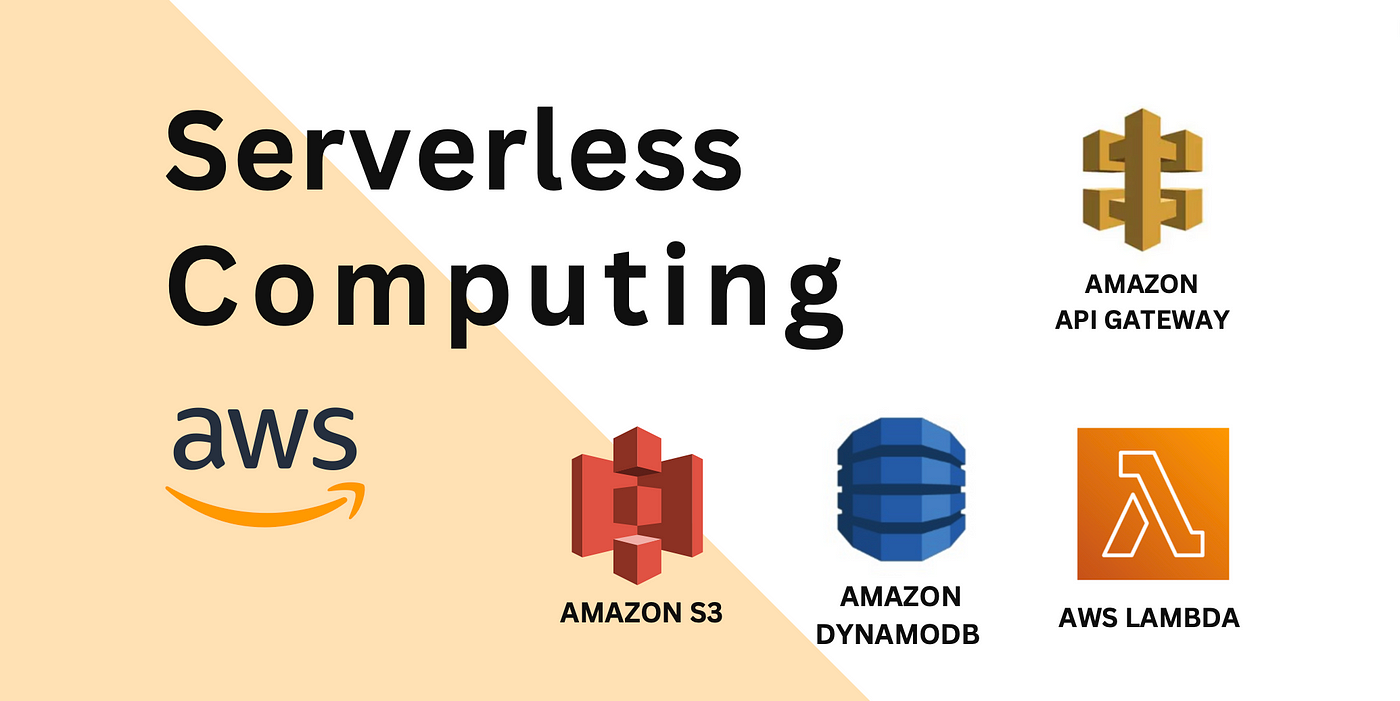
Discover the art of serverless simplicity as we guide you through creating a powerful API using AWS SAM, Lambda, DynamoDB, and API Gateway. Say goodbye to server management headaches and hello to scalability, cost-efficiency, and code-centric development. Ready to embrace the serverless revolution? Let's get started!
Prerequisites:
- AWS Account: Make sure to have an active AWS account. If you don't have one, you can easily create an account by following the instructions on the AWS website.
- AWS CLI and SAM CLI: Ensure the AWS CLI and SAM CLI are installed on your local machine. You can download and install them by following the instructions provided on the AWS CLI installation page and SAM CLI installation page.
- IDE or Code Editor: Recommend using a code editor or integrated development environment (IDE) for writing and deploying serverless applications. A popular choice is Visual Studio Code.
- Node.js and npm: Some serverless frameworks, including SAM, require Node.js and npm. Ensure you have these installed on your machine. You can download and install them from the official Node.js website.
Steps:
Step 01: Create an admin user
When working on your projects, avoid using a super admin account. Make a new user with admin powers and use it for your tasks.
- First, go to the IAM service and navigate to the user section. There, you'll find a button that says "Create User."
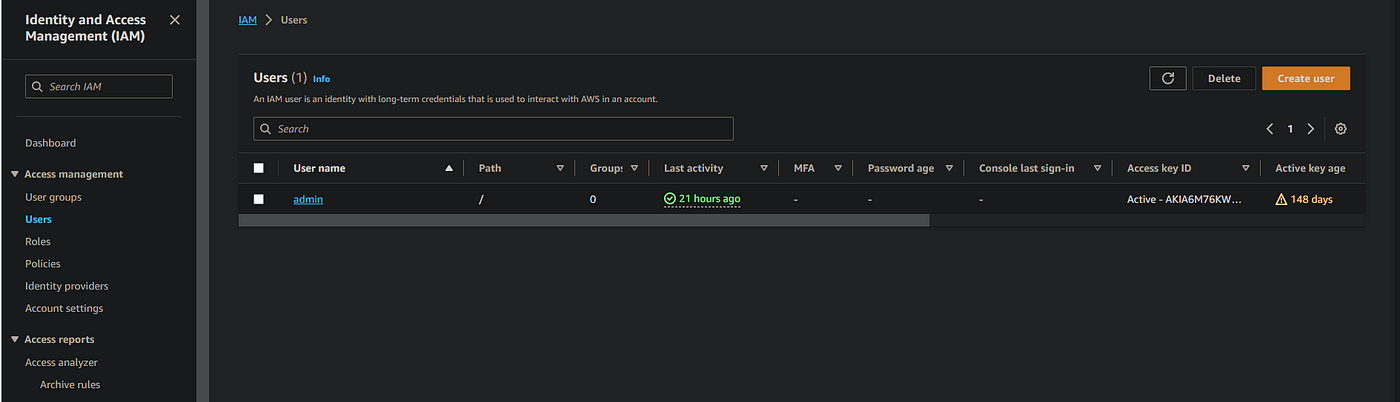
- Give a name to the IAM user.

- Choose "Administrator access" for that user, click the next button, and then hit the create user button. This will create the user.

Step 02: Generate access keys for the newly created admin user.
- Next, access the profile of the newly created user, go to the "Security Credentials" tab, and here you'll find the option to create access keys. Click on the "Create Access Key" button.
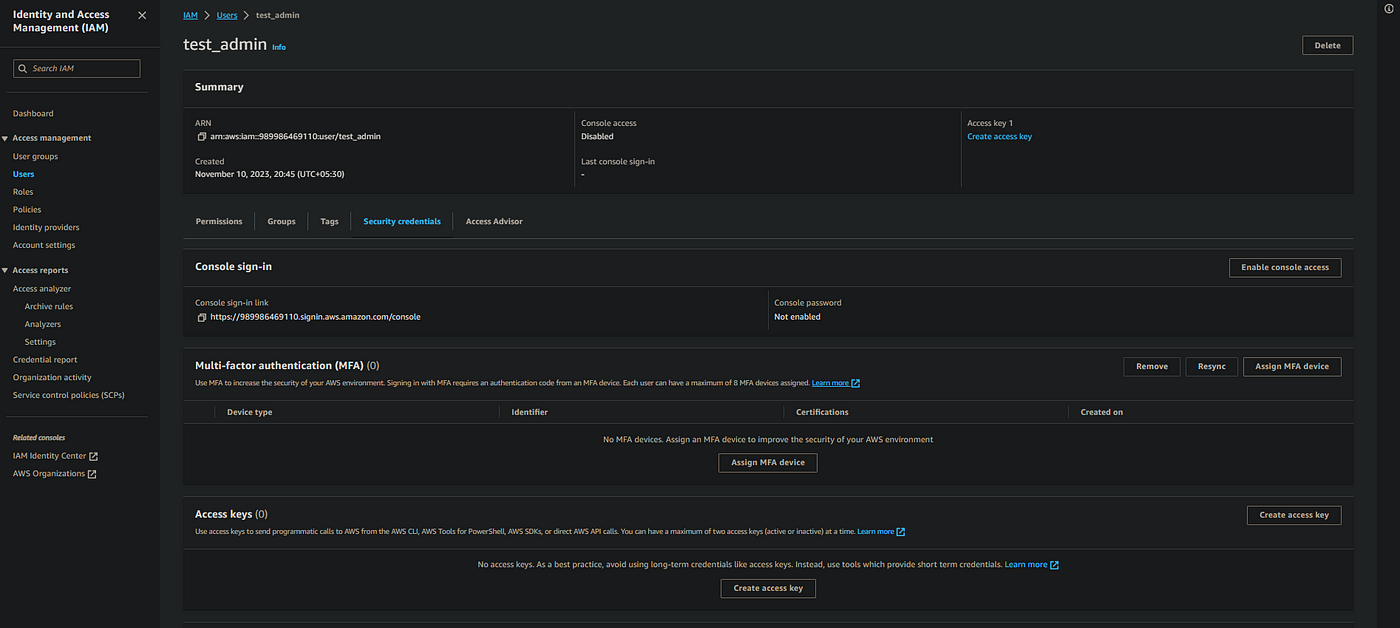

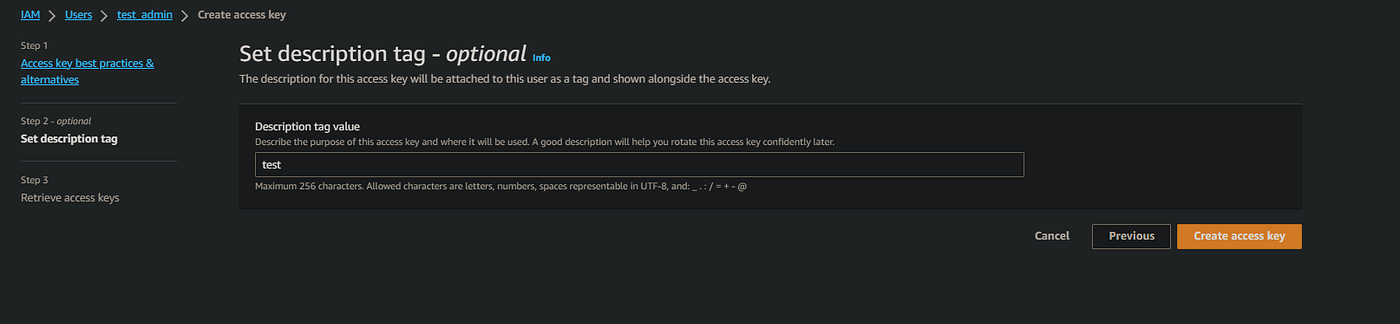
- Provide a descriptive tag for the key, then click the "Create Access Key" button.
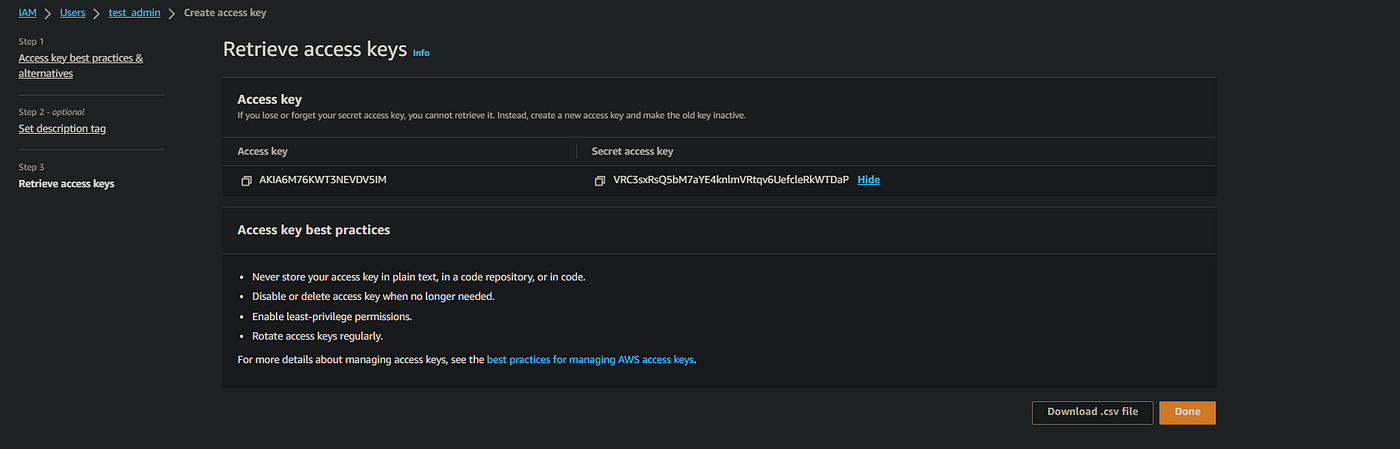
- Now, you'll see the access key and secret access key. Make sure to copy both of these keys
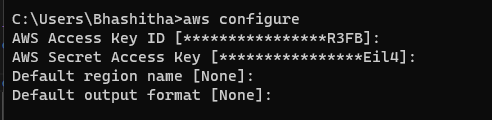
Step 03: Configure the AWS CLI on your computer.
- Open the terminal on your computer and type the following command:
aws configure
- If you have already configured the AWS CLI, you might see default values displayed for the access key and secret key. However, if you are configuring it for the first time, you need to manually enter the access key and secret key when prompted. Keep the other two values at their defaults unless you have specific preferences to change them.
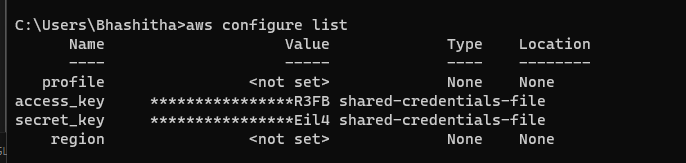
- Now, you can enter the following command:
aws configure list
- If the configuration is correct, you will see a list that includes the set access key and secret key.
Step 04: Set up the space for your project.
- Create a new folder and open it in VS Code.
mkdir my_project
cd my_project
code .
- Create a 'src' folder inside the "my_project" folder, add an 'app.js' file, and include the following code:
const AWS = require("aws-sdk");
const dynamoDb = new AWS.DynamoDB.DocumentClient();
const tableName = "users_table";

exports.getUsersHandler = async (event) => {
  let response;

  try {
    // Specify the attribute and value for the filter condition
    const filterAttribute = "security_status";
    const filterValue = "active";

    // Use the DocumentClient to get all items in the table
    const data = await dynamoDb
      .scan({
        TableName: tableName,
        FilterExpression: `${filterAttribute} = :value`,
        ExpressionAttributeValues: {
          ":value": filterValue,
        },
      })
      .promise();

    response = {
      statusCode: 200,
      body: JSON.stringify({
        message: "Data fetched from DynamoDB",
        date: data.Items,
      }),
    };
  } catch (err) {
    console.log(err);
    response = {
      statusCode: 500,
      body: JSON.stringify({
        message: err instanceof Error ? err.message : "Some error happened",
      }),
    };
  }

  return response;
};

exports.createUserHandler = async (event) => {
  let response;

  try {
    // Parse the incoming event data, assuming it's in JSON format
    const requestData = JSON.parse(event.body);

    // Create an item to be saved in the DynamoDB table
    const params = {
      TableName: tableName,
      Item: {
        ...requestData,
        security_status: "active",
      },
    };

    await dynamoDb.put(params).promise();
    const createdUser = await dynamoDb
      .get({
        TableName: tableName,
        Key: {
          id: requestData.id,
        },
      })
      .promise();

    response = {
      statusCode: 200,
      body: JSON.stringify({
        message: "Data saved to DynamoDB",
        date: createdUser.Item,
      }),
    };
  } catch (err) {
    console.log(err);
    response = {
      statusCode: 500,
      body: JSON.stringify({
        message: err instanceof Error ? err.message : "Some error happened",
      }),
    };
  }

  return response;
};

exports.updateUserHandler = async (event) => {
  let response;

  try {
    const updatedData = JSON.parse(event.body);
    const id = event.pathParameters.id;

    const params = {
      TableName: tableName,
      Key: {
        id: id,
      },
      UpdateExpression: "SET #data = :updatedData",
      ExpressionAttributeNames: { "#data": "name" },
      ExpressionAttributeValues: {
        ":updatedData": updatedData.name,
      },
      ReturnValues: "ALL_NEW", // Optional, returns the updated item
    };

    // Use the DocumentClient to put the item in the DynamoDB table
    const data = await dynamoDb.update(params).promise();

    response = {
      statusCode: 200,
      body: JSON.stringify({
        message: "Data updated to DynamoDB",
        data: data.Attributes,
      }),
    };
  } catch (err) {
    console.log(err);
    response = {
      statusCode: 500,
      body: JSON.stringify({
        message: err instanceof Error ? err.message : "Some error happened",
      }),
    };
  }

  return response;
};

exports.deleteUserHandler = async (event) => {
  let response;

  try {
    const id = event.pathParameters.id;

    const params = {
      TableName: tableName,
      Key: {
        id: id,
      },
      UpdateExpression: "SET #data = :value",
      ExpressionAttributeNames: { "#data": "security_status" },
      ExpressionAttributeValues: {
        ":value": "inactive",
      },
      ReturnValues: "ALL_NEW", // Optional, returns the updated item
    };

    // Use the DocumentClient to put the item in the DynamoDB table
    const data = await dynamoDb.update(params).promise();

    response = {
      statusCode: 200,
      body: JSON.stringify({
        message: "Data deleted from DynamoDB",
        data: data.Attributes,
      }),
    };
  } catch (err) {
    console.log(err);
    response = {
      statusCode: 500,
      body: JSON.stringify({
        message: err instanceof Error ? err.message : "Some error happened",
      }),
    };
  }

  return response;
};
- Create a 'template.yaml' file in the "my_project" folder and add the following code:
AWSTemplateFormatVersion: '2010-09-09'
Transform: AWS::Serverless-2016-10-31

Globals:
Function:
Timeout: 3
MemorySize: 512

Resources:
GetUsersFunction:
Type: AWS::Serverless::Function
Properties:
CodeUri: src/
Handler: app.getUsersHandler
Runtime: nodejs14.x
Policies: AmazonDynamoDBFullAccess
Architectures:

- x86_64
  Events:
  TestApiResource:
  Type: Api
  Properties:
  Path: /users
  Method: get

CreateUserFunction:
Type: AWS::Serverless::Function
Properties:
CodeUri: src/
Handler: app.createUserHandler
Runtime: nodejs14.x
Policies: AmazonDynamoDBFullAccess
Architectures:

- x86_64
  Events:
  TestApiResource:
  Type: Api
  Properties:
  Path: /users
  Method: post

UpdateUserFunction:
Type: AWS::Serverless::Function
Properties:
CodeUri: src/
Handler: app.updateUserHandler
Runtime: nodejs14.x
Policies: AmazonDynamoDBFullAccess
Architectures:

- x86_64
  Events:
  TestApiResource:
  Type: Api
  Properties:
  Path: /users/{id}
  Method: put

DeleteUserFunction:
Type: AWS::Serverless::Function
Properties:
CodeUri: src/
Handler: app.deleteUserHandler
Runtime: nodejs14.x
Policies: AmazonDynamoDBFullAccess
Architectures:

- x86_64
  Events:
  TestApiResource:
  Type: Api
  Properties:
  Path: /users/{id}
  Method: delete

DynamoDBTable:
Type: AWS::DynamoDB::Table
Properties:
TableName: users_table
AttributeDefinitions:

- AttributeName: id
  AttributeType: S
  KeySchema:
- AttributeName: id
  KeyType: HASH
  BillingMode: PAY_PER_REQUEST
- Create a 'samconfig.toml' file in the root directory ("my_project"):
version = 0.1
[default.deploy.parameters]
stack_name = "users-app"
resolve_s3 = true
s3_prefix = "users-app"
region = "us-east-1"
capabilities = "CAPABILITY_IAM"
image_repositories = []
- You can view the full code at this link: https://github.com/hbsbashitha/simpleUserCRUD-serverlessArchitecture
Step 05: Deploy your project to AWS
- From your project's main folder (my_project), enter the following command:
sam deploy template.yaml
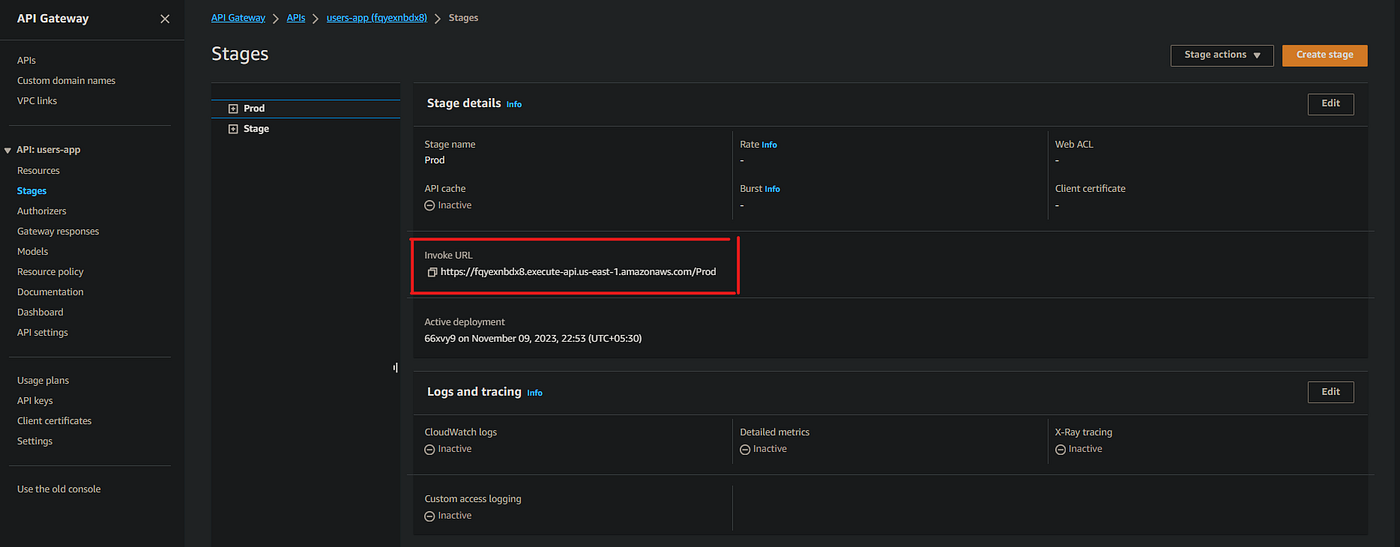
- After a few minutes, your project will be deployed. Then, go to the API Gateway service and look for your API named "users-app."

- Now, go to the "users-app" API, navigate to the stages tab on the left sidebar, and copy the provided invoke URL.
- This is your main URL for the basic API endpoints.
Step 06: Testing endpoints
- Create a new user endpoint.
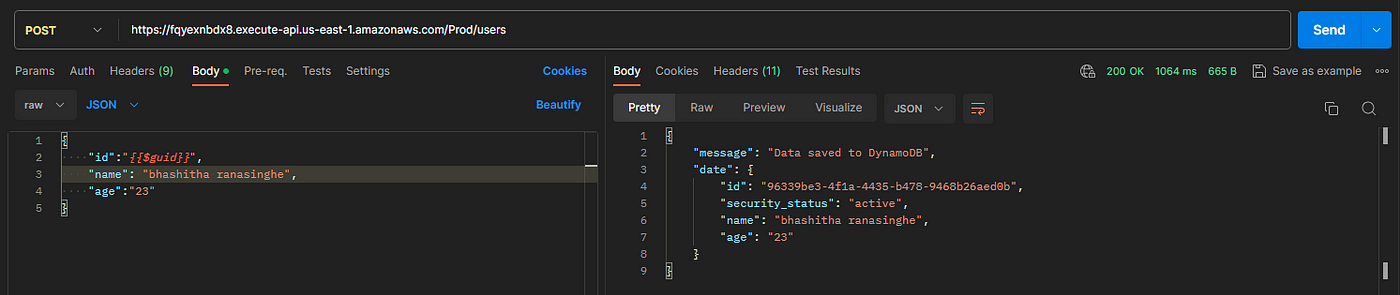
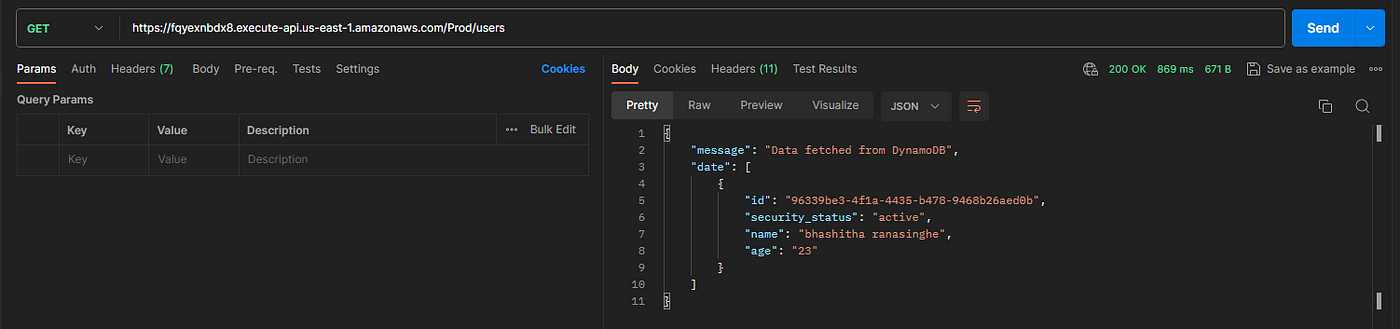
- Get all users endpoint
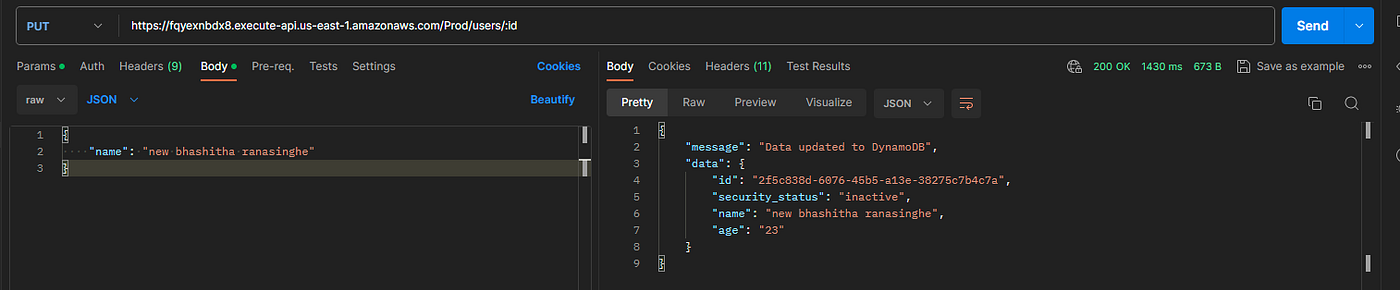
- Update user endpoint
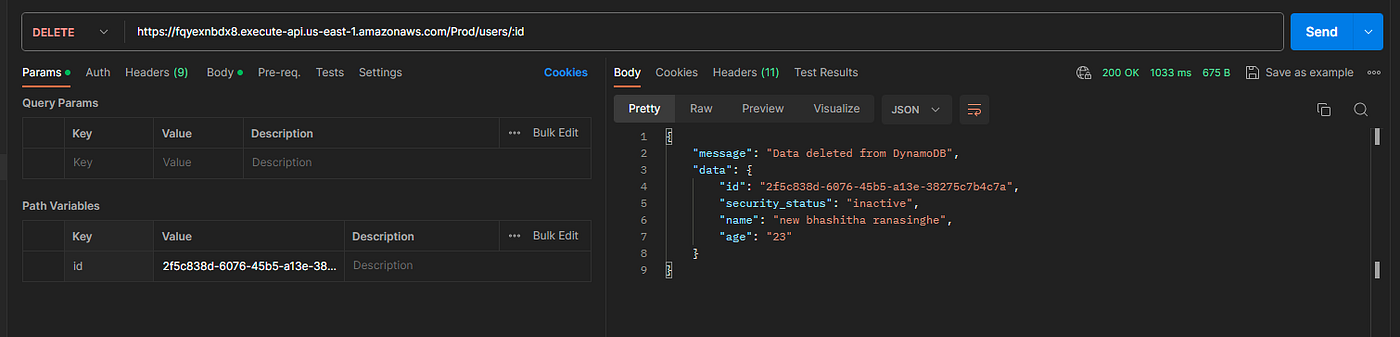
- Delete user endpoint
Conclusion
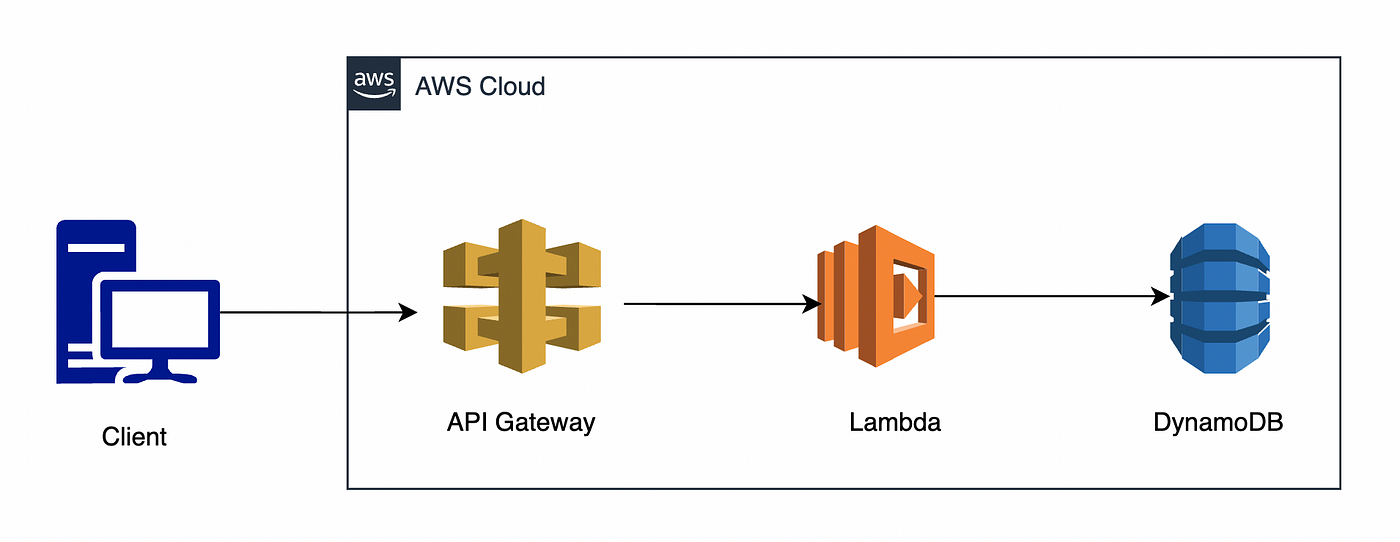
Congratulations! You've successfully set up the foundation for building scalable and cost-efficient serverless APIs on AWS using SAM, Lambda, DynamoDB, and API Gateway. By following the outlined prerequisites and steps, you've configured your AWS environment, established an administrative user, and created the necessary infrastructure for your serverless application.
Your code, written in Node.js and deployed through AWS SAM, provides functionality for managing users in a DynamoDB table. The defined API endpoints allow you to perform operations such as creating, retrieving, updating, and deleting users.
With your serverless architecture in place, you've embraced the simplicity, scalability, and cost-effectiveness of serverless computing. Now, take the next steps and test your endpoints, ensuring that your API functions as expected. This journey into serverless development marks a shift towards a more streamlined and code-centric approach, freeing you from the complexities of traditional server management. Happy coding!
Comments
Loading comments…