The idea of having loosely-coupled services as the primitive building blocks of a system — as opposed to monolithic development — isn’t exactly a hot take. Microservices offer modularity, independent scalability, and the ability to change, fix, and adopt new things as and when needed.
The problem, of course, is the word developers universally hate — a rewrite. Monoliths can contain years worth of accumulated code. How do you even begin to untangle the patchwork of bug fixes, legacy workarounds, intricately woven dependencies, and duplicated code that probably doesn’t belong?
Full, painful, lengthy rewrites done in one go have too much potential for both financial and strategic mistakes that can sink your company (see: Netscape 6). You need something that can help you migrate from monolithic architectures to microservices in a slightly less disastrous way.
So what’s to be done? Let’s talk about the combined power of two strategies: the Backend for Frontend (BFF) and the Strangler pattern, the formidable synergy that exists between the two, and then build and migrate a full-stack app from a monolithic to a microservices-based backend using the combination.
The app we’ll build and migrate to demonstrate this combination.
The Strangler Pattern
“[the huge strangler figs that] grow into fantastic and beautiful shapes, meanwhile strangling and killing the tree that was their host.”
- Martin Fowler, The Strangler Application
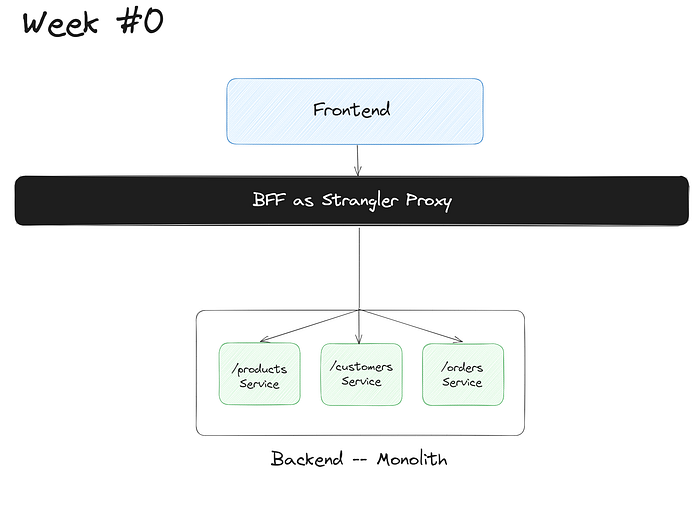
Basically, you throw an intermediary interface/proxy in front of the old monolith. While it starts out as a pass-through for incoming requests to the monolith, over time this new interface would route all of the old monolith’s functionality to new microservices, as they are implemented, one at a time. It would grow around the old monolith — “strangling” the older architecture — which you can then safely decommission, having moved over entirely to the microservices.
The idea is incremental adoption. You reduce the risks inherent with a ‘Big Bang’ rewrite, retaining the possibility to deliver new features while refactoring the older monolith. You have a new system in production right off the bat — even if it’s just a proxy initially — and with incremental development you get feedback ASAP, and can course correct accordingly.
But that’s still not an optimal solution, I’d say. Any such rewrite would always need considerable rewiring to go along with it. The issue is twofold, actually:
- Even with the perfect starting point — a modular monolith, with clearly defined boundaries between its components (read here) — each and every single chunk/component of the old monolith you “strangle” in favor of a fancy new microservice will first need a communication bridge built between the old and new systems.
- Obviously, you’d also have to redirect frontend calls from the old monolith to the new microservices — each and every single occurrence of this in client code — and then stitch together the response.
In a real-world scenario, an app of this scale would have dozens — even hundreds — of such rewiring.
Welcome to Adapter Hell.
BFFs To The Rescue
Turns out, the two issues we’ve just talked about are exactly the things the Backends-for-Frontends (BFF) pattern can solve.
In the BFF pattern — first popularized by SoundCloud, and detailed by Sam Newman in this blog post — separate backend services are created for different frontend clients (or user experiences) to cater to their specific needs. Each backend service is tailor made for a specific frontend, encapsulating client-specific logic, and optimizing data aggregation, performance, and security for that specific client, while enabling independent development and scaling.
With the BFF server being the only ‘backend’ as far as your client is concerned, you hide the real backend completely from the client. Your client apps are no longer making direct calls to downstream services. It is their much faster dedicated server layer (the BFF) which is doing so to fetch, aggregate, and cache data needed by the client.
You can see where I’m going with this.
This means you’d be free to use the Strangler pattern on your monolith, extracting out functionality to the new microservice incrementally — while a BFF server is your Strangler’s proxy. No exhausting changes, rerouting, or adapters will ever be needed for your frontend.
The BFF layer would call either the microservice or the monolith to get the data the client needs, while the latter remains blissfully unaware of the changes going on behind the scenes. This would go on until, eventually, all data is obtained via calls to microservices, and then the monolith can safely be decommissioned.
Let’s take a look at an example migration to demonstrate this. We’ll be using WunderGraph — a BFF framework, to consolidate our data dependencies (initially, the public API offered by our monolith, and then, when that monolith is broken out into three microservices) into an unified API that we can query and mutate using GraphQL or TypeScript operations.
Starting from a Monolithic API
We’ll start with a monolithic API, set up a BFF server for our NextJS client that uses it, and then migrate that monolith to microservices without a single change in our NextJS app. Our BFF will absorb the changes, shielding the client from underlying changes completely.
Step 1: The Express.js API
So this is our API, a service that provides product, customer, and order information. Let’s stick to serving static data for the purposes of this guide.
const express = require("express");
const app = express();
const { customers, products, orders } = require("./mockdata");

app.get("/customers", (req, res) => {
  res.json(customers);
});

app.get("/customers/:id", (req, res) => {
  const customerId = parseInt(req.params.id);
  const customer = customers.find((c) => c.id === customerId);
  if (!customer) {
    res.status(404).send("Customer not found");
  } else {
    res.json(customer);
  }
});

app.get("/products", (req, res) => {
  res.json(products);
});

app.get("/products/:id", (req, res) => {
  const productId = parseInt(req.params.id);
  const product = products.find((p) => p.id === productId);
  if (!product) {
    res.status(404).send("Product not found");
  } else {
    res.json(product);
  }
});

app.get("/orders", (req, res) => {
  res.json(orders);
});

app.get("/orders/:id", (req, res) => {
  const orderId = parseInt(req.params.id);
  const order = orders.find((o) => o.id === orderId);
  if (!order) {
    res.status(404).send("Order not found");
  } else {
    res.json(order);
  }
});

app.listen(3001, () => {
  console.log("API server started on port 3001");
});
Pretty self explanatory. Next, let’s create an OpenAPI spec for this. There are tools that can automate this for you, but if you’d like to skip ahead, here’s mine. It’s far too verbose to be included within the article itself.
> 💡 An OpenAPI/Swagger specification is a human-readable description of your RESTful API. This is just a JSON or YAML file describing the servers an API uses, its authentication methods, what each endpoint does, the format for the params/request body each needs, and the schema for the response each returns.
Our API here is a data dependency — WunderGraph works by introspecting these (by reading their OpenAPI specs), and consolidating them all into a single, unified virtual graph, that you can then define operations on, and serve the results via JSON-over-RPC. Now that your backend is up and running, let’s create a BFF server with WunderGraph, and set up a NextJS frontend too, while we’re at it.
Step 2: The BFF
We’ll use WunderGraph’s CLI tool for this.
> npx create-wundergraph-app my-project -E nextjs

> npm install
This sets up a basic NextJS 13 project (the tried-and-true pages router), TailwindCSS for styling, and a .wundergraph directory in your project root that contains config, operations you’ll define, and the unified, typesafe API we’ll eventually generate.
But first, we’ll deal with the BFF API.
Notice this NextJS project needs npm start to get going. Check out the package.json file to know why.
"scripts":  {
	"start":  "run-p dev backend wundergraph open",
	"wundergraph":  "wunderctl up --logs",
	"open":  "wait-on -d 500 http://localhost:9991 && open-cli http://localhost:3000",
	"backend":  "cd backend && npm run start:all",
	"build:wundergraph":  "wunderctl generate",
	"build:next":  "next build",
	"build":  "npm run build:wundergraph && npm run build:next",
	"dev":  "next dev",
	"check":  "tsc --noEmit",
	"test":  "jest",
	"test:playwright":  "npx -- playwright test"
}
The wunderctl is the WunderGraph CLI. Let’s quickly explain what these commands do:
wunderctl up— Starts the WunderGraph BFF serverwunderctl generate— WunderGraph uses code generation to create typesafe APIs from your config-as-code. This is executed automatically as part ofwunderctl up, but you can run it as and when needed, too.run-p— This isn’t part of WunderGraph itself; this is the npm-run-all package being used to run these scripts (dev,backend,wundergraph, andopen) in parallel.
Anyway, try out npm start, and if you see an example/splash page with data from the SpaceX API, everything’s working correctly. Now, let’s configure our API dependency as config-as-code.
./.wundergraph/wundergraph.config.ts
//...
const monolith = introspect.openApi({
  apiNamespace: "monolith",
  source: {
    kind: "file",
    filePath: "../backend/openapi-monolith.json",
  },
});

// configureWunderGraph emits the configuration
configureWunderGraphApplication({
  apis: [monolith],
  //...
});
Get rid of the SpaceX API, and include this in its place. Notice the apis dependency array. Any data dependency (OpenAPI REST, GraphQL, Federations, PostgreSQL databases, etc.) you introspect with WunderGraph will need to be defined as a variable, then included in that dependency array.
Next, we’ll create data Operations using GraphQL, that’ll use this API. Note that the WunderGraph SDK namespaces these based on the data source you defined in wundergraph.config.ts
./.wundergraph/operations/AllCustomers.graphql
query {
  customers: monolith_customers {
    id
    name
    email
    address
  }
}
./.wundergraph/operations/AllProducts.graphql
query allProducts {
  products: monolith_products {
    id
    name
    price
  }
}
./.wundergraph/operations/AllOrders.graphql
query {
  orders: monolith_orders {
    id
    status
    total
    products {
      name
      price
    }
    customer {
      name
      address
    }
  }
}
With WunderGraph, you’re only using GraphQL to define these queries/mutations at build time. No GraphQL endpoint is ever exposed. These operations you just defined will be served as hashed, persisted queries, as JSON-over-RPC at runtime, mounted and accessible at a unique endpoint, like:
http://localhost:9991/operations/AllOrders
And then you could just fetch data using that endpoint. If you’re using React, NextJS, SolidJS, or a data fetching library like SWR or react-query, though, WunderGraph generates a typesafe client for you anyway.
Step 3: The Next.JS Frontend
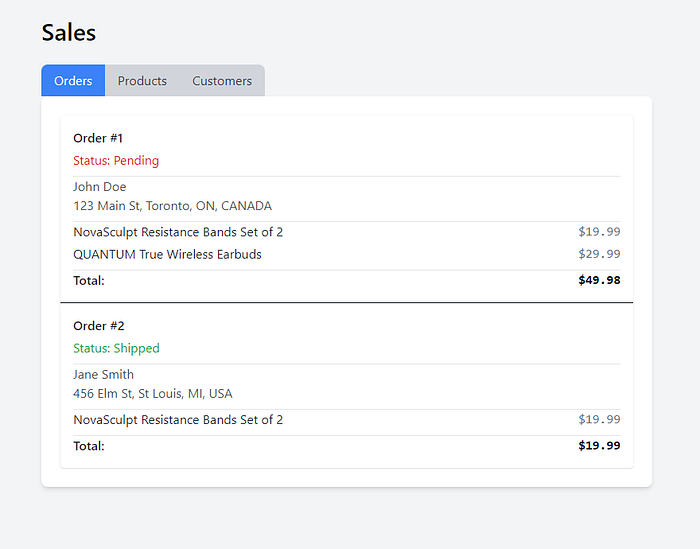
Our UI/UX design is dead simple. A tabbed display — one for each of the three kinds of information we’ll need.
./pages/index.tsx
import { NextPage } from "next";
import { useState } from "react";

import Orders from "../components/Orders";
import Customers from "../components/Customers";
import Products from "../components/Products";

const Home: NextPage = () => {
  const [activeTab, setActiveTab] = useState("orders");
  type TabContents = Record<string, JSX.Element>;

  // call in main content area with tabContents[tab name]
  const tabContents: TabContents = {
    products: <Products />,
    customers: <Customers />,
    orders: <Orders />,
  };

  return (
    <div className="flex w-full h-screen bg-gray-100">
      <div className="container mx-auto py-8">
        <h1 className="text-3xl font-semibold mb-6">Sales</h1>
        <div className="flex">
          <button
            className={`px-4 py-2 rounded-tl-lg ${
              activeTab === "orders"
                ? "bg-blue-500 text-white"
                : "bg-gray-300 text-gray-700"
            }`}
            onClick={() => setActiveTab("orders")}
          >
            Orders
          </button>
          <button
            className={`px-4 py-2 ${
              activeTab === "products"
                ? "bg-blue-500 text-white"
                : "bg-gray-300 text-gray-700"
            }`}
            onClick={() => setActiveTab("products")}
          >
            Products
          </button>
          <button
            className={`px-4 py-2 rounded-tr-lg ${
              activeTab === "customers"
                ? "bg-blue-500 text-white"
                : "bg-gray-300 text-gray-700"
            }`}
            onClick={() => setActiveTab("customers")}
          >
            Customers
          </button>
        </div>
        <div className="bg-white p-6 rounded-lg shadow-md">
          {tabContents[activeTab]}
        </div>
      </div>
    </div>
  );
};

export default Home;
./components/Customers.tsx
This is where we’ll see the typesafe data-fetching hooks WunderGraph generates for us, after we’ve defined our operations. This is using Vercel’s SWR under the hood (and can be modified to use react-query if you wish), and all you have to do is pass in the name of the operation (and inputs, if any) you’ve created.
import { useQuery } from "./generated/nextjs";

function Customers() {
  // typesafe data-fetching hook generated by WunderGraph
  const { data } = useQuery({
    operationName: "AllCustomers", // corresponds to AllCustomers.graphql
  });

  return (
    <div className="bg-white rounded shadow">
      <ul className="divide-y divide-gray-900">
        {data?.customers?.map((customer) => (
          <li key={customer.id} className="p-4 hover:ring">
            <div className="space-y-1">
              <div className="text-gray-800 font-medium">
                Customer ID: {customer.id}
              </div>
              <div className="text-gray-600">
                <strong>Name: </strong>
                {customer.name}
              </div>
              <div className="text-gray-600">
                <strong>Email: </strong>
                {customer.email}
              </div>
              <div className="text-gray-600">
                <strong>Address:</strong> {customer.address}
              </div>
            </div>
          </li>
        ))}
      </ul>
    </div>
  );
}

export default Customers;
./components/Products.tsx
import { useQuery, withWunderGraph } from "./generated/nextjs";

function Products() {
  const { data } = useQuery({
    operationName: "AllProducts",
  });

  return (
    <div className="bg-white rounded shadow">
      <ul className="divide-y divide-gray-900">
        {data?.products?.map((product) => (
          <li key={product.id} className="p-4 hover:ring ">
            <div className="flex items-center justify-between space-x-2">
              <div className="text-gray-800 font-medium">{product.name}</div>
              <div className="text-gray-500 font-mono">${product.price}</div>
            </div>
          </li>
        ))}
      </ul>
    </div>
  );
}

export default withWunderGraph(Products);
./components/Orders.tsx
import { useQuery } from "./generated/nextjs";

function Orders() {
  const { data } = useQuery({
    operationName: "AllOrders",
  });

  return (
    <div className="bg-white rounded shadow">
      <ul className="divide-y divide-gray-900">
        {data?.orders?.map((order) => (
          <li key={order.id} className="p-4 hover:ring">
            <div className="space-y-1">
              <div className="text-gray-800 font-medium">Order #{order.id}</div>
              <div className="space-y-2 divide-y divide-gray-200">
                <div
                  className={`text-${
                    order.status === "Shipped" ? "green" : "red"
                  }-600`}
                >
                  Status: {order.status}
                </div>
                <div>
                  <div className="text-gray-600">{order.customer?.name}</div>
                  <div className="text-gray-600">{order.customer?.address}</div>
                </div>
                <div>
                  <div className="space-y-1">
                    {order.products?.map((product) => (
                      <div className="flex items-between justify-between">
                        <div className="text-gray-800 ">{product.name}</div>
                        <div className="text-gray-500 font-mono">
                          ${product.price}
                        </div>
                      </div>
                    ))}
                  </div>
                </div>
                <div className="flex items-between justify-between">
                  <span className="text-gray-800 font-medium">Total:</span>
                  <span className="font-bold font-mono">${order.total}</span>
                </div>
              </div>
            </div>
          </li>
        ))}
      </ul>
    </div>
  );
}

export default Orders;
That’s it, you’re done!
…and on to Microservices.
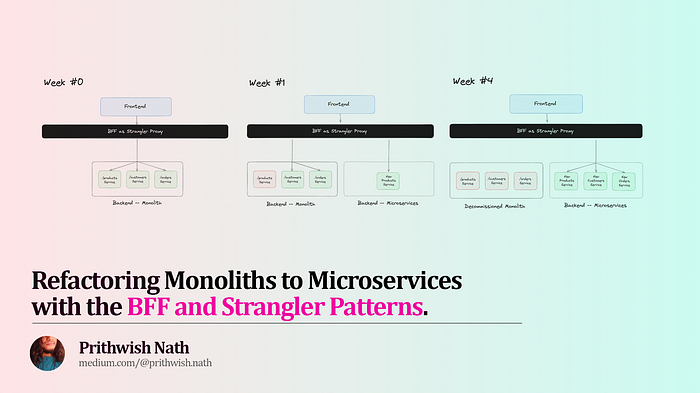
So that’s what your app looks like on Week 0, with a monolithic backend API being consumed by a BFF for the NextJS frontend.
Now, let’s look at what exactly changes when you migrate to microservices. Here’s where you’d use the Strangler pattern to break up that monolith into microservices.
Let’s say, by Week 1, you still have the existing monolithic API, but with just products as a microservice. What would that look like? What changes would you need?
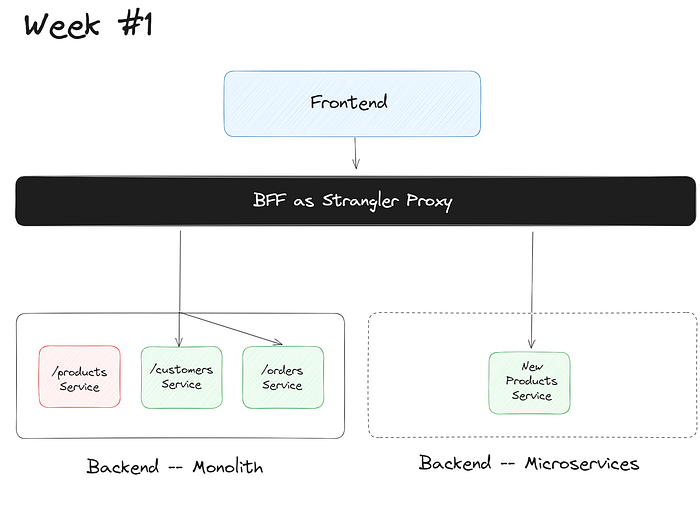
The Express.js app for this microservice is pretty simple — all you’d need to do is extract out the code for this service, and create its own OpenAPI specification.
const express = require('express');
const app = express();
const { products } = require('./mockdata');

app.get('/products', (req, res) => {
	res.json(products);
});

app.get('/products/:id', (req, res) => {
	const product = products.find(p => p.id === parseInt(req.params.id));
	if (!product) {
		res.status(404).send('Product not found');
	} else {
		res.json(product);
	}
});

On the BFF layer, this is a new data dependency, so you’d have to add it to your `wundergraph.config.ts`, as before.

app.listen(3002, () => {
	console.log('Product catalog service started on port 3002');
});
On the BFF layer, this is a new data dependency, so you’d have to add it to your wundergraph.config.ts, as before.
// ...
// New microservice = new data dependency. Add it.
const products = introspect.openApi({
  apiNamespace: "products",
  source: {
    kind: "file",
    filePath: "../backend/openapi-products.json",
  },
});

// Old data dependency -- the monolith -- stays.
const monolith = introspect.openApi({
  apiNamespace: "monolith",
  source: {
    kind: "file",
    filePath: "../backend/openapi-monolith.json",
  },
});

// configureWunderGraph emits the configuration
configureWunderGraphApplication({
  apis: [products, monolith], // add the new microservice to the dependency array
  // ...
});
Of course, since WunderGraph operations are namespaced, you’d have to change the GraphQL Operation for AllProducts.graphql to reflect the new data dependency.
./.wundergraph/operations/AllProducts.graphql
query AllProducts {
  products: products_products {
    id
    name
    price
  }
}
What about on the frontend? What changes would you need there?
// ...
function Products() {
  // No changes needed!
  const { data } = useQuery({
    operationName: "AllProducts",
  });
  // ...
}

export default withWunderGraph(Products);
Absolutely nothing.
This is why the Backends-for-Frontends pattern synergizes perfectly with the Strangler pattern. Your BFF server has eliminated all direct calls from the frontend to the backend, insulating your NextJS client from any change to any downstream service or data dependency.
And of course, now you’d continue with the migration, and by, say, Week 4…

Developers are terrible with time estimates.
…you’d have three microservices — products, customers, and orders — all with their own OpenAPI specs (1 2 3) that’ll be consumed by WunderGraph like so:
./.wundergraph/wundergraph.config.ts
// ...
// Fancy new Microservices!
const products = introspect.openApi({
  apiNamespace: "products",
  source: {
    kind: "file",
    filePath: "../backend/openapi-products.json",
  },
});
const customers = introspect.openApi({
  apiNamespace: "customers",
  source: {
    kind: "file",
    filePath: "../backend/openapi-customers.json",
  },
});
const orders = introspect.openApi({
  apiNamespace: "orders",
  source: {
    kind: "file",
    filePath: "../backend/openapi-orders.json",
  },
});

// Decommissioned old monolith
// const monolith = introspect.openApiV2({
// apiNamespace: 'monolith',
// source: {
// kind: 'file',
// filePath: '../backend/openapi-monolith.json'
// }
// })

// configureWunderGraph emits the configuration
configureWunderGraphApplication({
  apis: [products, customers, orders], // monolith omitted
  // ...
});
Three data sources — microservices — to replace the old monolithic API.
Next, make the necessary namespacing changes for the new GraphQL operations (you already have AllProducts.graphql by now) :
./.wundergraph/operations/AllCustomers.graphql
query {
  customers: customers_customers {
    id
    name
    email
    address
  }
}
./.wundergraph/operations/AllOrders.graphql
query {
  orders: orders_orders {
    id
    status
    total
    products {
      name
      price
    }
    customer {
      name
      address
    }
  }
}
And you’re done! As said before, your NextJS frontend code remains wholly unchanged.
Congratulations, you’ve successfully migrated your monolithic API to a microservices architecture, bypassing the drawbacks and risks of the Strangler pattern by using a Backend-for-Frontend server.
Where to go from here?
Refactoring a monolithic app to microservices requires more than just technical prowess and elbow grease. Every developer ever has felt the urge of a full rewrite to make things better, but that’s just way too much financial and strategic risk.
The Strangler pattern helps by providing a roadmap for incremental adoption. With its gradual and adaptive approach, it helps mitigate the inherent risks of migration by allowing seamless integration of new services while retiring legacy components organically. But there’s still so much rewiring needed.
The Backend-for-Frontends (BFF) pattern is exactly the missing piece here, allowing you to decouple the frontend from the backend in a way that’s meaningful enough to shield the former from any changes taking place in the latter — cutting down on the need for complex rerouting and adapters, making it the perfect compliment to the Strangler pattern.
And there’s no better way to create flexible, typesafe, secure BFF layers than with WunderGraph. Check out their docs here, and their helpful Discord community here.
Comments
Loading comments…