Introduction
Password security is more important than ever in today’s digital age. With so many online accounts and services requiring passwords, it can be difficult to keep track of all your login credentials. That’s where password management systems come in. Online password managers are a convenient way to store and manage passwords, but they can also present certain risks. They can be vulnerable to security breaches, just like any other online service, or If a hacker gains access to your password manager account, they can potentially gain access to all of your online accounts similarly there can be many scenarios.
With an offline password manager, you have complete control over your password data. You can choose where to store it, how to back it up, and how to protect it. You’re not dependent on a third-party service provider to keep your data safe. You don’t require an internet connection to access your passwords, which means that there is no risk of hacking or data breaches via the internet.
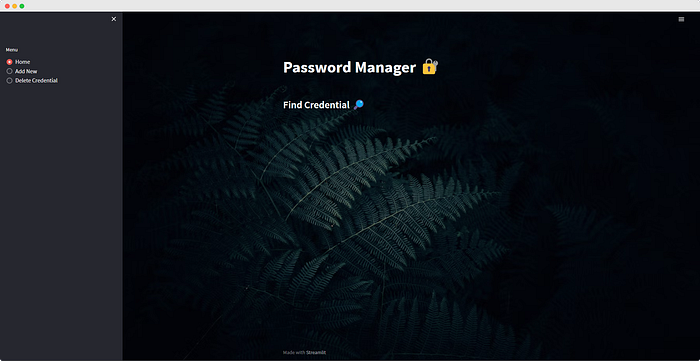
In this blog post, I’ll show you how to create a password management application using Python, Streamlit, and SQLite3. Here’s how the final product will look like 👇
This app was built in Streamlit! Check it out and visit https://streamlit.io for more awesome community apps.
The main features of our password management system include the ability to add, view, and delete passwords from an SQLite3 database using a Streamlit user interface. We will cover from scratch to the hatch. Here’s an outline of the steps we’ll cover in this blog post:
- Setting up the Environment
- Creating the Database
- Creating the User Interface
- Defining Database Operations
- Conclusion

Step 1: Setup the Environment
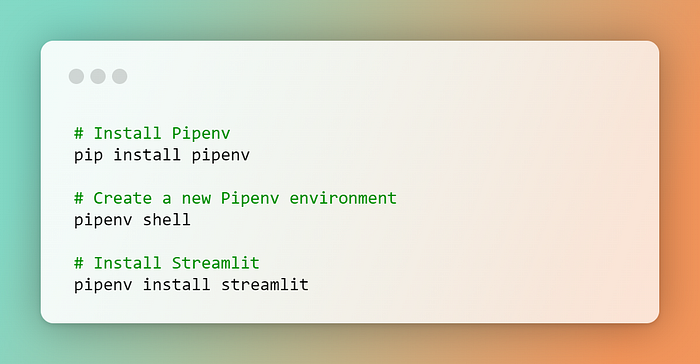
Before we dive into the code, we need to make sure we have the necessary tools and dependencies installed. Since the SQLite module comes pre-installed with Python, so you don’t need to install any additional libraries except for Streamlit. We can do this using pip, the Python package manager. We will create a new directory for our project, and create a pipenv environment within that directory. Open the command prompt or terminal and install pipenv using pip. Use the pipenv shell command to create a new virtual environment for your project and then install streamlit within that environment using pipenv.
Setting up a virtual environment:
Or, if you don’t want to go through these steps, I have already created a batch file in the Project Repository. All you have to do is to run by double-clicking the file setup_environment.bat from within the project folder.
Step 2: Creating the Database
Why SQLite?
SQLite is a software library that provides a relational database management system. This module contains functions for performing persistent CRUD operations on SQLite databases using SQL (Structured Query Language). SQLite is a popular choice for embedded systems and mobile applications because it is lightweight, portable, and requires minimal setup. In Python, you can use the sqlite3 module to interact with SQLite databases.
Basics
To use sqlite3, you first need to connect to a database using the connect() function, which takes the name of the database file as an argument. If the database file does not exist, SQLite will create a new one. Once you have a connection to the database, you can execute SQL commands using the execute() method of the connection object. You can also use other methods such as fetchone() and fetchall() to retrieve one row or all rows of query data respectively and the commit() method saves any changes made to the database. Learn more from the official documentation.
Database Design
For our Password Manager application, we need to create something that can interact with an SQLite3 database in order to retrieve, store, update, and delete password information for any social account or website. For this app we are going to consider 5 values(You can add as many based on your requirement) — Application/Website name, Username, Password, Email Address, and URL of that website.
Creating the Table
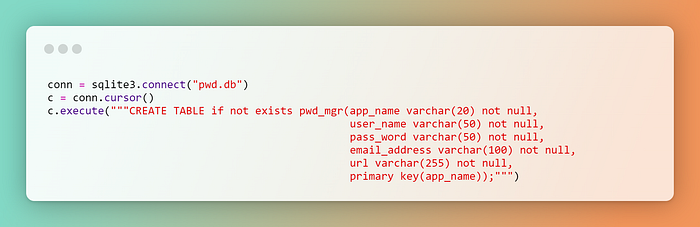
Here we are going to create a database connection by calling the connect() function with the name of the database file"pwd.db"(or creates it if it doesn’t already exist). Then inside the database, we’ll create a new table named pwd_mgr with columns for app_name, user_name, pass_word, email_address, and url. The primary key(app_name) constraint ensures that the app_name column is unique. The if not exists clause is used to check if the table already exists. If the table does not exist, it is created. If the table already exists, the statement is ignored and execution continues.
Creating the Table:
Connection vs Cursor
Here we have a connection object conn which is created using sqlite3.connect() function. Then we have created a cursor using the cursor() method of a connection object. A cursor serves as an interface to a database and allows Python code to interact with the database and manipulate data in a result set. Once the cursor is created, SQL statements can be executed using the cursor’s execute() method. Cursors also provide methods to fetch data from the result set, such as fetchone(), fetchmany(), and fetchall(). The cursor object c is used to execute SQL statements on the database.
In a nutshell, a connection is the entry point for accessing an SQLite database, while a cursor is used to navigate and manipulate the data within the result sets returned by SELECT statements.
So our database is ready and is waiting for being populated with the values.
Let’s not keep the guy waiting for longer. For that, we’ll quickly create some user interface for taking values as user input, which brings us to our next step.
Step 3: Defining the User Interface
We’ll use Streamlit to create a web app with four basic functionalities for viewing, adding, updating, and deleting credentials.
The UI is completely up to you on how you want to customize it. Here we’ll start by creating a simple GUI application with interactive components and conditional rendering based on user input.
Creating Basic UI:
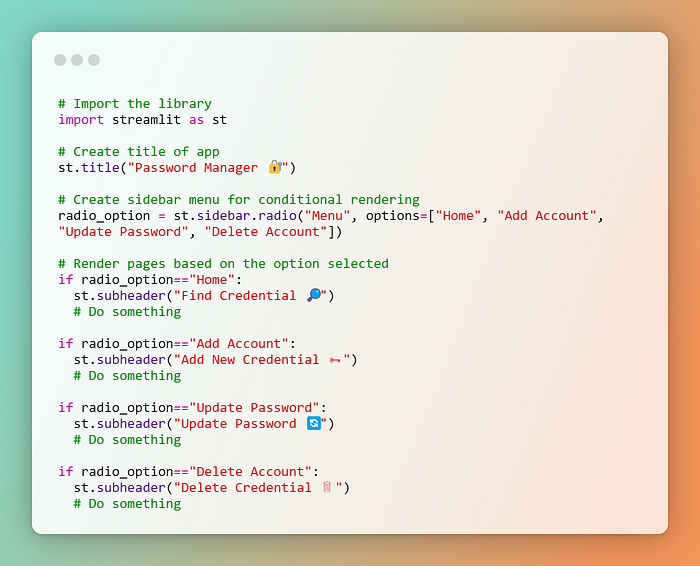
The first line imports the Streamlit library and assigns it the alias st. This alias is used throughout the code to refer to functions from the Streamlit library. We will create a sidebar menu using st.sidebar.radio() function with four options: "Home", "Add Account", "Update Password", and "Delete Account". The selected option will be stored in the radio_option variable.
The if statements check the value of radio_option to determine which subheader(this will be basically different pages) to display in the main content area.
This is how rapidly you can build any data app using streamlit 🔥. It is literally fun ⚡.
Display Credentials
This will be the homepage of the application where we will display the credentials by querying through the database. It will make sense only if there is at least a single credential present in the table. We will start right from there, by checking if a variable db_size is greater than 0. If it is, the code populates a select box with application names, retrieves the credentials for the selected application from a database using the get_cred_by_app() function(which we will cover in the next section), and displays the credentials in the GUI using various Streamlit functions.
Retrieve Data:
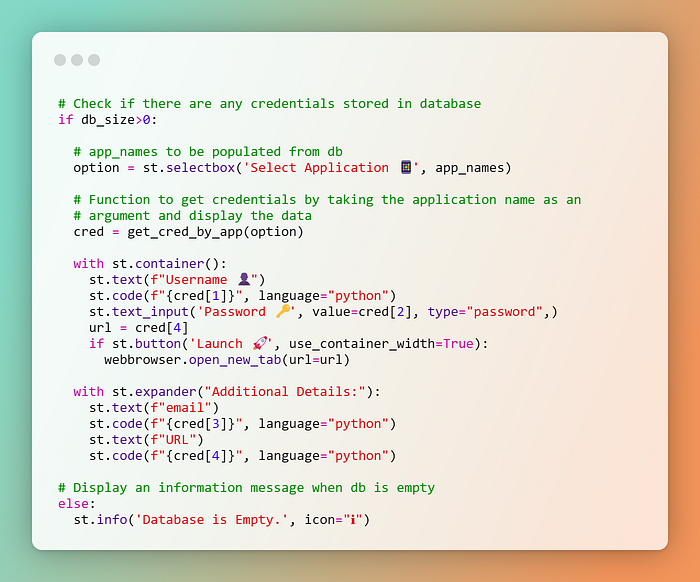
Here’s how the workflows. If the db_size variable is greater than 0, the following happens:
- A select box is created using the
st.selectbox()function and the options are populated from the database. The selected value is stored inoptionvariable. - The
get_cred_by_app()function is called by sendingoptionas an argument to retrieve the credentials associated with that application. - The credentials are displayed in the GUI using various Streamlit components.
- A
Launchbutton is displayed using thest.button()function. When clicked, this button opens the URL associated with the selected application in a new browser tab using thewebbrowser.open_new_tab()function. - Additional details such as email and URL are displayed in an expander using the
st.expander()function.
If db_size is not greater than 0, the code displays an information message using the st.info() function with the text "Database is Empty".
Adding Credentials to Database
For this section, we need to create a form to add new data to a database and display feedback messages based on the success or failure of the insertion. We will begin by creating the User class for representing users’ credentials for a particular application or website. The __init__() method of the User class is defined to accept the parameters app_name, user_name, pass_word, email, and url to set the corresponding attributes of a User instance when instantiated.
Insert Data:
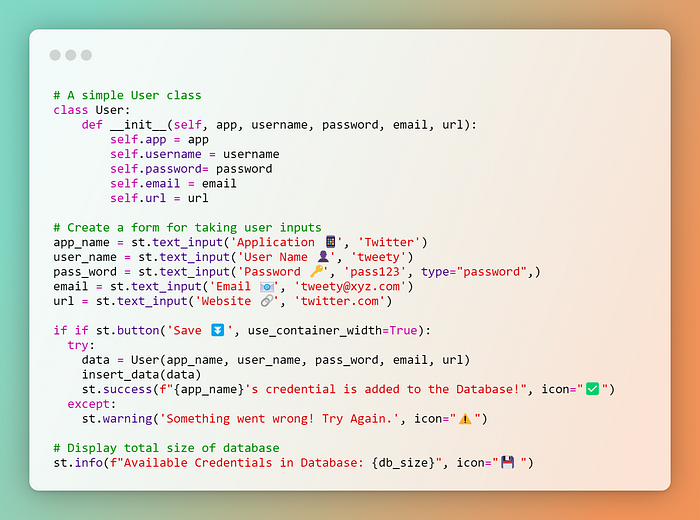
The form itself consists of several text input fields and a button. The text input fields are created using the st.text_input() function with appropriate labels and default values. When the Save ⏬ button is clicked the class object is passed to the insert_data() function which will store the attributes in the respective columns of the table.
Updating Passwords
Next, for this section, we will create a basic form that prompts the user to enter a new password, which they must confirm by retyping it in another text input field. If the two password fields match, the code updates the password for the selected account in the database by calling the update_password() function and passing the new password as an argument.
Update Data:

Deleting Credentials
Well, this brings us to the last section. Again, here we’ll first check whether the database has any credentials to delete. If the database is not empty, it will also provide an option to view the full database, and if the user agrees the code fetches all the app names, email addresses, and URLs from the database and displays them in a table format.
Delete Data:

Then, the user can select the account to delete from the dropdown list same as in the previous sections.
If the user clicks the Delete ❌ button, the remove_app_cred() function is called to remove the selected credential from the database, and a success message is displayed.
Step 4: Defining Database Operations
We have already discussed in detail about the **conn** object and what does a cursor do in Step 2. So understanding the following functions will be a lot easier now. This is the core part of our app. The GUI is interacting with the database via these functions.
Functions for Querying in Database:

SQL queries are used to INSERT, SELECT, UPDATE, and DELETE passwords from the database. Let’s go through each one of them:
insert_data(u): This function inserts a new row into thepwd_mgrtable with the providedUserobjectu. The values for each column in the row are extracted from the attributes ofu. This function uses a context manager to execute the SQL INSERT statement with the parameter values.get_cred_by_app(app): This function queries thepwd_mgrtable for a row with the providedappname and returns the first result as a tuple of(app_name, user_name, pass_word, email_address, url). This function uses a context manager to execute the SQL SELECT statement with the parameter values.remove_app_cred(app): This function deletes a row from thepwd_mgrtable that matches the providedappname. This function uses a context manager to execute the SQL DELETE statement with the parameter values.update_password(app, new_pass_word): This function updates the password of a row in thepwd_mgrtable that matches the providedappname. Thenew_pass_wordparameter specifies the new password to set. This function uses a context manager to execute the SQL UPDATE statement with the parameter values.

Here’s the complete script 📜 You can also check out the GitHub repo.
Complete Code for Password Manager Application:
import streamlit as st
import webbrowser
import sqlite3
from user import User

st.set_page_config(page_title="PMGR", page_icon="🚀" )
page_bg_img = f"""
<style>
[data-testid="stAppViewContainer"] > .main {{
background-image: url("Image-of-your-choice");
background-size: 100%;
display: flex;
background-position: top left;
background-repeat: no-repeat;
background-attachment: local;
}}
[data-testid="stHeader"] {{
background: rgba(0,0,0,0);
}}
[data-testid="stToolbar"] {{
right: 2rem;
}}
</style>
"""
st.markdown(page_bg_img, unsafe_allow_html=True)


conn = sqlite3.connect("pwd.db")
c = conn.cursor()
c.execute("""CREATE TABLE if not exists pwd_mgr (app_name varchar(20) not null,
                        user_name varchar(50) not null,
                        pass_word varchar(50) not null,
                        email_address varchar(100) not null,
                        url varchar(255) not null,
                    primary key(app_name)
                    );""")


def insert_data(u):
    with conn:
        c.execute("insert into pwd_mgr values (:app, :user, :pass, :email, :url)",
                  {'app': u.app, 'user': u.username, 'pass': u.password, 'email': u.email, 'url': u.url})

def get_cred_by_app(app):
    with conn:
        c.execute("select app_name, user_name, pass_word, email_address,
                   url FROM pwd_mgr where app_name = :name;", {'name': app})
        return c.fetchone()

def remove_app_cred(app):
    with conn:
        c.execute("DELETE from pwd_mgr WHERE app_name = :name", {'name': app})

def update_password(app,new_pass_word):
    with conn:
        c.execute("update pwd_mgr set pass_word = :pass where app_name = :name",
                  {'name': app, 'pass': new_pass_word})


st.title("Password Manager 🔐")
st.markdown('#')

c.execute("select count(*) from pwd_mgr")
db_size = c.fetchone()[0]

c.execute("select app_name from pwd_mgr")
app_names = c.fetchall()
app_names = [i[0] for i in app_names]

radio_option = st.sidebar.radio("Menu", options=["Home", "Add Account", "Update Password", "Delete Account"])

if radio_option=="Home":
    st.subheader("Find Credential 🔎")
    st.markdown("#####")
    if db_size>0:
        option = st.selectbox('Select Application 📱', app_names) # TO be populated from DB
        st.markdown("#####")
        cred = get_cred_by_app(option)
        with st.container():
            st.text(f"Username 👤")
            st.code(f"{cred[1]}", language="python")
            st.text_input('Password 🔑', value=cred[2], type="password",)
            st.markdown("####")
            url = cred[4]
            if st.button('Launch 🚀', use_container_width=True):
                webbrowser.open_new_tab(url=url)
        st.markdown('##')
        with st.expander("Additional Details:"):
            st.text(f"email")
            st.code(f"{cred[3]}", language="python")
            st.text(f"URL")
            st.code(f"{cred[4]}", language="python")
    else:
        st.info('Database is Empty.', icon="ℹ️")

if radio_option=="Add Account":
    st.subheader("Add New Credential 🗝️")
    st.markdown("####")
    app_name = st.text_input('Application 📱', 'Twitter')
    user_name = st.text_input('User Name 👤', 'tweety')
    pass_word = st.text_input('Password 🔑', 'pass123', type="password",)
    email = st.text_input('Email 📧', 'tweety@xyz.com')
    url = st.text_input('Website 🔗', 'twitter.com')
    st.markdown("####")
    if st.button('Save ⏬', use_container_width=True):
        try:
            data = User(app_name, user_name, pass_word, email, url)
            insert_data(data)
            st.success(f"{app_name}'s credential is added to the Database!", icon="✅")
        except:
            st.warning('Something went wrong! Try Again.', icon="⚠️")
    st.markdown("####")
    st.info(f"Available Credentials in Database: {db_size}", icon="💾")

if radio_option=="Update Password":
    st.subheader("Update Password 🔄")
    st.markdown('#####')
    if db_size>0:
        up_app = st.selectbox('Select an Account you want to update 👇', app_names)
        st.markdown('####')
        new_pass_1 = st.text_input('New Password ', 'new123', type="password",)
        new_pass_2 = st.text_input('Confirm New Password', 'new123', type="password",)
        if new_pass_1==new_pass_2:

            if st.button('Update ⚡️', use_container_width=True):
                try:
                    update_password(up_app,new_pass_1)
                    st.success(f"{up_app}'s password is updated!", icon="✅")
                except:
                    st.info(' Database is Empty. Go to Create to add Data ⬅️', icon="ℹ️")
        else:
            st.warning("Password don't match! Try Again.", icon="⚠️")
    else:
        st.info('Database is Empty.', icon="ℹ️")

if radio_option=="Delete Account":
    st.subheader("Delete Credential 🗑️")
    st.markdown("#####")
    if db_size>0:
        agree = st.checkbox('View Full Database')
        if agree:
            c.execute("select app_name, email_address, url from pwd_mgr")
            results = c.fetchall()
            st.table(results)
        st.markdown('#####')
        delt = st.selectbox('Select an Account you want to delete 👇', app_names)
        st.markdown('####')
        if st.button('Delete ❌', use_container_width=True):
            try:
                remove_app_cred(delt)
                st.success(f"{delt}'s Credential is removed from Database!", icon="✅")
            except:
                st.info(' Database is Empty. Go to Create to add Data ⬅️', icon="ℹ️")
    else:
        st.info('Database is Empty.', icon="ℹ️")
Conclusion
Throughout this blog post, we learned how to create a python virtual environment, install the necessary packages, create the SQLite database, define a table, then create a user interface using streamlit then finally create functions for inserting, retrieving, updating, and deleting data from the database. By following these steps, we were able to create a fully functional offline password manager app, where we have complete control over our data.
However, there are also some drawbacks to offline password managers. It may be more difficult to access your passwords on different devices or share them with others. You need to make sure you regularly back up your data. Overall, the choice between online and offline password managers will depend on your individual needs and preferences, and it’s important to carefully consider the pros and cons of each option.
Possible Enhancements
There are further steps that you can explore like adding user authentication for preventing unauthorized access, encrypting the data stored in the database, file system security, parameter binding, and firewall protection. By implementing these features, we can enhance the security and usability of the password manager app and make it more reliable for users to store and manage their passwords. It’s important to note that no single method can provide complete security. A combination of these methods can be used to secure a database.
Great job for making it to the end of this blog 👏👏👏
I hope you learned something new and enjoyed this article!
Adios 👋, See you in the next post!
I will try to bring up more Machine learning/Data science concepts and will try to break down fancy-sounding terms and concepts into simpler ones.
You can follow me Afaque Umer for more such articles.
Thanks for reading 🙏Keep learning 🧠 Keep Sharing 🤝 Stay Awesome 🤘
Comments
Loading comments…