Nowadays most of us are probably members of several Telegram groups that typically broadcast about job listings, deals for food and holidays, and news etc. Usually I am lazy or simply have no time to scour through the tons of messages for something I want.
So I decided that I wanted a bot or application that could do all the 'listening' and only alert me when posts of interest are detected by it. I did some research online to find out what is the most simple and efficient way with Python. In the end, I settled on Telethon that proved to be pretty straightforward.

Telethon
As stated on their landing page, Telethon is a wrapper that allows you to focus on building applications with Python without worrying too much about what is under the hood. Feel free to check out their website if you want to know more! But we shall move on with the setup.
Installation
The Python version in my environment was 3.7.4, and I am using a Macbook Pro. Other Python versions and Windows/Linux should work equally as well. Activate your conda environment in terminal:
$ conda activate <your_conda_environment_name>

$ pip3 install -U telethon --user

**# Run the following to check your telethon version:
**$ python3 -c "import telethon; print(telethon.__version__)"
And that's it for installation!
API ID and Hash
Next, you need your API id and hash that are tied to your Telegram account.
-
Proceed to https://my.telegram.org
-
Enter your phone number and confirmation code.
-
Click on 'API development tools'
-
Right under 'App configuration' you should see your 'App api_id' and 'App api_hash' — Copy them down and don't share it with others!
Use Case — Listening to Tuition Job Listings
Before I proceed, I want to use my example to illustrate what I achieved with Telethon. I am a member of a local tuition agency channel on Telegram that post tuition assignments regularly. These job ads cater to all kinds of subjects and levels i.e. primary school English, secondary three Math, or even university Physics etc.
Suppose I am a Physics/Math tutor and I only want to be notified of job ads that are related to physics and math. In addition, I only want to teach students above and below a certain grade/age. E.g. only secondary school and junior college (high school) students.
With close to hundreds of posts pertaining to different subjects and levels, it is difficult and time-consuming to slowly sieve out the ads that you want. It gets worse if you have joined other similar channels.
So for my case, I designed specifically 2 filters:
subjectFilter = ['physics', 'mathematics', 'maths', 'math']
levelFilter = ['sec', 'secondary', 'junior college', 'jc']
Only 1 Script Required
Let's take a look at the breakdown of the script:
Imports
import configparser
import json
import re
from telethon.errors import SessionPasswordNeededError
from telethon import TelegramClient, events, sync
from telethon.tl.functions.messages import (GetHistoryRequest)
from telethon.tl.types import (
PeerChannel
)
Your api_id and api_hash
api_id = <your_api_id>
api_hash = <your_api_hash>
Input channel and filters
**# Here you define the target channel that you want to listen to:
**user_input_channel = 'https://t.me/<channel_name>'

subjectFilter = ['physics', 'mathematics', 'maths', 'math']
levelFilter = ['sec', 'secondary', 'junior college', 'jc']
Main sauce
Few parts here to understand:
-
The async function listens for event coming from the target channel
-
newMessage reads the message text from the event parameter — this is the actual content of each message/post in the channel
-
For my use case, I want to filter out the subjects first using Regex.
-
If the message does contain the relevant subject texts (defined in subjectFilter, we look for relevant level next.
-
Finally, if the 2 layers of filtering return something, the client will forward the entire message (_event.message) _to the recipient defined using the parameter entity. Otherwise, nothing happens.
Do note that this client allows you to 'listen' to your normal chats with friends or families etc. It is not restricted to only channel. All you need is the channel name/link and username i.e. '@username123'. And also, '_me' is defined as your own personal account.
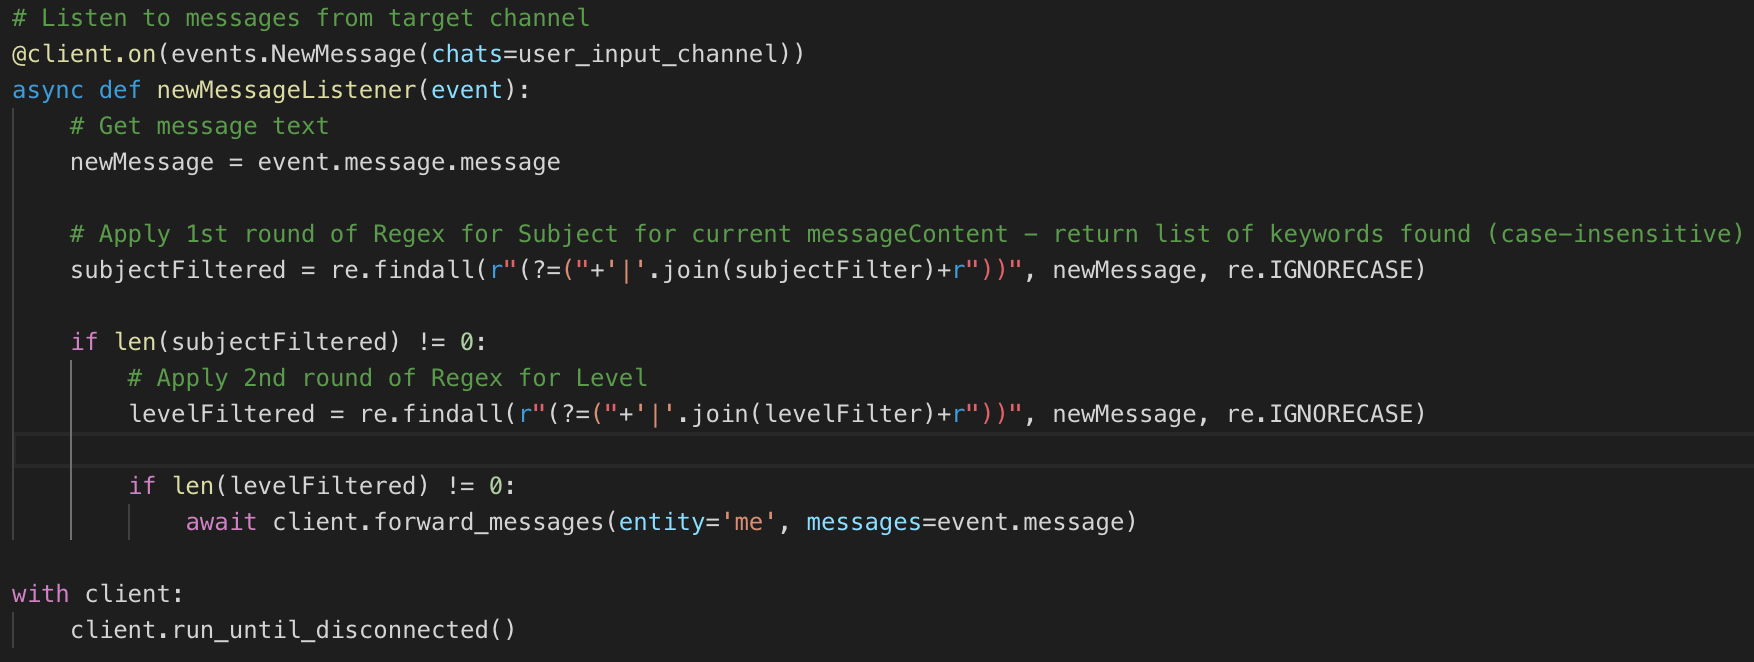 Figured it would be better to paste an image here for better indent and styling.
Putting everything together
Assuming that you have copied and pasted everything in the right order, you can save and run your script shortly. Open up your terminal and enter the following code:
**# Activate your conda environment, if you haven't done so
**$ conda activate <your_conda_environment>

**# Run the script to begin listening
**$ python main.py
How to know if it is working?
If you have defined a channel as your target channel, it might take awhile for you to test your script because you need to wait for the messages to come in.
Instead what you can do is this.
-
Set your target channel to be yourself
-
Set the entity to forward the message as someone else
**# Outside the cient: **user_input_channel = 'me'
**# Within the client: **await client.forward_messages(entity='@username', messages=event.message)
This way your client is listening to your 'Saved message' chat that can only be accessed by yourself. And you want to try forwarding messages to someone that you know, maybe your siblings or friends who don't mind some spamming.
Once that is all fixed, you can type some message with keywords defined in your filters. In my use case, I would type something like 'secondary physics' or 'sec math' etc. When your intended recipient has received your spams, you know your script is working just fine. Now you can tweak the parameters to your liking. You can also let the script run in the background so that you are constantly on the lookout for new messages.
In Summary,
We covered the following points:
-
Python environment and Telegram credential set up
-
Defining filters
-
Defining input and output channels
-
Putting everything together into a working script
I hope this is simple enough for you to get things started and make your life easier.
Comments
Loading comments…