
This article offers a practical demonstration of how RabbitMQ manages inter-service communication within a microservices architecture. We will utilize **amqplib**, a widely-used Node.js library that offers an API for interfacing with RabbitMQ.
What is RabbitMQ
RabbitMQ is an open-source message broker software that offers support for multiple API protocols including AMQP, STOMP, MQTT, and HTTP. In this discussion, our emphasis will be on RabbitMQ’s implementation of the AMQ Protocol.
What is AMQP
The Advanced Message Queuing Protocol (AMQP) stands as an open standard application layer protocol designed for message-oriented middleware in software systems. In the AMQP ecosystem, various critical components fulfill specific roles: Producers, responsible for transmitting messages; Consumers, designated to receive and process these messages; Queues, functioning as temporary storage for messages; Messages themselves, bearing data from producers to consumers; and Exchanges, serving as collection points for messages from producers, subsequently routing them to queues based on predefined exchange type rules, thus dictating message flow. Lastly, Bindings establishes connections between queues and exchanges, completing the fundamental links within the entire messaging workflow.

How to Install and Run RabbitMQ on Mac
To install RabbitMQ on your Mac run the following commands on your terminal:
brew updatebrew install rabbitmqbrew info rabbitmqbrew services start rabbitmq
Upon successful installation visit `http://localhost:15672/#/ on your browser to view the local RabbitMQ dashboard. The default login details are:
Username: guest
Password: guest
In case you are using Windows or another OS, kindly visit this link for installation guides rabbitmq.com
About Our Hands-On Application
The management of a particular school has chosen to divide its payment system into three distinct services, which are as follows:
- Fee Logger Service: Responsible for broadcasting information about the type of fee transactions made.
- Acceptance Fee Service: Handles the processing of acceptance fees within the school system.
- School/Hostel Fee Service: Manages the processing of school and hostel fees.
To maintain simplicity, this application will primarily log data to the console. The Fee Logger service will assume the role of the producer or publisher, while the other two services will operate as consumers. They will continuously listen for updates from the producer and react accordingly based on the type of fee transactions generated.
Project Set-Up
Step 1
Create the 3 following directories:
- fee_logger_service
- acceptance_fee_service
- School_hostel_fees_service
Step 2
Inside each directory run the commands below:
npm init –ynpm install express amqplib body-parser
Step 3
Create server.js file on each of the directories.
Step 4
Update your package.json by adding this line below to the script section
"start": "node server.js"
Awesome. You should have a folder structure similar to this:

How to Create the Producer(Publisher)
We stated at the beginning that the fee_logger_service will be our producer for this application.
- Locate the
service.jsfile inside thefee_logger_serviceand paste the code below:
const express = require("express");
const bodyParser = require("body-parser");
const app = express();
const Producer = require("./producer");
const producer = new Producer();
app.use(bodyParser.json("application/json"));
app.post("/fee-log", async (req, res, next) => {
  const { feeType, message } = req.body;
  await producer.publishMessage(feeType, message);
  res.send("Ok");
});
const port = 3001;
app.listen(port, () => {
  console.log(`Server running on port: ${port}`);
});
This code sets up a Node.js application using the Express framework. It’s a simple HTTP server that allows clients to submit fee-related log information, which is then published to a message queue by the Producer object for further processing. Now, let us create the producer.
- Inside the
fee_logger_servicecreate a new file and call itproducer.js. Insideproduce.jspaste the code below:
const amqp = require("amqplib");
const rabbitMQ = {
  url: "amqp://localhost",
  exchangeName: "feeExchange",
};
class Producer {
  channel;
  async createChannel() {
    const connection = await amqp.connect(rabbitMQ.url);
    this.channel = await connection.createChannel();
  }
  async publishMessage(routingKey, message) {
    if (!this.channel) {
      await this.createChannel();
    }
    const exchangeName = rabbitMQ.exchangeName;
    await this.channel.assertExchange(exchangeName, "direct");
    const logDetails = {
      logType: routingKey,
      message: message,
      dateTime: new Date(),
    };
    await this.channel.publish(
      exchangeName,
      routingKey,
      Buffer.from(JSON.stringify(logDetails))
    );
    console.log(
      `A new ${routingKey} fee have been detected and sent to ${exchangeName}`
    );
  }
}
module.exports = Producer;
This code defines a producer class that can connect to RabbitMQ, create channels, and publish log messages with different routing keys to a specific exchange within RabbitMQ.
How to Create the Consumers
Acceptance_fee_service
Locate the service.js file inside the acceptance_fee_service and paste the code below:
const amqp = require("amqplib");
const express = require("express");
const server = express();
async function consumeMessages() {
  const connection = await amqp.connect("amqp://localhost");
  const channel = await connection.createChannel();
  await channel.assertExchange("feeExchange", "direct");
  const q = await channel.assertQueue("AcceptanceQueue");
  await channel.bindQueue(q.queue, "feeExchange", "Acceptance");
  channel.consume(q.queue, (msg) => {
    const data = JSON.parse(msg.content);
    console.log(data);
    channel.ack(msg);
  });
}
server.get("/", async (_, res, __) => {
  res.send({ message: "Welcome to the acceptance fee service" });
});
const port = 3002;
server.listen(port, () => {
  consumeMessages();
  console.log(`Server running on port: ${port}`);
});
This code creates an HTTP server using Express, responds to requests on the root endpoint with a welcome message, and concurrently consumes messages from a RabbitMQ queue named ‘AcceptanceQueue’. It acknowledges and logs the content of incoming messages from the ‘feeExchange’ with the routing key ‘Acceptance’.
School_hostel_fees_service
Locate the service.js file inside the school_hostel_fees_service and paste the code below:
const amqp = require("amqplib");
const express = require("express");
const server = express();
async function consumeMessages() {
  const connection = await amqp.connect("amqp://localhost");
  const channel = await connection.createChannel();
  await channel.assertExchange("feeExchange", "direct");
  const q = await channel.assertQueue("HostelAndSchoolQueue");
  await channel.bindQueue(q.queue, "feeExchange", "Hostel");
  await channel.bindQueue(q.queue, "feeExchange", "School");
  channel.consume(q.queue, (msg) => {
    const data = JSON.parse(msg.content);
    console.log(data);
    channel.ack(msg);
  });
}
server.get("/", async (_, res, __) => {
  res.send({ message: "Welcome to the school and hostel fee service" });
});
const port = 3003;
server.listen(port, () => {
  consumeMessages();
  console.log(`Server running on port: ${port}`);
});
This code creates an HTTP server using Express, responds to requests on the root endpoint with a welcome message, and concurrently consumes messages from a RabbitMQ queue named ‘HostelAndSchoolQueue’. It acknowledges and logs the content of incoming messages from the ‘feeExchange’ with routing keys ‘Hostel’ and ‘School’.
Note: Here we have two routing keys that could trigger this consumer.
Each of the services has been created to run in different ports. Now, start the three applications by running:
npm start
on each of the services as seen below:

Now, go ahead and make your POST calls on [http://localhost:3001/fee-log](http://localhost:3001/fee-log) with this
{
  "feeType": "School",
  "message": "Transaction completed successfully"
}
Notice how school_hostel_fees_service received the message but acceptance_fee_service didn’t. This is because the feeType is of type School which is binded to the school_hostel_fees_service.
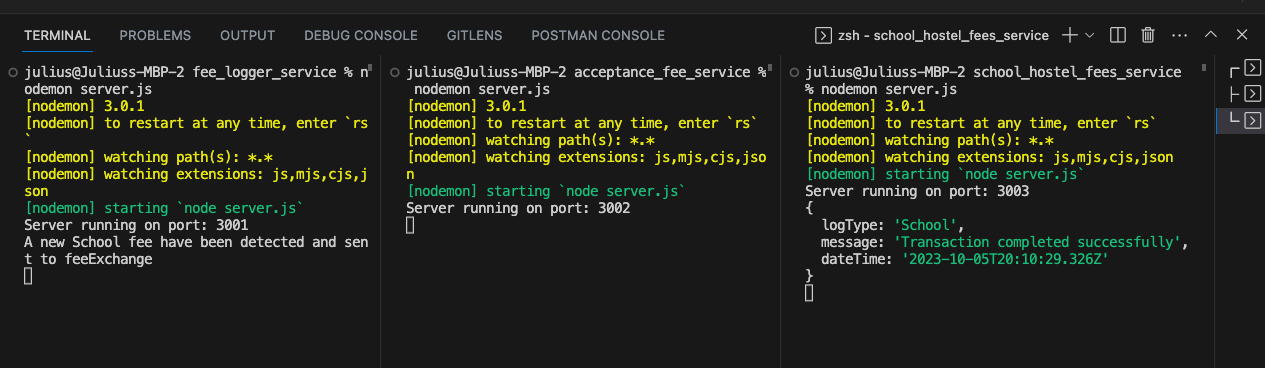
Feel free to switch the feeType as you like and observe how the services react based on the provided information.
Congratulations on completing this exercise with me. I hope you learned something new. Kindly support me by commenting and clapping 👏
You can access this project via the following link on GitHub
Conclusion
RabbitMQ, as a message broker, not only facilitates communication between different services within a distributed system but also serves as a safeguard for messages. It provides temporary storage for messages in queues, ensuring that messages are retained even when the intended recipient application is temporarily busy or offline. This decouples the sender and receiver, allowing them to operate independently of each other’s availability. RabbitMQ also offers features like message durability, multiple queues with different configurations, and guaranteed delivery, making it a dependable intermediary that ensures messages are reliably stored and delivered, even in the face of network issues or system failures. This message storage capability is essential for building robust and resilient distributed systems where the availability of services can vary.
Comments
Loading comments…