Angular logo by Angular PressKit / CC BY 4.0
In this article, we are going to examine some DOM manipulation techniques in Angular. If the terms elements, templates, views, and view containers sound confusing or new, then this one is for you.
So, let's get started!
Elements - ElementRef
Elements are pretty much everything we see (or not) on a web page. For example, input fields, links, images, and other things that may not be visible are all elements.
The ElementRef class is a simple wrapper for native elements, which are usually DOM elements in the browser. It provides a way to access the nativeElement object, exposing all the methods and properties of the associated native element.
export declare class ElementRef<T = any> {
  nativeElement: T;
  constructor(nativeElement: T);
}
How do we get an ElementRef?
One way to do this is by using the @ViewChild decorator. We assign a template variable in the template file.
<div #element>
  <p>Hello World!</p>
</div>
Then we use the @ViewChild decorator to query the element from the view (more on this term soon).
@Component({
  // ...
})
export class AppComponent implements AfterViewInit {
  @ViewChild("element") el: ElementRef<HTMLElement>;

  ngAfterViewInit(): void {
    console.log(this.el.nativeElement);
  }
}
This is what line 8 prints in the console:

Alternatively, we could use a directive on the element of interest.
<div appElement>
  <p>Hello World!</p>
</div>
And use dependency injection in the directive's constructor.
@Directive({
  selector: "[appElement]",
})
export class ElementDirective {
  constructor(el: ElementRef<HTMLElement>) {
    console.log(el.nativeElement);
  }
}
Through the nativeElement object, we can access all its methods and properties, and manipulate the element.
Note that the default type of the nativeElement is of any type (T = any). This means that if we just use ElementRef as the type, our nativeElement will be of any type. We can do better!
Instead, we used strong-typing like this ElementRef<HTMLElement>, which enables IntelliSense. We can also use more specific types, like the HTMLInputElement if the element is an input tag, and so on.
In our demo, we modified the appElement directive to receive a boolean input and to transform the div element based on its value.

We won't get into the details of this implementation as there are more important things to focus on. You can find and study the code in the StackBlitz provided at the end of this article.
Note that using ElementRef to manipulate the DOM should be done with caution!
The official Angular documentation states that
"[...] permitting direct access to the DOM can make your application more vulnerable to XSS attacks."
Suffice it to say, there is no risk if we simply want to get information about DOM elements using ElementRef. The risk is in specific cases of modifying DOM elements.
Long story short, to protect against XSS attacks, Angular treats all values as untrusted by default. When a value is inserted into the DOM from a template binding or interpolation, Angular sanitizes and escapes the untrusted values automatically.
By accessing and modifying the DOM directly through ElementRef, we are bypassing this sanitization mechanism, which may leave our application vulnerable to an XSS attack.
Read the security guide to learn more.
Views - ViewRef
We used the term view in the previous section. So, what exactly is a view?
According to Angular's documentation, views are "the smallest grouping of display elements that can be created and destroyed together".
Does this definition sound familiar?
Yup! Simply put, a component class and its template file define a view.
The [ViewRef](https://angular.io/api/core/ViewRef) class represents an Angular view in code. A ViewRef can be either a component template (host view) or a TemplateRef (embedded view).
View Containers - ViewContainerRef
View containers are containers for dynamically creating and adding, or removing views. A view container can contain:
- host views, which are created by instantiating a component with the
createComponentmethod - embedded views, which are created by instantiating a
TemplateRefwith thecreateEmbeddedViewmethod
The [ViewContainerRef](https://angular.io/api/core/ViewContainerRef) class represents a view container in code. It's the API we use to manage views programmatically.
How does this work?
To add or remove components dynamically through code, we need to get a hold of a view container. Like with the ElementRef, this can be done using a @ViewChild decorator or a directive.
Let's examine the first way.
We assign template variables to the containers we want to add components.
<button (click)="create()">Create Components</button>

<ng-container #myContainer></ng-container>
<div #anotherContainer></div>
Then in the class file, we query the view. Only this time we do so a bit differently. Observe the { read: ViewContainerRef } part.
@Component({
  // ...
})
export class ViewContainerComponent {
  @ViewChild("myContainer", { read: ViewContainerRef })
  myContainer: ViewContainerRef;
  @ViewChild("anotherContainer", { read: ViewContainerRef })
  anotherContainer: ViewContainerRef;

  create(): void {
    this.myContainer.createComponent(SomeComponent);
    this.anotherContainer.createComponent(SomeComponent);
  }
}
Now, when the user clicks the button, a SomeComponent instance is created and added to each view container.
Respectively, there is a remove method. We can optionally pass a 0-based index of the view we want to destroy. If we don't pass anything, then the last view is removed.
Did you know?
Each view container has a unique anchor element (1-to-1 relationship). In our demo, the HTML initially looks like this:
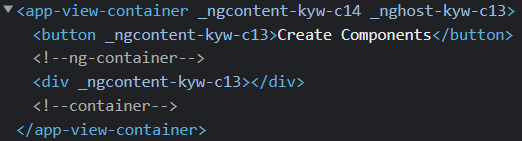
The <!--ng-container--> and <!--container--> are the anchor elements of our two view containers.
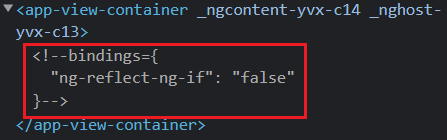
Well, what about the following case?
<ng-container *ngIf="false"></ng-container>
Even in cases where nothing is to be rendered, Angular will still use an anchor element.
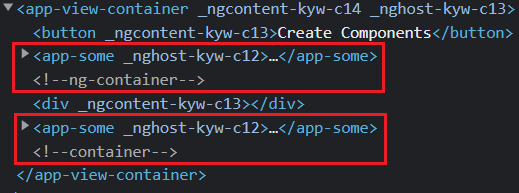
Additionally, when views are added to a view container, they become siblings of the anchor element!
Clicking the "Create Components" button will create and add the components as siblings to the anchor elements, like this:
By the way, this is exactly what happens with the <router-outlet> as well. The routed component's tag doesn't appear inside the <router-outlet> tag. Instead, it appears as a sibling.

Templates - - TemplateRef - Embedded Views
A template is a group of HTML elements that can be reused. Views defined in an <ng-template> are called embedded views. Embedded views are not rendered until instantiated.
The [TemplateRef](https://angular.io/api/core/TemplateRef) class "represents an embedded template that can be used to instantiate embedded views".
We use the <ng-template> tag in the component template file to define a template.
<button mat-raised-button color="accent" (click)="embed()">
  Embed Template
</button>

<ng-container #myContainer></ng-container>

<ng-template #myTemplate>
  <p>I'm an embedded view! Yay!</p>
</ng-template>
Then, in the component class, we can instantiate an embedded view on demand by using the createEmbeddedView method of the ViewContainerRef.
@Component({
  // ...
})
export class TemplateComponent {
  @ViewChild("myContainer", { read: ViewContainerRef })
  container!: ViewContainerRef;

  @ViewChild("myTemplate", { read: TemplateRef })
  template!: TemplateRef<any>;

  embed(): void {
    this.container.createEmbeddedView(this.template);
  }
}
If we wanted to just embed the view from the beginning, we could have simply used ngTemplateOutlet, like this:
<ng-container *ngTemplateOutlet="myTemplate"></ng-container>

<ng-template #myTemplate>
  <p>I'm an embedded view! Yay!</p>
</ng-template>
You can read more about [ngTemplateOutlet](https://javascript.plainenglish.io/creating-reusable-configurable-angular-components-b7fcba2f5f38) in this article.
You can find a working demo in the StackBlitz below. Don't forget to subscribe to my newsletter to stay tuned for more content like this!
Conclusion
In this article, we talked about a few terms (elements, templates, views, and view containers) along with their in-code representations (ElementRef, TemplateRef, ViewRef, and ViewContainerRef).
We also demonstrated with simple examples how we can utilize these classes to manipulate the DOM programmatically.
I hope you enjoyed this article and that you've learned something new.
Thanks for reading!
Comments
Loading comments…