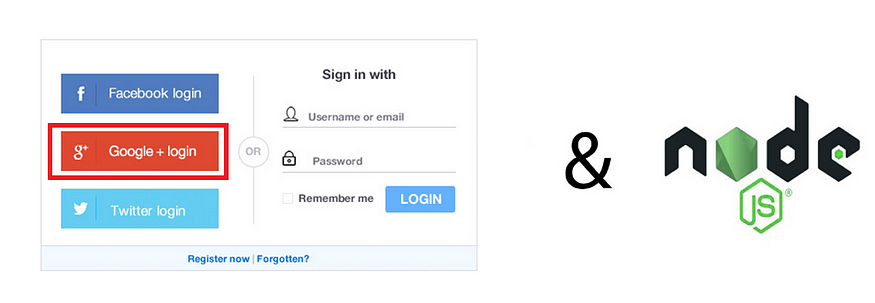
If you don’t want to spend much time setting safe authentication, Google Sign-In is exactly what you need. Google provides a secure, useful, and easy way for the users of your own applications to share their profile information consensually.
In this article, I will cover the way to sign in with Google for websites created in JavaScript.
I will use VS Code as the IDE and I assume that you have any Ideas about;
- HTML,
- Express-Node.js web application,
- Embedded JavaScript (EJS), and
- RESTful API
Let’s start by initializing a new Node.js project. To do that, open a command prompt at the directory you just created for your project and run:
npm init -y
In the file package.json, I add this line in script scopes:
“start”: “nodemon server.js”
And I install the dependencies:
npm install express ejs dotenv nodemon
After installing the related packages, the package.json should look like that:

package.json
And now I set up the REST API structure. To do that, I create the file server.js and add the codes below:
const express = require("express");

const app = express();

const PORT = process.env.PORT || 5000;

app.get("/", (req, res) => {
  res.send("Hello World");
});

app.listen(PORT, () => {
  console.log(`Server running on port ${PORT}`);
});
We have to show the Google Button to users on the client-side. So, we need HTML codes. And right now “ejs” comes into play.
EJS (Embedded JavaScript) allows us to use HTML within server-side projects. So, I add the file login.ejs to the project, and the HTML base structure to it.
<html lang="en">
  <head>
    <meta charset="UTF-8" />

    <meta http-equiv="X-UA-Compatible" content="IE=edge" />

    <meta name="viewport" content="width=device-width, initial-scale=1.0" />

    <title>Google-Sing-In</title>
  </head>

  <body></body>
</html>
In this file, I add the three meta tags within head tags.
<html lang="en">

<head>

<meta charset="UTF-8">

<meta http-equiv="X-UA-Compatible" content="IE=edge">

<meta name="viewport" content="width=device-width, initial-scale=1.0">

<meta name="google-signin-scope" content="profile email">

<meta name="google-signin-client_id" content="YOUR_CLIENT_ID.apps.googleusercontent.com">

<script src="https://apis.google.com/js/platform.js" async defer></script>

<title>Google-Sign-In</title>

</head>

<body>

</body>

</html>
That meta tags provide us with Google Authentication. But here, there is something so important. We must have a Client-ID. For that, we go to https://console.cloud.google.com. And we create a new project:

creating a new Google Cloud project
And I go to APIs & Services page by clicking the related option on the side menu. I click the External option on the OAuth consent screen page as a User Type. And I click the create button. Then comes the Edit app registration page. Here I must fill out the form to register for the app.
After registration, I click the Credentials button on the side menu. On this page, I click the button specified below:

create credentials button
I choose the OAuth Client ID option on the coming menu. And comes another menu. In this menu, I choose the Web Application option and fill out the form. And finally, we can get the client id:
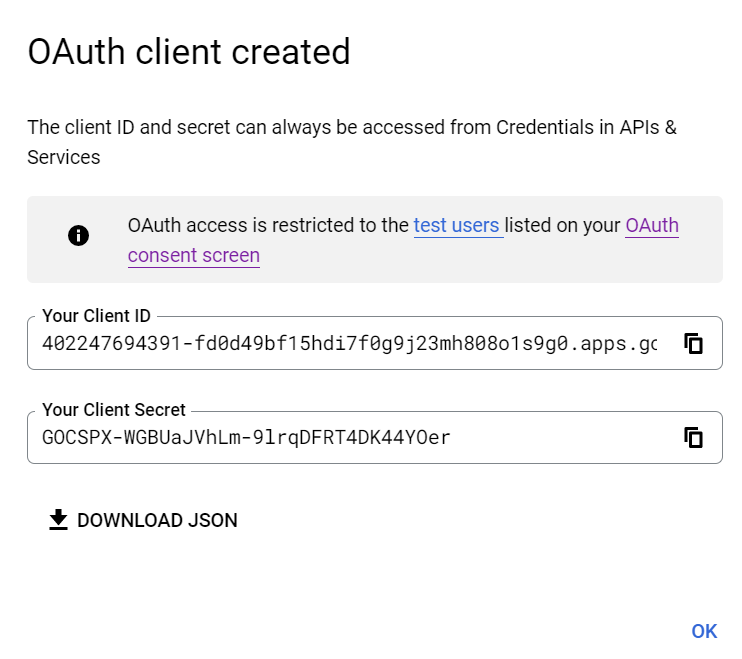
client id
We copy the client id and paste it to the related meta-tag on the login.ejs file. And then, we add the magic button and the sign-in and the sign-out method to that file. Now the login.ejs file must seem like the below:
<html lang="en">

<head>

<meta charset="UTF-8">

<meta http-equiv="X-UA-Compatible" content="IE=edge">

<meta name="viewport" content="width=device-width, initial-scale=1.0">

<meta name="google-signin-scope" content="profile email">

<meta name="google-signin-client_id" content="402247694391-fd0d49bf15hdi7f0g9j23mh808o1s9g0.apps.googleusercontent.com">

<script src="https://apis.google.com/js/platform.js" async defer></script>

<title>Google-Sign-In</title>

</head>

<body>

<h1>LOGIN</h1>

<div class="g-signin2" data-onsuccess="onSignIn" data-theme="dark"></div>

<a href="#" onclick="signOut();">Sign out</a>

<script>

function onSignIn(googleUser) {

var profile = googleUser.getBasicProfile();

console.log('ID: ' + profile.getId()); // Do not send to your backend! Use an ID token instead.

console.log('Name: ' + profile.getName());

console.log('Image URL: ' + profile.getImageUrl());

console.log('Email: ' + profile.getEmail()); // This is null if the 'email' scope is not present.

}

function signOut() {

var auth2 = gapi.auth2.getAuthInstance();

auth2.signOut().then(function() {

console.log('User signed out.');

});

}

</script>

</body>

</html>
Now I have to add a middleware method and /login route to the server.js in order to be able to show the google button:
const express = require("express");

const app = express();

const PORT = process.env.PORT || 5000;

// Middleware

app.set("view engine", "ejs");

app.get("/", (req, res) => {
  res.send("Hello World");
});

app.get("/login", (req, res) => {
  res.render("../login");
});

app.listen(PORT, () => {
  console.log(`Server running on port ${PORT}`);
});
And now when we follow the link http://localhost:5000/login, on the browser we can see the page below.
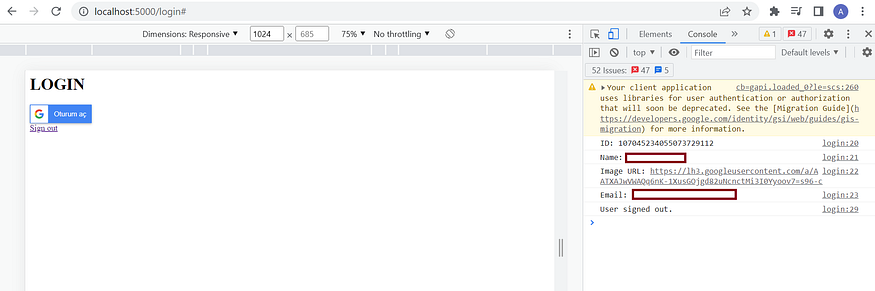
login.ejs
Conclusion
Using EJS pages within a Node.js project, we can create easier and more secure web pages with Google-Authentication-Popup.
You can reach the project by this link.
That’s it for this topic. Thank you for reading.
Comments
Loading comments…