
Preface
No matter what website we look at, there will be pictures, such as Medium, Twitter, etc. When writing on Medium, it supports uploading pictures. It will post the picture to https://medium.com/_/upload?source=6, and the response contains the picture’s saved fileId which can be used to generate the CDN URL.

Although I don’t know which programming language Medium uses to implement the upload server, we can use Node.js to implement the file upload server.
In this article, we’ll look at how to implement a file upload server with the busboy module in Node.js.
Create an HTTP server with Node.js
Nodejs provides the HTTP module which can be easily used to create a server, of course, it will be easier if you use Koa or Express. Although using native modules is inefficient, it can help us better master Node.js. But it is recommended to use Koa or Express in a production environment.
When creating an HTTP server, we only need to use the createServer API provided by the HTTP module, and bind a port at the same time.
const http = require('http');
http.createServer((req, res) => {
  res.end('hello world');
}).listen(4000);
Then we can test it and visit the http://localhost:4000:

Upload file and save on server
We can use the HTML form to upload files, and in the Node.js server, we can use the busboy package to parse incoming HTML form data. If you want to implement a file upload server in the production environment, it is recommended to use Multer (relying on busboy to parse form data) or formidable.
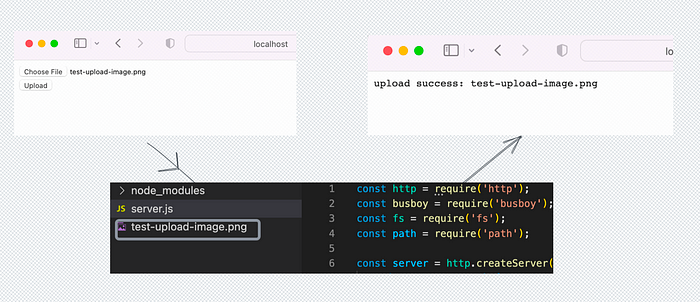
We need to optimize the Node.js code, respond to an HTML form when visiting the root path, and upload file with the /upload path.
const http = require("http");
const busboy = require("busboy");
const fs = require("fs");
const path = require("path");

const server = http.createServer((req, res) => {
  if (req.url === "/") {
    res.writeHead(200, { "Content-Type": "text/html" });
    res.end(`
      <form action="/upload" enctype="multipart/form-data" method="post">
        <input type="file" name="someCoolFiles"><br>
        <button>Upload</button>
      </form>
    `);
  } else if (req.url === "/upload") {
    let filename = "";
    const bb = busboy({ headers: req.headers });
    bb.on("file", (name, file, info) => {
      filename = info.filename;
      const saveTo = path.join(__dirname, filename);
      file.pipe(fs.createWriteStream(saveTo));
    });
    bb.on("close", () => {
      res.writeHead(200, { "Content-Type": "text/plain" });
      res.end(`upload success: ${filename}`);
    });
    req.pipe(bb);
  } else {
    res.writeHead(404, { "Content-Type": "text/plain" });
    res.end("404");
  }
});

server.listen(4000, () => {
  console.log("Server listening on http://localhost:4000 ...");
});
In the Node.js server, when receiving the file uploaded by the client, use the busboy module to parse it and save it to the current directory.
Conclusion
In the article, we learn about using Node.js to implement a very simple file upload server. With the busboy module, we can easily handle the incoming HTML form data. But it is recommended to use Multer (relying on busboy to parse form data) or formidable.
Comments
Loading comments…