How to connect to a MongoDB with NestJS.
I highly prefer to use a combination of Mongoose and the mongoose nestjs library. The pro of use only the Nestjs library is that you basically don't need to use an interface, only the schema directly. If you use mongoose directly to define the schema, you need to use an interface to create each object in the MongoDB.
Create a complicated schema with Mongoose using NestJS can be a pain in certain way, but once you dominate it, it is pretty cool how it works.
So let's create an application that manages Users, Clients, Products and Sales.
We basically need 4 schemas at the first view:
How to define a Schema in Mongoose with NestJS
NestJS has a powerful tool @nestjs/mongoose, so let's use it.
First we need to create our NestJs Application or feel free to just fork the repository that I posted at the end.
nest new nestjs-mongodb-app
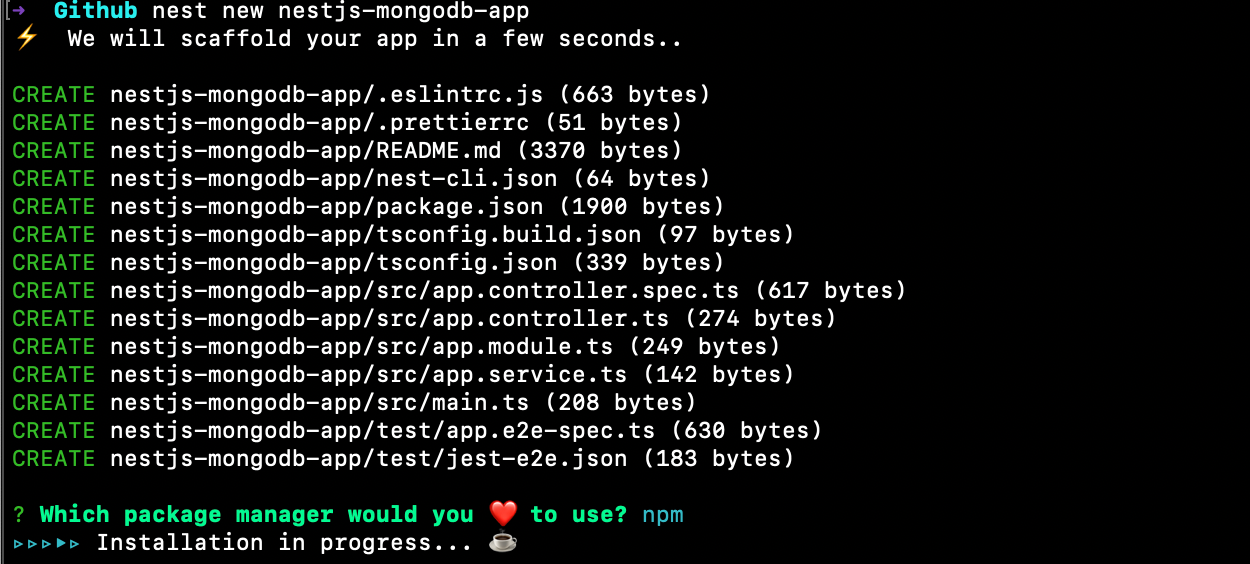 Create our Nestjs Application
nestjs/mongoose
*A progressive Node.js framework for building efficient and scalable server-side applications. Mongoose module for Nest…*github.com
Create our Nestjs Application
nestjs/mongoose
*A progressive Node.js framework for building efficient and scalable server-side applications. Mongoose module for Nest…*github.com
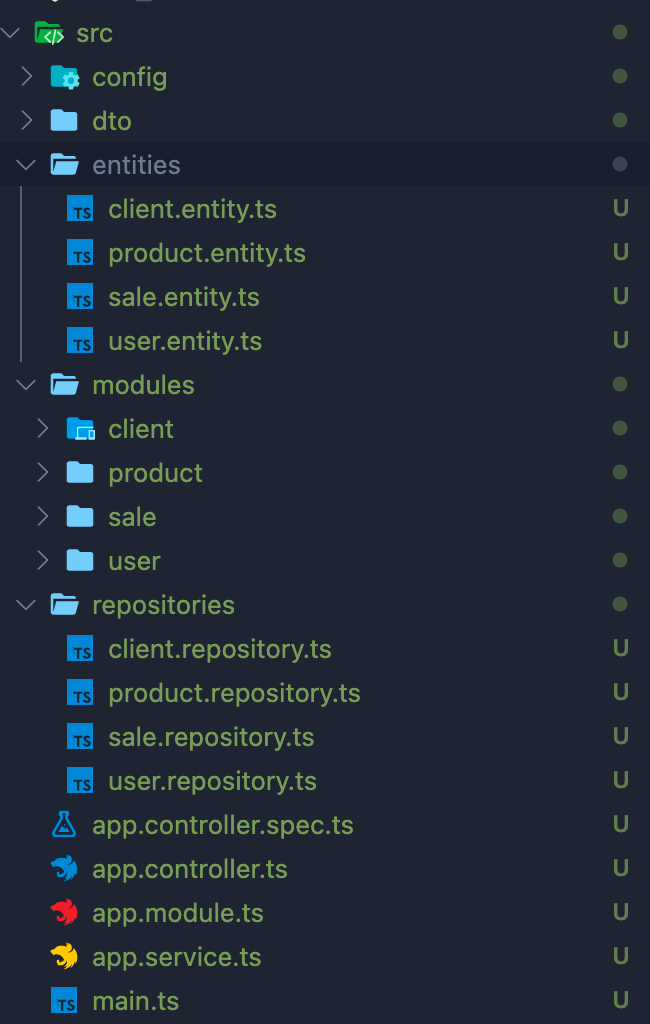
So this is how your NestJS application should look at first, if you need help to create a NestJS application, please go to NestJS and get started with the CLI, it's pretty straight forward.
We are going to create the 4 entities, client, product, sale and user.
Plus that we need to npm install the nestjs mongoose library.
Also you need to setup your local MongoDB, you can do this downloading MongoDB Compass Community or installing Mongo Directly with the CLI, so let me help you a bit with this.
Set Up MongoDB
Here you can download MongoDB Compass, install everything and open the application to create your first connection:
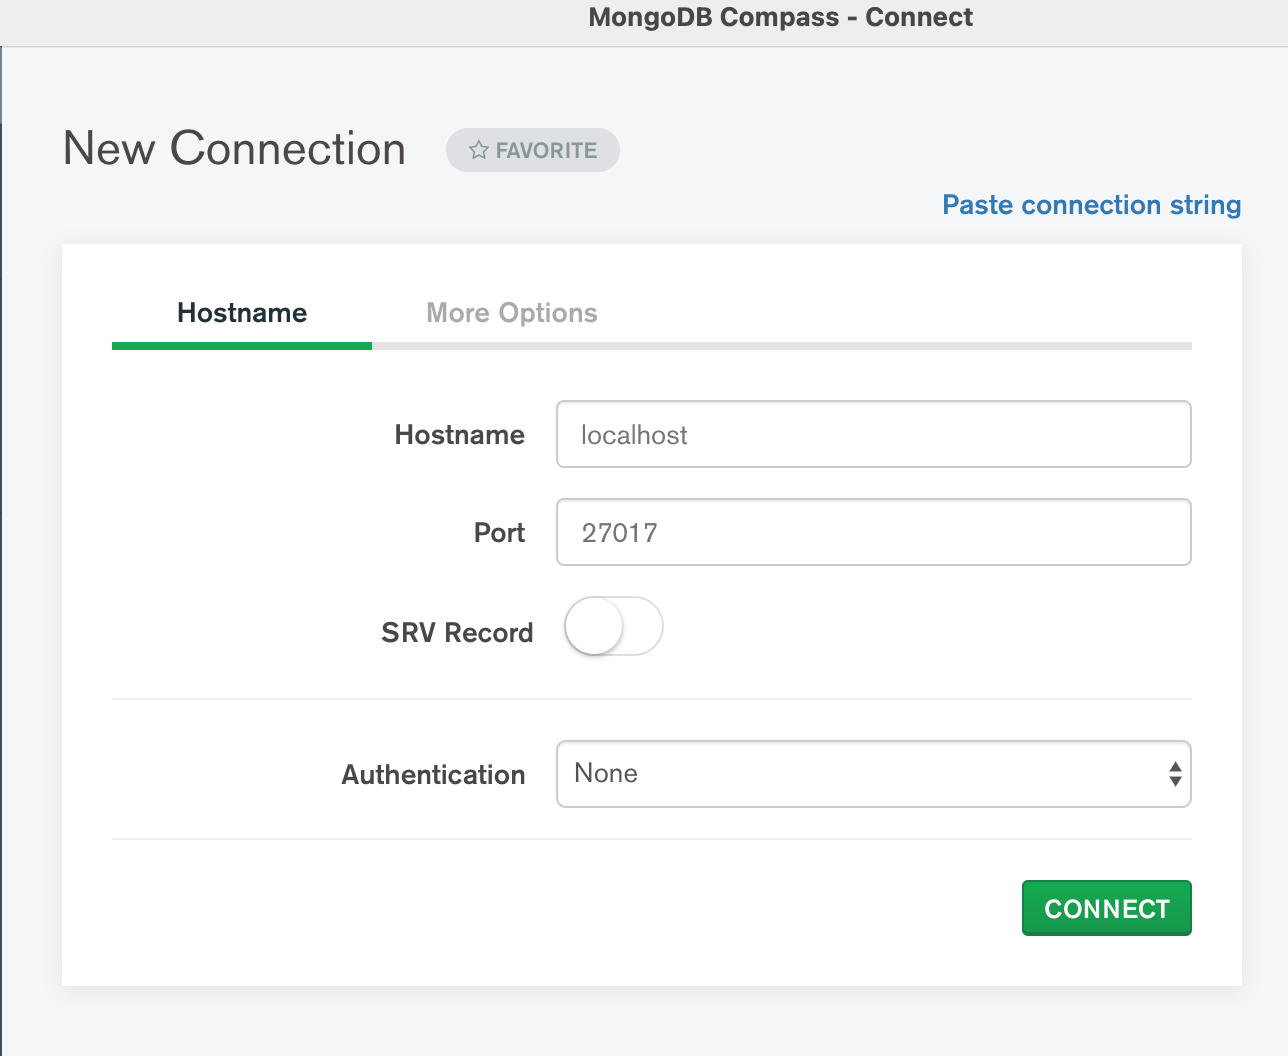
In case that the connection is refused, use this command to start mongo:
brew services start mongodb-community
Once you connected successfully, just create a new Database, give it some name, let's use the classic “testing” and create a collection name, for example users, you can create the other collections that our entities are going to manage, but mongoose is going to do the job anyway.
Now we need to connect our database to our NestJS application, so I highly recommend to create a username and password for your local mongodb, so in your shell (For Mac users it's just “mongo” on your terminal), for Windows you can use the shell included on the MongoDB Compass.
mongo
use testing
db.createUser({user:'admin', pwd:'strongpassword', roles:[{ role:'readWrite', db:'testing'}]})
Now to create the connection in our NestJS application, create a Config Module and Service:
ConfigModule
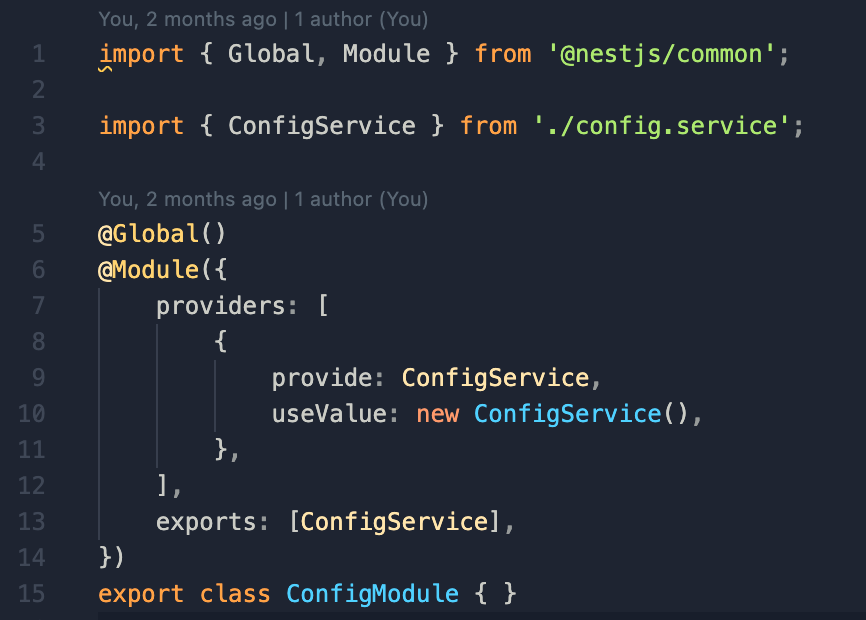 Config.module.ts

You can see the rest of the configs on this Repository: Cfvillarroel/nestjs-mongodb-app *Contribute to Cfvillarroel/nestjs-mongodb-app development by creating an account on GitHub.*github.com
Clone the repository, create your .env file with the information that we created before about our MongoDB and hit it!
npm install
npm run start:dev
The Entities!
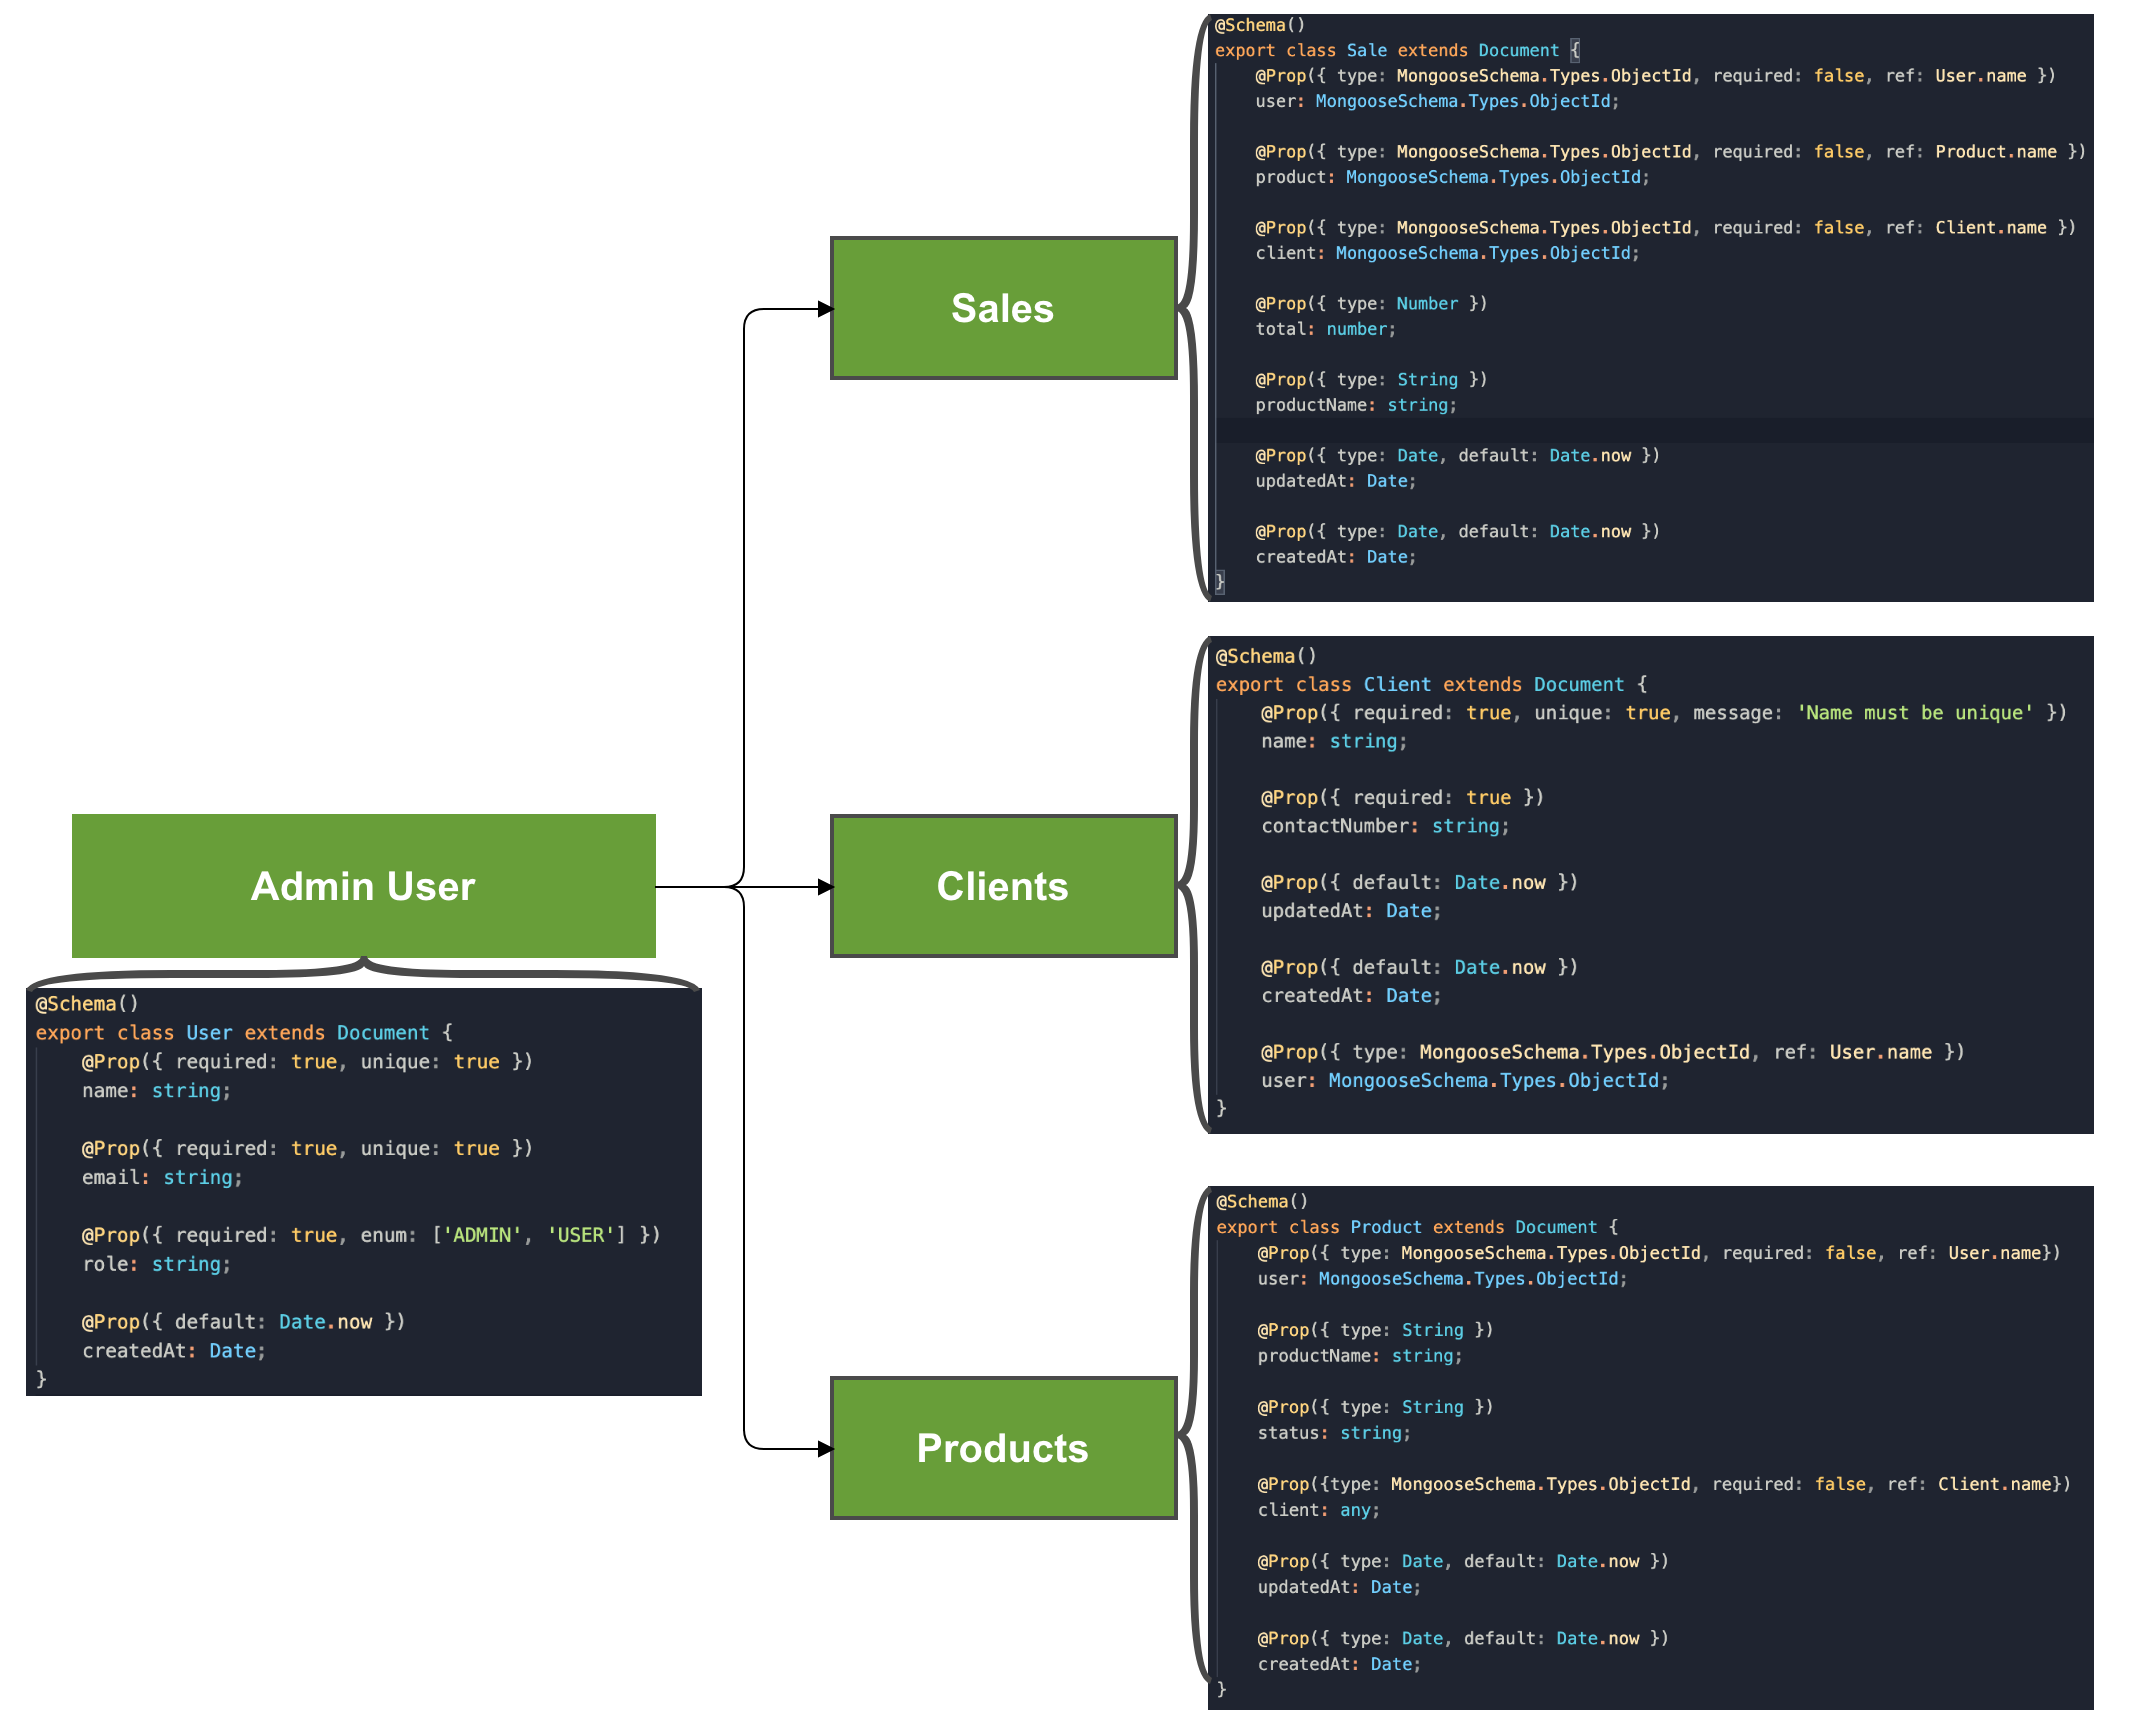
So here is the deal, the entities are the key to make this work, so let's relate them. Here is a little diagram with the schemas that describe the relations between the entities.
So this what we are going to do:
1- So we are going to create a user with a specific role
2- Create a Client
3- Create a Product
4- Create a Sale for a created Product to a specific Client
NestJS and mongoose allow you to relate the entities, you can see in the code that for example we are referencing the User Schema on the Sales, Clients and Products to register the user that is creating each event.
In the Sales we are referencing the product and client. Let's analyze a bit how it's done:
@Prop({type: MongooseSchema.Types.ObjectId, required: false, ref: Client.name})

client: any;
The type property defines the type of the field, it can be a Number, String or in this case a MongooseSchema Object Id, we can define if it's required or not, this means that if it is set to true, you can't create a for example a Sale without a client.
There is also the unique property, that means that you can't create 2 users with the same email or name or any field that you define. There is a lot more, you can read the mongoose documentation to find the properties that fits your needs.
So we have the code, we understand a bit better how the entities and schemas works, so now let's test it!
If you need more information or want to learn more about MongoDB, here is a link wit all the information about it: Databases and Collections - MongoDB Manual *In MongoDB, databases hold one or more collections of documents. To select a database to use, in the shell, issue the…*docs.mongodb.com
Create some Collections!
Let's start creating a User! For this we are going to use Insomnia, Postman will do the job too.
You can see on the controllers all the endpoints that we can use, my application is seted up on this way:
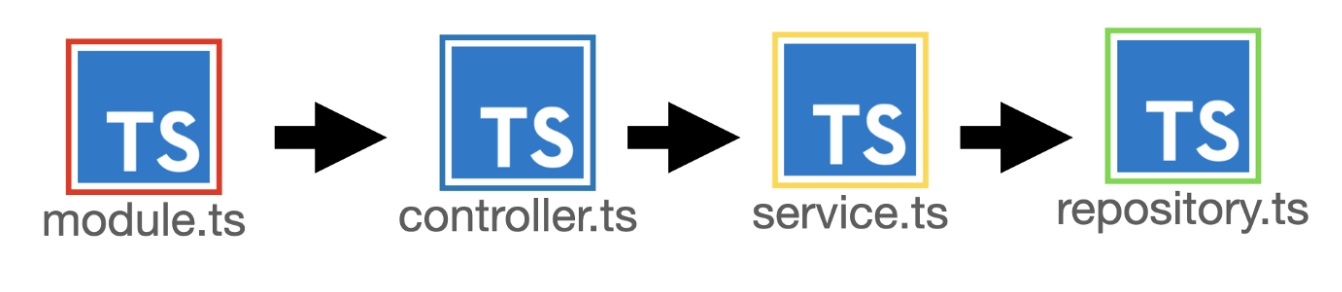
A NestJS application basically works with a module, service and controller logic.
I also use a repository file, the repository files are used with typeorm and entities for MySQL, I also use this with MongoDB and all my projects, It seems to me that it is much more orderly.
I use the .service.ts for the business logic and the repository for every type of connection to a Database or external API, that way is decoupled and I don't have to change a lot of logic if I change the DB for example.
It is important to mention as you will see on my code that I also use the DTOs (Data Transfer Objects) to create, update, etc. So it is important that your DTOs remain related to your entities.
So, with that clarified let's create our first user, we need to pass a name, role and email to our POST:
[http://localhost:3000/user/createUser](http://localhost:3000/user/createUser)
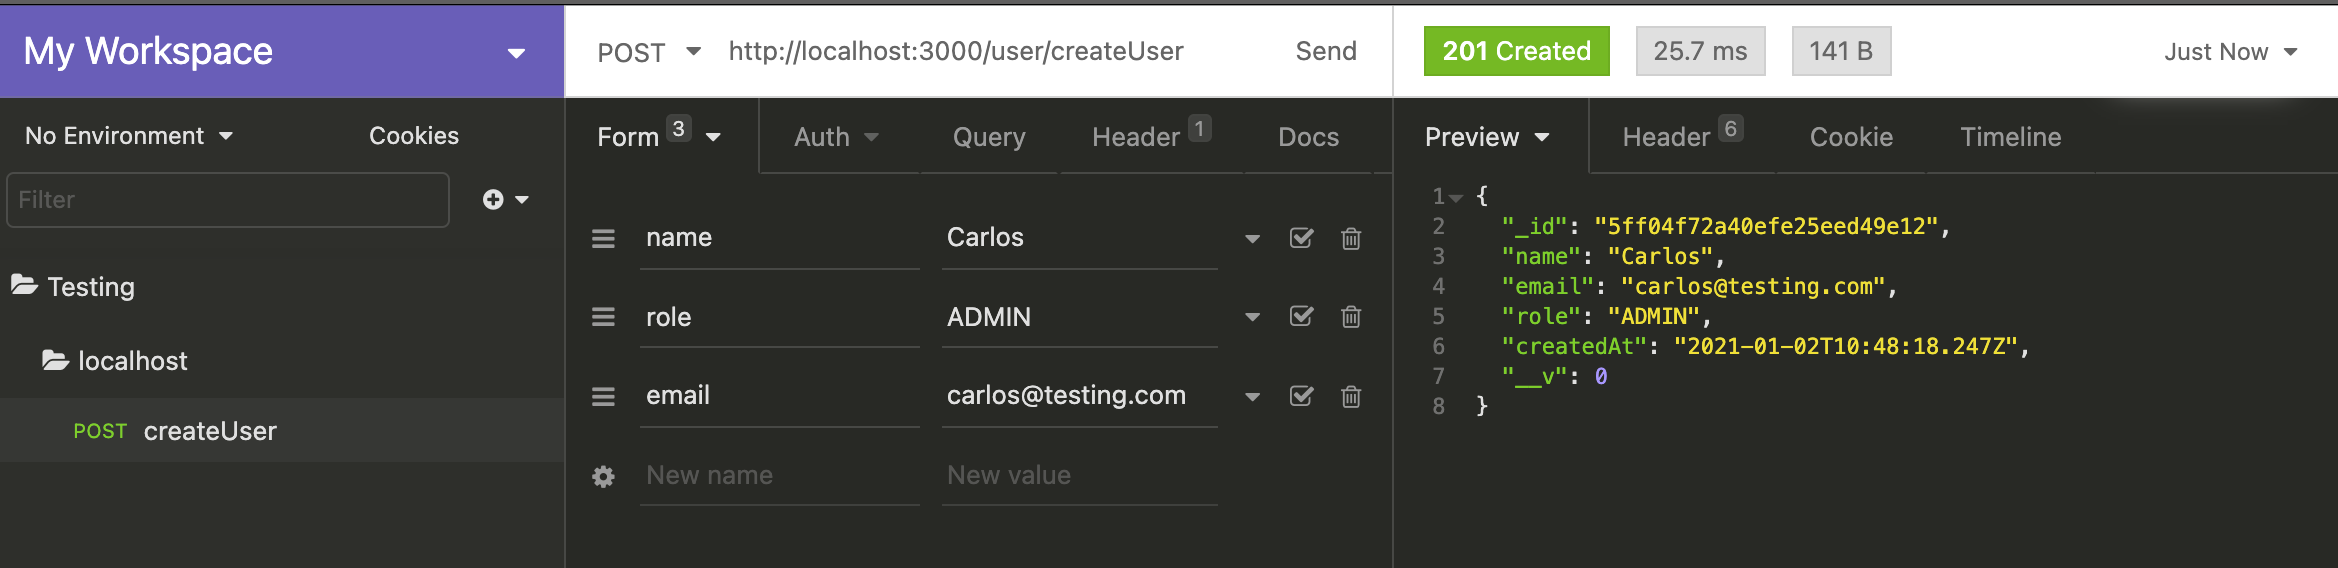 Creating our User
Once the user is created, as we defined in our Schema, 2 users with the same email are not allowed, so if we try to send this request again, we should get an error
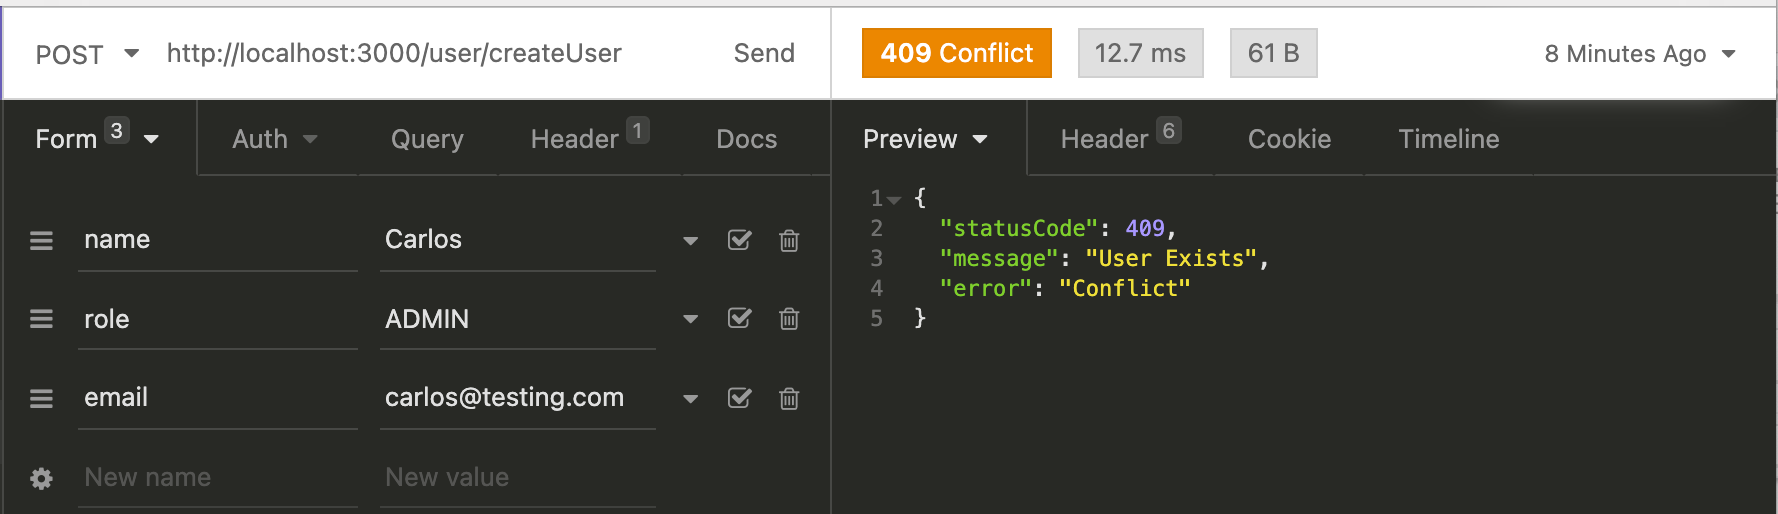
Nice! Working Great!
Let's create a Client now:
[http://localhost:3000/client/createClient](http://localhost:3000/client/createClient)
We need a name for our client, a contactNumber and of course the userId that we just created
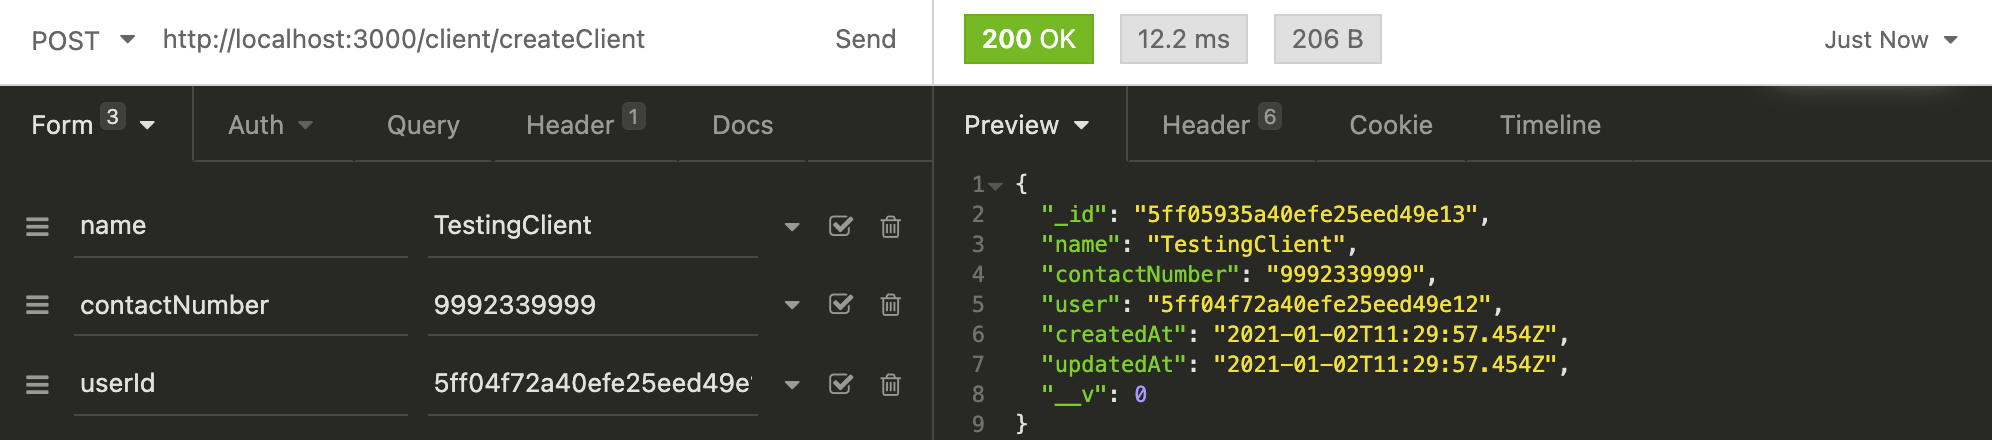 Creating our First Client
All good! Let's do the same for our first Product!
[http://localhost:3000/product/createProduct](http://localhost:3000/product/createProduct)
We need a name for our product and also the userId that we created before
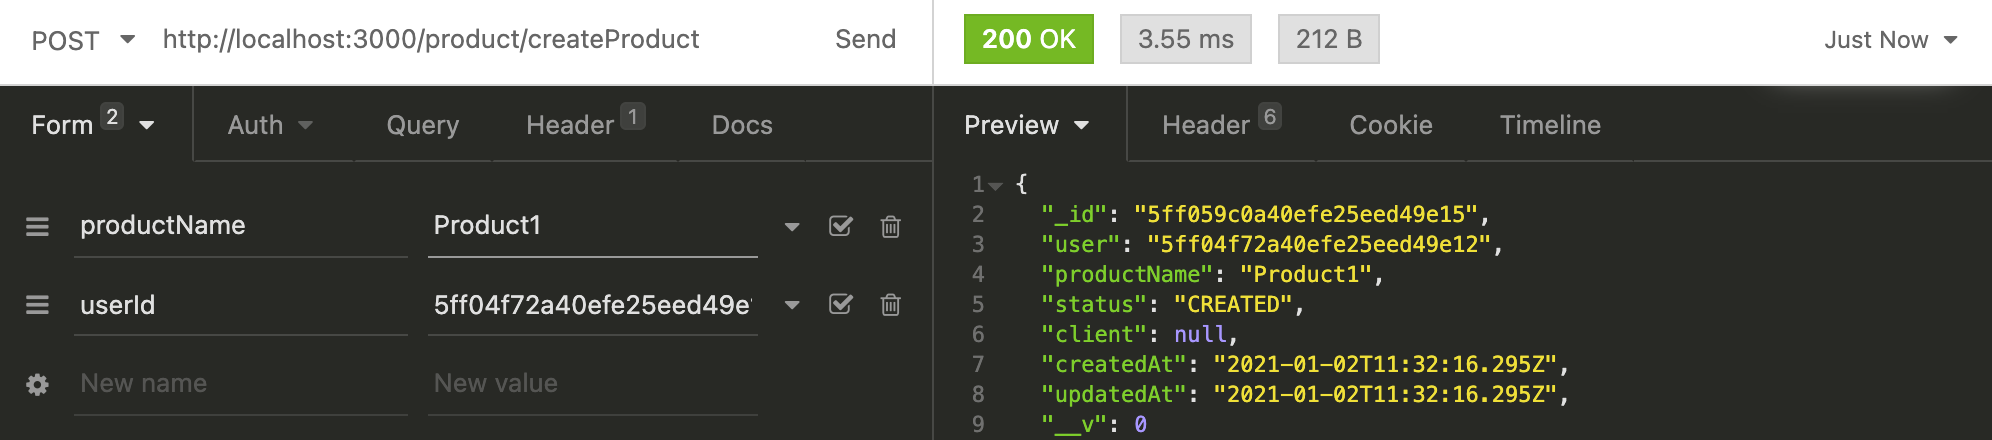 Creating our first Product
Perfect! So now we have our User who is creating our Client and Product, time to create a Sale and Update our Product Status to “SOLD”.
So we are going to stop here and analyze a bit how the Sale works.
How to create the Sale?
First, the DTO:
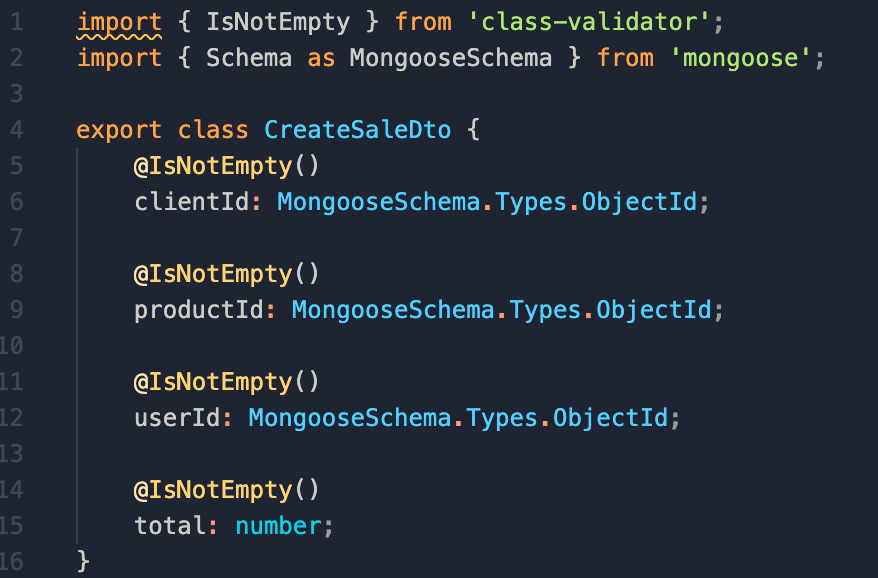 CreateSaleDto
To create our first sale we need the clientId, the productId that we are going to sell and the userId that is creating the sale.
Plus that, the sale has a total amount associated to it.
Our Sale schema looks like we saw before:
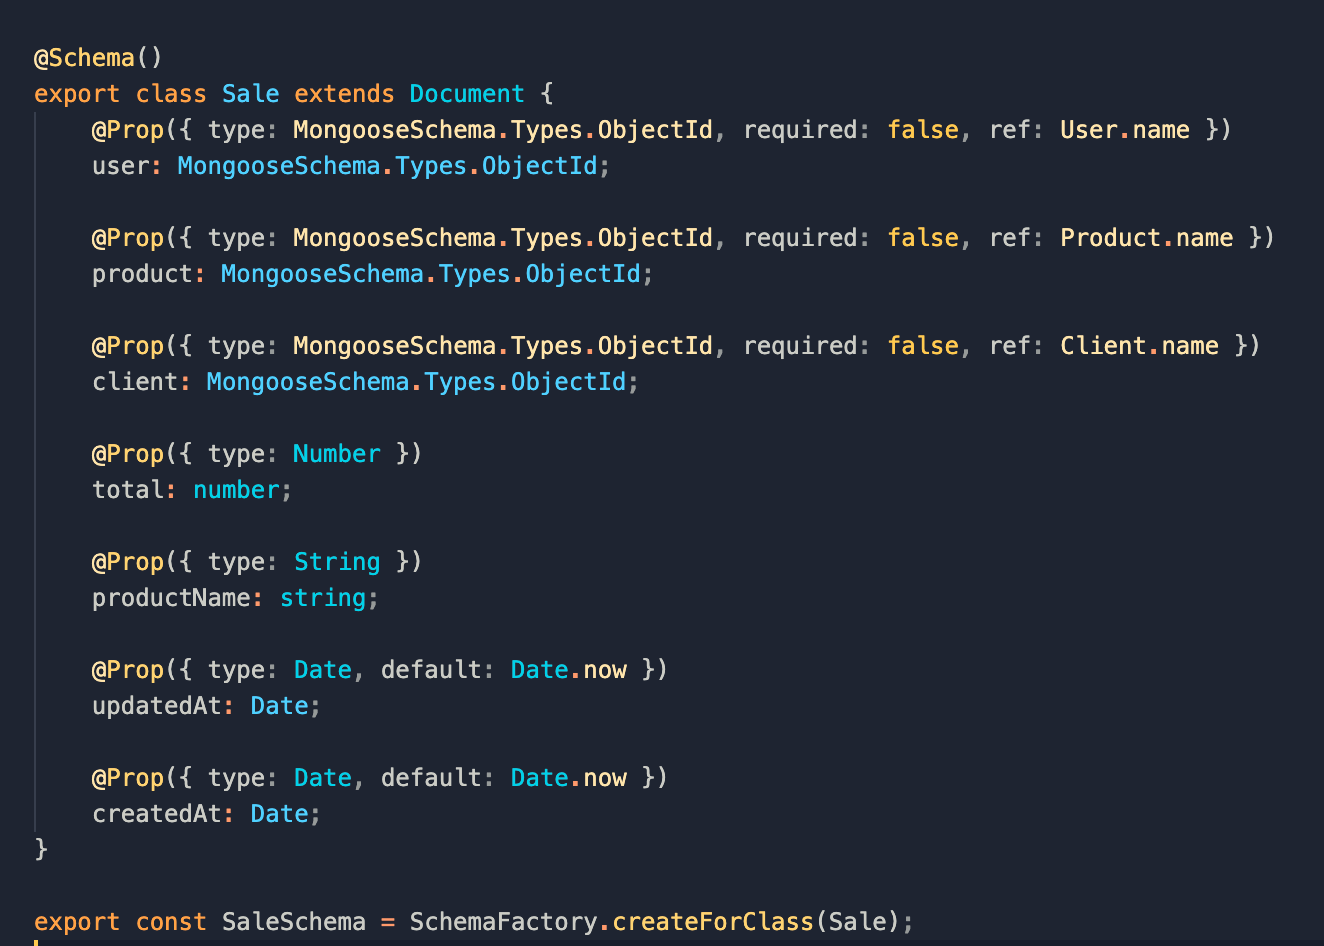 Sale Schema
So once the sale is created, we can get all the product, and client information directly from the sale, that's the magic of mongoose.
Next it's our SaleService.ts, with the createSaleDto we are going to get the User so we can validate it's role, we also get the product and pass it to de createSale method, once the sale is created, we are going to update our product status to “SOLD”
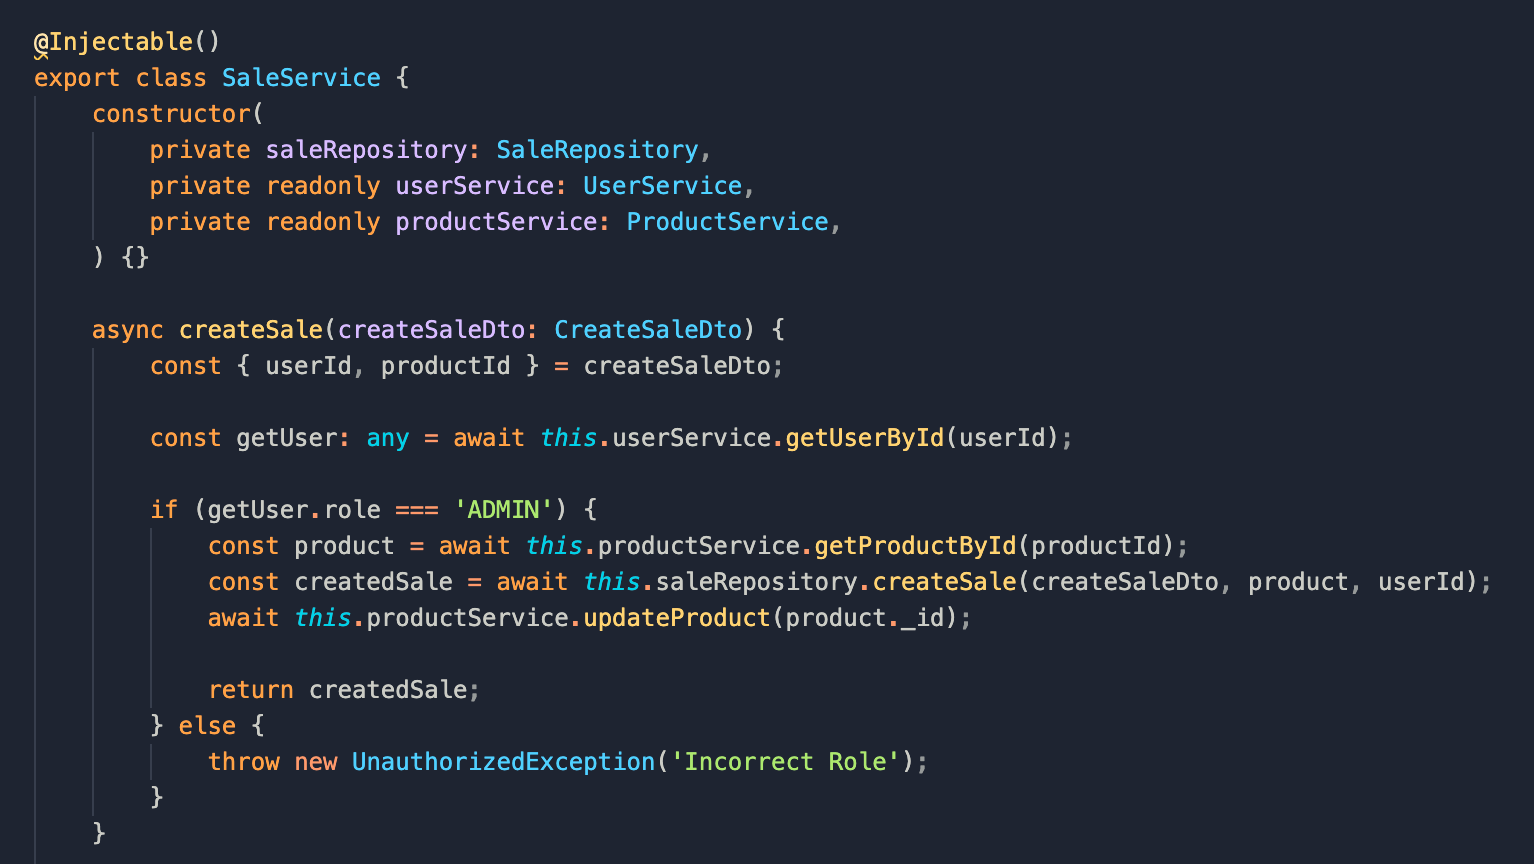 Sale Service: createSale Method
So here are the codes to create the Sale and update the Product Status:
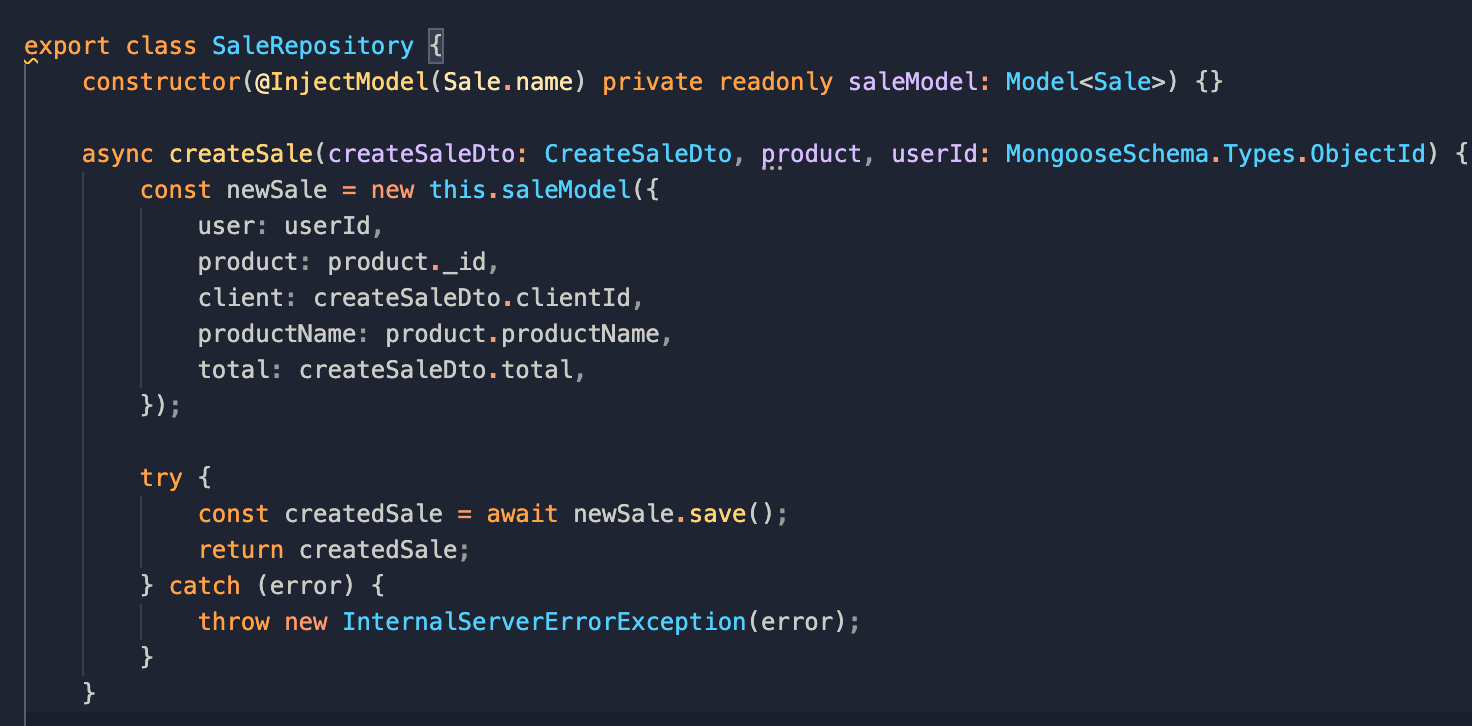 Sale Repository: createSale Method
Finally when our creation succeeded, we can update our product status and its updatedAt field, important as I mentioned before I use the service => repository logic, so we need to import our Product Service to update the product:
 Product Repository: updateProduct Method
Hope it's clear, so let's create our first Sale now!
Creating the Sale
Now that is more clear how everything works in the backend, let's create our first sale:
[http://localhost:3000/](http://localhost:3000/sale/createSale)sale/createSale
As you can see here we need the clientId, the userId and the productId that we created before
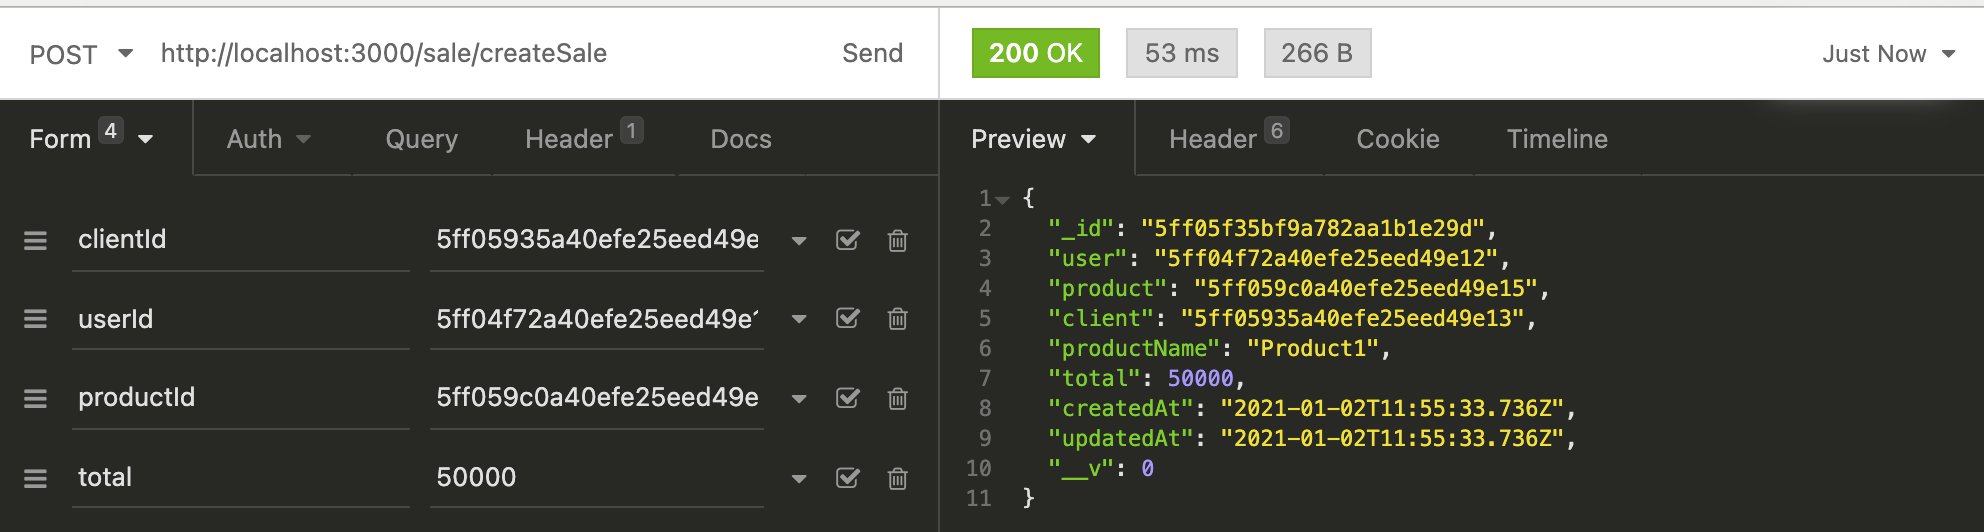
Good!! Our Sale is created and it has associated the product, client and user. We also updated our Product so now it has a Client associated too, you can complex a bit more this creating for example an array of clients for the product and so on, not mandatory, we are just testing relations.
So, now we want to get the sale that we just created with all it's information!
For this we can use the mongoose again and populate the fields that we created as MongooseSchema ObjectId
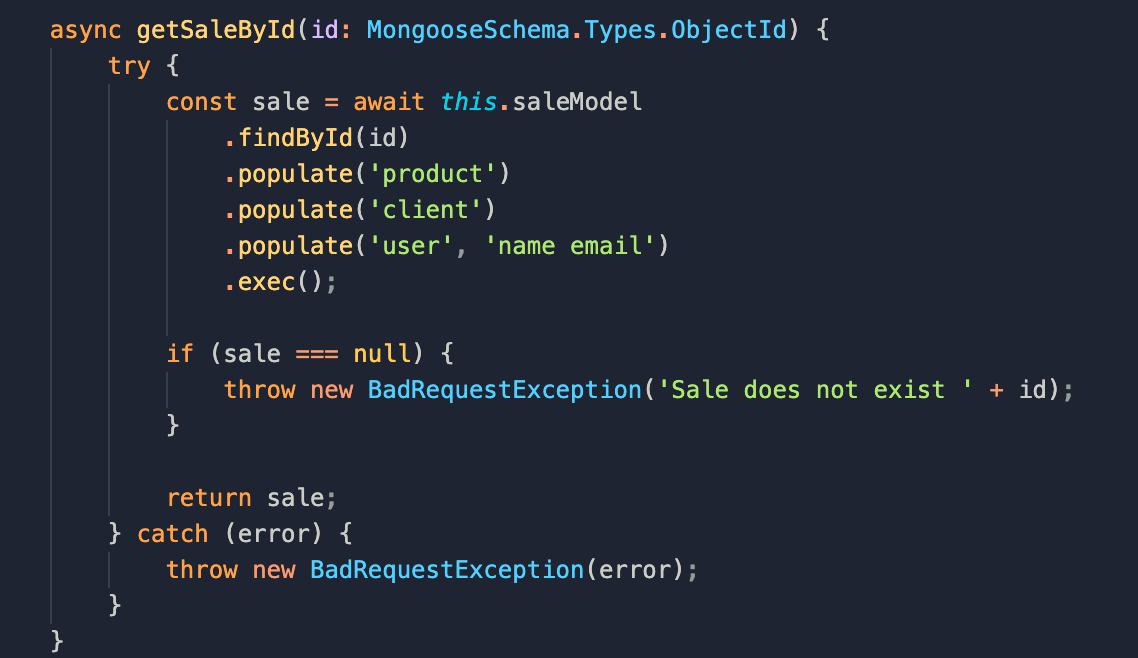
So here we are getting our sale and populate it with the product, client and user information, let's try it:

It works!! Our sale has all the information!
We created all the Schemas, we related them and created each of the collections, now we can create Sales with other entities associated to it.
Conclusions
As we can see mongoose is a really powerful tool, we can create amazing applications handling it with NestJS, it is really important even if we are working with a non-relational db how to relate things, it's pretty straight forward and as you can see, you don't need to change a lot of things to relate 2 collections.
Hope you enjoyed it and this will be useful!
Github Repository of the Project
About Me
f you can, please share this post and feel free to contact me by LinkedIn Carlos Felipe Villarroel Navarro - IT Manager - Rindegastos | LinkedIn *View Carlos Felipe Villarroel Navarro's profile on LinkedIn, the world's largest professional community. Carlos Felipe…*www.linkedin.com
I currently work as IT Manager at Rindegastos. I completed a Diploma in Strategic Leadership and a Master in Data Science.
Passionate about technology, developer in Typescript, Javascript and Python. I work with MongoDB and MySQL.
Currently developing Microservices with the NestJS framework in the back-end and Angular in the front-end, supported with Docker and AWS. I develop in Ionic v5 and also Serverless with NestJS.
Comments
Loading comments…