Hi folks, this article covers the sending of emails and then reading them using two different services. For sending emails I will be using Nodemailer and for reading/parsing the emails I will be using the IMAP library. Let's get to the process now.
Photo by Stephen Phillips - Hostreviews.co.uk on Unsplash
STEP 1: Setting up the configuration for sending and receiving the mails.
I created a config.js file to store the configuration objects for both services. The file code is pretty straight forward and it looks like.
STEP 2: Setup email sending service
To send a mail via node-mailer we need to create a transporter object with the configuration defined in the config object as shown previously. It majorly focusses on 4 parameters that are
-
from // the email sent from
-
to // Sending to, can be an array of recipients
-
subject // the mail subject
-
HTML // the HTML body if you have a template
-
text // the text you want to send (can be used along with HTML as well)
When the mail is sent we print the detail and time to cross verify the results at the end of the article.
STEP 3: Create Mail read service
This file is quite complicated to explain. I'll try my best to explain what's going on in here.
The function readMail at line 5 is the wrapper for the imap service and natively it used callbacks. The code available on documentation is quite difficult to understand. I converted it to use async await syntax for better readability. As the function starts, we try to establish a connection with our passed mail configuration. If the connection succeeds we print the information. Otherwise it goes to catch block and print the error. The searchCriteria at line 10 is used to determine what type of mails are we looking at. It may be SEEN, UNSEEN and along with it you can pass a custom configuration like
const searchCriteria = [ 'UNSEEN', ['SINCE', 'May 20, 2021']
// Meaning to fetch all the mails unread emails since May 20, 2021
The fetch options defines what we want in the emails to be filtered. For my case I included the header and text part. The markSeen when set to true will fetch the unread mail (if searchCriteria is UNSEEN) and then mark them as read. The results at line 15 returns a lot of data due to which it needs to be parsed. The code after line 15 totally depends on what you are searching for. You may use regex to extract the relevant data but it might not always work.
Since I mentioned after line 15 you need a custom code functionality to target the exact part of the mail you are looking for. I targeted the text of the mail so that we can verify the content of what we sent and what we received.
This is all you need to do for reading the mails given the searchCriteria and the fetchOptions.
Step 4: Assembling all the modules
So for this part for the purpose of demonstration I would simply send a mail, wait for 10 seconds and try reading the mail that was sent. The main app.js file is quite straight forward too.
Finally let's see the output
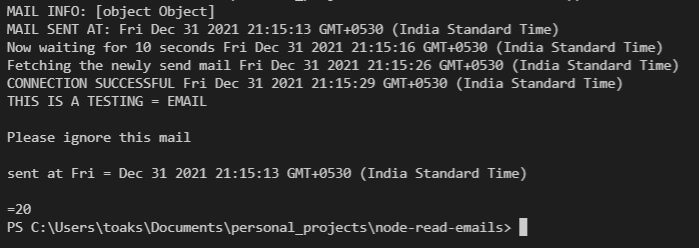
Notice the time period in which the program flow was executed.
The mail was sent at 21:15:13
The information that program will wait arrived at 21:15:16 [3 seconds]
After timeout, started fetching the details at 21:15:26 [10 seconds] Connection successful at 21:15:29 [3 seconds]
The program worked exactly as mentioned. Just a note in the end that I used a library called html-to-text to convert the html to text. This is how simple it is to read and send mails. For other information here are some links that might be useful for you.
Comments
Loading comments…