What is JWT
JWT(Json Web Token) is a standard that defines a way to transmit secure information through tokens.
JWTs are commonly used for authentication and authorization in web applications, APIs, and microservices architectures, including frontend applications built with technologies such as Next.js, Angular, or React. JWTs provide a secure means of transmitting authentication tokens between the client and the server.
JWTs can be signed publicly or privatelyA standard JWT looks like this:
eyJhbGciOiJIUzI1NiIsInR5cCI6IkpXVCJ9.
eyJzdWIiOiIxMjM0NTY3ODkwIiwibmFtZSI6IkpvaG4gRG9lIiwiaWF0IjoxNTE2MjM5MDIyfQ.
SflKxwRJSMeKKF2QT4fwpMeJf36POk6yJV_adQssw5c
As you can see, its structure is made up of 3 parts separated by a period(.), namely:
- header
- payload
- signature
Header:
The header is the first part of a JWT token, and it identifies the algorithm used to sign and verify the signature. Signing algorithms may include RSA signature, HMAC-SHA256, HMAC-SHA512, and others.
Payload:
The payload is the second part, and it contains claims. A claim can include the following:
- A user's id.
- Permissions.
- Expiration time.
- Issued-at time.
- Any other data required by the application.
Signature
The signature and the third part creates by combining the base64-encoded header and base64-encoded payload and a secret key. The signature is used to verify the authenticity of the JWT token.
All three parts are Base64Url encoded and concatenated using periods (“.”) to form a URL string
When a user logins to a website, the user is authenticated, and the server generates a unique JWT token as a response. The user then uses the token in subsequent requests by including it in the Authorisation Header in the format Authorization: Bearer [JWT token].
During subsequent requests, the server will continuously verify the token’s authenticity during each request.
Getting Started
In this section, we will create a django application and demonstrate how JWT tokens are generated when a user is authenticated and how to restrict certain views from access when the user does not provide a token.
Let’s start by creating and activating a new virtual environment with the venv module.
python -m venv myenviron
source myenviron/bin/activate
Install django, django rest framework, and the simple JWT package. The simple JWT provides an easy-to-use authentication Backend for the Django REST framework. Install django, django rest framework, and the simple JWT package. The simple JWT provides an easy-to-use authentication Backend for the Django REST framework.
pip install django djangorestframework djangorestframework-simplejwt
Create a django project named django_jwt and an app called tokens.
django-admin startproject django_jwt
cd django_jwt
python manage.py startapp tokens
Add the Django rest framework, the Simple JWT package, and the tokens app to the list of INSTALLED_APPS in the settings.py file.
INSTALLED_APPS = [
   ......

    'rest_framework_simplejwt',
    'rest_framework',

    'tokens',
]
Next, add the rest_framework_simplejwt.authentication.JWTAuthentication to the DEFAULT_AUTHENTICATION_CLASSES settings.py file.
REST_FRAMEWORK = {
    'DEFAULT_AUTHENTICATION_CLASSES': [
        'rest_framework_simplejwt.authentication.JWTAuthentication',
    ],
}
Django rest framework uses the DEFAULT_AUTHENTICATION_CLASSES setting to specify a list of authentication classes for authentication. Adding rest_framework_simplejwt.authentication.JWTAuthentication configures Django Rest framework to use JWT authentication for your application.
Run migrations to create the default user database tables. Create a superuser with the username admin.
python manage.py migrate
python manage.py createsuperuser
UserLogin
When a user logins in, we want the server to provide them with a JWT token which they will use to authenticate them when they perform requests in the application.
In your tokens/views.py file, create a LoginView class that authenticates a user and creates a unique token.
from django.http import JsonResponse
from rest_framework.views import APIView
from rest_framework_simplejwt.tokens import RefeshToken
from django.contrib.auth.models import User
from django.contrib.auth import authenticate


# Create your views here.

class LoginView(APIView):
    def post(self, request):
        username = request.data.get('username')
        password = request.data.get('password')

        user = authenticate(
            username=username, password=password)

        refresh = RefeshToken.for_user(user)

        return JsonResponse(
            {
               'refresh':str(refresh),
               'access':str(refresh.access_token)
            }
        )
In the code above, we get the username and password from the request data , then authenticate the user with the built in authenticate method.
The authenticate() method is a built-in function provided by Django’s authentication framework. It verifies the user credentials and authenticates them.
Refresh.for_user(user) — creates a a token for the user
Lastly, we return a JsonResponse with the refresh and access_token as strings.
Open the root urls.py file and map the LoginView to a url path.
path('api/login', LoginView.as_view(), name ='login')
We will use the superuser credentials and the POSTMAN tool to test the login endpoint. If you dont have POSTMAN, you can find download it here.
Open Postman and perform a get request to the http://127.0.0.1:8000/api/login endpoint. The Content type should be set to application/json.
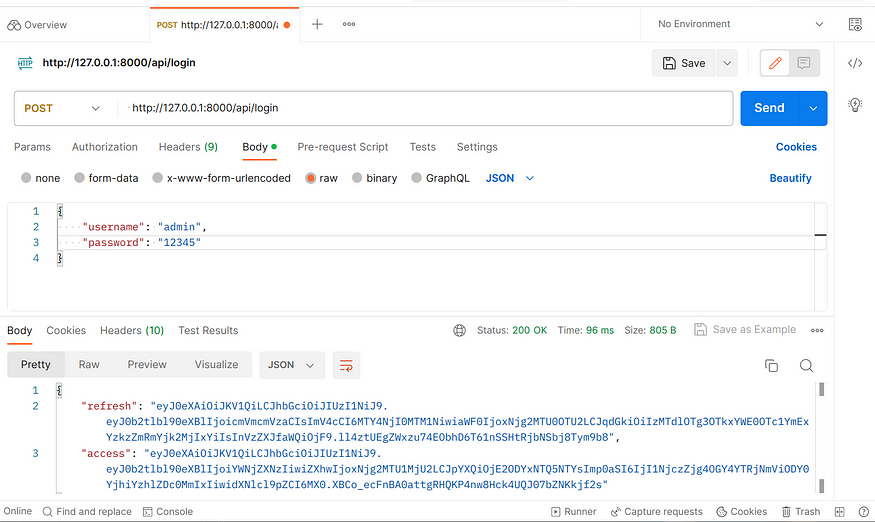
As you can see above, the login url returns a refresh and an access token.
refresh : As the name suggests, a refresh token is used to refresh tokens; in simple terms, it is used to obtain a new access token without logging in. A refresh token has a longer expiration time compared to an access token.
The user can use the refresh token to request a new access token if the access token expires.
Refresh tokens have a longer expiration timeframe.
access: An access token is used to grant access. The user will use the access token to authenticate and authorize application requests. Access tokens have a short expiration timeframe.
If we decode the access token, it gives you the following
 {
 typ: "JWT",
 alg: "HS256"
}.
{
 token_type: "access",
 exp: 1686203362,
 iat: 1686203062,
 jti: "7ca1b5721c7145feab6b1efe0f127008",
 user_id: 1
}.
[signature]
Header:
typ: “JWT”: indicates that the token is a JWT.alg: “HS256” :indicates that the algorithm used to sign the token is HMAC-SHA256.
Payload:
token_type: “access”: indicates that it is an access token.exp: 1686203362: indicates the expiration timestamp of the token; the timestamp is represented as a Unix timestamp.iat: 1686203062:represents the issued-at timestamp of the tokenjti: “7ca1b5721c7145feab6b1efe0f127008”: a unique identifier for the token.user_id: 1— The user object id associated with the token. In our case, this is the superuser, and django assigned an id =1
from django.contrib.auth.models import User
user = User.objects.get(username="admin")
user.id
1
Signature:
[signature]— indicates the signature of the JWT,
Let’s create a protected view and use the tokens to authorize the user. Open views.py and add the following code.
from rest_framework.permissions import IsAuthenticated

class RestrictedView(APIView):
    permission_classes = [IsAuthenticated]

    def get(self, request, format=None):
        # Your code here
        return JsonResponse({"response":"YOU ARE ALLOWED HERE"})
Then Map the view to a url.
path('api/restricted', RestrictedView.as_view(), name ='restricted')
Perform a GET request to http://127.0.0.1:8000/api/restricted endpoint with Postman.
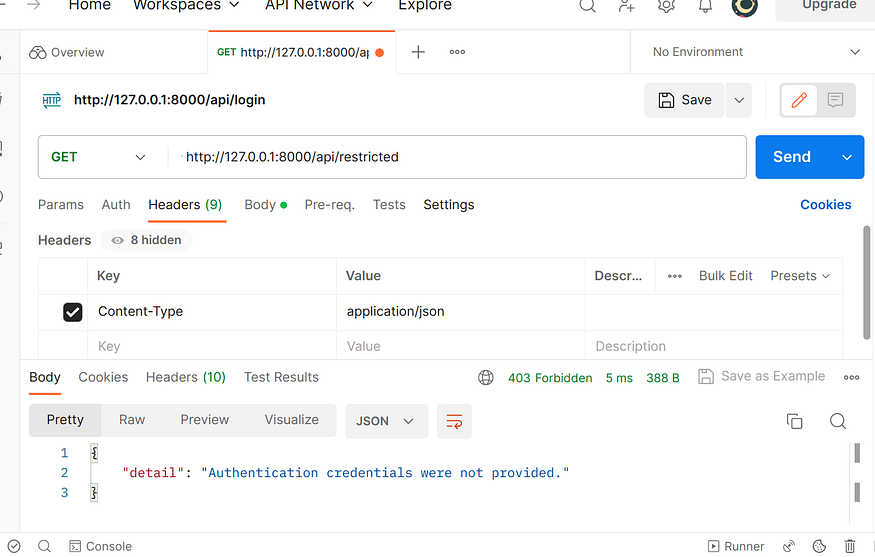
As you can see, it returns the following response since we did not provide the access token in the header.
{
    "detail": "Authentication credentials were not provided."
}
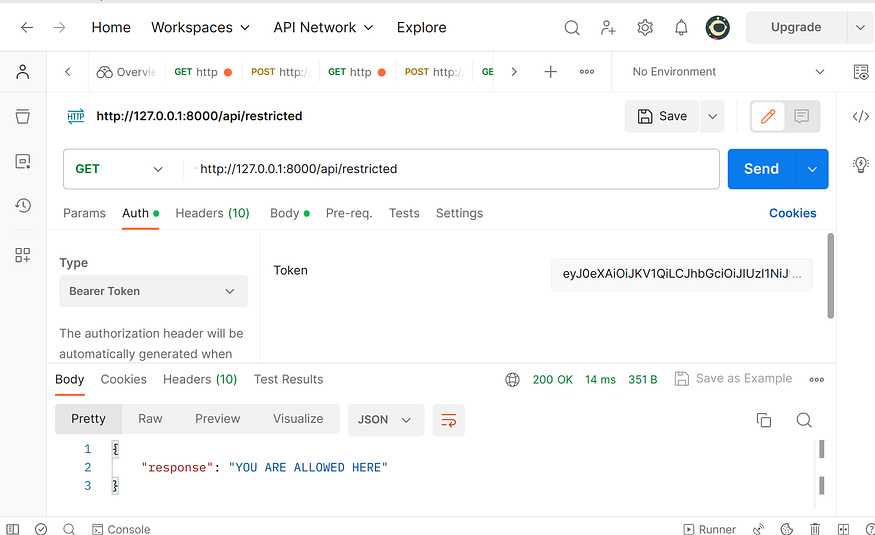
Add the access token in the headers and perform the GET request again. In the Authorization options, choose Bearer Token and add the access token in the space provided.
As you can see, we got the expected response.
If you provide an incorrect or expired access token, you will get this error:
{
    "detail": "Given token not valid for any token type",
    "code": "token_not_valid",
    "messages": [
        {
            "token_class": "AccessToken",
            "token_type": "access",
            "message": "Token is invalid or expired"
        }
    ]
}
Conclusion
This tutorial has introduced you to JSON Web Tokens (JWT), their structure, their work behind the scenes, and how to use the Simple JWT library in a Django application. We have learned about their significance in authentication and authorization processes.
By leveraging JWTs with the Django Rest Framework, you can enhance the security of your API endpoints.
Comments
Loading comments…