Image by Will McGugan
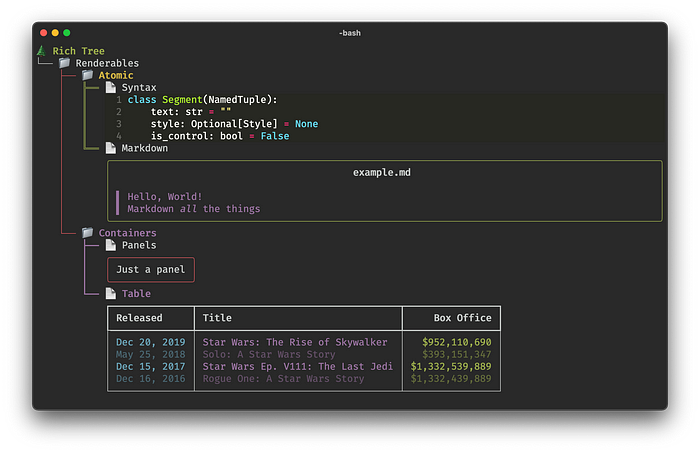
I was introduced to the most amazing Python library called “rich”. I am surprised I had not heard of it earlier, as it would have made life a lot easier. One of the contributors to my free open-source trading bot project (“PyCryptoBot”) started creating a console-based UI using it. If you are unfamiliar with the library this will give you a brief introduction and a demonstration. The demonstration will be a trading WebSockets dashboard using EOD Historical Data (EODhd).
At a high level, the “rich” library enriches the text console in such a nice way. You can add console markup, rich text, highlighting, pretty-printing, log handling, enhanced traceback, prompts, columns, render groups, markdown, padding, panels, progress displays, syntax, tables, trees, live displays, layouts, emojis, and much more. I recommend taking a look at the documentation.
What I created is pretty basic in terms of the capabilities of “rich”. EOD Historical Data (EODhd) allows the subscribing of up to 50 trading tickers for free. I created a 7x7 matrix that contained 49 tickers, all updating in real-time. I used 49 instead of 50 only for convenience in terms of the matrix.
Just to give you an idea, this is what the empty layouts look like before receiving data. I have 7x7 boxes filling the entire console width and height within my Visual Studio Code console.

Image by Author
If I run the script in a full-screen console window it looks like this.
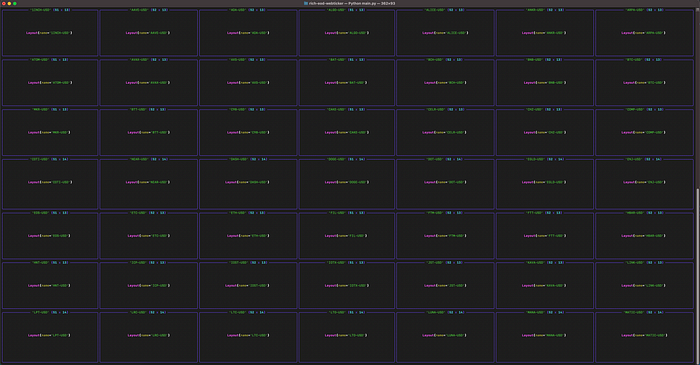
Image by Author
It’s a little small in this image but the main takeaway here is that you can see that the scaling of the layouts is dynamic.
The end result of what we are creating will look like this.
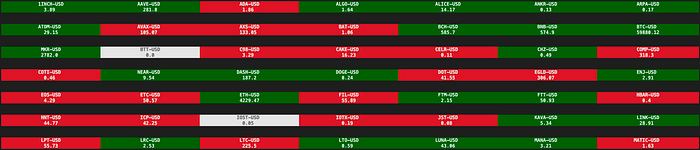
Image by Author
This matrix of boxes is updating real-time with crypto market prices. The box will be green if the current price is higher than the previous price, red if the current price is below the previous price, and white if there is no change. I’m rounding the prices to two decimal places so that is why BTT-USD is white and showing 0. The actual price is $0.00357. I could have replaced it with a more suitable market but I left it in just to show you the white box option.
Let’s dive into the code
The first step is to import the “rich” library components we want to use (out of the many available).
from rich.console import Console
from rich.layout import Layout
from rich.text import Text
from rich.live import Live
You will almost always import Console. There are many layout options like Panel, Table, etc. but for my demonstration, I used a Layout. I imported Text as I am rendering rich Text and I imported Live as I want to enable live updating of my interface.
I then imported the WebSocketClient from EOD Historical Data (EODhd). This will provide our real-time trading data via a WebSocket.
from eodhistoricaldata import WebSocketClient
I then initialized my “rich” Console and Layout.
console = Console()
layout = Layout()
I then went to the “List of Supported CRYPTO Currencies” on EOD Historical Data (EODhd), and selected 49 markets (they call them symbols). There is no particular reason why I selected them. My main criteria were high volume symbols to receive a lot of activity on my tickers.
symbol_list = [
    "1INCH-USD", "AAVE-USD", "ADA-USD", "ALGO-USD",
    "ALICE-USD", "ANKR-USD", "ARPA-USD",  "ATOM-USD",
    "AVAX-USD", "AXS-USD", "BAT-USD", "BCH-USD", "BNB-USD",
    "BTC-USD", "MKR-USD", "BTT-USD", "C98-USD", "CAKE-USD",
    "CELR-USD", "CHZ-USD", "COMP-USD", "COTI-USD", "NEAR-USD",
    "DASH-USD", "DOGE-USD", "DOT-USD", "EGLD-USD", "ENJ-USD",
    "EOS-USD", "ETC-USD", "ETH-USD", "FIL-USD", "FTM-USD",
    "FTT-USD", "HBAR-USD", "HNT-USD", "ICP-USD", "IOST-USD",
    "IOTX-USD", "JST-USD", "KAVA-USD", "LINK-USD", "LPT-USD",
    "LRC-USD", "LTC-USD", "LTO-USD", "LUNA-USD", "MANA-USD",
    "MATIC-USD",
]
I then created a dictionary using this symbol list. The dictionary contains a list with two numbers. The first is the price of the symbol. The second is either a -1 for decreased, 0 for stayed the same, or 1 for increased. You may be wondering why I created the “symbol_list” when I could have just created the “symbol_dict” in one step. The reason was purely for ease of input.
symbol_dict = {}
for symbol in symbol_list:
    symbol_dict[symbol] = [0, 0]
I then created my matrix layout. The first split created my 7 rows, then each row is split into 7 column layouts. I gave the name of each cell layout the market symbol name. You will see why I did this in a moment. Basically, you are able to access these layouts by name and update them individually. If you are familiar with any web front-end technologies like React.js or Angular.js, it has a similar feel as being able to update a component.
layout.split(
    Layout(name="R1"),
    Layout(name="R2"),
    Layout(name="R3"),
    Layout(name="R4"),
    Layout(name="R5"),
    Layout(name="R6"),
    Layout(name="R7"),
)
layout["R1"].split_row(
    Layout(name=symbol_list[0]),
    Layout(name=symbol_list[1]),
    Layout(name=symbol_list[2]),
    Layout(name=symbol_list[3]),
    Layout(name=symbol_list[4]),
    Layout(name=symbol_list[5]),
    Layout(name=symbol_list[6]),
)
layout["R2"].split_row(
    Layout(name=symbol_list[7]),
    Layout(name=symbol_list[8]),
    Layout(name=symbol_list[9]),
    Layout(name=symbol_list[10]),
    Layout(name=symbol_list[11]),
    Layout(name=symbol_list[12]),
    Layout(name=symbol_list[13]),
)
layout["R3"].split_row(
    Layout(name=symbol_list[14]),
    Layout(name=symbol_list[15]),
    Layout(name=symbol_list[16]),
    Layout(name=symbol_list[17]),
    Layout(name=symbol_list[18]),
    Layout(name=symbol_list[19]),
    Layout(name=symbol_list[20]),
)
layout["R4"].split_row(
    Layout(name=symbol_list[21]),
    Layout(name=symbol_list[22]),
    Layout(name=symbol_list[23]),
    Layout(name=symbol_list[24]),
    Layout(name=symbol_list[25]),
    Layout(name=symbol_list[26]),
    Layout(name=symbol_list[27]),
)
layout["R5"].split_row(
    Layout(name=symbol_list[28]),
    Layout(name=symbol_list[29]),
    Layout(name=symbol_list[30]),
    Layout(name=symbol_list[31]),
    Layout(name=symbol_list[32]),
    Layout(name=symbol_list[33]),
    Layout(name=symbol_list[34]),
)
layout["R6"].split_row(
    Layout(name=symbol_list[35]),
    Layout(name=symbol_list[36]),
    Layout(name=symbol_list[37]),
    Layout(name=symbol_list[38]),
    Layout(name=symbol_list[39]),
    Layout(name=symbol_list[40]),
    Layout(name=symbol_list[41]),
)
layout["R7"].split_row(
    Layout(name=symbol_list[42]),
    Layout(name=symbol_list[43]),
    Layout(name=symbol_list[44]),
    Layout(name=symbol_list[45]),
    Layout(name=symbol_list[46]),
    Layout(name=symbol_list[47]),
    Layout(name=symbol_list[48]),
)
The last part is the retrieving of the WebSocket data and updating the relevant layout cell. You will notice I removed my “api_key”. Replace “
This code should be self-explanatory but I wanted to point out a couple of important parts.
The “layout” component will be rendered real-time and full-screen. The code in the code block below it will be run on each refresh. Depending on what you want to do, you may want to import the time library and sleep 1 second. For my WebSocket demonstration as the data was coming in so quickly, I removed this manual delay.
with Live(layout, screen=True, redirect_stderr=False) as live:
This is the next important piece of code I wanted to show you.
layout[websocket.message["s"]].update(Text(f{websocket.message['s']}\n{round(float(symbol_dict[websocket.message['s']][0]), 2)}", style="bold white on dark_green", justify="center")
In simple terms
layout["BTC-USD"].update(Text("0.1", style="bold white on dark_green", justify="center")
You are able to target a specific layout and update it (using a style, or not). In this example, I’m accessing the “BTC-USD” layout and updating the layout with the Text, “0.1”.
Summary
I highly recommend checking out the “rich” library by Will McGugan. This is also a really good video tutorial on how to use the library. I’ve also been using EOD Historical Data (EODhd) quite a lot recently. They recently added their WebSockets functionality so they are still working through a few issues, but on a whole, it’s pretty great. I would really like to see more British Pound (GBP) crypto symbols on their platform. For example, they only have SOL-USD and not SOL-GBP. Hopefully, if they read this article they will add it to their roadmap :)
Comments
Loading comments…