
Authentication and Authorization are two difficult concepts in programming. Lucky for us, Django makes our lives super easy and handles those things for us.
Recently, I have been working on a Django REST API that has around seven roles in it, all have different permissions for both the back-end API and the web app, which displays different views based on roles. This created a problem, as Session Authorization is great until we start working with mobile apps, which is the next step in this application. A JWT token was needed for authentication, but how was I to handle authorization? Let’s take a look at how to add role-based authorization to your Django REST apps.
Project Setup
You should have Python already installed on your system. Let’s create our virtual environment and get Django installed.
First, create the directory for your Django project and cd into it:
mkdir my-django-app && cd "$_"
Next, we need to create our virtual environment:
// macOS and Linux
python3 -m venv venv// Windows
python -m venv venv
Active your environment with:
// macOS and Linux
source venv/bin/activate// Windows
.\venv\Scripts\activate
And finally, install your dependencies:
// macOS and Linux
pip3 install django djangorestframework djangorestframework-simplejwt// Windows
pip install django djangorestframework djangorestframework-simplejwt
Freeze your requirements with:
// macOS and Linux
pip3 freeze > requirements.txt// Windows
pip freeze > requirements.txt
Now we can start writing some code!
Creating your Django App
Now we are ready to start our Django project. Start with:
django-admin startproject my_django_app
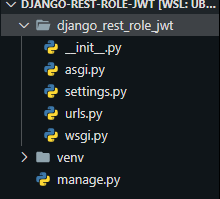
This will create a new folder in your current directory with a folder of the same name and a file named manage.py inside of it. You need to move those files to your current directory. Once you do that, you can remove the original folder that was created. The folder structure should like like the following:
Next, let’s create an app. Run the following command to start a project:
// macOS and Linux
python3 manage.py startapp api// Windows
python manage.py startapp api
Create Your Model and Manager
We are going to create a custom user for our authentication needs. Add in the following code below to create our user:
import uuid

from django.db import models
from django.contrib.auth.models import PermissionsMixin
from django.contrib.auth.base_user import AbstractBaseUser
from django.utils import timezone

from .managers import CustomUserManager

# Create your models here.
class User(AbstractBaseUser, PermissionsMixin):

    # These fields tie to the roles!
    ADMIN = 1
    MANAGER = 2
    EMPLOYEE = 3

    ROLE_CHOICES = (
        (ADMIN, 'Admin'),
        (MANAGER, 'Manager'),
        (EMPLOYEE, 'Employee')
    )

    class Meta:
        verbose_name = 'user'
        verbose_name_plural = 'users'
Then, we can add fields to our user:
import uuid

from django.db import models
from django.contrib.auth.models import PermissionsMixin
from django.contrib.auth.base_user import AbstractBaseUser
from django.utils import timezone

from .managers import CustomUserManager

# Create your models here.
class User(AbstractBaseUser, PermissionsMixin):

  # Roles created here
  uid = models.UUIDField(unique=True, editable=False, default=uuid.uuid4, verbose_name='Public identifier')
  email = models.EmailField(unique=True)
  first_name = models.CharField(max_length=30, blank=True)
  last_name = models.CharField(max_length=50, blank=True)
  role = models.PositiveSmallIntegerField(choices=ROLE_CHOICES, blank=True, null=True, default=3)
  date_joined = models.DateTimeField(auto_now_add=True)
  is_active = models.BooleanField(default=True)
  is_deleted = models.BooleanField(default=False)
  created_date = models.DateTimeField(default=timezone.now)
  modified_date = models.DateTimeField(default=timezone.now)
  created_by = models.EmailField()
  modified_by = models.EmailField()

  USERNAME_FIELD = 'email'
  REQUIRED_FIELDS = []

    objects = CustomUserManager()

    def __str__(self):
        return self.email
The code above is just normal Django code. I replaced the default username field with an email address and I also removed is_staff and is_superuser. These fields are fine to have if you have a use for them. In this example, we don’t have any. We are also setting the default role of a ‘Employee’ for all new users in our application.
You may have noticed I also added an extra UUID field called uid to the model, but not at the primary key. I like to use a UUID as a public identifier that we can render in a URL. I only put it on resources that will be displayed on their own, not internal or nested tables. This way, I still have an integer field as my PK that I can easily do queries on in the database and I have a safer identifier to use in my URL’s.
A user manager class allows you to write your own logic for creating users and superusers. Add a managers.py file to your api app and add the following code to it:
from django.contrib.auth.base_user import BaseUserManager
from django.utils.translation import ugettext_lazy as _


class CustomUserManager(BaseUserManager):
    """
    Custom user model where the email address is the unique identifier
    and has an is_admin field to allow access to the admin app
    """
    def create_user(self, email, password, **extra_fields):
        if not email:
            raise ValueError(_("The email must be set"))
        if not password:
            raise ValueError(_("The password must be set"))
        email = self.normalize_email(email)

        user = self.model(email=email, **extra_fields)
        user.set_password(password)
        user.save()
        return user

    def create_superuser(self, email, password, **extra_fields):
        extra_fields.setdefault('is_active', True)
        extra_fields.setdefault('role', 1)

        if extra_fields.get('role') != 1:
            raise ValueError('Superuser must have role of Global Admin')
        return self.create_user(email, password, **extra_fields)
Notice here when I create my superuser, I am setting my role to 1, or ‘Admin’. In this case, I want to make a super user when I create an admin, but you can set this field to whatever role you want. Again, this is just standard Django code.
Update settings and Make Migrations
Now we need to go into our settings.py file and add a couple of fields. We first need to add our new app to the INSTALLED_APPS and setup our settings for authentication and for the JWT.
# Other settings not shown
# Set your auth user to the new user you have created
AUTH_USER_MODEL = 'api.User'

# We need to add our api app and the rest framework to INSTALLED_APPS
INSTALLED_APPS = [
    'django.contrib.admin',
    'django.contrib.auth',
    'django.contrib.contenttypes',
    'django.contrib.sessions',
    'django.contrib.messages',
    'django.contrib.staticfiles',
    'rest_framework',
    'api.apps.ApiConfig'
]

# App the REST framework url conf
ROOT_URLCONF = 'django_rest_role_jwt.urls'

# REST framework settings
REST_FRAMEWORK = {
    'DEFAULT_PERMISSION_CLASSES': (
        'rest_framework.permissions.IsAuthenticated'
    ),
    'DEFAULT_AUTHENTICATION_CLASSES': (
        'rest_framework_simplejwt.authentication.JWTAuthentication',
        'rest_framework.authentication.SessionAuthentication',
        'rest_framework.authentication.BasicAuthentication'
    ),
}

# Configure the JWT settings
SIMPLE_JWT = {
    'ACCESS_TOKEN_LIFETIME': timedelta(minutes=5),
    'REFRESH_TOKEN_LIFETIME': timedelta(days=14),
    'ROTATE_REFRESH_TOKENS': True,
    'BLACKLIST_AFTER_ROTATION': False,
    'ALGORITHM': 'HS256',
    'SIGNING_KEY': SECRET_KEY,
    'VERIFYING_KEY': None,
    'AUTH_HEADER_TYPES': ('JWT',),
    'USER_ID_FIELD': 'id',
    'USER_ID_CLAIM': 'user_id',
    'AUTH_TOKEN_CLASSES': ('rest_framework_simplejwt.tokens.AccessToken',),
    'TOKEN_TYPE_CLAIM': 'token_type',
}
These settings tell Django to use the JWT token as the default authentication schema. The settings for the JWT token are the default settings from the SimpleJWT docs.
Next, we need to run our database migrations. Use the following command to run your migrations:
// macOS and Linux
python3 manage.py makemigrations// Windows
python manage.py makemigrations
Then to apply the migrations:
// macOS and Linux
python3 manage.py migrate// Windows
python manage.py migrate
We are now ready to start building our serializers.
Creating Serializers
In Django Rest Framework, a serialzier is used to take complex data and put it into a standard Python data form to be used as JSON, XML, or other content types. Let’s create a serializer for our registration process.
from .models import User

class UserRegistrationSerializer(serializers.ModelSerializer):
class Meta:
model = User
fields = (
'email',
'password'
)

    def create(self, validated_data):
        auth_user = User.objects.create_user(**validated_data)
        return auth_user
All we need to register a user is their email address and a password.
Now, we need a serializer to handle our logins. Here, we need to authenticate a user based on a given email and password and return the JWT back to the user.
from rest_framework import serializers
from rest_framework_simplejwt.tokens import RefreshToken


class UserLoginSerializer(serializers.Serializer):
    email = serializers.EmailField()
    password = serializers.CharField(max_length=128, write_only=True)
    access = serializers.CharField(read_only=True)
    refresh = serializers.CharField(read_only=True)
    role = serializers.CharField(read_only=True)

    def create(self, validated_date):
        pass

    def update(self, instance, validated_data):
        pass

    def validate(self, data):
        email = data['email']
        password = data['password']
        user = authenticate(email=email, password=password)

        if user is None:
            raise serializers.ValidationError("Invalid login credentials")

        try:
            refresh = RefreshToken.for_user(user)
            refresh_token = str(refresh)
            access_token = str(refresh.access_token)

            update_last_login(None, user)

            validation = {
                'access': access_token,
                'refresh': refresh_token,
                'email': user.email,
                'role': user.role,
            }

            return validation
        except AuthUser.DoesNotExist:
            raise serializers.ValidationError("Invalid login credentials")
The login serializer is pretty straightforward. We are defining all required fields for handling login requests. Note that password is write_only. This is to prevent a password in plain text from being returned back to the user as apart of the response. We also have an access and refresh token. The access token lets the user access resources and expires after five minutes by default. When it expires, we send the refresh token back to the server and have it return another access token. More on that in the SimpleJWT docs.
Finally, we need one more serializer to handle returning all users data. This object can only be accessed by Admins. This is the route we will use our role authorization for.
class UserListSerializer(serializers.ModelSerializer):
    class Meta:
        model = AuthUser
        fields = (
            'email',
            'role'
        )
This serializer is really basic. We just want to get the email addresses and user roles back from the API.
Creating Views, Update URLs, and Run Tests
We need to create three views. One for registration, one for login, and one for accessing all the users.
Let’s first create a registration view:
from rest_framework import status
from rest_framework.views import APIView
from rest_framework.response import Response
from rest_framework.permissions import AllowAny, IsAuthenticated

from .serializers import (
    UserRegistrationSerializer,
    UserLoginSerializer,
    UserListSerializer
)

from .models import User


class AuthUserRegistrationView(APIView):
    serializer_class = UserRegistrationSerializer
    permission_classes = (AllowAny, )

    def post(self, request):
        serializer = self.serializer_class(data=request.data)
        valid = serializer.is_valid(raise_exception=True)

        if valid:
            serializer.save()
            status_code = status.HTTP_201_CREATED

            response = {
                'success': True,
                'statusCode': status_code,
                'message': 'User successfully registered!',
                'user': serializer.data
            }

            return Response(response, status=status_code)
Now, we need to create a view for logins:
class AuthUserLoginView(APIView):
    serializer_class = UserLoginSerializer
    permission_classes = (AllowAny, )

    def post(self, request):
        serializer = self.serializer_class(data=request.data)
        valid = serializer.is_valid(raise_exception=True)

        if valid:
            status_code = status.HTTP_200_OK

            response = {
                'success': True,
                'statusCode': status_code,
                'message': 'User logged in successfully',
                'access': serializer.data['access'],
                'refresh': serializer.data['refresh'],
                'authenticatedUser': {
                    'email': serializer.data['email'],
                    'role': serializer.data['role']
                }
            }

            return Response(response, status=status_code)
Finally, we need a view for our list of users:
class UserListView(APIView):
    serializer_class = UserListSerializer
    permission_classes = (IsAuthenticated,)

    def get(self, request):
        user = request.user
        if user.role != 1:
            response = {
                'success': False,
                'status_code': status.HTTP_403_FORBIDDEN,
                'message': 'You are not authorized to perform this action'
            }
            return Response(response, status.HTTP_403_FORBIDDEN)
        else:
            users = AuthUser.objects.all()
            serializer = self.serializer_class(users, many=True)
            response = {
                'success': True,
                'status_code': status.HTTP_200_OK,
                'message': 'Successfully fetched users',
                'users': serializer.data

            }
            return Response(response, status=status.HTTP_200_OK)
Here, we are setting the permissions classes to IsAuthenticated. This stops users who aren’t logged from accessing this information. Next, we need to check the users role. We can get that from request.user.role. If the role is 1 or is an admin, then they can access the requested resource.
Now we need to update our URLs to be able to hit our endpoints. Create a urls.py file and add the following code:
from django.urls import path
from rest_framework_simplejwt import views as jwt_views

from .views import (
    UserRegistrationView,
    UserLoginView,
    UserListView
)

urlpatterns = [
    path('token/obtain/', jwt_views.TokenObtainPairView.as_view(), name='token_create'),
    path('token/refresh/', jwt_views.TokenRefreshView.as_view(), name='token_refresh'),
    path('register', UserRegistrationView.as_view(), name='register'),
    path('login', UserLoginView.as_view(), name='login'),
    path('users', UserListView.as_view(), name='users')
]
We now need to import them to our main urls.py file:
from django.contrib import admin
from django.urls import path, include

urlpatterns = [
    path('admin/', admin.site.urls),
    path('api/auth/', include('api.urls'))
]
Let’s add some tests to see if it works. Open up test.py and add the following code.
import json
from django.urls import include, path, reverse
from rest_framework import status
from rest_framework.test import APITestCase, APIClient, URLPatternsTestCase

from .models import User

# Create your tests here.

class UserTest(APITestCase, URLPatternsTestCase):
""" Test module for User """

    urlpatterns = [
        path('api/auth/', include('api.urls')),
    ]

    def setUp(self):
        self.user1 = User.objects.create_user(
            email='test1@test.com',
            password='test',
        )

        self.admin = User.objects.create_superuser(
            email='admin@test.com',
            password='admin',
        )

    def test_login(self):
        """ Test if a user can login and get a JWT response token """
        url = reverse('login')
        data = {
            'email': 'admin@test.com',
            'password': 'admin'
        }
        response = self.client.post(url, data)
        response_data = json.loads(response.content)
        self.assertEqual(response.status_code, status.HTTP_200_OK)
        self.assertEqual(response_data['success'], True)
        self.assertTrue('access' in response_data)

    def test_user_registration(self):
        """ Test if a user can register """
        url = reverse('register')
        data = {
            'email': 'test2@test.com',
            'password': 'test',
        }
        response = self.client.post(url, data)
        self.assertEqual(response.status_code, status.HTTP_201_CREATED)

    def test_list_all_users_as_admin(self):
        """ Test fetching all users. Restricted to admins """
        # Setup the token
        url = reverse('login')
        data = {'email': 'admin@test.com', 'password': 'admin'}
        response = self.client.post(url, data)
        login_response_data = json.loads(response.content)
        self.assertEqual(response.status_code, status.HTTP_200_OK)
        self.assertTrue('access' in login_response_data)
        token = login_response_data['access']

        # Test the endpoint
        client = APIClient()
        client.credentials(HTTP_AUTHORIZATION='JWT ' + token)
        response = client.get(reverse('users'))
        response_data = json.loads(response.content)
        self.assertEqual(response.status_code, status.HTTP_200_OK)
        self.assertEqual(User.objects.count(), len(response_data['users']))

    def test_access_denied_all_users(self):
        """ Test fetching all users. Restricted to admins """
        # Setup the token
        url = reverse('login')
        data = {'email': 'test1@test.com', 'password': 'test'}
        response = self.client.post(url, data)
        login_response_data = json.loads(response.content)
        self.assertEqual(response.status_code, status.HTTP_200_OK)
        self.assertTrue('access' in login_response_data)
        token = login_response_data['access']

        # Test the endpoint
        client = APIClient()
        client.credentials(HTTP_AUTHORIZATION='JWT ' + token)
        response = client.get(reverse('users'))
        response_data = json.loads(response.content)
        self.assertEqual(response.status_code, status.HTTP_403_FORBIDDEN)
        self.assertFalse(response_data['success'])
All the tests should run successfully.
In this guide, we looked at how to implement role based authorization in Django REST views with JWT authentication. We created a custom user object and tied a role to it, as well as secured our routes. We also wrote unit tests to test our views.
One thing that could be expanded on is if there is a need for multiple roles, you could create a separate role table and create a many to many relationship between that and your custom user object. This would need a little more detailed serializer, but as a whole, is completely doable. It all just depends on what you need in your application.
Full project can be found here: https://github.com/BrockHerion/django-rest-role-jwt
Comments
Loading comments…