When I was first learning React, I felt overwhelmed by its many unique features and extensions. It was one of the most challenging transitions between phases during my time at Flatiron School. Despite this, I was able to get increasingly comfortable with the framework and expand my skill-set to include many helpful tools, including Redux.
Why Redux?
One of the main reasons so many people use redux is that it utilizes simpler, more streamlined state management for complex or highly populated component hierarchies. Redux also makes it easier to maintain a separation of concerns in your app — its one and only job is to handle global state.
When managing state in a large app with many components, it can get quite messy when the state in one component must be updated by a second component. Traditionally, the new value would be passed all the way to the top of the component hierarchy through every component above its origin, and then passed down again to the next component to update its state.
With Redux, state is stored globally and can easily be updated or invoked from anywhere in the app.
This is comparable to taking the local bus vs. taking an uber. A local bus usually only goes in one direction and makes many stops to get to a final destination. It also only picks up from predetermined locations and if the bus doesn’t stop at your desired destination, you end up having to transfer to a different bus. Alternatively, an uber can pick you up from any location and will always bring you to the correct destination. Sure, the bus is cheaper, gets the job done, and you don’t have to set up a whole profile or enter your credit card info, but uber always comes in handy when things with the bus get a little too complicated.
File Structure
When I was learning redux I was taught to separate actions and reducers by file. This follows Redux’s theme of separation of concerns and also makes the code more readable and less cluttered.
Index.js

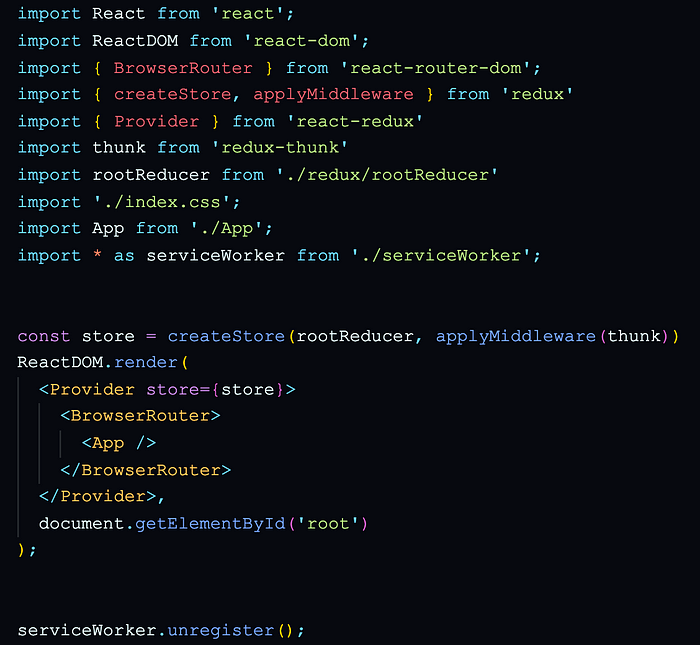
At the top of the Index.js file, createStore applyMiddleware, and rootReducer are imported from the redux library, Provider is imported from the react-redux library, and thunk is imported from the redux-thunk library.
CreateStore is used to create the app’s store using the root reducer which will contain the state tree of the app. ApplyMiddleware is used to apply the redux-thunk middleware to the store. Provider is passed the store as props, making state accessible to all components wrapped inside.
The Action Types File
The Action Types file contains the variables used to discern actions in the Actions File. Although this file isn’t necessary to Redux’s functionality, it further contributes to the separation of concerns and helps avoid typos or other small mistakes.

In my app, Pocket Dudes, I chose to utilize Redux to handle pet state. In the Action Types file, two variables, GET_PETS and ADD_PET, are set to their name in quotations and exported.
The Actions File
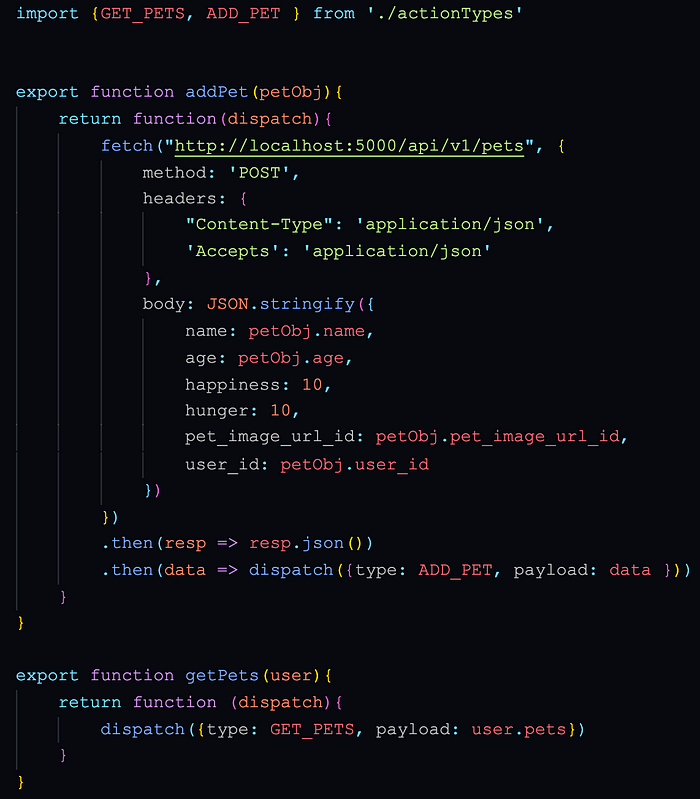
The Actions file contains redux functions that return the data (dispatch) being passed into redux. Usually, these functions will take in a piece of data and then dispatch it and the action-type to the root reducer.

First, both action types are imported from the Action Types file. The first function, addPet, takes in a pet object and sends a post request to the database. Then, after the post request completes, the data is dispatched to the root reducer with a key payload and the action type ADD_PET. The second function, getPets, takes in the user object, sets the payload to the user's pets, and dispatches it to the root reducer with the action type GET_PETS.
The Root Reducer File
The Root Reducer File contains the current state and “reducer functions” that handle updating state.

In the Root Reducer file, combineReducers is imported from the redux library and is later used to maintain the current state and keep it updated.
Then, default state is set to a hash with a key of ‘pets’ and a value of an empty array. The function petsReducer takes in the default state and the action, determines the action type, and updates the state with the payload (whatever data we set the payload key to in the Actions File).
The root reducer sets the current state of ‘pets’ to whatever the petsReducer is currently returning. If no action is called then the petsReducer returns the current state.
Map Dispatch To Props
The map dispatch to props (mdp) function makes specific redux actions accessible through a component’s props.


Here, I used the getPets function to fetch all of the user’s pets in the PetCard component and the addPet function to add a pet to the user’s list of pets in the AdoptPet component. The connect function is imported at the top of the file from the Redux library and is used to connect the dispatch response from the function, when called, to the root reducer.
Map State to Props
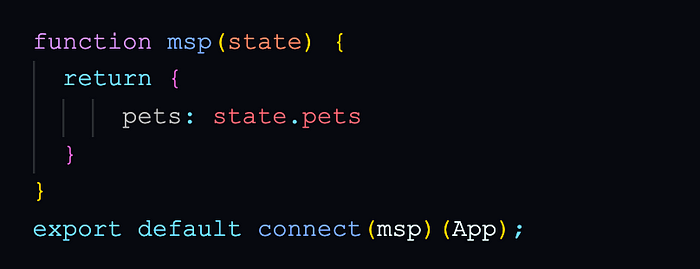
The Map State to Props (msp) function makes specific state objects accessible through a component’s props.

In the App.js file, the msp function takes in the current redux state (through the connect function) and returns the value for a specified state key.
Conclusion
Redux is a very abstract library and takes a lot of studying and practice to fully grasp. Although my understanding is still fairly fresh and I may not have gone very in-depth in my explanations, I plan to continue practicing and learning Redux and will hopefully come back to edit this blog with a more thorough illustration.