
Implementing role-based access control (RBAC) in a React application involves controlling what different users or roles can and cannot do within the app. This helps ensure that only authorized users can access specific routes or features.
First check the deployed app here: https://medium-role-based-access-react.netlify.app/login
- Login by Customer user role and Click and see what is happening by clicking all links provided on the Home Page
- Then, Login by Admin user role and Click and see what is happening by clicking all links provided on the Home Page
Let''s dive into the explanation.
Now, for ease of understanding let''s set up your coding environment by using GitHub Code spaces
Go to the following link: role-based-access-control-react
Click the following buttons:
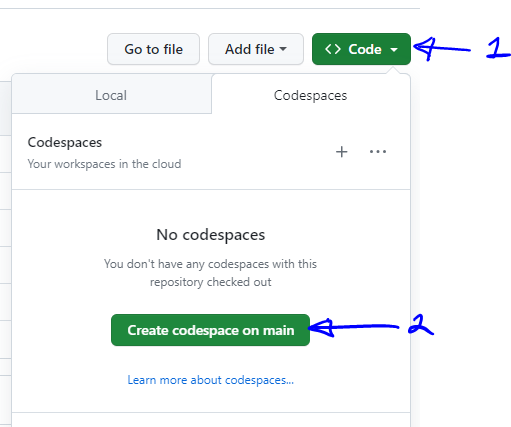
npm install command will be executed automatically.
After successful execution of npm install, run “npm start” in the terminal.
What features are covered in this tutorial?
- If the user is logged in they can''t go to the login page again without logout
- If the user is not logged in they cant view protected pages
- Some pages demonstrated in this example are user role-based protected (which means, Some pages are accessible only for allowed user roles) for example:

You can see the following folder structure

Data folder and Pages Folder explanation

- First, you need to define your user roles. So, In src → data you can see there are 2 user roles defined.
- Now, let''s go to the pages folder. Here we created Login, Nav, and some more pages for demonstration purposes 2.1 — In the Login Page, We provided login for Customer and Admin. Inside the submitLogin you can add your API calls for backend and business logic. We stored user data in local storage. 2.2 — In Nav, You can see logout logic. 2.3 — Other pages are containing only some texts inside the return
Route Folder explanation

- Inside the routes folder, You can see AppRoute.js (The main file that connects all routes) and some more JS files.
- If you check other LoanRoutes.js files in src →routes, you can see exported arrays. Inside the arrays, we have all route data as separate objects.
- Likewise, you can see the same logic in other route files too.
- In UnProtectedRoutes.js we have a login and root route. Those routes can be accessed without login. As you can see, availability is not present here.
- In AppRoutes.js we created a main array that contains all protected routes (in line 15) and unprotected routes (in line 21).
- Then we mapped all unprotected and protected routes separately.
- In line 27, You can see unprotected route mapping. You can see the element is enclosed with the <RedirectIfLoggedIn> tag. We can see login in the <RedirectIfLoggedIn> within some minutes.
- In line 45, You can see unprotected route mapping. You can see the element is enclosed with <RequireAuth userroles={e?.availability}> tag. We can see about this within a few minutes.
- Now let''s go to our important folder Utils.
Utils Folder explanation

Inside the utils you can see, RequireAuth and RedirectIfLogged in files. Let''s see the explanations one by one.
RedirectIfLogged.js
import { Navigate } from "react-router-dom";

const RedirectIfLoggedIn = ({ children }) => {
  if (JSON.parse(localStorage.getItem("user"))) {
    return <Navigate to="/home" />;
  }
  return children;
};
export default RedirectIfLoggedIn;
In summary, this code is a React component that checks if a user is logged in based on the presence of a “user” object in localStorage. If the user is logged in, it redirects them to the “/home” route using the Navigate component. If not, it renders its children.
RequireAuth.js
import { Navigate } from "react-router-dom"
import Swal from ''sweetalert2''
const RequireAuth = ({ children, userroles }) => {
    let currentUserRole;
    if (localStorage.getItem("user")) {
        currentUserRole = JSON.parse(localStorage.getItem("user"));
    }

    if (currentUserRole) {
        if (userroles) {
            if (userroles.includes(currentUserRole)) {
                return children
            } else {
                Swal.fire(''Access Denied !'', "", ''warning'')
                return <Navigate to="/home" />
            }
        } else {
            return children
        }
    } else {
        return <Navigate to="/login"/>
    }
}
export default RequireAuth
In summary, this code is a React component (RequireAuth) that checks if a user is authenticated and authorized based on their role.
If the user is authenticated and authorized, it renders the children. If not, it either redirects the user to the login page or shows an "Access Denied" warning, depending on their role and the provided userroles prop.
Let''s dig more into RequireAuth.js,
- The code imports the
Navigatecomponent from "react-router-dom" for navigation and theSwalmodule from the ''sweetalert2'' library for displaying pop-up messages. - It defines a functional component called
RequireAuth, which takes two props:childrenanduserroles. - Inside the component, it initializes a variable
currentUserRoleto store the current user''s role. It checks if there is a "user" object in the localStorage and parses it as JSON to retrieve the user''s role if it exists. - It then proceeds to check the user’s authentication and authorization:
4.1 — If
currentUserRoleexists (i.e., the user is authenticated): 4.2 — Ifuserroles(an array of roles) is provided as a prop (In AppRoute.js line 53) and it includes thecurrentUserRole, it returns thechildrenprop. This means the user is authorized, and the component renders its content. 4.3 — Ifuserrolesare provided but do not include thecurrentUserRole, it displays an "Access Denied" warning message usingSwal.fireand redirects the user to "/home" using theNavigatecomponent. 4.4 — Ifuserrolesare not provided, it assumes that all users are authorized and returns thechildren. - If
currentUserRoledoes not exist (i.e., the user is not logged in), it redirects the user to the login page ("/login") using theNavigatecomponent. - Finally, the component is exported as the default export of the module, making it available for use in other parts of the application.
In App.js <AppRoutes> is called.
That is all.
You can see the GitHub repo here: https://github.com/sragu2000/role-based-access-control-react
You can see the deployed application here: https://medium-role-based-access-react.netlify.app/login
Thank you for reading… Let''s meet on another interesting topic! 👋
Comments
Loading comments…