This article will give you an overview of using micro frontend architecture and module federation to build scalable and efficient web applications, with a step-by-step guide to building a micro frontend using module federation in React.

What is Micro frontend?
Micro frontend is an architectural pattern for building web applications that involves breaking down a large frontend monolith into smaller, more manageable pieces. Each piece is an independent application, or microfrontend, that can be developed, tested, and deployed separately. This allows teams to work more efficiently and independently, as well as improve the performance and scalability of the overall application.
What is Module Federation?
Module Federation is a way to share code between different applications or micro-frontends. It allows you to distribute your code across multiple domains, which is essential when working with large-scale applications.
How Does it Work?
Module Federation is a system that allows you to use parts of an application in another application without having to import the entire application. This means that you can break down your application into smaller modules, making it easier to manage and update.
With module federation, you can share code between multiple applications.
Benefits of Module Federation
Module Federation has several benefits, including:
- Scalability: With Module Federation, you can easily add new features to your application without having to rewrite your entire application.
- Efficiency: By breaking down your application into smaller modules, you can make your application more efficient, reducing the time it takes to load and run.
- Collaboration: Module Federation allows developers to work together more easily, as it makes it easier to share code between applications.
Example
Here is a demo to build a micro frontend using Module Federation. We are going to build two applications: Home App and Header App.
 You can follow these steps:
Step 1 — Create Applications
Create a new React application using create-react-app or your preferred method. In your root directory, create two applications:
npx create-react-app home-app

npx create-react-app header-app
Step 2 — Install Webpack 5
Within each application, install webpack 5 and related dependencies.
#NPM
npm install –save-dev webpack webpack-cli html-webpack-plugin webpack-dev-server babel-loader css-loader
#Yarn
yarn add -D webpack webpack-cli html-webpack-plugin webpack-dev-server babel-loader css-loader
Step 3 — Customize Home Page
Customize your home page
Customize your Home Page. For example, In home-app/App.js:
import React from ''react''; // Must be imported for webpack to work
import ''./App.css'';

function App() {
  return (
    <div className="App">
      <div className="container">This is my home page</div>
    </div>
  );
}

export default App;
Run your home-app:
cd ./home-app && yarn && yarn start
Step 4— Customize Header Page
Customize your header page
Customize your Home Page. For example, In header-app/App.js:
import React from ''react''; // Must be imported for webpack to work
import ''./App.css'';

function App() {
  return (
    <div className="HeaderApp">
      <div>Header</div>
    </div>
  );
}

export default App;
Run your header-app:
cd ./home-app && yarn && yarn start
Step 5— Webpack Configuration
Create webpack.config.js file at the root of header-app/ and home-app/:
//home-app/webpack.config.js
const HtmlWebpackPlugin = require("html-webpack-plugin");

module.exports = {
  entry: "./src/index",
  mode: "development",
  devServer: {
    port: 3000, // port 3001 for header-app
  },
  module: {
    rules: [
      {
        test: /\.(js|jsx)?$/,
        exclude: /node_modules/,
        use: [
          {
            loader: "babel-loader",
            options: {
              presets: ["@babel/preset-env", "@babel/preset-react"],
            },
          },
        ],
      },
      {
        test: /\.css$/i,
        use: ["style-loader", "css-loader"],
      },
    ],
  },
  plugins: [
    new HtmlWebpackPlugin({
      template: "./public/index.html",
    }),
  ],
  resolve: {
    extensions: [".js", ".jsx"],
  },
  target: "web",
};
Modify header-app/src/index.js & home-app/src/index.js:
import React from ''react'';
import ReactDOM from ''react-dom/client'';
import ''./index.css'';
import App from ''./App'';

const root = ReactDOM.createRoot(document.getElementById(''app''));
root.render(
  <React.StrictMode>
    <App />
  </React.StrictMode>
);
Modify header-app/public/index.html & home-app/public/index.html:
<!DOCTYPE html>
<html lang="en">
  <head>
    <meta charset="UTF-8" />
    <meta http-equiv="X-UA-Compatible" content="IE=edge" />
    <meta name="viewport" content="width=device-width, initial-scale=1.0" />
    <title>React with Webpack</title>
  </head>
  <body>
    <div id="app"></div>

    <script src="main.js"></script>
  </body>
</html>
Change the start script in header-app/package.json & home-app/package.json to utilize our webpack config:
"scripts": {
    "start": "webpack serve",
    "build": "webpack --mode production",
 },
Run your header-app and home-app:
cd home-app && yarn start
cd header-app && yarn start
Step 6— Module Federation Configuration
First, we need add a file entry.js as an entry to each of our app.
We need this additional layer of indirection because it allows Webpack to load all necessary imports for rendering the remote app.
Create header-app/entry.js and home-app/entry.js:
import(''./index.js'')
Modify the entry of header-app/webpack.config.js and home-app/webpack.config.js
module.exports = {
  entry: "./src/entry.js",
  //...
};
Step 7— Exposes Header for Module Federation
Now we need to expose Header for home-app to use, in our header-app/webpack.config.js:
// header-app/webpack.config.js
const HtmlWebpackPlugin = require("html-webpack-plugin");
// import ModuleFederationPlugin from webpack
const ModuleFederationPlugin = require("webpack/lib/container/ModuleFederationPlugin");
// import dependencies from package.json, which includes react and react-dom
const { dependencies } = require("./package.json");
module.exports = {
  //...
  plugins: [
    //...
    new ModuleFederationPlugin({
      name: "HeaderApp", // This application named ''HeaderApp''
      filename: "remoteEntry.js", // output a js file
      exposes: {
        // which exposes
        "./Header": "./src/App", // a module ''Header'' from ''./src/App''
      },
      shared: {
        // and shared
        ...dependencies, // some other dependencies
        react: {
          // react
          singleton: true,
          requiredVersion: dependencies["react"],
        },
        "react-dom": {
          // react-dom
          singleton: true,
          requiredVersion: dependencies["react-dom"],
        },
      },
    }),
  ],
};
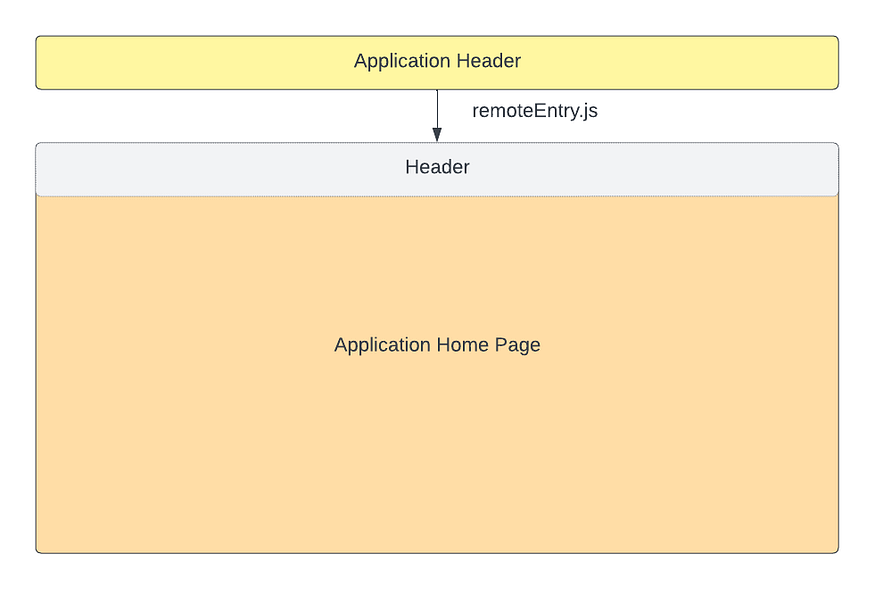
Start the app, navigate to http://localhost:3001/remoteEntry.js. This is a manifest of all of the modules that are exposed by the header application.

Step 8— Add Module Federation in Home App
Now we need to add the ModuleFederationPlugin to home-app/webpack.config.js:
// home-app/webpack.config.js
const HtmlWebpackPlugin = require("html-webpack-plugin");
// import ModuleFederationPlugin from webpack
const ModuleFederationPlugin = require("webpack/lib/container/ModuleFederationPlugin");
// import dependencies from package.json, which includes react and react-dom
const { dependencies } = require("./package.json");

module.exports = {
  //...
  plugins: [
    //...
    new ModuleFederationPlugin({
      name: "HomeApp", // This application named ''HomeApp''
      // This is where we define the federated modules that we want to consume in this app.
      // Note that we specify "Header" as the internal name
      // so that we can load the components using import("Header/").
      // We also define the location where the remote''s module definition is hosted:
      // Header@[http://localhost:3001/remoteEntry.js].
      // This URL provides three important pieces of information: the module''s name is "Header", it is hosted on "localhost:3001",
      // and its module definition is "remoteEntry.js".
      remotes: {
        HeaderApp: "HeaderApp@http://localhost:3001/remoteEntry.js",
      },
      shared: {
        // and shared
        ...dependencies, // other dependencies
        react: {
          // react
          singleton: true,
          requiredVersion: dependencies["react"],
        },
        "react-dom": {
          // react-dom
          singleton: true,
          requiredVersion: dependencies["react-dom"],
        },
      },
    }),
  ],
};
Modify home-app/src/App.js to use the Header component from the remote app:
import React, { lazy, Suspense } from ''react''; // Must be imported for webpack to work
import ''./App.css'';

const Header = lazy(() => import(''HeaderApp/Header''));

function App() {
  return (
    <div className="App">
      <Suspense fallback={<div>Loading Header...</div>}>
        <Header />
      </Suspense>
      <div className="container">Demo home page</div>
    </div>
  );
}

export default App;
Run your home-app and header-app:
cd home-app && yarn start
cd header-app && yarn start
Done!
Navigate to Home App http://localhost:3000
And done! You have successfully created a module federated app with a header.

Conclusion
Micro frontend architecture and module federation are powerful tools for building scalable and efficient web applications. By breaking down a large monolithic frontend into smaller, more manageable pieces, teams can work more efficiently and independently. Module federation then allows developers to share code between applications, enabling collaboration and reducing duplication of effort. By following the steps outlined in this article, you can build your own micro frontend with module federation in React and take advantage of these powerful tools.
Useful Resources
The full source code is avaliable in my Github repository.
Finally, you can reach me at LinkedIn.
Comments
Loading comments…