At NPM you can find thousands of packages for Node — and some of them really make sure that you never want to do without them again. Here are a few particularly practical
 Each of them needs the other ❤
Node.js has become an integral part of IT. And with its own package manager, NPM, there are many incredibly useful libraries & frameworks for Node to discover. In this article I will show you a few that will give you even more possibilities to build complex & dynamic applications with Node.js.
1. Chalk — Styling the output in your terminal
Especially during the development of a new Node.js application, console.log is indispensable. It doesn't matter if we use it to output errors, system data or output of functions and co. However, it does get a bit confusing, since the console.log function outputs plain white text in the terminal by default. Chalk changes that, and you keep the overview.
Just installed it as usual from https://www.npmjs.com/package/chalk with npm install chalk, and you are good to go.
Here is a code example, and underneath, what it all really looks like in my terminal.
const chalk = require('chalk')

*// just blue font
*console.log(chalk.blue('this is lit'))

*// blue & bold font, red background (bg = background)
*console.log(chalk.blue.bgRed.bold('Blue & Bold on Red'))

*// blue font, red background
*console.log(chalk.blue.bgRed('Regular Blue on Red'))

*// combining multiple font colors
*console.log(chalk.blue('Blue') + ' Default' + chalk.red(' Red'))

*// Underlining text
*console.log(chalk.red('There is an ', chalk.underline('Error')))

*// Using RGB-colors
*console.log(chalk.rgb(127, 255, 0).bold('Custom green'))
It don't think there is much to explain about this code. If so, just drop your questions in the comments, no problem :)
The output:
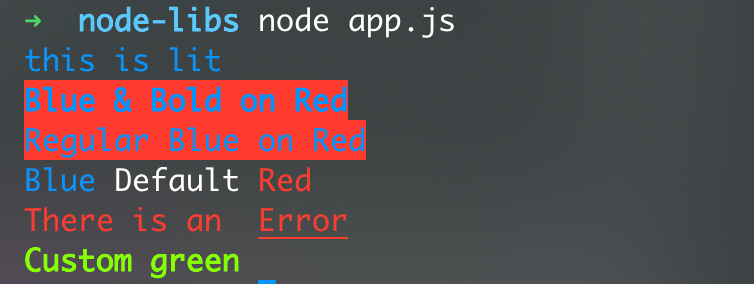 Looks pretty cool, hm?
2. Morgan — Logging all the important information from HTTP requests
And again something that is especially useful in the development of an application. Because HTTP requests are the heartbeat of the digital world — that's why it's so important to have full control over everything that affects them in your app. Morgan provides important information about this.
As usual, get it from https://www.npmjs.com/package/morgan via npm install morgan
In morgan, we can define what we want to get as information about the request. As in the documentation described, just pass it into the morgan middleware, so we will have this below, as a code example.
const express = require('express')
const morgan = require('morgan')

const app = express()

app.use(
morgan(
 ':method :url :status :response-time ms'
))

app.get('/', function(req, res) {
  res.send('hello, world!')
})

app.listen(8080)
So, we want to get the following details about the incoming HTTP request: the method, the requested URL, the status of the request, and how long the response took.
Running this code should lead to the following output, when we open up our site in the browser:

And there are no real surprises. When we open our page in the browser, it is always a GET-Request to the server, because we requested “/”, morgan will show this too, and our “hello, world!” site was delivered successfully — which means status code 200. The whole execution took about 2.3 ms, which is pretty fast. But we not just requested our Website, but also does the browser always request a favicon. Which could not be found — error status 404.
Let's weigh up an experiment: We change the code so that there is a 200 ms pause before each response. Here are the changes in the code:
app.get('/', function(req, res) {
  setTimeout(function() {
    res.send('hello, world!')
  }, 200)
})
Now morgan will log this, when we request the page in the browser again:

Now the response took more than 200 ms — just as we wanted it. But in the end, the page was successfully delivered again. With the exception of the favicon, which we still do not have. And which only took a few MS, since we only delayed the requests for the “/” route.
3. Cheerio — Manipulating the DOM already on the Server with a jQuery-like syntax
Especially when we don't deliver static HTML files but dynamic websites, Cheerio is very practical. We can tinker the requested HTML code directly between request and response of the browser without the client knowing about it. This is especially easy because of the jQuery-like syntax. Of course you can also use Cheerio for crawling and many other things.
Install it from https://www.npmjs.com/package/cheerio with npm install cheerio
So, with Cheerio we can get information about our HTML structure & content:
const template = `
  <div id=”main”>
    <h1 id=”message”>Welcome on our site</h1>
  </div>
`

const $ = cheerio.load(template)

console.log($('h1').text()) // Welcome on our site
Adding HTML to the existing template:
let template = `
  <div id=”main”>
    <h1 id=”message”>Welcome on our site</h1>
  </div>
`

const $ = cheerio.load(template)

$('div').append('<p class=”plum”>Paragraph</p>')

template = $.html()
Now this is the template:
<div id="main">
  <h1 id="message">Welcome on our site</h1>
  <p class="plum">Paragraph</p>
</div>
But one of the most used cases for Cheerio would probably be the subsequent writing of content into the template:
let template = `
  <div id=”main”>
    <h1 id=”message”></h1>
  </div>
`

const $ = cheerio.load(template)

$('h1').append('New welcome message!')

template = $.html()
This is the template now:
<div id=”main”>
  <h1 id=”message”>New welcome message!</h1>
</div>
And there are so many more things you can do with Cheerio. Just check out the docs!
Comments
Loading comments…