🙋♂️Introduction:
In the last blog post — Static Website Hosting on AWS S3 (Advanced Level), we created CloudFront distribution with “Caching Enabled” to serve the content to users from CloudFront distribution from its edge locations.
As shown below, we integrated the CI/CD pipeline in the architecture to deploy changes to the S3 bucket (Origin) as new changes are available in the version control system (CodeCommit).
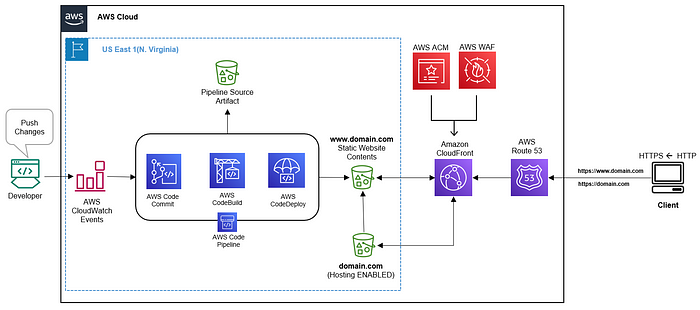
Current Static Website Hosting on S3 with CI/CD Architecture Diagram
However, testing indicated that the latest changes are unavailable to the users because the contents are cached at the CloudFront edge locations. The default caching policy keeps the contents cached for up to 24 hours (TTL).
🛠️Problem:
We must invalidate the CloudFront cache whenever new changes are added to the S3 bucket.
🌟Overview:
In this blog post, we will explore the five different ways to invalidate the CloudFront Cache using the following methods:
- Using Lambda Actions In CodePipeline.
- Using S3 Events triggers AWS Lambda.
- Using buildspec.yml in the CodeBuild stage.
- Using **AWS CLI/**Shell commands
- Using AWS Console
Let’s see how to invalidate CloudFront Cache using the above methods one by one now.
For source code: Clone GitHub Repository from here
🔸Invalidate CloudFront Cache In CodePipeline Using AWS Lambda Actions
AWS Lambda Actions can be added in the Code PipeLine as a stage where we can trigger a Lambda function to invalidate the CloudFront Cache.
The process of adding Lambda actions as the stage is the same as the other stage, but instead of choosing the source action or build action, this time, we need to choose ‘Lambda Action” in the source.
Before we can add the “Lambda Actions” stage to our existing Code Pipeline, we need to create our AWS Lambda Function.
Implementation:
1️⃣Create AWS Lambda Function: Creating the AWS lambda function is a straightforward task. Just go to the AWS management console, search for Lambda, and click on it to see the AWS Lambda console.
📓 Select Python 3.xx runtime for the AWS Lambda Function.
On the right top, click on: “Create Function” button. 👈
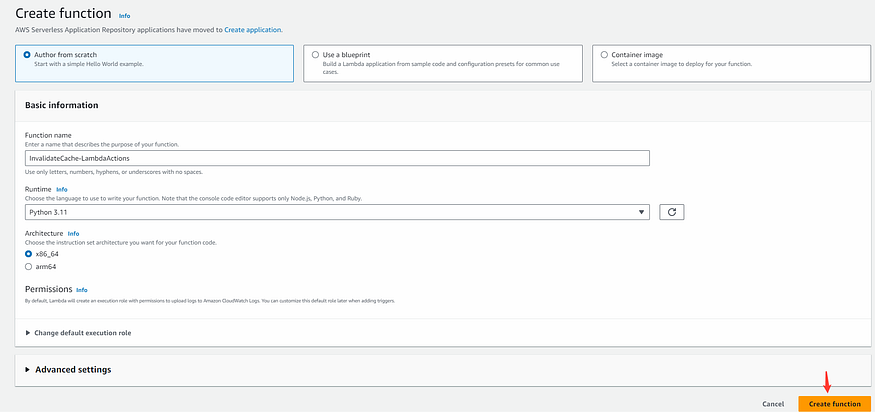
Create AWS Lambda Function (Python Runtime) With Basic Lambda Execution Role

Create a new basic execution role for the new AWS Lambda Function.
2️⃣Create Lambda Actions Stage in AWS Code Pipeline
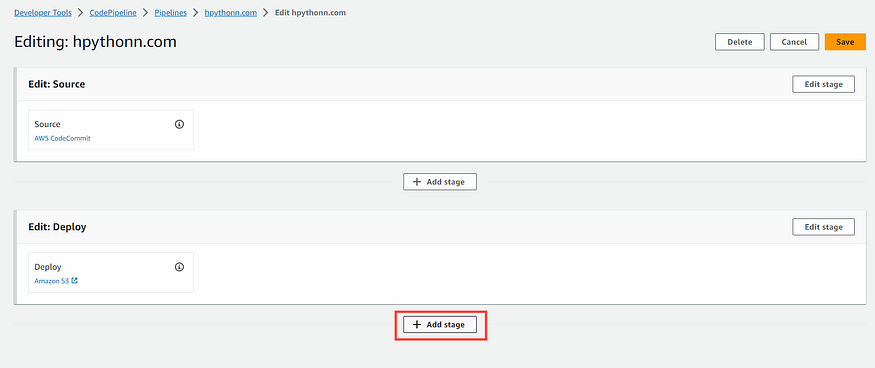
If you have followed my Static Website Hosting on AWS S3 (Advanced Level) blog then you should have the Code Pipeline created for the static website hosting with the Source provider as Code Commit and Deploy provider as Code Deploy as shown below —
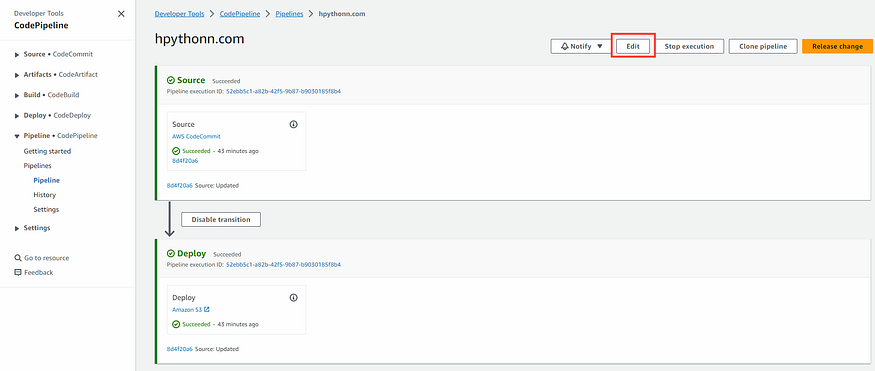
Showing Code Pipeline created for AWS Static Website Hosting
Click on the “Edit” ✏️button to edit the existing Pipeline and click on “➕ Add Stage” after the Code Deploy stage —
Add Another Stage for cache invalidation after Code Deploy in the Code Pipeline.
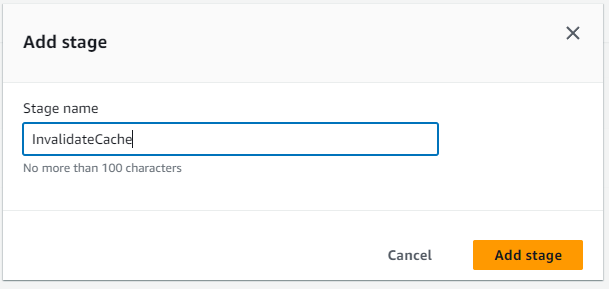
Add Stage Name — Invalidate Cache
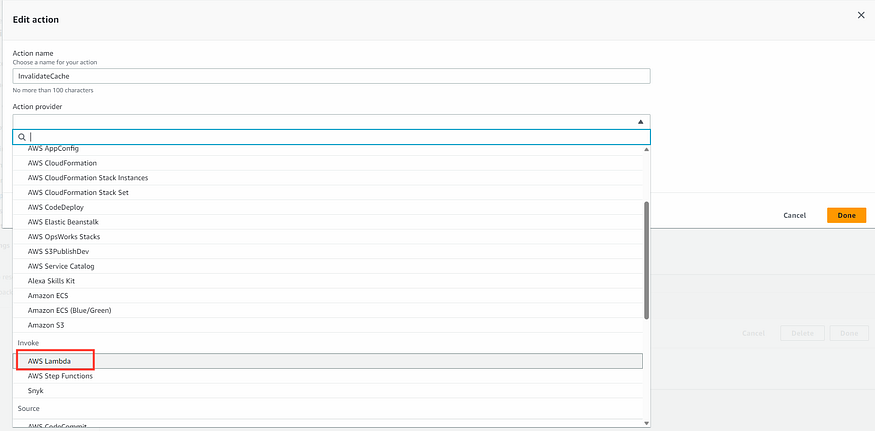
Click on the “Add Action” ✏️button to edit the stage, enter the action name as “InvalidateCache” and choose “AWS Lambda” as the action provider.
Choose input artifacts as “SourceArtifacts” 📚 (this is the output from the source stage) and the function name that you have created in the first step and add the user parameters as below.
// User parameter for the AWS lambda function, hard coded disbribution ID
{"distributionId": "replace with disbribution ID", "objectPaths": ["/*"]}

OR
//get Id from parameter store as a secure string.
{"distributionId": "/CodeBuild/cloudfront/root/distribution-id", "objectPaths": ["/*"]}

Invalidate Cache Stage Configuration using Lambda Actions
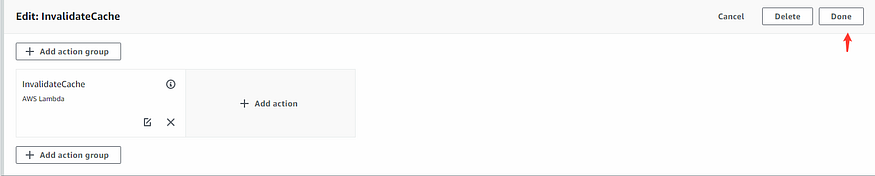
After entering all the details as above, you can click DONE, next click SAVE pipeline, and click OK.
Invalidate Cache Stage Using Lambda Actions
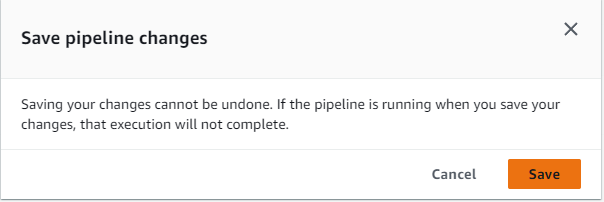
Save PipeLine
3️⃣Add Code & Deploy
In the code, we will use AWS SDK, and the boto3 library to interact with the AWS CloudFront, parameter store (if you are storing distribution ID in the parameter store).
import boto3
import json

codePipeline = boto3.client("codepipeline")
cloudFront = boto3.client("cloudfront")
systemManager = boto3.client("ssm")

def  lambda_handler(event, context):

print("Received event: " + json.dumps(event, indent=2))

# {"distributionId": "string", "objectPaths": ["/*"]}
userParams = event["CodePipeline.job"]["data"]["actionConfiguration"]["configuration"]["UserParameters"]
print("UserParams: " + userParams)

# {"distributionId": "string", "objectPaths": ["/*"]}
userParamsJson = json.loads(userParams)
print("UserParamsJson: " + json.dumps(userParamsJson, indent=2))

# get the distributionId from the userParamsJson and ssm parameter store
distributionId = systemManager.get_parameter(Name=userParamsJson["distributionId"])["Parameter"]["Value"]
print("DistributionId: " + distributionId)

# get the objectPaths from the userParamsJson and ssm parameter store
objectPaths = userParamsJson["objectPaths"]

#invalidate the cache
cloudFront.create_invalidation(
DistributionId=distributionId,
InvalidationBatch={
'Paths': {
'Quantity': len(objectPaths),
'Items': objectPaths
},
'CallerReference': 'hpythonn.com CodePipeline InvalidateCache'
}
)
4️⃣Update Lambda Service Role Permission
Go to the lambda Permission tab and click on the permission policy. This will take you to the IAM. Click on the ➕and expand the permission policy and then click on EDIT.
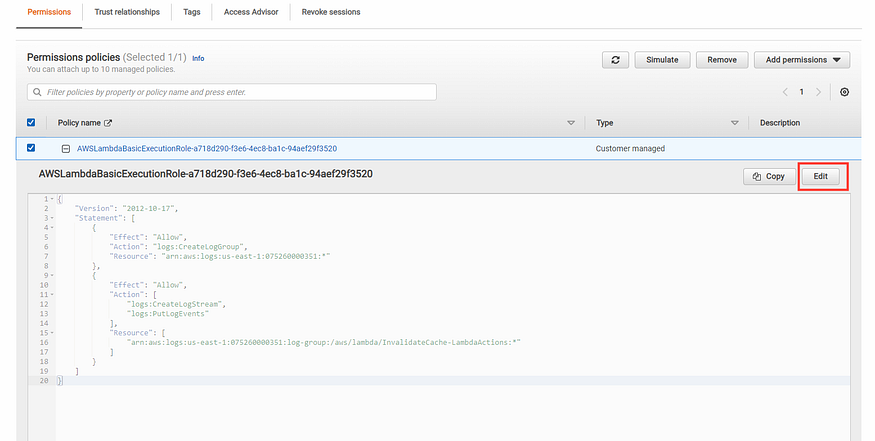
Update the Lamba service role to grant access to —
- Read from parameter store permission.
- Create invalidation, put job failure and success results permission.
**Copy and paste the permission policy below in the Lamba Execution Role: (**replace XXXXXXXXXXXX with your AWS Account number).
You can add a granular permission policy by replacing “” in the resource list by only giving access to resources required for the Lambda role. For example — distribution ID, parameter name, or code pipeline name. For simplicity, I’m using “” here.
{
  "Version": "2012-10-17",
  "Statement": [
    {
      "Effect": "Allow",
      "Action": "logs:CreateLogGroup",
      "Resource": "arn:aws:logs:us-east-1:XXXXXXXXXXXX:*"
    },
    {
      "Effect": "Allow",
      "Action": ["logs:CreateLogStream", "logs:PutLogEvents"],
      "Resource": [
        "arn:aws:logs:us-east-1:XXXXXXXXXXXX:log-group:/aws/lambda/InvalidateCache-LambdaActions:*"
      ]
    },
    {
      "Sid": "CloudFrontPermission",
      "Effect": "Allow",
      "Action": ["cloudfront:CreateInvalidation"],
      "Resource": "*"
    },
    {
      "Sid": "ParameterStore",
      "Effect": "Allow",
      "Action": ["ssm:GetParameter"],
      "Resource": ["*"]
    },
    {
      "Sid": "CodePipeLine",
      "Effect": "Allow",
      "Action": [
        "codepipeline:PutJobFailureResult",
        "codepipeline:PutJobSuccessResult"
      ],
      "Resource": ["*"]
    }
  ]
}
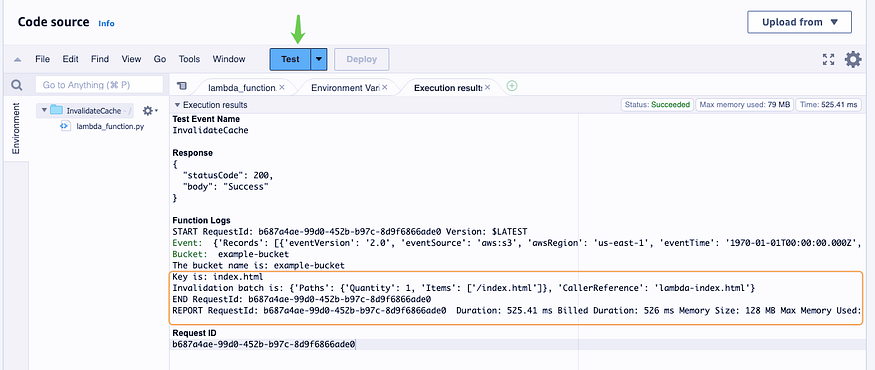
5️⃣Unit Testing
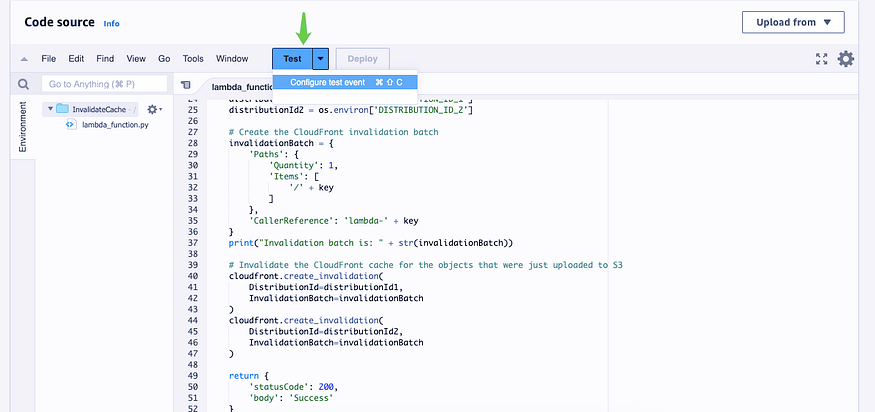
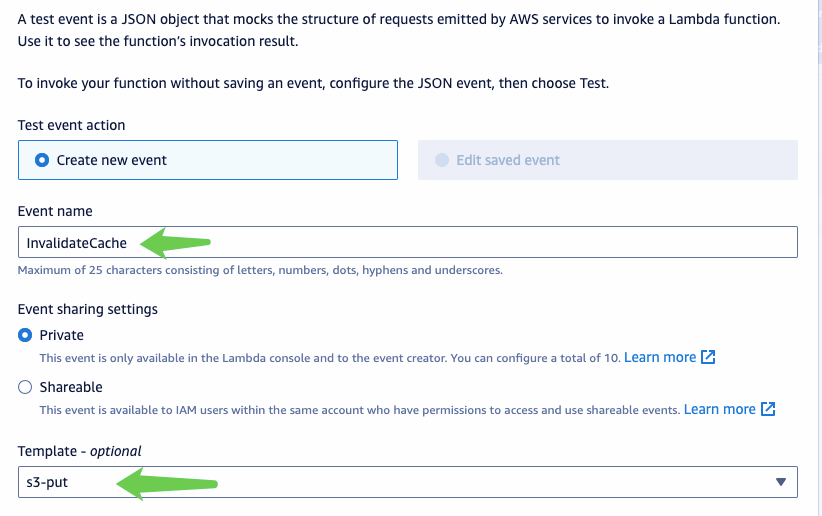
Configure a TEST event for your AWS Lambda function in the Lambda source code section as shown below and test it to make sure you don't have any syntax or permission error with the function code.
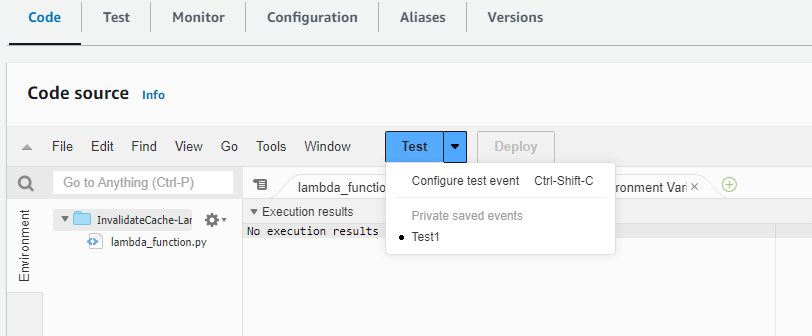
Using the “Configure test event” option to create a test event for the AWS Lambda Function

Setting up a code pipeline test event for AWS Lambda
6️⃣Results: ☑️ Passed
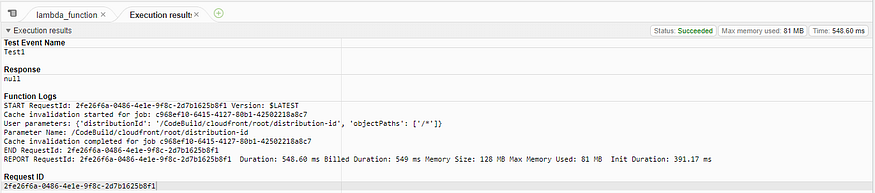
Successful Testing of AWS Lambda Function using “a code pipeline test event”
7️⃣Integration Testing
We already integrated the AWS Lambda actions with Code Pipeline. Now onwards, whenever there are new changes detected in the code commit repository, the code pipeline will trigger and deploy changes to the S3 bucket and invalidate the CloudFront cache as well.
🔸Invalidate CloudFront Cache Using S3 Put Event Trigger Lambda
In this case, an AWS lambda can be triggered as soon as the code deploy stage completes and adds new objects in the static website-hosted S3 bucket.
💡Using this approach, we can invalidate the cache for individual objects added to the S3 object instead of invalidating the cache for all as we did in the first approach where we added the invalidate path as “/*”.
Implementation:
1️⃣ Create AWS Lambda Function — Follow the same process as mentioned here to create a lambda function.
Replace the following code in the Lambda function editor. The function code reads the event (S3 put) and gets the object key which was recently added to the S3 bucket.
import boto3
import os

s3 = boto3.client('s3')
cloudfront = boto3.client('cloudfront')


def  lambda_handler(event, context):
# Get the object from the event
print("Event: ", event)
print("Bucket: ", event['Records'][0]['s3']['bucket']['name'])

bucket = event['Records'][0]['s3']['bucket']['name']
print("The bucket name is: " + bucket)

key = event['Records'][0]['s3']['object']['key']
print("Key is: " + key)

# Get the CloudFront distribution IDs from the environment variables
distributionId1 = os.environ['DISTRIBUTION_ID_1']
distributionId2 = os.environ['DISTRIBUTION_ID_2']

# Create the CloudFront invalidation batch
invalidationBatch = {
'Paths': {
'Quantity': 1,
'Items': [
'/' + key
]
},
'CallerReference': 'lambda-' + key
}
print("Invalidation batch is: " + str(invalidationBatch))

# Invalidate the CloudFront cache for the objects that were just uploaded to S3
cloudfront.create_invalidation(
DistributionId=distributionId1,
InvalidationBatch=invalidationBatch
)
cloudfront.create_invalidation(
DistributionId=distributionId2,
InvalidationBatch=invalidationBatch
)

return {
'statusCode': 200,
'body': 'Success'
}
In the above example, the CloudFront distribution IDs were added as environment variables but as a security best practice, we can add them as secure strings in the parameter store or secret manager.
2️⃣ Add Distributions Id’s as Environment variables as shown below —
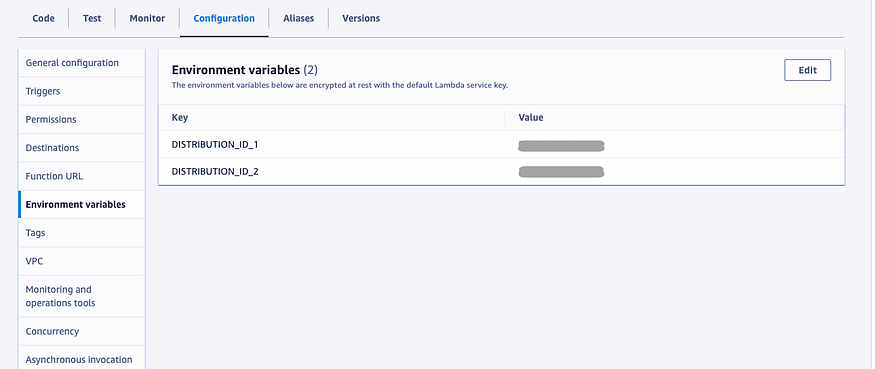
Add Environment Variables
3️⃣ Update the Lambda service role policy
Open the Lambda Service Role by clicking the link here on the permission tab.

Lambda Service Role
This Lamba function would need permission to create invalidation in CloudFront.
Create a new inline policy for the lambda function using the below JSON policy document and attach it to the service role.
{
  "Version": "2012-10-17",
  "Statement": [
    {
      "Sid": "CreateInvalidation",
      "Effect": "Allow",
      "Action": "cloudfront:CreateInvalidation",
      "Resource": "*"
    }
  ]
}
Or, replace the current policy document with the following statements. The policy will grant Lambda service role permission to execute the commands to invalidate the cache in CloudFront for the specified distribution IDs.
{
  "Version": "2012-10-17",
  "Statement": [
    {
      "Effect": "Allow",
      "Action": "logs:CreateLogGroup",
      "Resource": "arn:aws:logs:us-east-1:075260000351:*"
    },
    {
      "Effect": "Allow",
      "Action": ["logs:CreateLogStream", "logs:PutLogEvents"],
      "Resource": [
        "arn:aws:logs:us-east-1:075260000351:log-group:/aws/lambda/InvalidateCache:*"
      ]
    },
    {
      "Sid": "CreateInvalidation",
      "Effect": "Allow",
      "Action": "cloudfront:CreateInvalidation",
      "Resource": "*"
    }
  ]
}
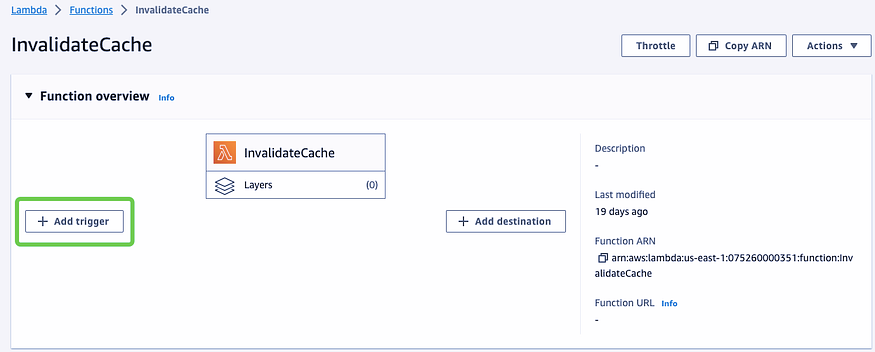
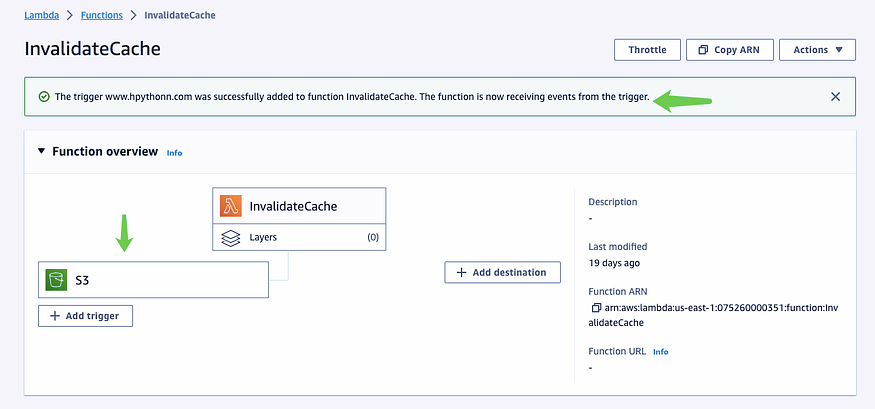
4️⃣ Add Lambda Trigger (S3 Put)
The last step here is to add a trigger for the lambda function. The following screenshots show the steps needed to add a trigger to the lambda —
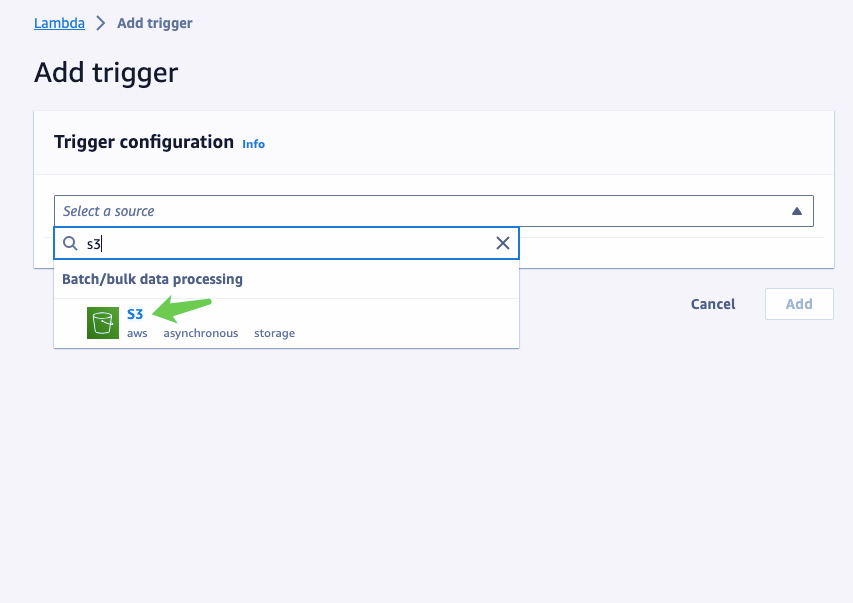
Select trigger action as S3, bucket as the website hosting bucket (origin for the CloudFront distribution), and event type as PUT.

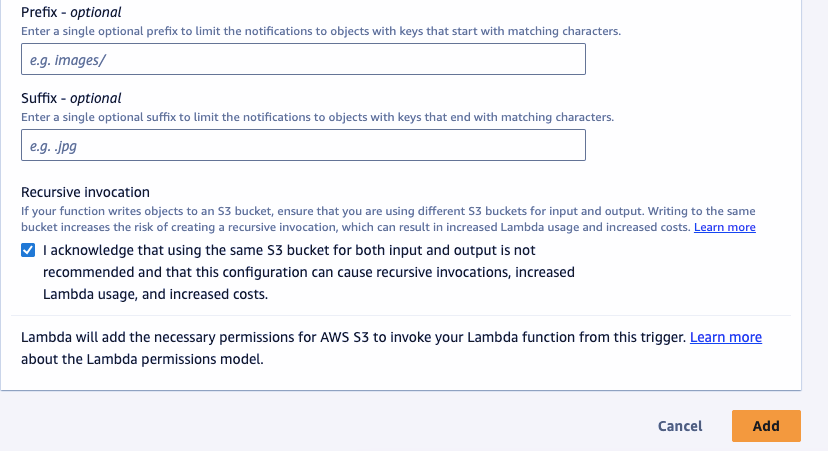
Accept the acknowledge check box to confirm that you are not using the same S3 bucket for input and output as selecting that would create a recursive invocation for the lambda function and would incur the cost. Next, just click Add to finalize the trigger.
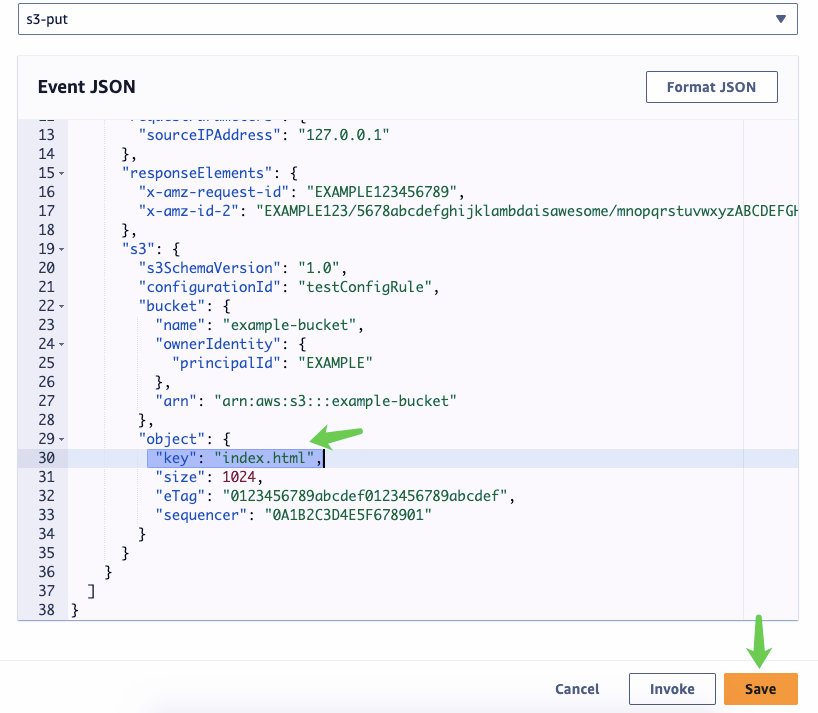
5️⃣ Testing: Try to push a change to CodeCommit and see if that action triggers the lambda function. You can also do some unit testing by creating a TEST in the AWS Lambda Function itself using the S3 put event.
Configure a TEST Case using this option
🔸Invalidate CloudFront Cache in CodeBuild Stage BuildSpec.yml
In this method, we will utilize the CodeBuild stage to create CloudFront cache invalidation. AWS CodeBuild is a fully managed build service that compiles, builds, runs unit tests, and produces artifacts for the deployment stage.
First, we will need to create a build project using AWS CodeBuild and then we will add it as an action provider in the Code Pipeline.
Implementation:
1️⃣ Add BuildSpec.yml to Project Root
Add buildspec.yml in your project root directory and push it to the Code Commit repository.
version:  0.2

env:
variables:
CLOUDFRONT_DISTRIBUTION_ID:  ""
parameter-store:
CLOUDFRONT_DISTRIBUTION_ID:  "/cloudfront/distribution-id"  # Replace with your parameter store path

phases:
install:
runtime-versions:
python:  3.7
commands:
-  echo  "Installing dependencies..."
-  pip  install  awscli
pre_build:
commands:
# - echo "Reading CloudFront distribution ID from parameter store..."
# - export CLOUDFRONT_DISTRIBUTION_ID=$(aws ssm get-parameter --name /cloudfront/distribution-id --query Parameter.Value --output text)
build:
commands:
-  echo  "Invalidating CloudFront cache..."
-  aws  cloudfront  create-invalidation  --distribution-id  $CLOUDFRONT_DISTRIBUTION_ID  --paths  "/*"
post_build:
commands:
-  echo  "CloudFront cache invalidated successfully!"
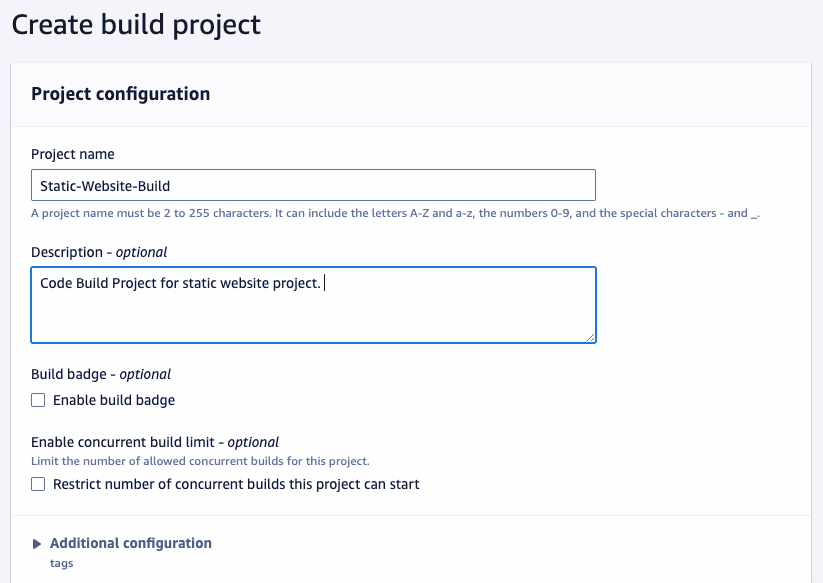
2️⃣ Create Build Project
Search for AWS CodeBuild in the AWS management console and then click Create Build Project.
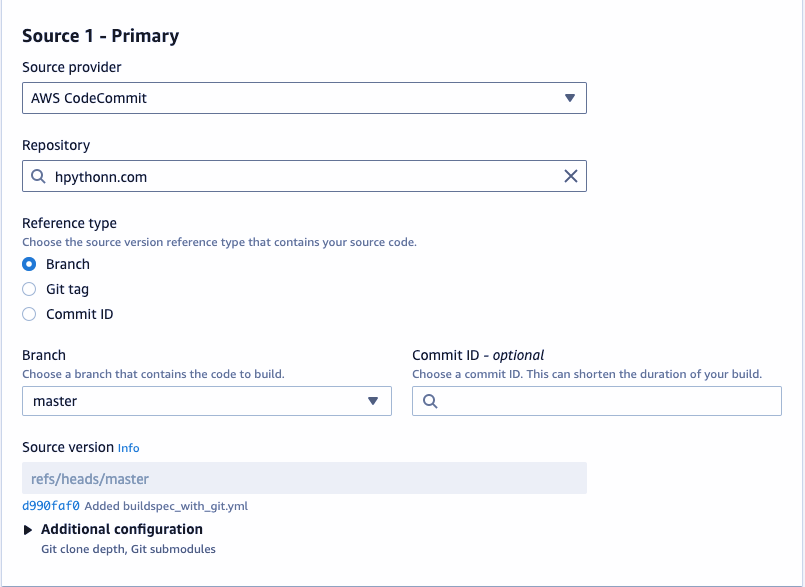
Select “Source Provider” as the Code Commit repository.
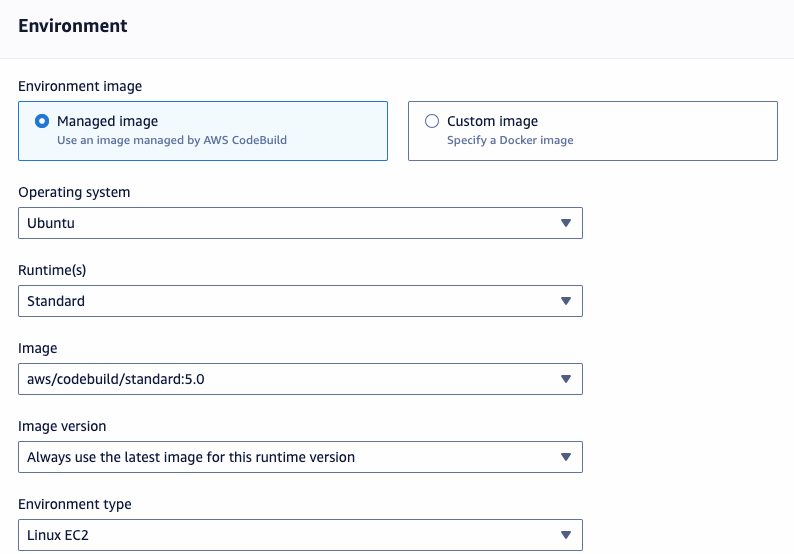
In the environment, use the managed image provided by AWS, and choose the operating system as Amazon Linux 2 or Ubuntu. The runtime would be standard and use the latest image and version.
Lastly, select the environment as Linux EC2 and choose the code build service role as “new service role”.
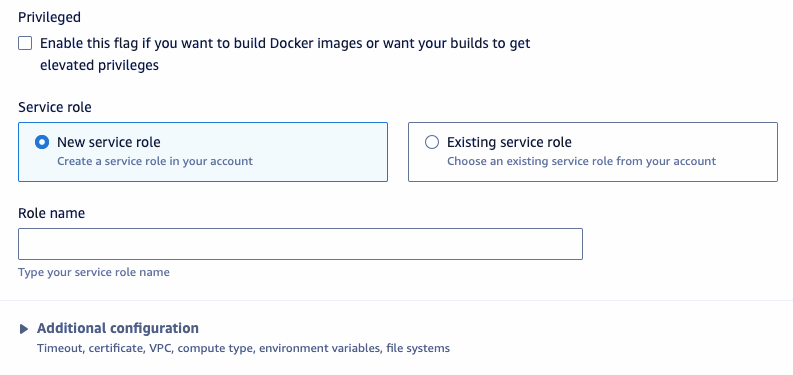
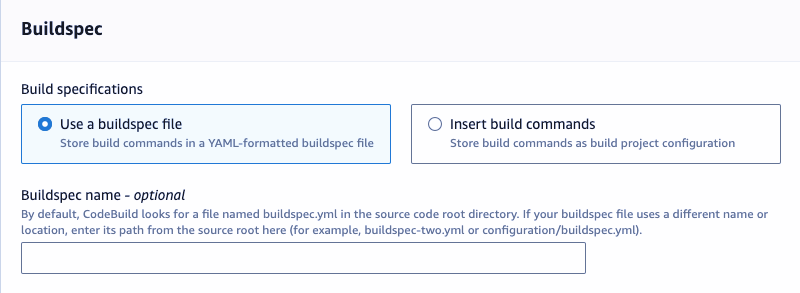
Provide BuildSpect.yml from the project root directory. The buildSpec.yml should be located in the root directory in your source repository for the below configuration.
Keep the rest of the settings as default and then click “Create Build Project”.
Create Build Project — AWS CodeBuild
3️⃣ Add CodeBuild stage in CodePipeline
After the source stage, add a new stage as shown below.
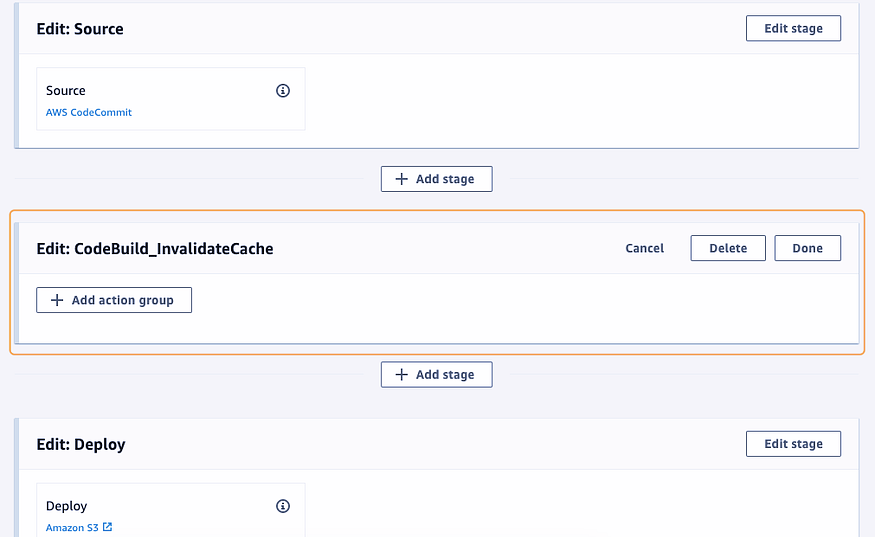
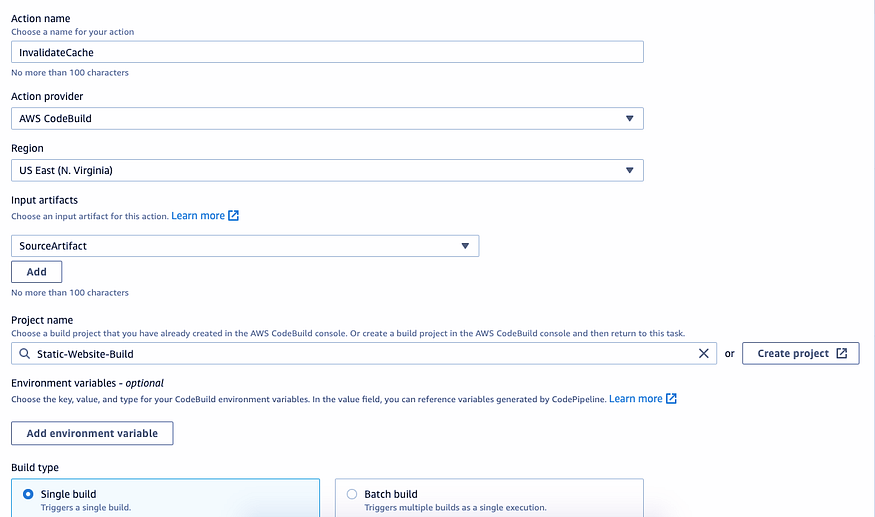
Click “Add action group”. Enter the action name as “CacheInvalidation”, the action provider as “CodeBuild”, and input artifacts as the output artifact name of the previous source stage. In my case the name I entered for the output state was “SourceArtifact”, select the project name and select “Single Build” option, and click ✅ DONE.
Adding CodeBuild Action Provide
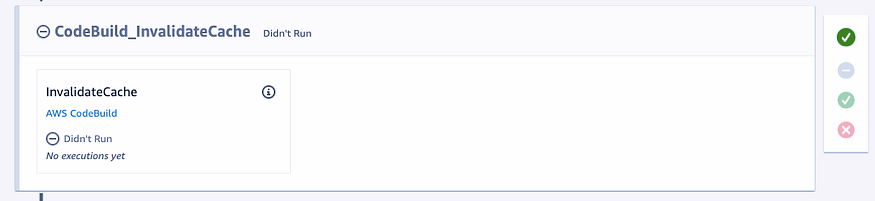
CodeBuild Invalidate Cache Stage
4️⃣ Testing: To test the build stage, run the build project from the AWS Code build.
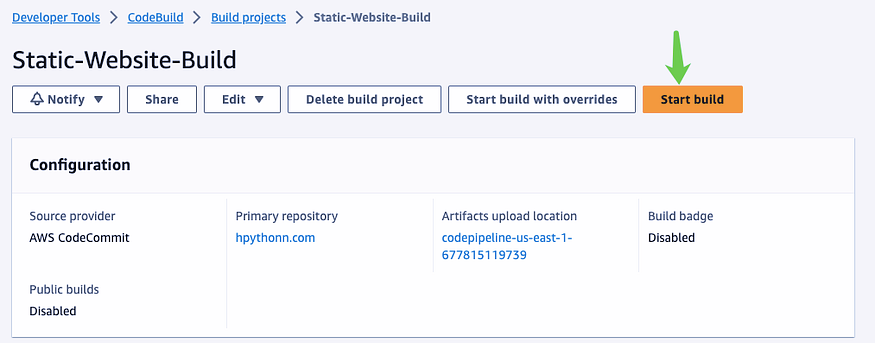
CodeBuild Project
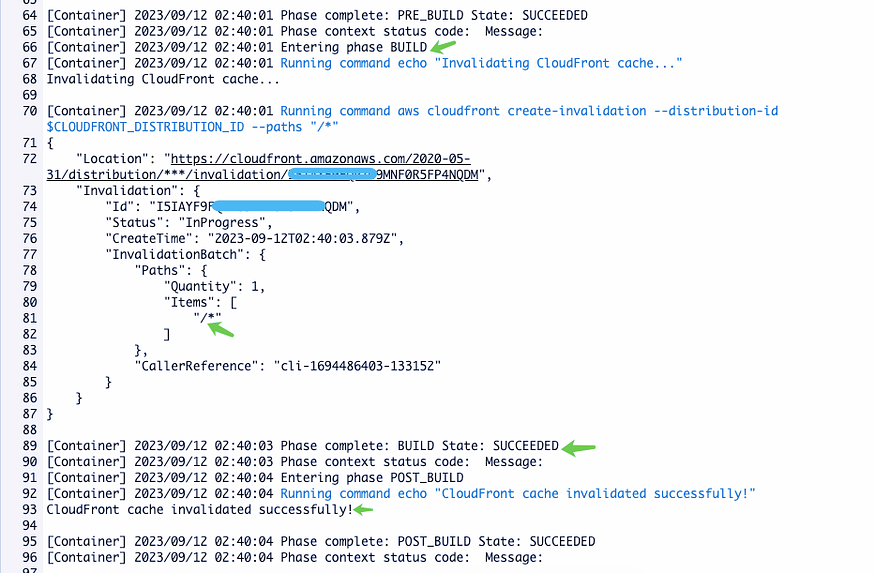
Results: Build logs showing a successful run of the CodeBuild specification file.
Test Code Pipeline — Release the Code Pipeline manually and verify the results of each stage to ensure successful execution.
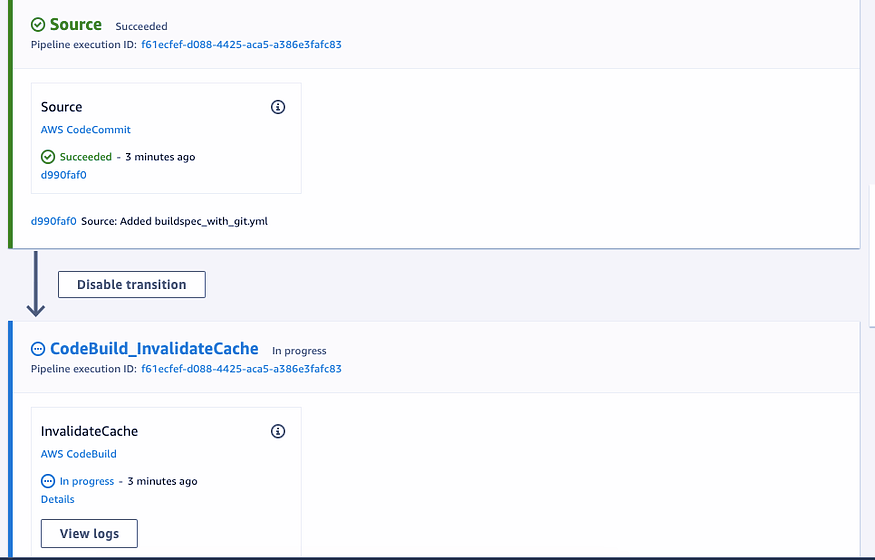
Code Build — In Progress
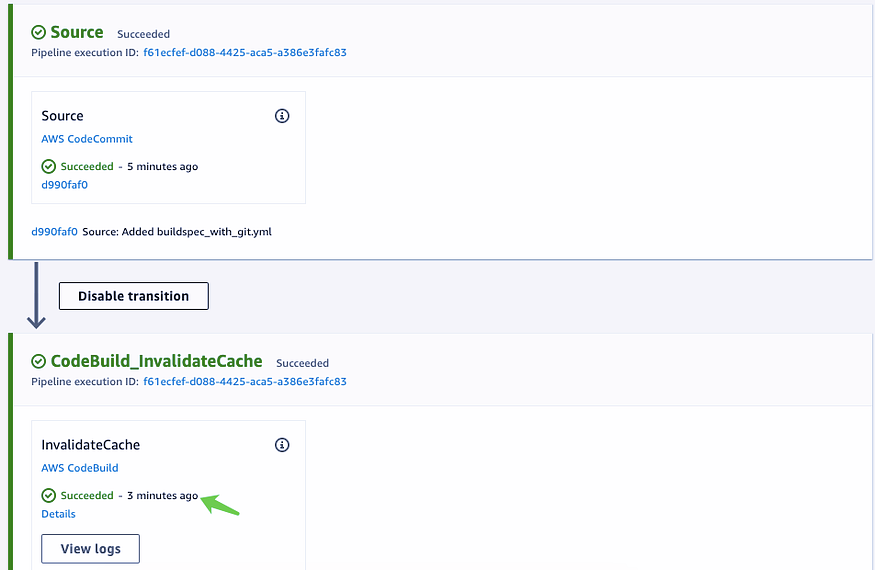
Code Build — Successful
🔸Invalidate CloudFront Cache By Running AWS CLI Commands
To invalidate CloudFront cache using AWS CLI, we can run the following commands. Before running them make sure you have AWS CLI installed and configured using the “aws configure” command.
# Run below AWS CLI commands to invalidate CloudFront cache
# Get the distribution ID from CloudFront console

aws cloudfront list-distributions --query "DistributionList.Items[].{DomainName:DomainName, Id:Id, Origin:Origins.Items[].DomainName}" --output table
# OUTPUT
# -----------------------------------------------------+
# | ListDistributions |
# +---------------------+------------------------------+
# | DomainName | Id |
# +---------------------+------------------------------+
# | d111111abcdef8.cloudfront.net | E1Q2Z3R4S5T6U7 |
# +---------------------+------------------------------+
# Get S3 Objects tree structure

aws s3 ls s3://mybucket --recursive
# OUTPUT
# 2019-01-01 00:00:00 0
# 2019-01-01 00:00:00 0 folder1/
# 2019-01-01 00:00:00 0 folder1/folder2/
# 2019-01-01 00:00:00 0 folder1/folder2/folder3/
# 2019-01-01 00:00:00 0 folder1/folder2/folder3/file1.txt
# 2019-01-01 00:00:00 0 folder1/folder2/folder3/file2.txt
# 2019-01-01 00:00:00 0 folder1/folder2/folder3/file3.txt
# Run command to invalidate cache

aws cloudfront create-invalidation --distribution-id E1Q2Z3R4S5T6U7 --paths "/*"
# OUTPUT
# {
# "Location": "https://cloudfront.amazonaws.com/2019-03-26/distribution/E1Q2Z3R4S5T6U7/invalidation/I1Q2Z3R4S5T6U7",
# "Invalidation": {
# "Id": "I1Q2Z3R4S5T6U7",
# "Status": "InProgress",
# "CreateTime": "2019-03-26T00:00:00.000Z",
# "InvalidationBatch": {
# "Paths": {
# "Quantity": 1,
# "Items": [
# "/*"
# ]
# },
# "CallerReference": "2019-03-26T00:00:00.000Z"
# }
# }
# }
🔸Invalidate CloudFront Cache Using AWS Console Manually
This is useful when you want to manually delete the cache from Cloudfront using the AWS console. Check out the following post to learn how to invalidate CloudFront cache manually step by step.
Conclusion 💡
In this post, we have learned about five distinct approaches to invalidate the CloudFront Cache.
From utilizing Lambda Actions in CodePipeline to utilizing S3 Events to trigger AWS Lambda functions, and even employing buildspec.yml within the CodeBuild stage, or resorting to AWS CLI/Shell commands for manual cache control, we’ve explored a range of methods catering to different use cases and preferences.
By understanding these techniques, we can effectively manage content delivery through CloudFront and ensure up-to-date content delivery to end-users with ease.
Comments
Loading comments…