This tutorial will be based on a use case in which an AWS Lambda pools messages from an SQS, for each message it extracts the body of the message and transforms it to a file, then uploads it to an S3 bucket. The source code of the Lambda you can find here.
1. Prerequisites
I assume that you already have:
- An AWS account. If you don't have you can create it here.
- An AWS credentials. How to create credentials you can find here.
- Your PC has config and credentials files configured. Step by step configuration you can find here.
- IntelliJ IDEA, Apache Maven, Docker, Docker Compose installed on your PC. Docker Compose is only necessary for this use case because I need an S3 bucket.
1. Install SAM
LINUX
-
Download the latest SAM version from GitHub by clicking here.
-
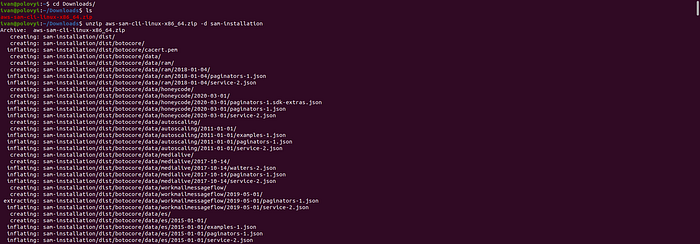
Extract using command:
$unzip aws-sam-cli-linux-x86_64.zip -d sam-installation
-
Install SAM using command;
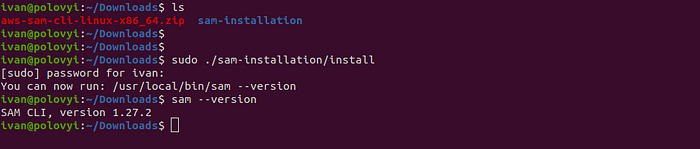
$sudo ./sam-installation/install
SAM installation on Linux (Ubuntu)
WINDOWS
- Download the SAM installer here then run it.
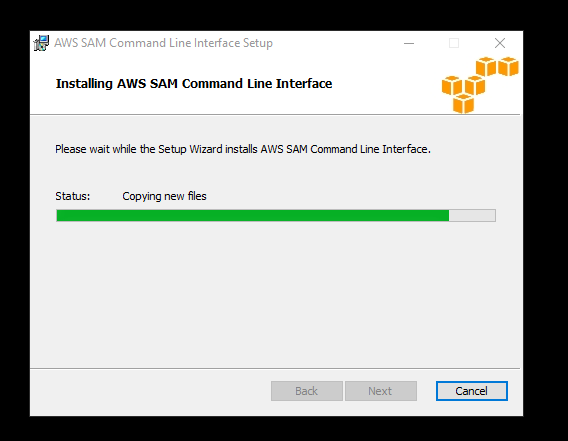
AWS SAM installer for Windows
-
After installation check, if it is installed by running the command
$sam --version
Now you have a SAM installed on your PC!
2. Install AWS Toolkit plugin
In IntelliJ go to File -> Settings -> Plugins, make sure you are in the Marketplace tab, type AWS Toolkit, then press Install, after installation is complete restart IDE.
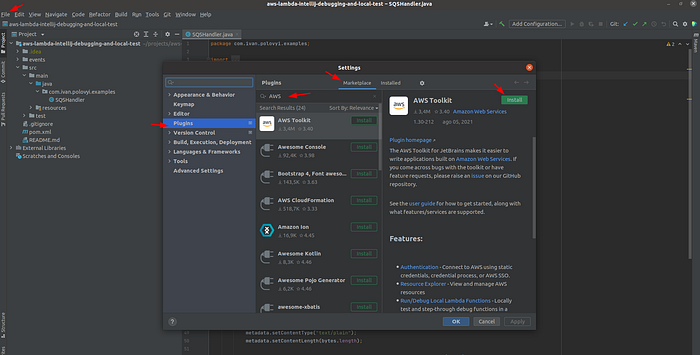
Installing AWS Toolkit plugin
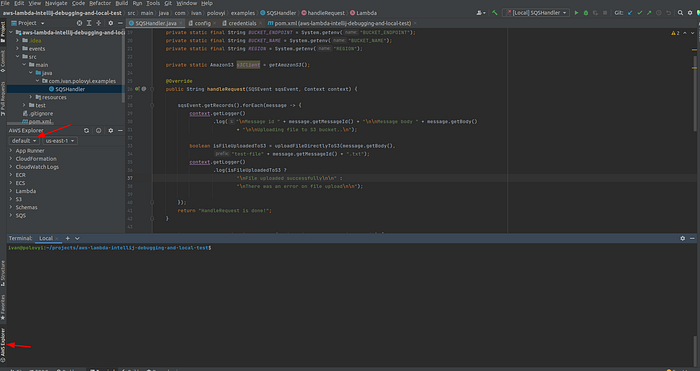
Now we have to define credentials in an AWS Toolkit plugin Explorer tab. If your tab doesn't appear, go to View -> Tool windows and click on AWS Explorer. Open an AWS Explorer tab select from the dropdown box the name of credentials and a Region.
We have to point the AWS Toolkit plugin to the SAM CLI executables. Usually, IntelliJ will detect it automatically. If this does not happen, then you need to do it manually.
LINUX
Execute one of the commands to find the SAM CLI executable path:
$which sam
$whereis sam
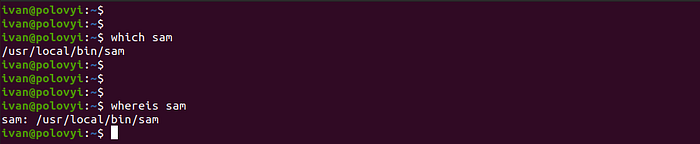
Checking SAM CLI executables path on Linux
WINDOWS
Usually, the path to SAM executable looks like below:
C:\Program Files\Amazon\AWSSAMCLI\bin\sam.cmd
Then in IntelliJ go to File -> Settings -> Tools -> AWS in the SAM CLI executable set the path and press OK.
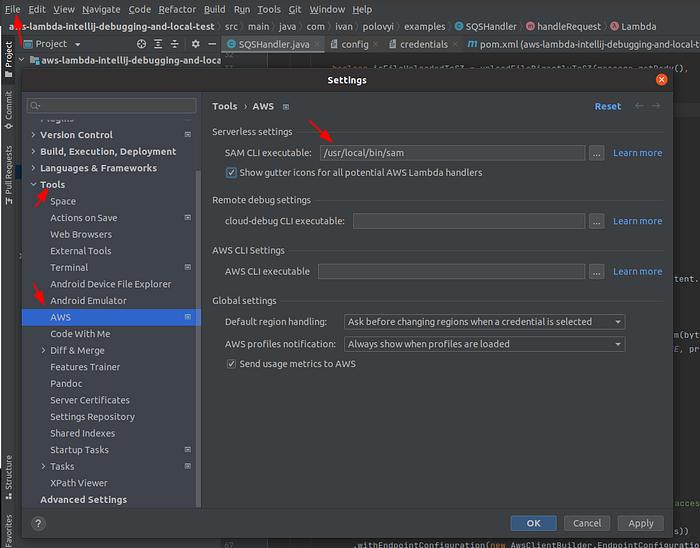
Setting SAM CLI executable in AWS Toolkit plugin Linux

Setting SAM CLI executable in AWS Toolkit plugin Linux
An alternative way is to use an AWS Explorer tab -> Show option menu
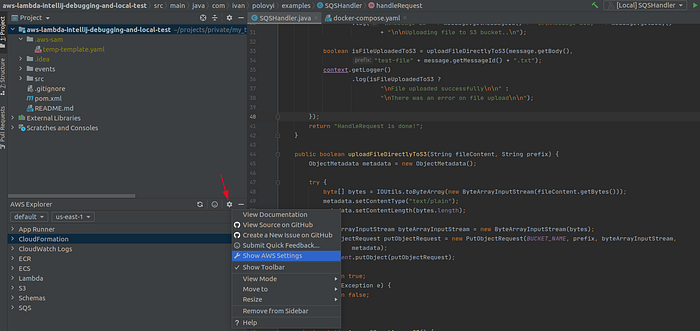
An alternative way to access AWS settings
3. Create an S3 bucket on Lockalstack
To create an S3 bucket on my PC I will use Localstack. More about Localstack you can find here. How to create resources on Localstack initialization you can find in my tutorial here.
From the directory docker-compose of a project in the terminal execute the command
$docker-compose up
This command will spin up the container with a Localstack. During the initialization, Localstack will pick up a sh script from the same directory and execute it. This execution will create an S3 bucket.

Running docker-compose up command
While running on Windows:
- you have to give the Docker Desktop access to the folder with the sh scripts by pressing “Share It” when it asks you to do so.
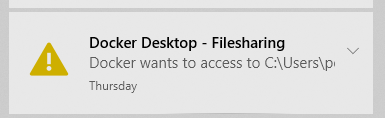
Docker Desktop message
-
you may stumble upon an error like below
$'\r': command not found
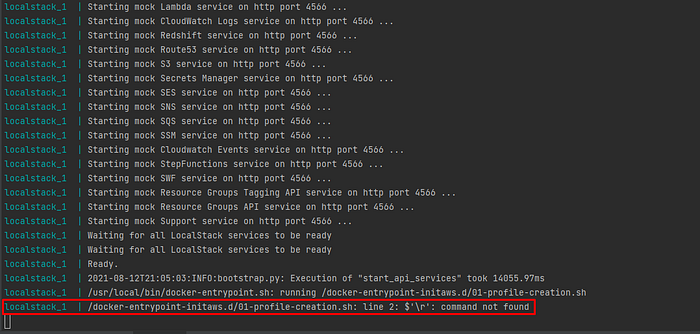
Error on Windows
The Windows-style newline characters can cause this error. The Localstack runs the scripts in Linux (Unix-like) environment inside the container. So you may have to convert shell scripts from CRLF to LF (Dos to Unix) using tools like Notepad++ or online tools like EOL converter. After converting save your script and run docker-compos up again.
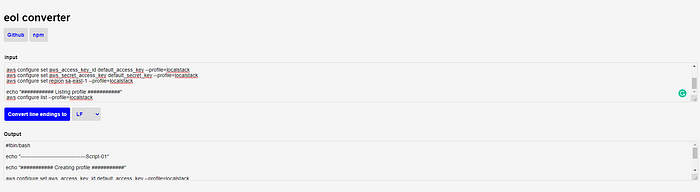
EOL converter
4. Creating run configuration
Click on Add Configuration…-> Add new… -> AWS Lambda -> Local.
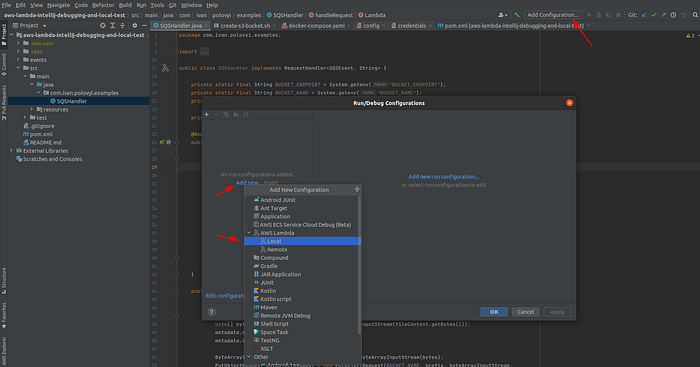
Adding new Run configuration
Give it a name. In the Configuration section, if you select From template, you have to provide a path to a SAM template.yaml. I won't show you how to do it as it is very easy.
When you select From handler, you need to fill up all configurations and behind the scenes, AWS Toolkit will create a template.yaml for you based on your input. Select Runtime, as a Handler type the full class name of a request handler class, set the Timeout and the Memory. Open the Environment variables and set necessary variables.
The BUCKETENDPOINT is equal to _http://
The input can be either From file or Text. In the case of From file you just have to provide a path to the file. You can test it on your own, the project has a directory called events with one file that you can use.
For the Text option, you have to select the Event template from the dropdown box. You can make changes to it if you need. After setting all configurations press OK. And run the application in Run or Debug mode.

RunDebug Configurations
The outcome will be like this:
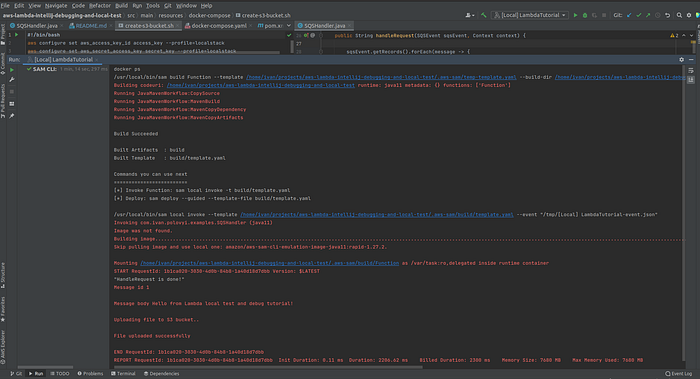
The run outcome on Linux OS
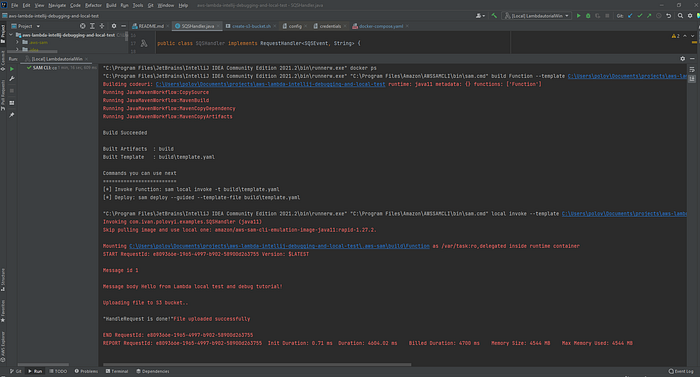
The run outcome on Windows OS
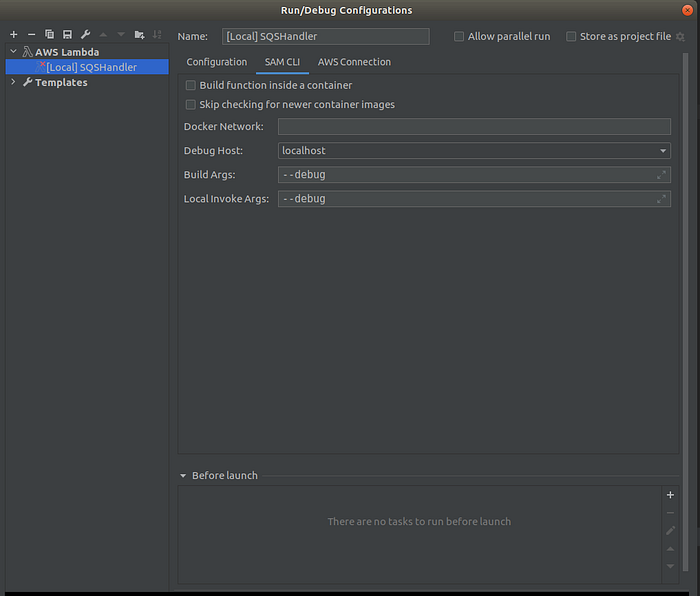
You can add SAM build and SAM Local Invoke Arguments on the SAM CLI tab, for example, debug. More about arguments you can find here for build and here for invoke.
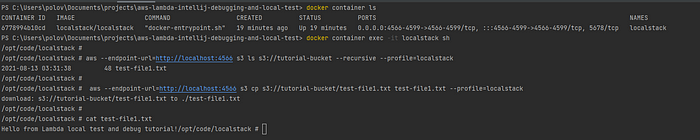
Then you can sh into a Localstack container to check the file in S3 Bucket, using the commands below.
$docker container ls - to obtain Localstack container number
$docker container exec -it <container-id/name> sh - to sh inside the container
aws --endpoint-url=[http://localhost:4566](http://localhost:4566/) s3 ls s3://tutorial-bucket --recursive --profile=localstack - to list all files in the S3 bucket
aws --endpoint-url=[http://localhost:4566](http://localhost:4566/) s3 cp s3://tutorial-bucket/<file-name> <file-name> --profile=localstack - to download the file from the S3 bucket

sh to the Localstack container and download file from S3 bucket commands (Linux)
sh to the Localstack container and download file from S3 bucket commands (Windows)
On Windows you can encounter an error, that won't let you run the Lambda. I think it is some kind of a bug.
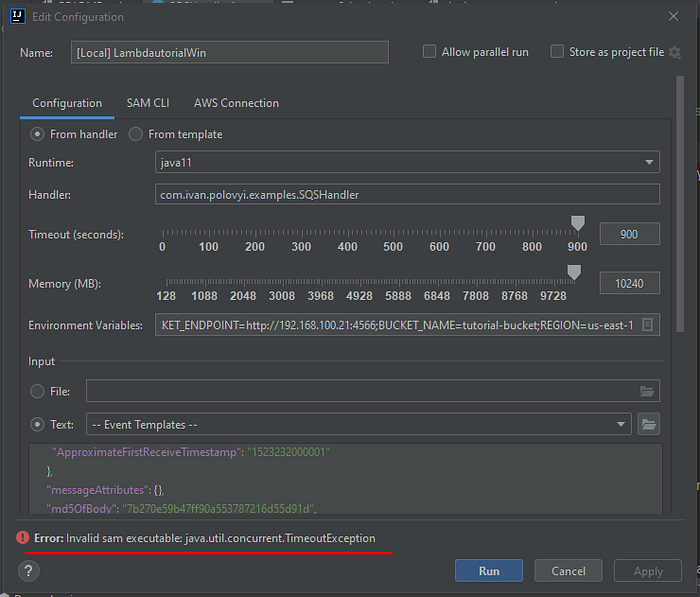
To solve this error, just go to File -> Settings -> Tools -> AWS and check if the path for SAM CLI executables is correct. If the path is correct just click on the path and press OK. When you try to run the Lambda again the error won't be there anymore.
5. Getting under the hood of the setup
If you are curious about how it works, then this section is for you. When you press the Run or the Debug button on IntelliJ IDEA it will trigger the AWS Toolkit plugin. The AWS Toolkit plugin will perform the steps listed below:
- Creates or recreates in a project root directory a folder with the name .aws-sam. If you have chosen From handler option a temp-template.yaml file based on the run configuration from IntelliJ will be created as well in the same directory.
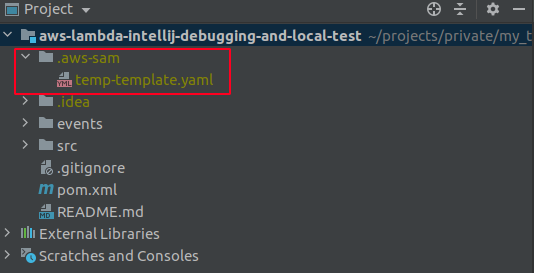
SAM folder structure
-
Sends a build command to a SAM specifying as arguments temp- template.yaml or the one you specified in From template configurations and a build directory path as .aws-sam/build.
$sam build <function-name> --template <template-file.yaml> --build-dir <build-dir>
This command builds source code using Maven, creates a template.yaml, and creates a folder /.aws-sam/build in which it stores the code artifact and the template.yaml.
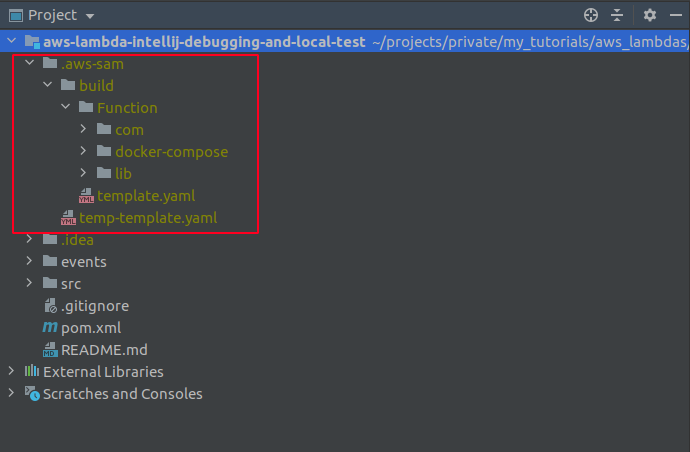
SAM folder structure after SAM build command
-
Sends the command below to a SAM passing template.yaml from the build directory and creates [Local] SQSHandler-event.json in a /tmp (C:\Users<user-name>\AppData\Local\Temp\ on Windows) directory based on Input -> Text -> Event template from Run configurations (or passing specified in the run configuration file).
$sam local invoke --template <template.yaml> --event <event.json>
This command checks if aws-sam-cli-emulation-image-java11:latest image exists in a local docker repository if it does not then it pulls this image from the DockerHub. After pull is done Docker will use this image to build another one with AWS Lambda Runtime Interface Emulator (aws-lambda-rie) in it and will tag this new image as aws-sam-cli-emulation-image-java11:rapid-1.13.2.
A newly created image is used to spin up a container with a Lambda. This container has a volume mounted to the directory .aws-sam/build/Function on PC. This directory has a Lambda packaged code that was built by the previous step.
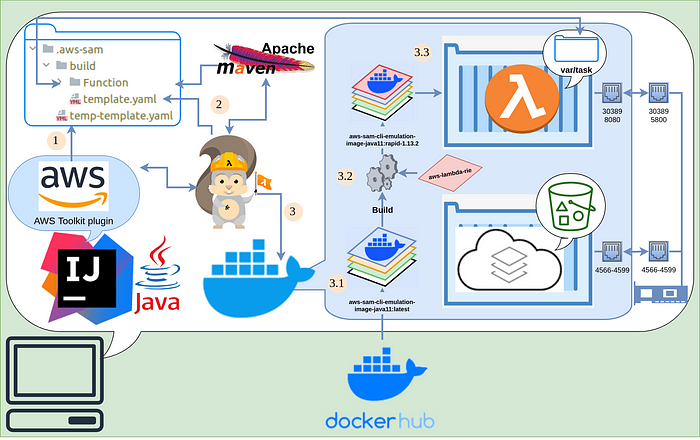
The first Lambda invocation takes longer because a Docker needs to pull the necessary image from a DockerHub and build another image, so have patience. But sequential runs will take much less time as a Docker will skip these time-costly operations.
Summary:
The AWS Lambda is a simple yet powerful tool for any developer. It is easy to create and deploy to the cloud, but sometimes it is hard to run and test locally. So in this tutorial, I’ve explained how to set up a PC to easily run, test, and debug your Lambda function.
Thank you for reading! If you have any questions or suggestions, please feel free to write me on my LinkedIn account.
Comments
Loading comments…