Overview of Amazon Web Services S3
Amazon Web Services (AWS) allows one to use their cloud-based object storage service, Amazon Simple Storage Service, (Amazon S3), to store among other items, images. They are stored in an S3 bucket.
To learn more about Amazon S3, check out this article by Jovan Hernandez and this article by Gonzalo P.
In this article, I'd like to explore one of several ways to display images stored in an S3 bucket on a web page from Node.js. and in such a way that we do not have to store the image to the file system.
I mention one of several ways above because how you choose to display images in S3 depends on how they are stored, Public or Private. If they are in a Public S3 bucket, the process is as simple as pointing the <img> to the URL of the image. Most S3 buckets are not Public.
However, when the S3 bucket is Private, things become a bit more complicated. With this situation there are two main options. One is to establish a signed URL to your S3 bucket. The other is to access images as a stream.
This will be our approach.
The GitHub repo can be found here.
Let's Get Started
AWS Assumptions
-
I will assume you already have a private S3 bucket called companyimages with an image in it. Use the resources mentioned above to help build an S3 if needed.
-
I will assume you have either IAM credentials or an EC2 Role that allows access to the S3 bucket.
The EC2 Roles with least privileges is considered a best practice. IAM credentials are only mentioned and used here for those experimenting with a free-tier.
I will be using Visual Studio Code (VSCode) with Node.js installed.
Note: The complete code is at the bottom of this article in case you have any issues.
Create The Web Server
Let's start by using Express to create a web server.
-
Create a directory and open VSCode to that folder.
-
Create a file called index.js. then open your Terminal window and type the following to create package.json and make index.js the default file.
npm init -y
-
Type the following in the Terminal to install Express.
npm install express
-
Add the following code to index.js to build our basic web server.
const express = require("express");
const app = express();
const PORT = 3200;

// Our default route
app.get("/", (req, res) => {
  res.send("Testing");
});
app.listen(PORT, () => {
  console.log(`Web Server running on port ${PORT}`);
});
- Test run your web server by hitting F5. The console should show it running on port 3200 (feel free to choose a different port.) Also in your browser type localhost:3200 and verify it says “Testing”.
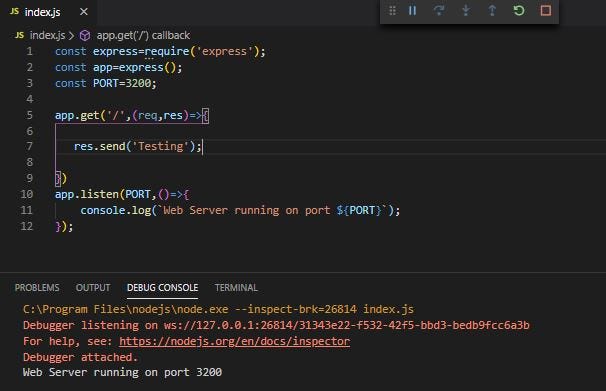
Note: you can use the tools in the upper right of the image above to refresh and stop the web server as needed. We could install nodemon to monitor our web server but I'd like to stay focused on our task.
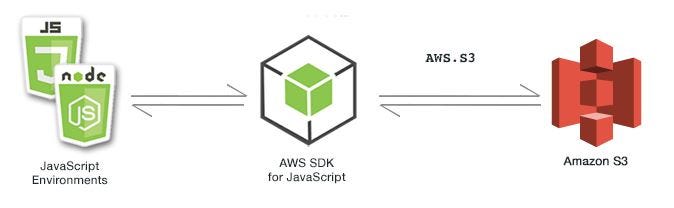
Installing The AWS SDK for JavaScript in Node.js
This step is necessary to be able to access AWS resources.
-
In the Terminal type the following to install the aws-sdk npm package.
npm install aws-sdk
-
We need to import this file. Add the following additional line to the top of your index.js:
const express = require("express");
const app = express();
const path = require("path");
const PORT = 3200;

const AWS = require("aws-sdk");
When the user browses to our web site, the default route (/) will be accessed. In here, app.get(‘/'), is where we will do the majority of our work. First we will establish our AWS credentials. I do not recommend hard coding your IAM credentials like we will be doing. Then we will create an instance of S3.
- Delete the res.send(‘Testing'); and add the following in its place.
AWS.config.update({
  accessKeyId: "Your Key Goes Here",
  secretAccessKey: "Your Secret Key Goes Here",
});

let s3 = new AWS.S3();
Getting and Displaying The Image
We will be using the getObject() method of S3. We will wrap in this in an async function and return a promise.
The getImage() function will invoke the getObject() method passing it your S3 bucket name and the name of the desired image.
- Add the following code. The inside of app.get should now look as follows:
AWS.config.update({
  accessKeyId: "Your Key Goes Here",
  secretAccessKey: "Your Secret Key Goes Here",
});

let s3 = new AWS.S3();

async function getImage() {
  const data = s3
    .getObject({
      Bucket: "companyimages",
      Key: "your stored image",
    })
    .promise();
  return data;
}
The const data will contain a data stream. We will need to convert this to a Base64 string and prepend the MIME type. The encoding will be done in a function, encode(). The encode() function below will be invoked once we get the data from S3.
- Add the following code below the getImage() function:
function encode(data) {
  let buf = Buffer.from(data);
  let base64 = buf.toString("base64");
  return base64;
}
Finally we need to call getImage() which will in turn invoke getObject(). Since getObject() returns a promise, we will use .then() to receive the data and using an arrow function, encode it, while building an tag whose source will be our MIME type and encoded data. We will then build the HTML we need, incl using the image.
The HTML part could of course be done in a framework or templating engine but I'd like to keep it as plain as possible.
- Add the following code above or below the encode() function. I put mine above it.
getImage()
  .then((img) => {
    let image =
      "<img src='data:image/jpeg;base64," + encode(img.Body) + "'" + "/>";
    let startHTML = "<html><body></body>";
    let endHTML = "</body></html>";
    let html = startHTML + image + endHTML;
    res.send(html);
  })
  .catch((e) => {
    res.send(e);
  });
And we are done!
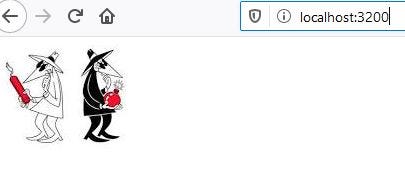
Let's test it. The full code will follow in case of any issues.
Refresh your web server or stop and start it. Navigate to localhost:3200 in your browser, or refresh it and you will see your image.
Pretty cool!
Conclusion
We have successfully pulled an image from an AWS S3 bucket and displayed it without having to use the file system to store the image. Why bypass the file system? If you happen to be running this on an AWS EC2, you do not have access to the file system or rather should not be using it.
Along the way we also learned how to create a simple web server and pass data from the server-side to the client with plain JavaScript.
Thank you for reading and happy coding!
Full Code
const express = require("express");
const app = express();
const PORT = 3200;

const AWS = require("aws-sdk");

// Our default route
app.get("/", (req, res) => {
  AWS.config.update({
    accessKeyId: "Your Key Goes Here",
    secretAccessKey: "Your Secret Key Goes Here",
  });

  let s3 = new AWS.S3();

  async function getImage() {
    const data = s3
      .getObject({
        Bucket: "companyimages",
        Key: "your stored image",
      })
      .promise();
    return data;
  }

  getImage()
    .then((img) => {
      let image =
        "<img src='data:image/jpeg;base64," + encode(img.Body) + "'" + "/>";
      let startHTML = "<html><body></body>";
      let endHTML = "</body></html>";
      let html = startHTML + image + endHTML;
      res.send(html);
    })
    .catch((e) => {
      res.send(e);
    });

  function encode(data) {
    let buf = Buffer.from(data);
    let base64 = buf.toString("base64");
    return base64;
  }
});
app.listen(PORT, () => {
  console.log(`Web Server running on port ${PORT}`);
});
References:
Comments
Loading comments…