The AWS Load Balancer Controller manages AWS Elastic Load Balancers for a Kubernetes cluster.
What is the AWS Load Balancer controller?
The AWS Load Balancer Controller manages AWS Elastic Load Balancers for a Kubernetes cluster. The controller provisions the following resources:
- It satisfies Kubernetes Ingress resources by provisioning Application Load Balancers.
- It satisfies Kubernetes Service resources by provisioning Network Load Balancers.
Let’s Deploy…
Prerequisites
- AWS IAM access with admin privileges
- AWS EKS cluster (1.22)
- AWS CLI
Step 1: Setup permissions in IAM
1.1 Create an IAM policy
- Download the below-given IAM policy for the AWS Load Balancer Controller.
curl -o iam_policy.json [https://raw.githubusercontent.com/kubernetes-sigs/aws-load-balancer-controller/v2.4.3/docs/install/iam_policy.json](https://raw.githubusercontent.com/kubernetes-sigs/aws-load-balancer-controller/v2.4.3/docs/install/iam_policy.json)
- Create an IAM policy using the policy downloaded in the previous step.
aws iam create-policy \
    --policy-name AWSLoadBalancerControllerIAMPolicy \
    --policy-document file://iam_policy.json

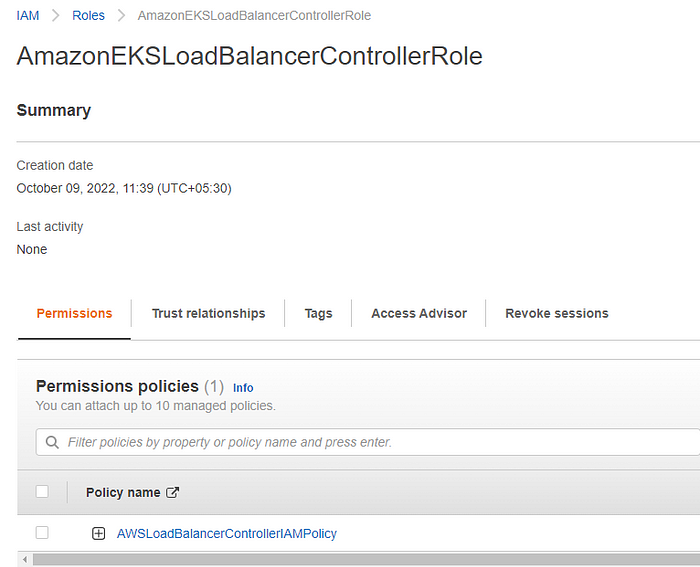
1.2 Create an IAM role
- We need to create an IAM role and attach the above-created IAM policy. You can use the AWS CLI to create the IAM role.
- View your cluster’s OIDC provider URL.
aws eks describe-cluster --name my-cluster --query "cluster.identity.oidc.issuer" --output text
- The example output is as follows.
oidc.eks._region-code_.amazonaws.com/id/_EXAMPLED539D4633E53DE1B71EXAMPLE_
- Copy the following contents to your device. Replace
_111122223333_with your account ID. Replace_region-code_with the AWS Region that your cluster is in. Replace_EXAMPLED539D4633E53DE1B71EXAMPLE_with the output returned in the previous step. After replacing the text, run the modified command to create theload-balancer-role-trust-policy.jsonfile.
cat >load-balancer-role-trust-policy.json <<EOF
{
    "Version": "2012-10-17",
    "Statement": [
        {
            "Effect": "Allow",
            "Principal": {
                "Federated": "arn:aws:iam::111122223333:oidc-provider/oidc.eks.region-code.amazonaws.com/id/EXAMPLED539D4633E53DE1B71EXAMPLE"
            },
            "Action": "sts:AssumeRoleWithWebIdentity",
            "Condition": {
                "StringEquals": {
                    "oidc.eks.region-code.amazonaws.com/id/EXAMPLED539D4633E53DE1B71EXAMPLE:aud": "sts.amazonaws.com",
                    "oidc.eks.region-code.amazonaws.com/id/EXAMPLED539D4633E53DE1B71EXAMPLE:sub": "system:serviceaccount:kube-system:aws-load-balancer-controller"
                }
            }
        }
    ]
}
EOF
- Create the IAM role.
aws iam create-role \
  --role-name AmazonEKSLoadBalancerControllerRole \
  --assume-role-policy-document file://"load-balancer-role-trust-policy.json"
- Attach the required Amazon EKS-managed IAM policy to the IAM role. Replace
_111122223333_with your account ID.
aws iam attach-role-policy \
  --policy-arn arn:aws:iam::111122223333:policy/AWSLoadBalancerControllerIAMPolicy \
  --role-name AmazonEKSLoadBalancerControllerRole
Step 2: Installing the AWS load balancer controller add-on
2.1 Add the Service Account
- Replace
_111122223333_with your account ID. After replacing the text, run the modified command to create theaws-load-balancer-controller-service-account.yamlfile.
cat >aws-load-balancer-controller-service-account.yaml <<EOF
apiVersion: v1
kind: ServiceAccount
metadata:
  labels:
    app.kubernetes.io/component: controller
    app.kubernetes.io/name: aws-load-balancer-controller
  name: aws-load-balancer-controller
  namespace: kube-system
  annotations:
    eks.amazonaws.com/role-arn: arn:aws:iam::111122223333:role/AmazonEKSLoadBalancerControllerRole
EOF
- Create the Kubernetes service account on your cluster. The Kubernetes service account named
aws-load-balancer-controlleris annotated with the IAM role that you created named_AmazonEKSLoadBalancerControllerRole_. - For the kubectl authentication you need the kubeconfig file, Run the update-kubeconfig command and confirm that it updates the config file under ~/.kube/config:
aws eks --region region-code update-kubeconfig --name cluster_name
- Execute the below given kubectl command to configure the service account.
kubectl apply -f aws-load-balancer-controller-service-account.yaml

2.2 Install the AWS Load Balancer Controller using Helm V3
- Add the
eks-chartsrepository.
helm repo add eks [https://aws.github.io/eks-charts](https://aws.github.io/eks-charts)
- Run the update
helm repo update
- Replace
_my-cluster_with your own. The following commandaws-load-balancer-controlleris the Kubernetes service account you created in a previous step.
helm install aws-load-balancer-controller eks/aws-load-balancer-controller \
  -n kube-system \
  --set clusterName=my-cluster \
  --set serviceAccount.create=false \
  --set serviceAccount.name=aws-load-balancer-controller
- Verify the deployment
kubectl get deployment -n kube-system aws-load-balancer-controller
Step 3: Configuration of ingress routes
3.1 Deploy a sample application
- Deploy a sample application to configure ingress routes, Here we are deploying the Nginx image in the default namespace and exposing it as ClusterIP
apiVersion: apps/v1
kind: Deployment
metadata:
  name: nginx
  labels:
    app: nginx
spec:
  replicas: 1
  selector:
    matchLabels:
      app: nginx
  template:
    metadata:
      labels:
        app: nginx
    spec:
      containers:
      - name: nginx
        image: nginx
        ports:
        - containerPort: 80

##SVC Exposing as clusterIP
---
apiVersion: v1
kind: Service
metadata:
  labels:
    app: nginx
  name: nginx
spec:
  ports:
  - port: 80
    protocol: TCP
  selector:
    app: nginx
- Execute the below given kubectl commands to deploy a sample application
kubectl apply -f nginx_deploy.ymlkubectl get deployment nginx
3.2 Add ingress route
- To customize their behavior, you can add annotations to Kubernetes Ingress and Service objects.
- Add two public subnets in the “alb.ingress.kubernetes.io/subnets”
- We’ll use the “alb.ingress.kubernetes.io/actions.${action-name}” annotation to setup an ingress to redirect HTTP traffic into HTTPS
- Here we’ll be using AWS Certificate Manager (ACM )for configuring HTTPS, You need to provide the ACM arn in the “alb.ingress.kubernetes.io/certificate-arn”
- Replace the host value with your desired custom domain and service name example with SVC that you created during the sample application deployment.
---
apiVersion: networking.k8s.io/v1
kind: Ingress
metadata:
  namespace: default
  name: ingress
  annotations:
    kubernetes.io/ingress.class: alb
    alb.ingress.kubernetes.io/scheme: internet-facing
    alb.ingress.kubernetes.io/target-type: ip
    alb.ingress.kubernetes.io/subnets: public_subnet_one,public_subnet_two
    alb.ingress.kubernetes.io/certificate-arn: acm_ssl_arn
    alb.ingress.kubernetes.io/listen-ports: '[{"HTTP": 80}, {"HTTPS":443}]'
    alb.ingress.kubernetes.io/group.name: app
    alb.ingress.kubernetes.io/actions.ssl-redirect: >-
        {
            "Type": "redirect",
            "RedirectConfig": {
                "Protocol": "HTTPS",
                "Port": "443",
                "Host": "#{host}",
                "Path": "/#{path}",
                "Query": "#{query}",
                "StatusCode": "HTTP_301"
            }
        }
spec:
  rules:
     - host: app.example.com  ##Replace the host value with your desired custom domain
       http:
        paths:
          - path: /
            pathType: Prefix
            backend:
             service:
              name: ssl-redirect
              port:
               name: use-annotation
          - path: /
            pathType: Prefix
            backend:
              service:
                name: example ##Replace service name example with SVC that you created during the sample application deployment
                port:
                  number: 80 ##Replace 80 with application port number
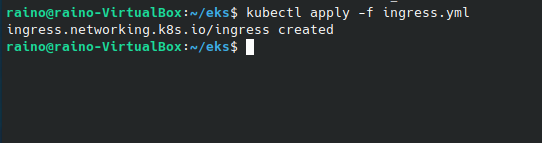
kubectl apply -f ingress.ymlError from server (InternalError): error when creating "ingress.yml": Internal error occurred: failed calling webhook "vingress.elbv2.k8s.aws": Post "[https://aws-load-balancer-webhook-service.kube-system.svc:443/validate-networking-v1-ingress?timeout=10s](https://aws-load-balancer-webhook-service.kube-system.svc/validate-networking-v1-ingress?timeout=10s)": context deadline exceeded
oops !! I think we have got a problem here
- The above error indicates that the k8s control plane is not able to connect to the AWS-load-balancer-controller pods running on the worker nodes
- For the AWS lb controller, We need to allow port 9443 for webhook access.
- So add port 9443 in the worker nodes security group to allow access from the control plane to the webhook port of the AWS load balancer controller.

- Let’s run the kubectl command again.
- Now, let's check if the load balancer is created or not
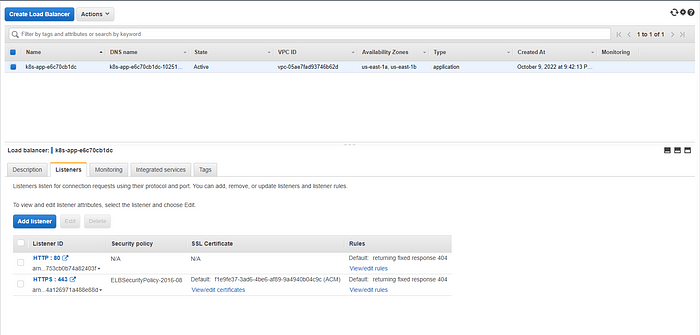
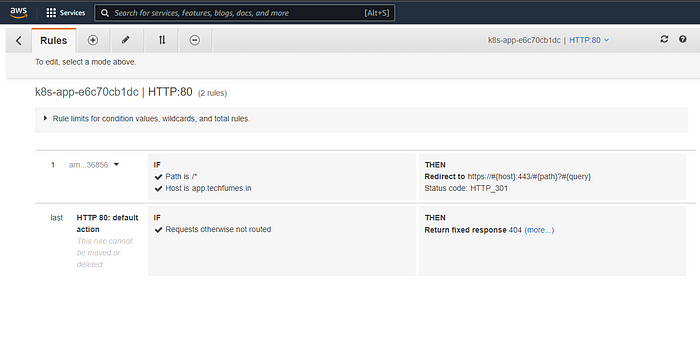
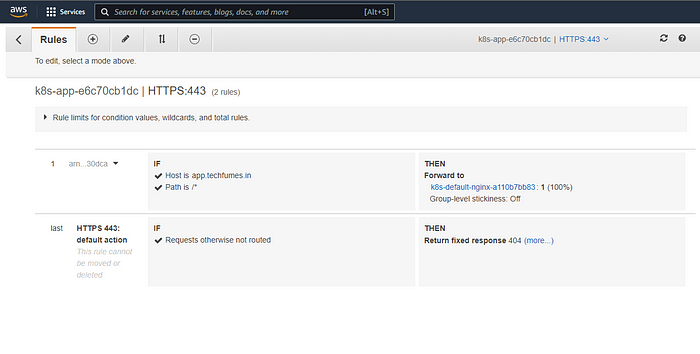
- The load balancer and rules are created, Now let’s try accessing the sample application using the hostname that we added in the ingress configuration.
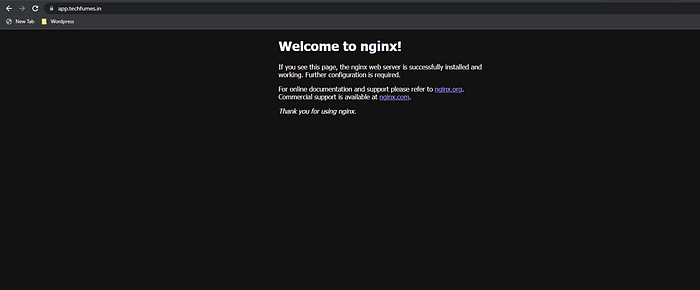
- We can access the sample application(Nginx) using the hostname and thus verify that we have successfully configured the AWS load balancer controller and Ingress routes.
References
- https://docs.aws.amazon.com/eks/latest/userguide/aws-load-balancer-controller.html
- https://kubernetes-sigs.github.io/aws-load-balancer-controller/v2.4/
- https://github.com/kubernetes-sigs/aws-load-balancer-controller/issues/2462
- https://github.com/kubernetes-sigs/aws-load-balancer-controller/blob/main/docs/guide/ingress/annotations.md
Comments
Loading comments…