Amazon Simple Notification Service (SNS) is an AWS managed service for sending notifications or messages. It can be used for application to application communication or application to person communication.
In this article, I will show how to use SNS with other AWS services and integration with Spring Boot.
First, let’s see some benefits of SNS
- Helps us decouple our applications.
- Sends push notifications, SMS to millions of users.
- Provides auto-scaling based on demand.
- Can coordinate with other AWS services like CloudWatch and EventBridge.
Use Cases
- Sets billing alarm if AWS bill goes over the expected threshold.
- Sets event notification for an AWS event. For example, if a new EC2 instance is deployed from my account I will get an email notification with the details.
- Sends push notifications.
- Sends SMS.
Types
1. Standard
This is super-fast, unlimited TPS, guaranteed at-least-once delivery, but not ordering. Subscription protocols are SQS, Lambda, HTTP, SMS, email, mobile application endpoints
2. FIFO
It can process 300 messages per second. But it can be increased. It guarantees exactly-once processing. And also maintains orders. Subscription protocols are SQS.
Terminology
- Topic: First we will have to create a topic to publish any message. Producers will always send messages to a specific topic. Topic name cannot be changed after creation. Each topic will have an ARN.
- Subscription: The subscriber will subscribe to a specific topic. Topic ARN will be added to the subscriber configuration. The protocol can be many things like email, SMS, SQS. We can also set up DLQ.
When a message is published on a topic, all the subscribers of that topic will get notifications based on protocol.
Integration with Other AWS Services
Billing Alert
In this case, I will use the CloudWatch alarm. The alarm will set off if the AWS bill goes over $2. First, I will create a topic. The topic will have a name and a display name.
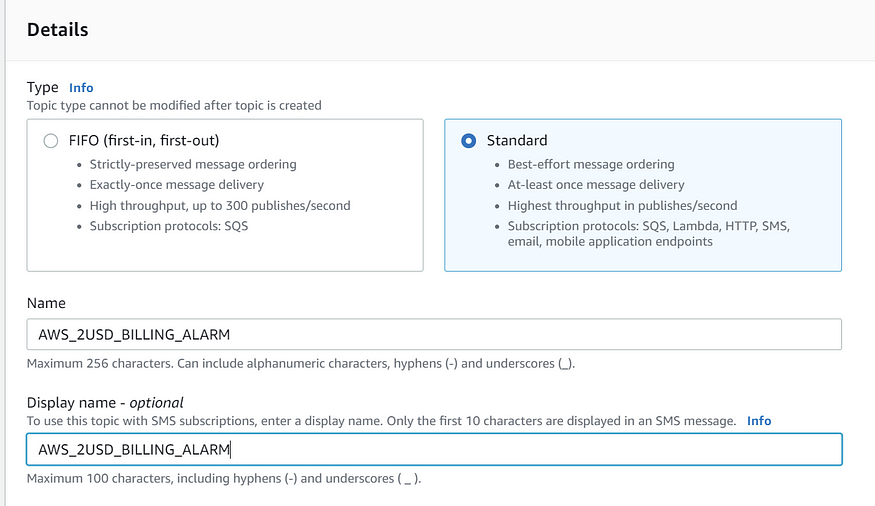
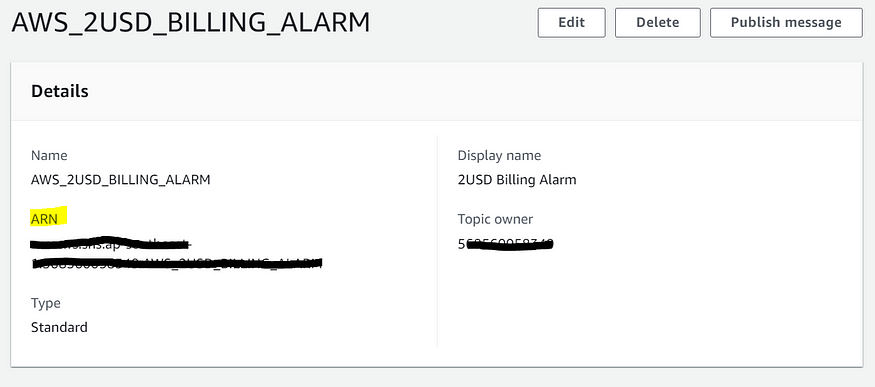
After creating the alarm AWS will generate an ARN. This ARN will be needed when I set up the subscriber.
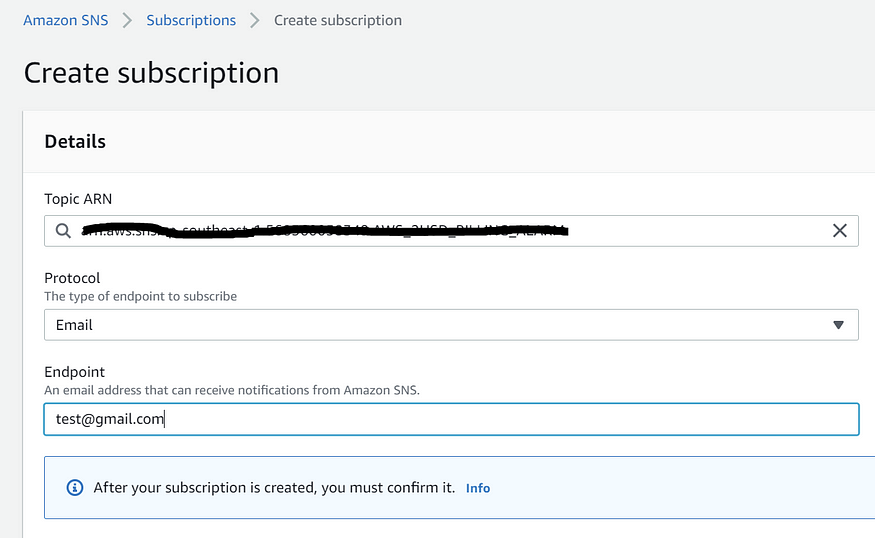
Here I used my newly created topic ARN and set up a protocol for email. The endpoint is something that we want our message to be sent. In my case, I want to get an email when someone publishes a message on my topic. We are all set from our SNS side. Now I will set up CloudWatch.
To set up the billing alarm I had to move to the us-east-1 region as AWS stores all the billing info there. Although billing information is global. So, any billing alarm will be global.

From metrics click Billing.

I will set the total estimated charge. But we can set by service too.
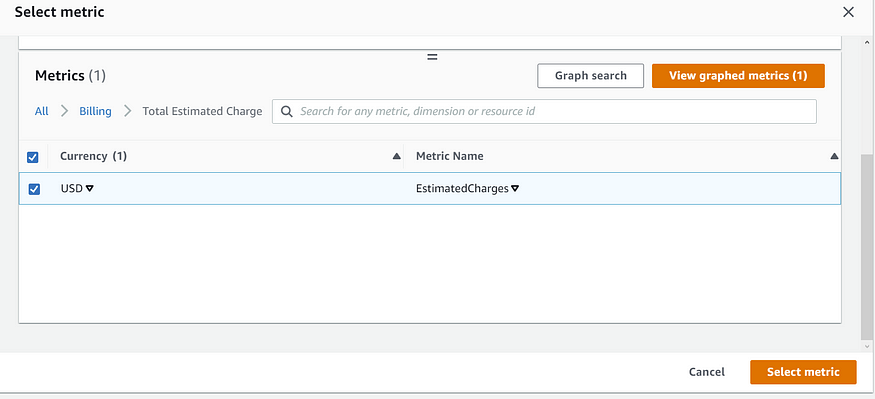
Select USD and proceed.
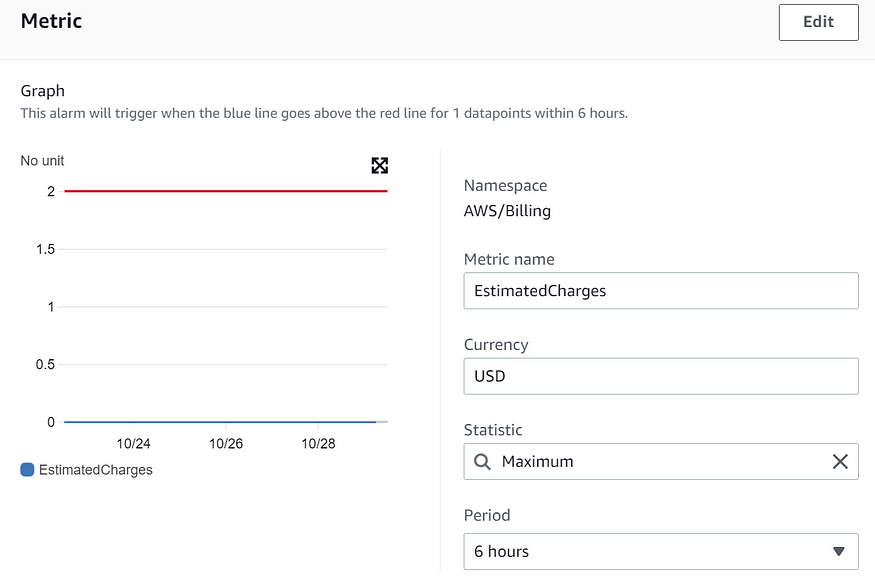
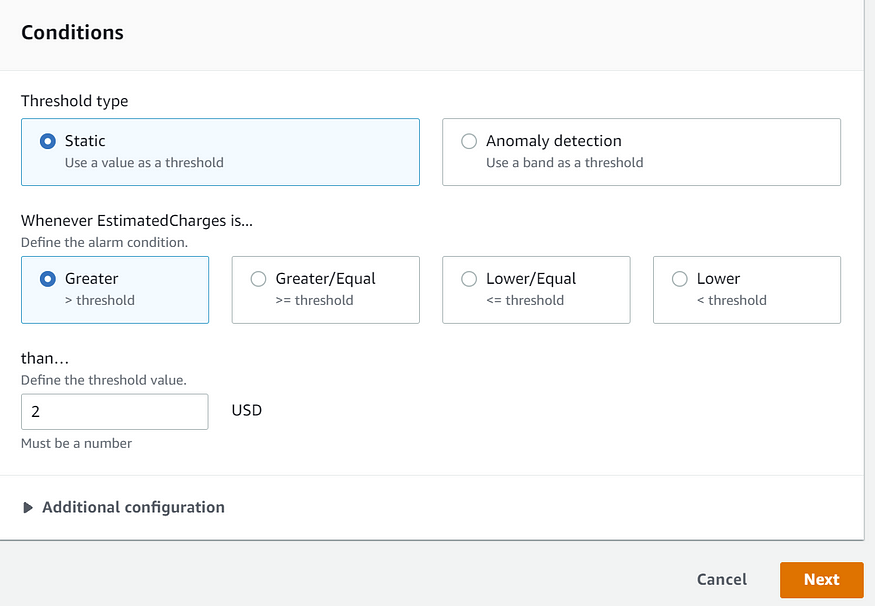
If the threshold goes over 2USD then it will trigger an alarm. Statistics can be maximum, sum, average or something else. Click next.
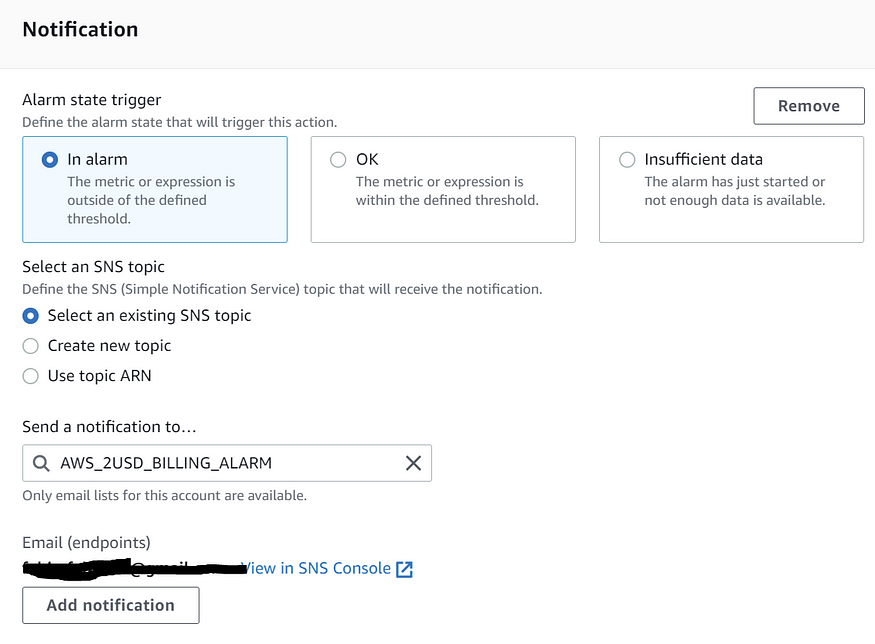
In this step, I moved to the region I created my SNS topic and now I will be able to select my existing SNS topic. Click next. Give a name to the alarm and create the alarm. Now CloudWatch is also configured for getting alarmed when our AWS bill goes over 2USD.
New EC2 Instance Launch Alert
For this, I already set up an SNS topic and subscribed. Now I will set up EventBridge.

From the EventBridge dashboard, I move to rules and set a name for the rule.

Select Event pattern. On the right side, AWS will ask for some configuration. Select Pre-defined pattern by service. There are many event types for EC2. I will have to select state change notification. If you do not specify any state then you will get a notification for all the state changes. But I only want notification when EC2 is running.
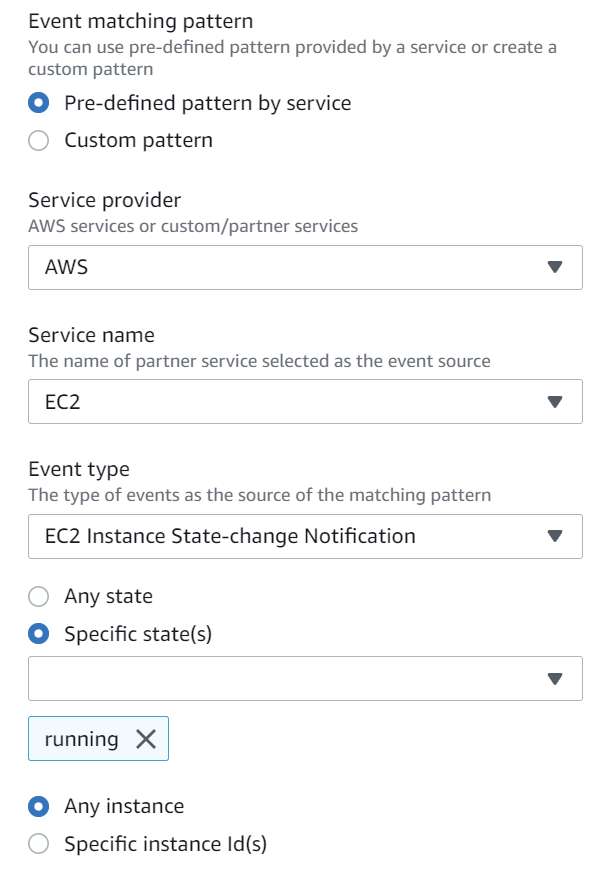
On the left side, you will see 2 parts. Event pattern and sample event.
Event pattern:
{
 “source”: [“aws.ec2”],
 “detail-type”: [“EC2 Instance State-change Notification”],
 “detail”: {
 “state”: [“running”]
 }
}
Sample event:
{
  “version”: “0”,
  “id”: “ee376907–sadfsdf”,
  “detail-type”: “EC2 Instance State-change Notification”,
  “source”: “aws.ec2”,
  “account”: “123456789”,
  “time”: “2021–10–30T11:30:34Z”,
  “region”: “us-east-1”,
  “resources”: [“arn:aws:ec2:us-east-1:1232:instance/i-a1111”],
  “detail”: {
  “instance-id”: “i-a1111”,
  “state”: “running”
  }
}
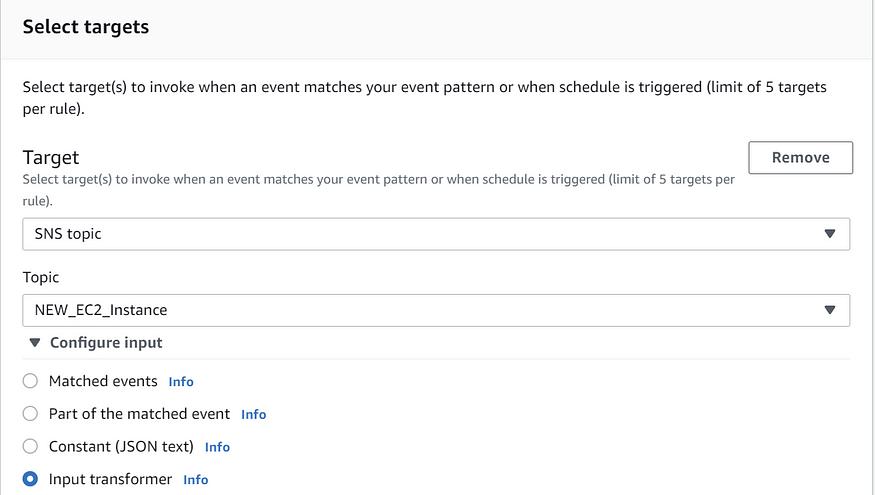
Select the previously created SNS topic as a target and select the input transformer. I will use this parameter to send some EC2 instance detail in the email.
In the input path set this message:
{“awsRegion”:”$.region”,”configurationItemCaptureTime”:”$.time”,”instanceId”:”$.detail.instance-id”}
I get these parameters from the sample event.
In input template:
“New EC2 instance deployed in <awsRegion> in <configurationItemCaptureTime>. Instance id <instanceId>”
So after you deploy or rerun an instance in AWS you will get an email notification like this:

You can add a few more details in the email if you want. The “” is necessary for the template.
You can set up this type of service-based notification from EventBridge.
Integration with Spring Boot
I will create a topic from the Spring Boot application. Then add a subscriber and then publish a message to that topic from the Spring Boot application.
First I will add the Maven dependency.
<dependency>
	<groupId>com.amazonaws</groupId>
	<artifactId>aws-java-sdk-sns</artifactId>
	<version>1.12.99</version>
</dependency>
Now I will need to configure an SNS client that will interact with AWS SNS. For that, I have an IAM role with SNS access. From the users' list, a user gets AmazonSNSFullAccess and get access and secret key for that user.
@Service
public class AmazonSnsClient {
  private AmazonSNS client;

  @PostConstruct
  private void initializeAmazonSnsClient() {
    this.client =
        AmazonSNSClientBuilder.standard()
            .withCredentials(getAwsCredentialProvider())
            .withRegion(Region.getRegion(Regions.AP_SOUTHEAST_1).getName())
            .build();
  }

  private AWSCredentialsProvider getAwsCredentialProvider() {
    AWSCredentials awsCredentials =
        new BasicAWSCredentials("access-key", "secret-key");
    return new AWSStaticCredentialsProvider(awsCredentials);
  }

  public AmazonSNS getClient() {
    return client;
  }
}
Now the client is ready and I can write the service code.
@Service
public class SnsService {

  @Autowired AmazonSnsClient amazonSnsClient;

  public String createSNSTopic(String topicName) {

    CreateTopicResult result;
    try {
      CreateTopicRequest request = new CreateTopicRequest().withName(topicName);

      result = amazonSnsClient.getClient().createTopic(request);
      return result.getTopicArn();
    } catch (Exception e) {
      System.err.println(e.getMessage());
    }
    return "";
  }

  public void listSNSTopics() {

    try {
      ListTopicsRequest request = new ListTopicsRequest();

      ListTopicsResult result = amazonSnsClient.getClient().listTopics(request);
      System.out.println("Topics are " + result.getTopics());

    } catch (Exception e) {
      System.err.println(e.getMessage());
    }
  }

  public void subEmail(String topicArn, String email) {

    try {
      SubscribeRequest request =
          new SubscribeRequest()
              .withProtocol("email")
              .withEndpoint(email)
              .withReturnSubscriptionArn(true)
              .withTopicArn(topicArn);

      SubscribeResult result = amazonSnsClient.getClient().subscribe(request);
      System.out.println("Subscription ARN: " + result.getSubscriptionArn());

    } catch (Exception e) {
      System.err.println(e.getMessage());
    }
  }

  public void pubTopic(String message, String topicArn) {

    try {
      PublishRequest request = new PublishRequest().withMessage(message).withTopicArn(topicArn);

      PublishResult result = amazonSnsClient.getClient().publish(request);
      System.out.println(
          result.getMessageId()
              + " Message sent. Status is "
              + result.getSdkHttpMetadata().getHttpStatusCode());

    } catch (Exception e) {
      System.err.println(e.getMessage());
    }
  }
}
After creating a topic you will need the ARN to publish any message to that topic.
The code can be found here.
I hope this will help you to start with Amazon SNS and Spring Boot integration. Best of luck 😀