
When I started as a web developer, I was always amazed by all the websites having such amazing interactive backgrounds. I always thought to myself that maybe someday, I’ll also learn how to do this. But this would take some time as this was meant only for very experienced web developers.
One and a half year down the line, I am making all these interactive backgrounds in my side projects for fun which amuses me if I’m being honest.
If there’s one thing I regret, it’s that I thought these designs could only be made by professional developers and I’d not be able to do this. This pushed my progress back a few months.
In this article, I’d like to help you make an interactive background without having to understand its specificities. Take a look below at the interactive background which you’ll be making in no time and you can easily be using it in all of your own web apps.
Particles.js Demo
Setting up the Project
Pre-requisites
Node.jsinstalled on your systemcreate-react-apppackage- Preferably, an IDE
- Need for a background/willingness to learn
Creating a React App
Firstly, we’ll create a React App with the help of the create-react-apppackage, so we run the following commands:
npx create-react-app react-particles
cd react-particles
Clearing the Clutter and Setting up App (optional)
So, now that you have created your app, open your working folder in your IDE and you see a lot of files are already there, but for the scope of this project (and usually all small-scale projects), we can remove a few of these files and make your project folder look a bit better and more organised. So, remove these files in your project’s src folder:
App.testserviceWorker.jssetupTests.js
This will clear up your src folder where all of your work is going to be done.
Now, open your public folder and go to index.html , in the file, change the title of your App to React Particlesjs (or anything that you like), i.e., replace <title>React App</title> with:
<title>React Particlesjs</title>
Now, open your App.js and index.js files in the src folder and remove the unnecessary lines and imports (for the files that were removed), after which they shall look like this (React.StrictMode is optional though):
// src/App.js

import React from "react";

import logo from "./logo.svg";

import "./App.css";

function App() {
  return (
    <div className="App">
      <header className="App-header">
        <img src={logo} className="App-logo" alt="logo" />

        <p>
          Edit <code>src/App.js</code> and save to reload.
        </p>

        <a
          className="App-link"
          href="https://reactjs.org"
          target="_blank"
          rel="noopener noreferrer"
        >
          Learn React
        </a>
      </header>
    </div>
  );
}

export default App;
// src/index.js

import React from "react";

import ReactDOM from "react-dom";

import "./index.css";

import App from "./App";

ReactDOM.render(
  <React.StrictMode>
    <App />
  </React.StrictMode>,

  document.getElementById("root")
);
Initial App.js and index.js
But do note that this is an optional step and you can leave the whole of this step if you are not trying to create an app from scratch.
Starting the Project
Particles.js
Now, we take a look at the JavaScript library that we’re going to use, it is called particles.js and is made by Vincent Garreau. You can take a look at the demo here.
As you can see in the pictures below, there are a few options to select, firstly there is the dropdown having Default as selected, there you can choose from a few options and get different looks for your prospective web apps.

Demo of the library from https://vincentgarreau.com/particles.js/
Then, if you click on particles or interactivity, different options come up, such as numbers, clicking on which you’ll get options to increase the density of these particles. You can also change the color or shapes or all the other things as can be seen from the image.
Next, you see the interactivity dropdown, you can change the effects that hovering or clicking on the screen cause. After that, we have page background which basically is something the library tells us to put in the .css file of ours (not in all cases do we need to do that, as will be demonstrated later in the article).
All in all, this demo website is yours to play around with, you can try all of the things and see what effects it has without having to understand how it works.
Lastly, after you’re done experimenting and finally are satisfied with the design, click on Download current config (JSON). This will download your current configurations of the design.
Using Particles.js in your React Project
To integrate this library in your React web app, we require the react-particles-js package, so firstly we use this command:
yarn add react-particles-js
After it gets installed, we go to our IDE and start editing.
A side note: react-particles-js starting from version 3.0.0 is using tsParticles as core library and not particles.js. . You can find more details here: https://dev.to/matteobruni/react-particles-js-tsparticles-3okk. There’s also an official tsParticles react library: react-tsparticles. See more here: https://particles.js.org.
First of all, we open the json file we just downloaded and copy the whole of its content. Then, we create a new folder config in the src folder and create a new file named configParticles.js inside it.
Now, in this file, create a const named configParticles and assign it the content that you just copied.
// src/config/particlesConfig.js

const particlesConfig = {
  /*

"particles": {

...

},

"retina_detect": true

*/
};

export default particlesConfig;
particlesConfig.js
Here, just paste the contents of the json file in the place of the comments, i.e., instead of /* ... */ paste your content. So, now your config file is ready and now you just have to import and use it in your App.js and you’ll have your preferred background.
Finalising the project
So, we come to the final part of our project, we open our App.js file and import these two things:
import Particles from 'react-particles-js';
import particlesConfig from './config/particlesConfig';
Then, in the App function, we give our div with className=“App” an inline style (can give it in the App.css file too, but that’s just extra steps), in this inline style we set its position: "relative" and overflow: "hidden" .
In the next line, we create another div component and provide it an inline style too, in which we set its position: "absolute" .
Lastly, we use the Particles component we just imported and give it a height="100vh" and width="100vw" . After this, we use the particlesConfig that we imported as the params for the Particlescomponent.
// src/App.js

import React from "react";

import logo from "./logo.svg";

import "./App.css";

import Particles from "react-particles-js";

import particlesConfig from "./config/particlesConfig";

function App() {
  return (
    <div className="App" style={{ position: "relative", overflow: "hidden" }}>
      <div style={{ position: "absolute" }}>
        <Particles height="100vh" width="100vw" params={particlesConfig} />
      </div>

      <header className="App-header">
        <img src={logo} className="App-logo" alt="logo" />

        <p>
          Edit <code>src/App.js</code> and save to reload.
        </p>

        <a
          className="App-link"
          href="https://reactjs.org"
          target="_blank"
          rel="noopener noreferrer"
        >
          Learn React
        </a>
      </header>
    </div>
  );
}

export default App;
App.js We just had to change/add 6 lines, viz.,
6–7&11–14except for the use of thejsonfile and we’ve successfully made an interactive, responsive, and beautiful-looking background for our web app.
Running our Web App
Lastly, we run our web app in our bash/command prompt with the following commands:
yarn start
Voila, now you have our own web app with a beautiful background that can be used anywhere.
Demo
The web app shall look like this if you copied the default config code from the Particles.js library demo and followed the same path as the tutorial.
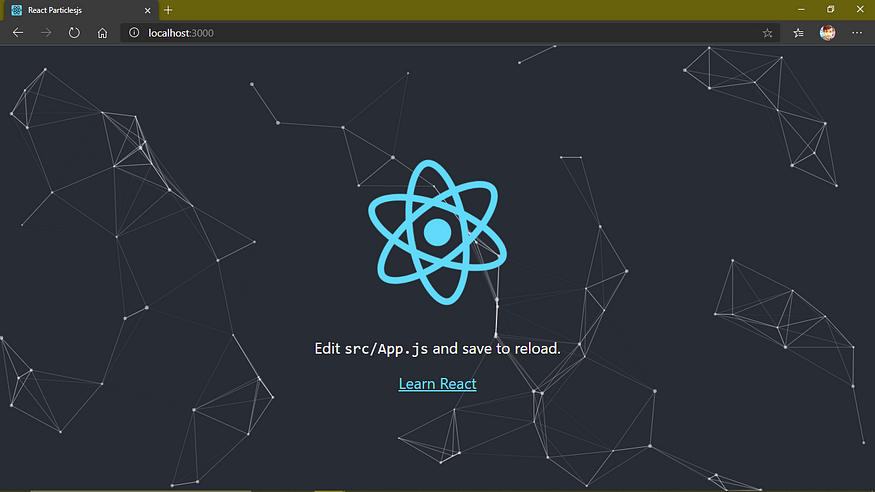
Demo for React-Particlesjs
If you faced any difficulties, feel free to contact me or you can take a look at my GitHub repo here for any doubts.
Comments
Loading comments…