
This article is divided in 4 parts:
1. User Interface with Material-UI
2. Creation of forms
3. Save user input with React useContext
4. Implement Stripe
If you came straight to the last part of this article and missed everything else,
I suggest that you download the full code so you track with the rest of this article.
The code is available here.
Now let's go for the final sprint…

If you did not install Stripe and Material-UI, then do so:
npm i @stripe/react-stripe-js @stripe/stripe-js @material-ui/core @material-ui/icons @material-ui/lab
MAIN
src/views/Main.js
The first thing is to wrap our element with the Stripe provider. I decided to do that in Main.js but you can also do it in App.js or directly on the form where you intend to use the Stripe elements.
Start by importing the stripe provider call loadStripe (documentation):
import { loadStripe } from '@stripe/stripe-js';
And import the stripe Elements wrapper as covered on the same Stripe documentation:
import { Elements, } from "@stripe/react-stripe-js";
Find your publishableKey (available on your Stripe Developers Dashboard):
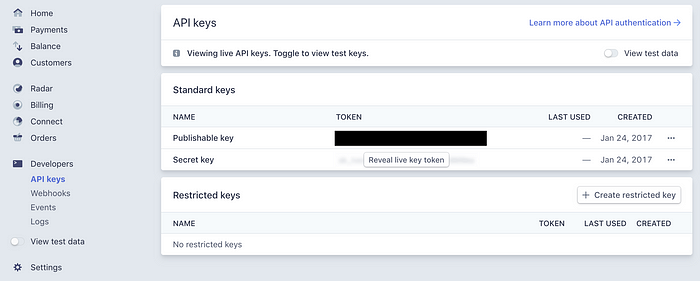
Activate it by adding this constant with your publishableKey:
const stripe = loadStripe(publishableKey);
On my git repository you'll see that I am saving all the keys (including the publishableKey) in a back end PHP file and pull it with a fetch function that is called on load with useEffect. You do not have to do that for the publishableKey but I believe that it's good practice.
Wrap the stepper in Main.js with the Elements component:
<Container maxWidth="md" className={classes.container}>
     <Paper elevation={5}>
		 <Elements stripe={stripe}>
               <Stepper />
		 </Elements>
     </Paper>
</Container>
PAYMENTFORM
src/views/Forms/PaymentForm.js
Start by importing the Stripe elements necessary for our payment form.
In my example I'll be using CardNumber, CardExpiry and CardCvc. For the full list of available elements click here.
import {
     CardNumberElement,
     CardExpiryElement,
     CardCvcElement,
} from "@stripe/react-stripe-js";
We are going to start with the Credit Card Number.
For those that did not follow the prior articles, we already created a TextField that looks as follow:
<TextField
     label="Credit Card Number"
     name="ccnumber"
     variant="outlined"
     required
     fullWidth
     InputLabelProps={{ shrink: true }}
/>
The TextField component of Material-UI uses the Input component.
You can read the official documentation here: TextField and Input.
You want to replace the Input component with the CardNumber component from Stripe.
Per the official TextField documentation you'll have to use the InputProps attribute to interact with the Input Component:
<TextField InputProps={} />
You are now inside the Input component and can use the attributes from the Input documentation.
The Input component has an attribute call “inputComponent” and that's used if you don't want to use a basic HTML but something else — in this case we want to use CardNumber.
So logically you'll think that you'll have to do something like this:
<TextField InputProps={{ inputComponent: CardNumber }} />
And unfortunately… no. That would be too easy. Doing so will seem to work but if you look at the console, the moment you start typing something you'll get the following error:
TypeError: Material-UI: Expected valid input target. Did you use a custom inputComponent and forget to forward refs? See https://material-ui.com/r/input-component-ref-interface for more info.
STRIPEINPUT
src/components/StripeInput.js
That component will have to receive CardNumber from Stripe as prop and useRef to explain that when you use TextField it has to interact with CardNumber. So here is how that component looks like:
import React, { useRef, useImperativeHandle } from 'react'
const StripeInput = (
     { component: Component, inputRef, ...props }
) => { const elementRef = useRef();
     useImperativeHandle(inputRef, () => ({
          focus: () => elementRef.current.focus
     }));
     return (
          <Component
               onReady={element => (elementRef.current = element)}
               {...props}
          />
     )
}
export default StripeInput
I won't explain what are the various React hooks, you can check it out here on the official documentation: useRef, useImperativeHandle.
Now, let's go back to our PaymentForm to use that new component.
PAYMENTFORM
src/views/Forms/PaymentForm.js
Start by importing the new component:
import StripeInput from "../../components/StripeInput";
Go back to the TextField and add that new component:
<TextField
     label="Credit Card Number"
     name="ccnumber"
     variant="outlined"
     required
     fullWidth
     InputLabelProps={{ shrink: true }}
     InputProps={{
          inputComponent: StripeInput
     }}
/>
And of course you still need to send the “CardNumberElement” component to StripeInput and to forward a prop to Input you need to use InputProps again but this time inside the InputProps of the “Input” element as follows:
InputProps={{
     inputComponent: StripeInput,
     inputProps: {
          component: CardNumberElement
     },
}}
Here we go! No error anymore in the Console.
Let's do the same for the Expiry Date and CVC.
By now you should see the placeholders on each fields and if you type a wrong card number or expiry date the text will become red to indicate to the user that there is an error.
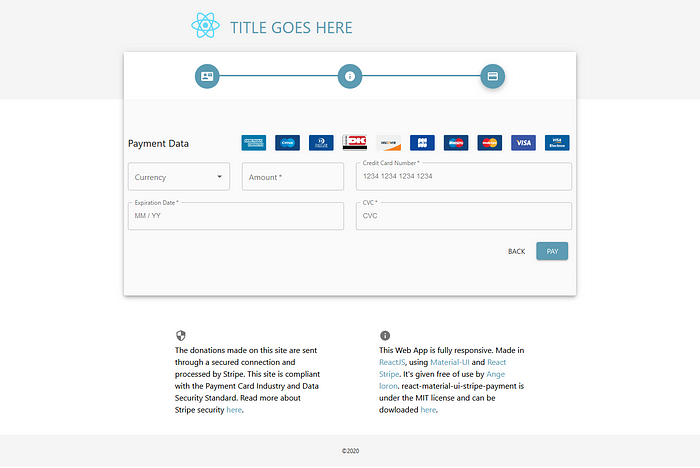
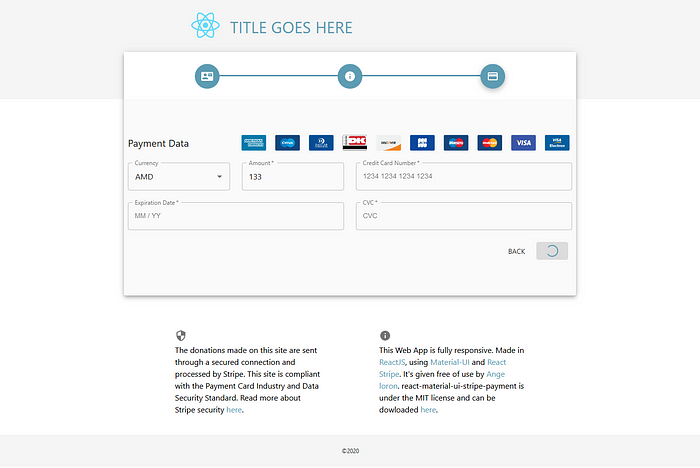
It is now time to send all these data to stripe once the user presses the “PAY” button.
STEPPER
src/views/Stepper.js
We will have to create a function and it could be that it takes time so you want to have a loading indicator that shows to the user that something is happening. For that purpose we will use the circular progress component from Material-UI and add a state for it.
import {
   Stepper,
   Step,
   StepLabel,
   Button,
   Box,
   Grid,
   CircularProgress,
} from '@material-ui/core';
[...]
const [loading, setLoading] = useState(false);
[...]
<Button variant="contained"
  color="primary"
  className={classes.button}
  type="submit"
  disabled={loading}
>
{
  loading
  ?
  <CircularProgress size={24} />
  :
  activeStep === 2 ? 'Pay' : 'Next'
}
</Button>
For those that did not follow the first parts of this article a function was created onSubmit call “handleNext”
<form className={classes.form} onSubmit={e => { e.preventDefault(); handleNext() }}>
That function is used to change step on the stepper and we will now add an if statement to check if it is on the last step and if it is then we will execute a new async function call “capture” as it will be used to capture the credit card:
const handleNext = () => {
   if (activeStep === 2) {
      capture()
   } else {
      setActiveStep(prevActiveStep => prevActiveStep + 1);
   }
};
The first part of the capture function will be to activate the loading:
const capture = async () => {
   setLoading(true);
}
To capture the card we need to send the amount and currency to Stripe which will send back a transaction number. In addition to the amount and currency we also want to send the data on the customer (name, email, etc.).
To do so let's first import the data from our reducer to our page (Stepper.js) and the various hooks from Stripe:
import {
   useStripe,
   useElements,
   CardNumberElement,
} from '@stripe/react-stripe-js';
import { useStateValue } from "../stateContext";
And declare them:
const stripe = useStripe();
const elements = useElements();
const [{ formValues }, dispatch] = useStateValue();
Go back to the “capture” function and send the data to a function that we will create right after call “clientSecretPull”:
const clientSecret = await clientSecretPull({
   amount: formValues.amount * 100,
   currency: formValues.currency.code,
   cardType: "card",
   receipt_email: formValues.email,
   metadata: {
      date: formValues.date,
      service: formValues.service,
      facebook: formValues.facebook,
      twitter: formValues.twitter,
   }
})
email was changed to “receipt_email” which will indicate to Stripe that it has to send a receipt email to the customer and all other data
clientSecretPull will be using Axios to fetch the data, so start by installing Axios:
npm i axios
Then import it:
import Axios from "axios";
And create that function:
const clientSecretPull = (data) => {

   const url = window.location.hostname + "capture.php"

   return new Promise(async resolve => {
     const { data: { clientSecret } } = await Axios.post(url, data);
     resolve(clientSecret)
   })
}
And now you're asking, WTF is “capture.php”?!?
CAPTURE
public/capture.php
I decided to go with PHP for the back end but you can of course do something similar with NodeJS. I chosed that simply because the documentation for PHP on Stripe.js was the best I could find (https://stripe.com/docs/api/payment_intents/create).
Anyhow, to use this we need to download the “stripe-php” library available here.
Save the whole stripe-php folder in your public folder and create the catpure.php file.
First import the stripe-php library and put your API keys:
<?php
require_once 'stripe-php/init.php';
$ApiKey = 'sk_test_1234567891234567891234567891234567';
$publishableKey = 'pk_test_1234567891234567891234567891234567';
\Stripe\Stripe::setApiKey($ApiKey);
?>
Axios is sending your data in a json format so you'll have to decode it and ensure the most important data are sent (amount, currency and email).
Then send back the clientSecret — that's what you'll need to confirm that the purchase took place.
$data = json_decode(file_get_contents('php://input'), true);
if (!isset($data['amount']) || !isset($data['currency']) ||
!isset($data['receipt_email'])) {
  echo "Missing parameters";
} else {

 if(!isset($data['metadata'])) {
  $data['metadata'] = [];
 }

  $paymentIntent = \Stripe\PaymentIntent::create([
 'amount' => $data['amount'],
 'currency' => $data['currency'],
    'receipt_email' => $data['receipt_email'],
 'metadata' => $data['metadata'],
 ]);
 $output = [
  'publishableKey' => $publishableKey,
  'clientSecret' => $paymentIntent->client_secret,
 ];

  echo json_encode($output);

}
STEPPER
src/views/Stepper.js
We got a “client_secret” by sending some data about the user but we still did not send the credit card data and we want that money!!!
Go back to the “capture” function and create a constant that will pull the credit card data:
const capture = async () => {
	setLoading(true);
	const clientSecret = await clientSecretPull({
      amount: formValues.amount * 100,
      currency: formValues.currency.code,
      cardType: "card",
      receipt_email: formValues.email,
      metadata: {
         date: formValues.date,
         service: formValues.service,
         facebook: formValues.facebook,
         twitter: formValues.twitter,
     }
   });
   const cardElement = elements.getElement(CardNumberElement);
}
On the function you see my pulling “CardNumberElement” and not the CVV or expiry data and Sprite Elements are all connected so it pulls all the data. In actual fact I could have put the CardCvcElement instead and it would have worked the same way.
The cardElement constant now includes the Credit Card Number, Expiry data and CVV number.
So the time has come to send all these data to Stripe and run that card. For that we will use “stripe.confirmCardPayment()” which will return a paymentIntent and an error message.
const stripeDataObject = {
   payment_method: {
      card: cardElement,
      billing_details: {
         address: {
            city: formValues.city,
            country: formValues.country.code,
            line1: formValues.line1,
            line2: formValues.line2,
            postal_code: formValues.postal_code,
            state: null
         },
         email: formValues.email,
         name: `${formValues.firstname} ${formValues.lastname}`,
         phone: null
      },
   },
}
const { paymentIntent, error } = await
stripe.confirmCardPayment(clientSecret, stripeDataObject);
WOOHOUUU! You are now ready to run some cards!
If you're using your test API keys, you can use those test cards here:

You won't get anything back on the webpage as we did not program any feedback for the user yet, but check your Stripe Dashboard and you should start seeing some payments.
As such we are done with the implementation of Stripe onto our webpage.
However, I will add a few line of codes for the user to know if the card was ran or not.
CAPTURE FEEDBACK
src/views/Stepper.js capture()
At the end of our capture function we'll add the following if statement:
if (error) {

} else if (paymentIntent && paymentIntent.status === "succeeded") {
   dispatch({ type: 'emptyFormValue' });
}
setActiveStep((prevActiveStep) => prevActiveStep + 1);
setLoading(false);
The above will empty our form by running the “emptyFormValue” function that was created on part 3 of this article.if the credit card ran successfully and send the user to the next and final step and stop the loading indicator.
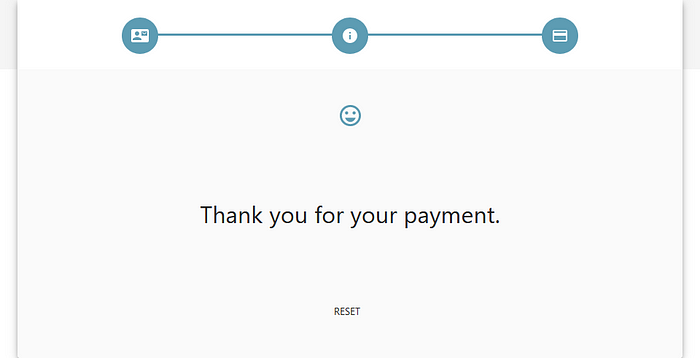
Our final step only has a “RESET” button which is not very inviting. Instead we should have some kind of text like “Thank you for your payment” or if the card was declined we should have another text.
There we can have 2 states, either the card ran successfully or it did not and there will be a different text based on that
Let's create those states:
const [cardStatus, setCardStatus] = useState(true);
const [cardMessage, setCardMessage] = useState("");
And adjust that state in our if statement in the capture function:
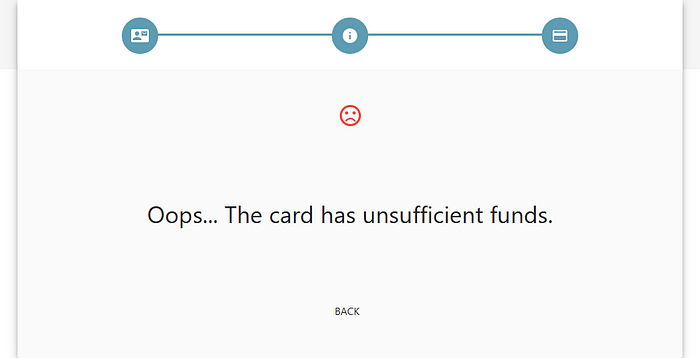
if (error) {
   setCardStatus(false);
   setCardMessage(`Oops... ${error.message}`);
} else if (paymentIntent && paymentIntent.status === "succeeded") {
   dispatch({ type: 'emptyFormValue' });
   setCardStatus(true);
   setCardMessage("Thank you for your payment.");
}
setActiveStep((prevActiveStep) => prevActiveStep + 1);
setLoading(false);
That's great but the user can still see nothing…

Ok, let's take care of our users…
You can of course create whatever interface you want but for my purpose I'll create something simple:
To do so, let's important Typography and the two icons from Material-UI:
import {
   Stepper,
   Step,
   StepLabel,
   Button,
   Box,
   Grid,
   CircularProgress,
   Typography
} from '@material-ui/core';
import {
   SentimentVerySatisfied,
   SentimentVeryDissatisfied
} from '@material-ui/icons';
Locate the reset button inside the Steppers function:
{activeStep === 3
?
   <Button onClick={handleReset} className={classes.button}>
      Reset
   </Button>
:
....
And modify it as follow:
<>
   {cardStatus
    ?
    <SentimentVerySatisfied fontSize="large" color="primary" />
    :
    <SentimentVeryDissatisfied fontSize="large" color="error" />
   }
   <Typography variant="h4">
      {cardMessage}
   </Typography>
   <Button onClick={cardStatus ? handleReset : handleBack}
           className={classes.button}
   >
      {cardStatus ? "Reset" : "Back"}
   </Button>
</>
We have done a lot of changes on the Stepper.js file so in case you lost track, here is how it should look:

You can find the whole code on GitHub:
Comments
Loading comments…