Introduction
Web scraping, the process of extracting public data from websites, has gained popularity for its application in various domains. One notable use case of web scraping is its application in sentiment analysis, particularly with product reviews. By analyzing the sentiments expressed within these reviews, you can glean valuable insights regarding public opinion and consumer attitudes. You can then use these insights to predict consumer trends and make informed business decisions regarding marketing strategies and product improvements.
With millions of reviews submitted by shoppers worldwide, Amazon's repository offers a great opportunity to extract valuable data and comprehensively understand customer sentiments. The objective of this post is to walk you through the process of scraping Amazon product reviews using Puppeteer and then analyze the sentiment expressed in those reviews.
However, scraping a site like Amazon comes with its own set of challenges, such as changes in website layout/structure, incorporation of anti-scraping mechanisms like CAPTCHAs, IP rate limits, geo-location blocks, etc, making consistent data extraction difficult. To get over these challenges, we'll be making use of Bright Data's Scraping Browser, an automated real browser that comes with in-built block-bypassing technology and proxy management tools, and that is fully compatible with Puppeteer/Playwright/Selenium scripts.
The Scraping Browser will take care of automating IP rotation, CAPTCHA solving, and more on the server-side, so you won't have to spend time incorporating additional block-bypassing logic in your code.
💡 Note: To do this, the Scraping Browser utilizes an unlocker infrastructure that can bypass even the most complex anti-scraping measures, you can learn more about it here.
Without further adieu then, let's get started.
Tools and Setup
The introduction has already mentioned the aim of the article. If you are already into the world of web scraping, you must have heard of tools like Selenium, Puppeteer, or Playwright, as these tools are used for web scraping extensively. Puppeteer is a Node.js library that provides high-level APIs for automating web browsers. Selenium and Playwright are similar tools available in other languages like Python. Puppeteer primarily provides APIs to control headless Chrome or Chromium-based browsers, but Playwright and Selenium support browsers like Firefox too. When using these libraries with headless Chrome, they use the Chrome Devtools Protocol.
Now, we'll be making use of the Scraping Browser and it depends on the same protocol. And because of this reason, we'll need to choose a library that uses the same protocol. As mentioned before, the Scraping Browser API is fully compatible with Puppeteer/Selenium/Playwright scripts, but for the purposes of this article, we will use Puppeteer.
👇 Learn more about the features of the Scraping Browser:
Scraping Browser - Automated Browser for Scraping
For analyzing the sentiments from the reviews, the Sentiment package will be used. It uses the AFINN-165 wordlist and returns an AFINN score. The package provides an AFINN score:
- A positive score indicates a positive sentiment.
- A negative score points to a negative sentiment.
- A neutral score suggests a neutral sentiment.
But before jumping into the code part, it is important to obtain a few necessary keys for using the Scraping Browser.
Obtaining the Required Username and Password from Bright Data
To connect the Scraping Browser with Puppeteer, obtaining the username, password, and host is important. Follow these steps to obtain the necessary keys:
- Visit the Scraping Browser page and create a new account for free by clicking on Start free trial/Start free with Google. Once you've finished the signup process, Bright Data will give you a free credit of 5$ for testing purposes.
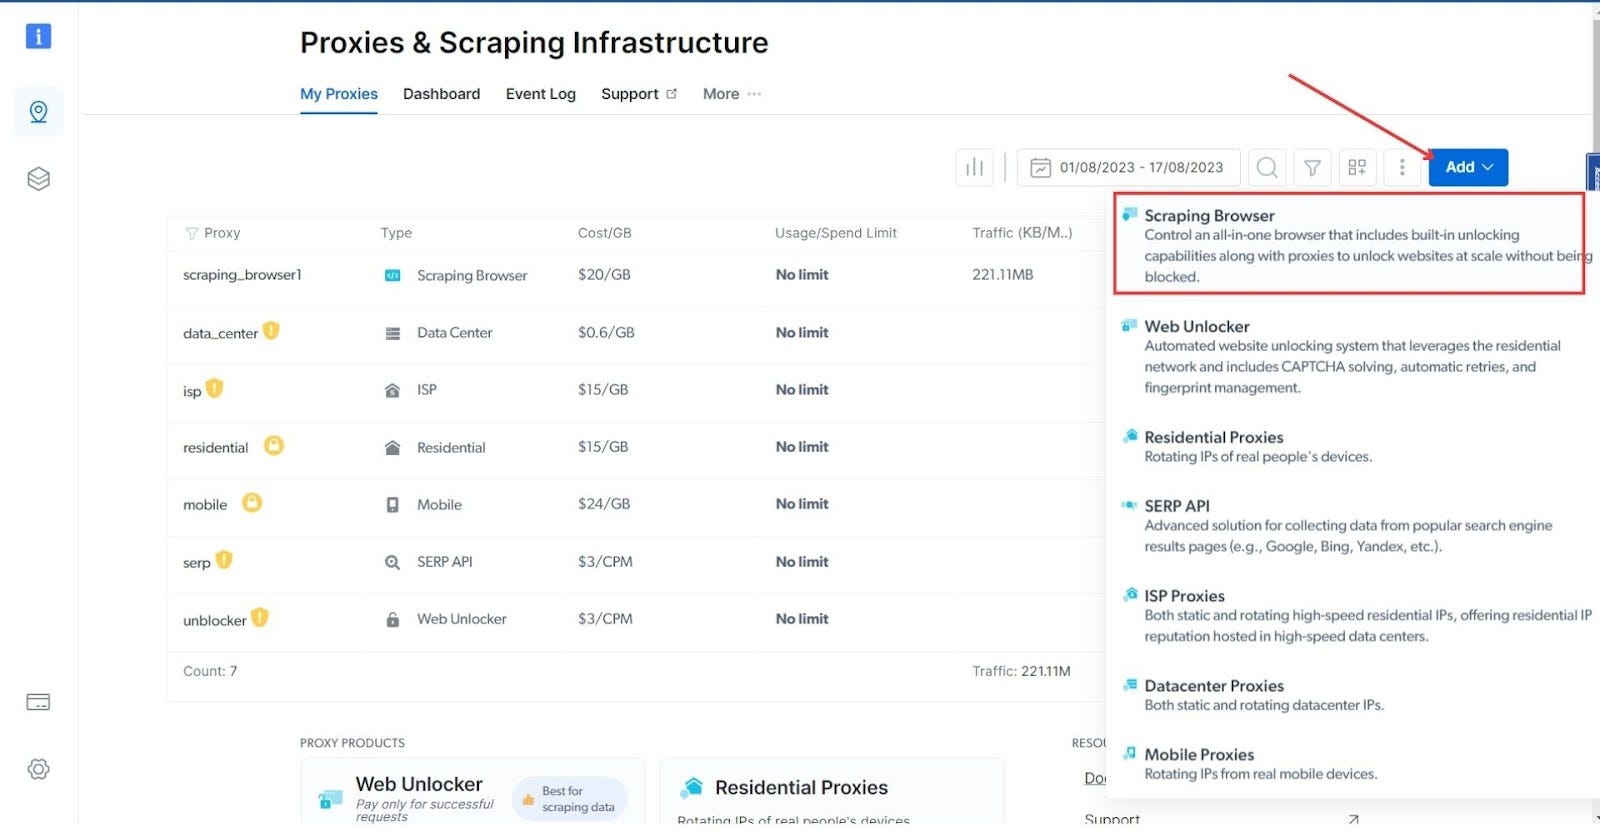
- After the account is created, navigate to the Proxy and Scraping Infrastructure section and click the Add button from the top-right section. Choose Scraping Browser from the list.
- Give a name to your scraping browser, or move forward with the auto-generated one.
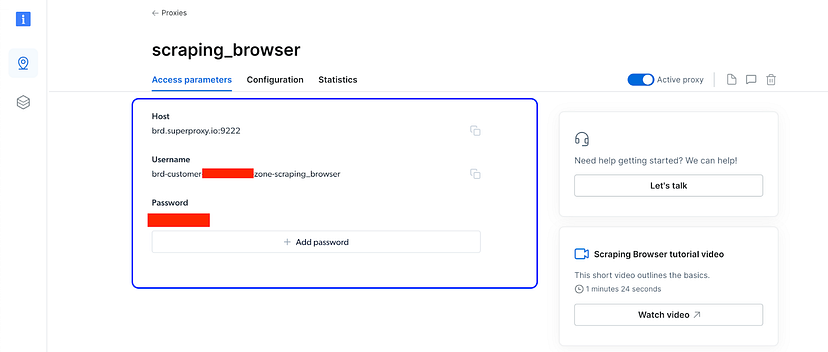
- After the browser is created, click on the name of the browser, and it'll take you to a page with more details.
- Navigate to the Access Parameters tab to access the required username, password, and host.
Note down these values, as you'll need them later.
Now that you have the necessary keys, you can move forward to initialize a new Node.js project. As a prerequisite, it is important that your computer already has Node.js and NPM installed on it. It's also important that you have some basic knowledge of Node.js.
Setting Up the Project for Scraping
First of all, open a new directory in your favorite code editor and initialize it with NPM. To do so, run the following command:
npm run init -y
The command will generate a new package.json file with default values. Once the command is run successfully, you are ready to install the required dependencies. Only two dependencies are needed for this tutorial:
- Puppeteer Core: For running the headless browser
- Sentiment: For analyzing the sentiments.
To install them, run the following command:
npm i puppeteer-core sentiment
Once the installation is successful, it's time to integrate the Bright Data scraping browser with Puppeteer and scrape the product reviews.
How to Scrape Amazon Product Reviews
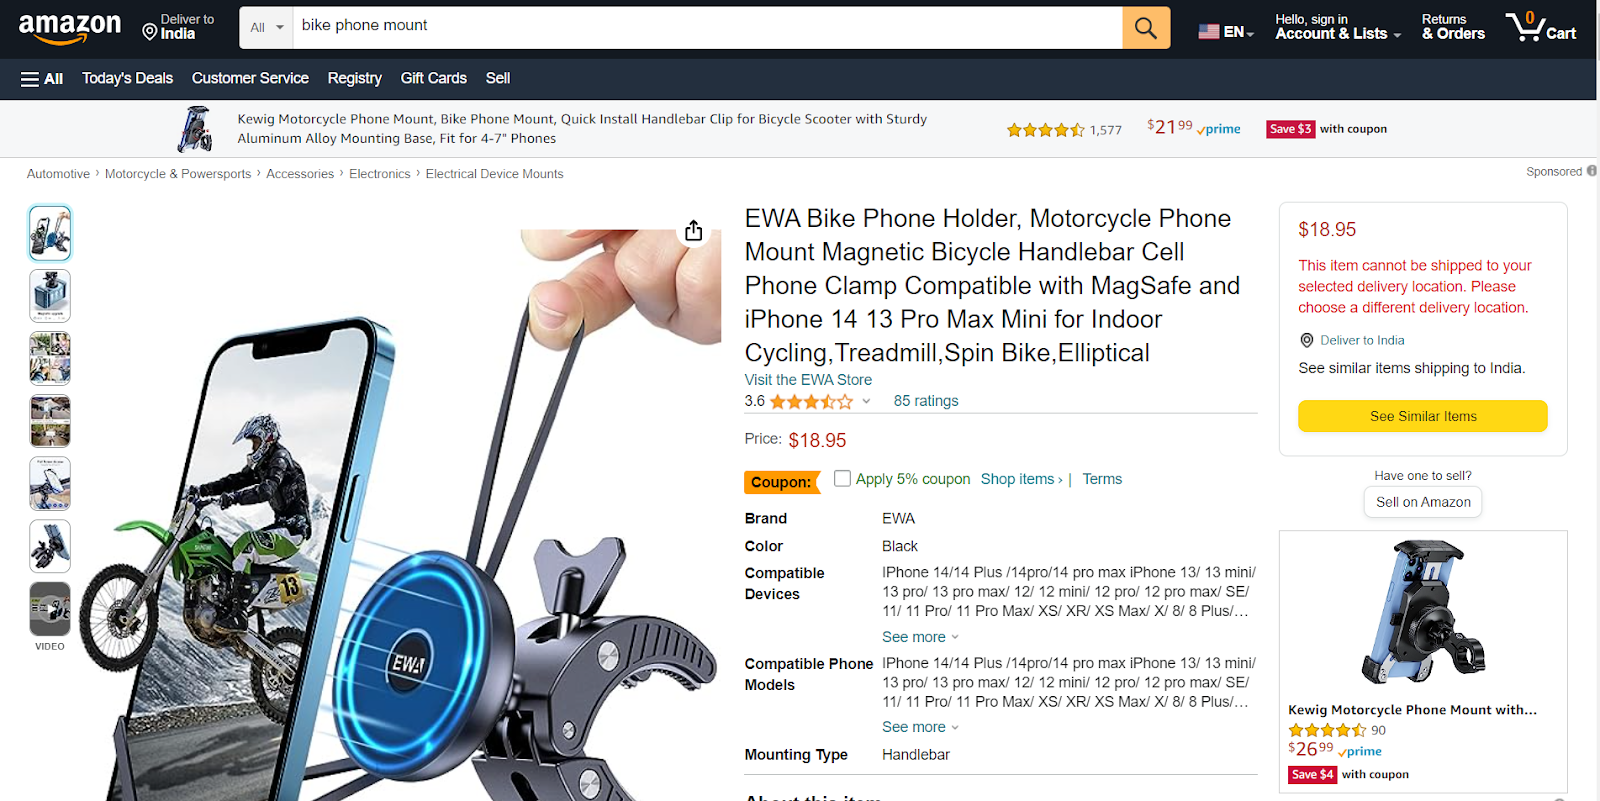
Now that you have acquired the necessary keys and the project has been initialized, let's write some code. For this tutorial, the reviews of this bike phone holder mount product will be scraped.
First of all, create a new file called app.js in your working directory and paste the following code into it:
const puppeteer = require("puppeteer-core");
const fs = require("fs");
const Sentiment = require("sentiment");

const sentiment = new Sentiment();

const SBR_WS_ENDPOINT = "wss://YOUR_USERNAME:YOUR_PASSWORD@YOUR_HOST";

async function main() {
  console.log("Connecting to Scraping Browser...");
  const browser = await puppeteer.connect({
    browserWSEndpoint: SBR_WS_ENDPOINT,
  });
  try {
    console.log("Connected! Navigating to an Amazon product review page...");
    const page = await browser.newPage();

    page.setDefaultNavigationTimeout(2 * 60 * 1000);

    await page.goto(
      "https://www.amazon.com/Bike-Phone-Holder-Motorcycle-Mount/dp/B09MFP8SKN/ref=sr_1_301?keywords=bike+phone+mount&qid=1692258143&refinements=p_72%3A1248864011&rnid=1248859011&sprefix=bike+phone%2Caps%2C378&sr=8-301"
    ); // Replace with your specific Amazon product URL

    new Promise((r) => setTimeout(r, 5000));

    console.log("Navigated! Scraping reviews...");
    const reviews = await getReviews(page); // This doesn't exist yet.

    fs.writeFileSync("reviews.json", JSON.stringify(reviews, null, 2), "utf-8");

    console.log("Scraped! Checking sentiments...");
    checkSentiments(); // This doesn't exist yet.

    console.log("Done!");
  } finally {
    await browser.close();
  }
}

if (require.main === module) {
  main().catch((err) => {
    console.error(err.stack || err);
    process.exit(1);
  });
}
Let's understand the code briefly now:
- The required packages like puppeteer-core, sentiment, and fs are imported into the file first. Then the sentiment package is initialized using the constructor method new Sentiment();.
- Because Puppeteer will connect using a remote proxy browser, authentication with Bright Data is required. Replace YOUR_USERNAME, YOUR_PASSWORD, and YOUR_HOST with the username, password, and host you received from the scraping browser parameters in the earlier section of obtaining the keys.
- The next step is to initialize a main function that will initialize the headless browser to navigate to the Amazon product page. Using Puppeteer's connect method, a connection is established over a WebSocket to an existing browser instance (a Chromium instance). The browserWSEndpoint is a WebSocket URL the Puppeteer client can use to connect to a running browser instance. One of the primary reasons for choosing Puppeteer in this article is because the tool is based on Chrome Devtools Protocol, allowing you to connect to a remote browser using WebSocket connection. The same is not possible using tools like Cheerio.
- In the try block, a new page/tab is opened using const page = await browser.newPage();. Once the page is created, the next step is to set the default navigation timeout to 2 minutes (or 120,000 milliseconds). If the page doesn't load within this time, Puppeteer will throw an error.
- The script then navigates to the specified Amazon product page. You can change the product page according to your needs.
- The promise in the next line makes the script wait for 5 seconds.
- After waiting for the specified period of time, a function called getReviews is invoked. The function is not yet available to the program. The data returned by the function is stored in a variable called reviews and stored in a JSON file named reviews.json. The fs module from the native Node.js is used for writing it to the file.
- Once the file is written, another function called checkSentiments is invoked to check the sentiments. This function is yet to be written.
- Finally, the browser is closed using the browser.close method.
- The if block at the end determines if the script is being run directly or imported to another file. If executed directly, it invokes the main function. Any errors from main are logged, and the script exits with an error code of 1. This ensures the script's core actions only execute when not imported into another module.
The main function is ready. Let's write the getReviews function now to get the reviews from the product page. Below the SBR_WS_ENDPOINT variable and above the main function, paste the following code:
async function getReviews(page) {
  return await page.$$eval(".review", (reviews) => {
    return reviews.map((review) => {
      const reviewTextElement = review.querySelector(
        ".review-text-content span"
      );
      const reviewTitleElement = review.querySelector(
        ".review-title span:nth-child(3)"
      );
      const reviewDateElement = review.querySelector(".review-date");
      const reviewRatingElement = review.querySelector(".review-rating");

      return {
        reviewText: reviewTextElement ? reviewTextElement.innerText : null,
        reviewTitle: reviewTitleElement ? reviewTitleElement.innerText : null,
        reviewDate: reviewDateElement ? reviewDateElement.innerText : null,
        reviewRating: reviewRatingElement
          ? reviewRatingElement.innerText
          : null,
      };
    });
  });
}
Let's understand the code now.
- First, a new asynchronous function named getReviews is defined, which takes a page parameter.
- The function's primary task is to evaluate the content of the given page using Puppeteer's $$eval method, which runs a function against the elements matching the selector, in this case, .review.
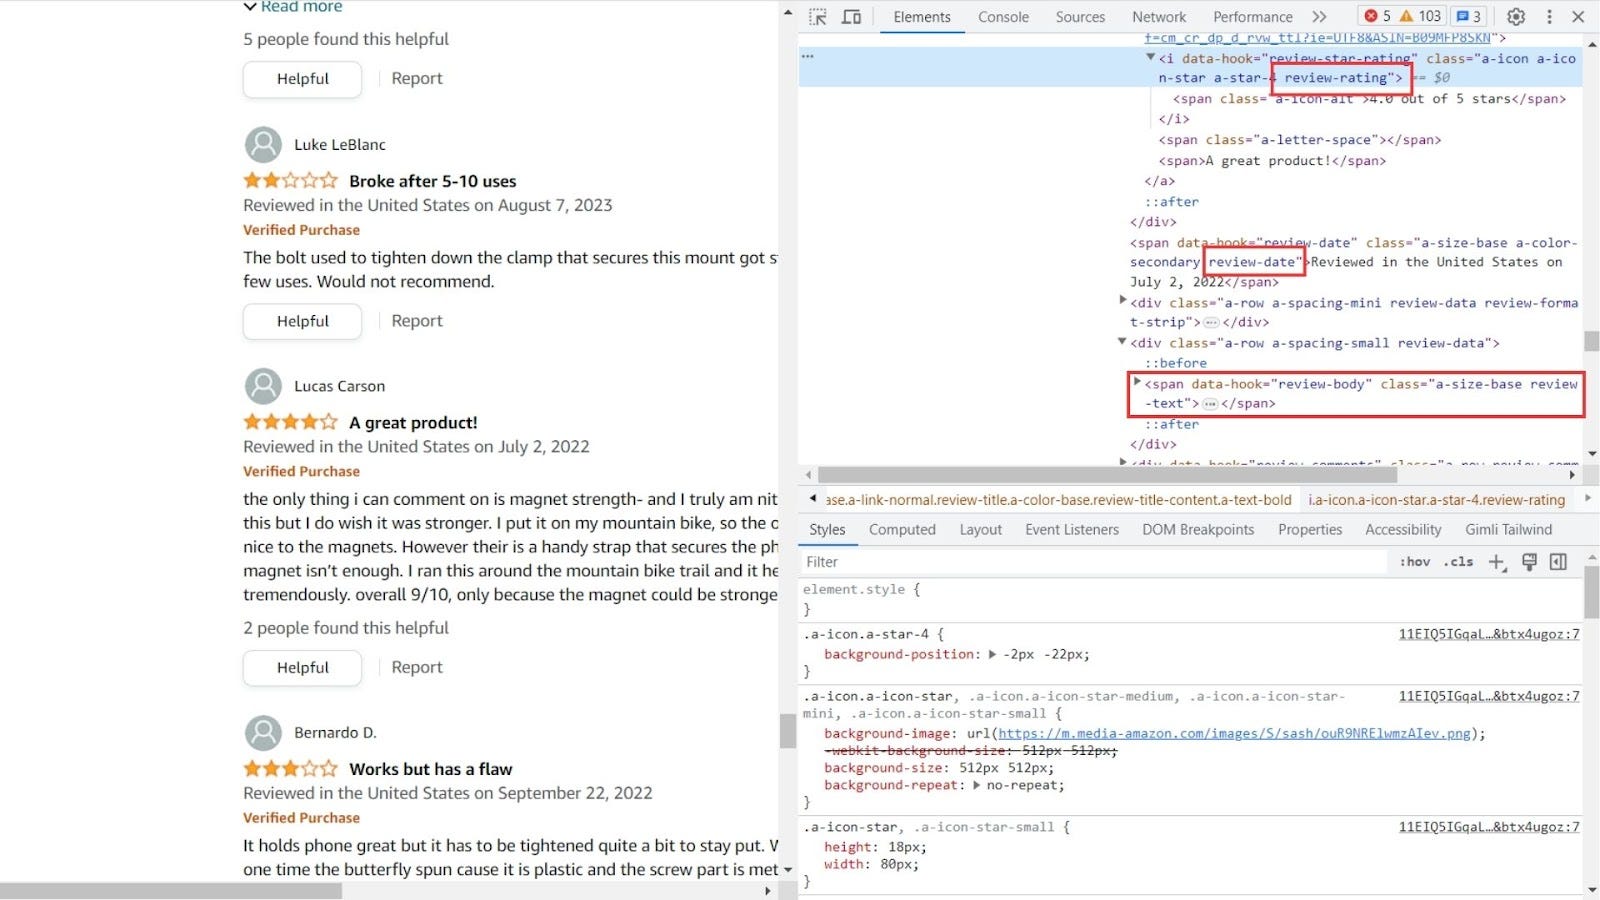
- For each review element matched by the .review selector on the page, the function retrieves four sub-elements: the review text, the review title, the review date, and the review rating. These are fetched using the querySelector method with the respective selectors: .review-text-content span, .review-title span, .review-date, and .review-rating. The image below will give you a better idea of how these classes are selected.
- For each review, the function constructs and returns an object containing the inner text of the four sub-elements defined above, ensuring that it only fetches the inner text if the sub-element exists, else it returns null.
- Finally, the function maps over all the review elements, returning an array of these objects, representing each review's details on the page. This array is then returned by the getReviews function.
At this stage, if you comment or remove the checkSentiments function call in your code and run your script using node app.js, you'll be able to see a few console statements in your terminal, and finally, a new file called reviews.json will be created in the script directory. The content of this file will look like this object:
[
  {
    "reviewText": "Product came without the rubber bands pictured in the advertisement. Other than that it works.",
    "reviewTitle": "Came without the bands...",
    "reviewDate": "Reviewed in the United States on July 2, 2023",
    "reviewRating": "3.0 out of 5 stars"
  }
  // ...
]
You've successfully scraped the reviews from an Amazon product page. Now, it's time to check the sentiments of each comment.
How to Perform Sentiment Analysis of Amazon Product Reviews
You have already installed and initialized the Sentiment package. This package will be used to check the sentiments of the reviews. Only the reviewText property will be analyzed. The Sentiment package returns a score along with many other data like positive words, negative words, tokens, etc. For this tutorial, only the value of the score is enough. The score is either positive or negative. A higher value represents higher polarity towards positive or negative sentiment.
The function will loop through each review inside the reviews.json file, generate the sentiment score, and write the score again in the same file. The analysis can also be achieved during the scraping, but a separate function and an extra step are added to make it more modular. If you want, you can perform this directly during the scraping operation.
Below your getReviews function, paste the following code:
function checkSentiments() {
  const reviews = JSON.parse(fs.readFileSync("reviews.json", "utf-8"));
  const updatedReviews = reviews.map((review) => {
    const reviewText = review.reviewText;
    const reviewSentiment = sentiment.analyze(reviewText);

    return {
      ...review,
      reviewSentiment: reviewSentiment.score,
    };
  });

  fs.writeFileSync(
    "reviews.json",
    JSON.stringify(updatedReviews, null, 2),
    "utf-8"
  );
}
The code is pretty straightforward:
- First, the function checkSentiments is defined.
- Inside the function, the existing reviews are read from the reviews.json file and parsed into a JavaScript object using the native Node.js fs module's readFileSync method.
- These reviews are then mapped (processed) using the map function. For each review
- The reviewText property of the review is extracted.
- The reviewText is then analyzed using sentiment.analyze function, which returns sentiment analysis data.
- The sentiment score from the analysis (reviewSentiment.score) is then added to the review object while retaining all the existing properties of the review using the spread operator.
- The resulting array of updated reviews (updatedReviews), which now contains the sentiment scores, is then stringified into a JSON format and written back to the reviews.json file, overwriting the original content.
Your sentiment analyzer code is ready.
Putting it All Together
The complete code at this moment should look like this:
const puppeteer = require("puppeteer-core");
const fs = require("fs");
const Sentiment = require("sentiment");

const sentiment = new Sentiment();

const SBR_WS_ENDPOINT = "wss://YOUR_USERNAME:YOUR_PASSWORD@YOUR_HOST";

async function getReviews(page) {
  return await page.$$eval(".review", (reviews) => {
    return reviews.map((review) => {
      const reviewTextElement = review.querySelector(
        ".review-text-content span"
      );
      const reviewTitleElement = review.querySelector(
        ".review-title span:nth-child(3)"
      );
      const reviewDateElement = review.querySelector(".review-date");
      const reviewRatingElement = review.querySelector(".review-rating");

      return {
        reviewText: reviewTextElement ? reviewTextElement.innerText : null,
        reviewTitle: reviewTitleElement ? reviewTitleElement.innerText : null,
        reviewDate: reviewDateElement ? reviewDateElement.innerText : null,
        reviewRating: reviewRatingElement
          ? reviewRatingElement.innerText
          : null,
      };
    });
  });
}

function checkSentiments() {
  const reviews = JSON.parse(fs.readFileSync("reviews.json", "utf-8"));
  const updatedReviews = reviews.map((review) => {
    const reviewText = review.reviewText;
    const reviewSentiment = sentiment.analyze(reviewText);

    return {
      ...review,
      reviewSentiment: reviewSentiment.score,
    };
  });

  fs.writeFileSync(
    "reviews.json",
    JSON.stringify(updatedReviews, null, 2),
    "utf-8"
  );
}

async function main() {
  console.log("Connecting to Scraping Browser...");
  const browser = await puppeteer.connect({
    browserWSEndpoint: SBR * WS_ENDPOINT,
  });

  try {
    console.log("Connected! Navigating to an Amazon product review page...");
    const page = await browser.newPage();
    page.setDefaultNavigationTimeout(2 * 60 * 1000);

    await page.goto(
      "https://www.amazon.com/Bike-Phone-Holder-Motorcycle-Mount/dp/B09MFP8SKN/ref=sr_1_301?keywords=bike+phone+mount&qid=1692258143&refinements=p_72%3A1248864011&rnid=1248859011&sprefix=bike+phone%2Caps%2C378&sr=8-301"
    ); // Replace with your specific Amazon product URL

    await new Promise((r) => setTimeout(r, 5000));

    console.log("Navigated! Scraping reviews...");
    const reviews = await getReviews(page);

    fs.writeFileSync("reviews.json", JSON.stringify(reviews, null, 2), "utf-8");

    console.log("Scraped! Checking sentiments...");
    checkSentiments();

    console.log("Done!");
  } finally {
    await browser.close();
  }
}

if (require.main === module) {
  main().catch((err) => {
    console.error(err.stack || err);
    process.exit(1);
  });
}
You can test your code by running the command in your terminal:
node app.js
Because of the console statements in the code, the terminal will show these messages:
$ node app.js
Connecting to Scraping Browser...
Connected! Navigating to an Amazon product review page...
Navigated! Scraping reviews...
Scraped! Checking sentiments...
Done!
If you check the directory of the script now, a new file called reviews.json will be created. The structure will be the same, but an extra property called reviewSentiment is added to it now. And the complete object will look like this:
{
  "reviewText": "It holds phone great but it has to be tightened quite a bit to stay put. When I did tighten one time the butterfly spun cause it is plastic and the screw part is metal and the teeth that combine them are very small. I will be welding half a washer to make a new butterfly.",
  "reviewTitle": "Works but has a flaw",
  "reviewDate": "Reviewed in the United States on September 22, 2022",
  "reviewRating": "3.0 out of 5 stars",
  "reviewSentiment": 3
}
This object is just one among multiple. The reviews.json file contains an array of objects, each having different reviews. From the above object, you can find that it contains all relevant information like the review title, review text, rating, and sentiment. The sentiment in this particular review is 3 stars, which is somewhat positive but not very much. This sentiment score can be different for each review, and you can get a better idea of each particular review instantly from this score. You can also compare and contrast the reviews or use the sentiment score of all the reviews with a data visualization library to give yourself a big-picture idea very quickly.
With this, you have successfully created an Amazon product review scraper that also analyzes the sentiment expressed in those reviews. You can access the complete code in this GitHub repo.
Conclusion
Leveraging web scraping for Amazon product reviews is a powerful approach for gathering invaluable customer feedback on products, enabling you to gain deeper insights into user experiences and product quality. The aim of the article was to help you scrape and analyze product reviews. Along with Puppeteer, we used the Scraping Browser to achieve the desired goal in a seamless manner.
You can check out the official documentation to know more about the Scraping Browser and how it can be integrated with other tools like Selenium or Playwright.
It is important to make use of web scraping responsibly. While the technical side of web scraping and sentiment analysis offers many opportunities, it's also essential to consider the ethical implications and uphold data privacy laws.
Overall, by making effective use of sentiment analysis, you can turn unstructured data into actionable insights and gain a vital competitive edge by understanding product strengths, weaknesses, and trends.


