We needed a scheduler for our batch ML pipelines. Something the team could check each morning to see which jobs ran, which failed, and why. MWAA was the first thing we looked at, and for a few minutes it seemed like the obvious choice until we looked at the pricing. The smallest MWAA environment (a Small instance), runs around $360 a month. For a team running a handful of nightly scoring jobs with no 24/7 on-call requirements, that number is hard to defend.
We decided to run Airflow on EC2 instead: single instance, Docker, behind an ALB, managed with CloudFormation. The setup itself is straightforward. Getting it to deploy in a production account where AWS::EarlyValidation::ResourceExistenceCheck fires before any resource is provisioned is where it got interesting.
This article is the setup guide we wished existed when we started.
Why EC2?
The AWS-native option for managed Airflow is MWAA. It handles the infrastructure, scaling, and upgrades for you, but that convenience comes at a price. Here’s what it actually costs per month in eu-west-1:
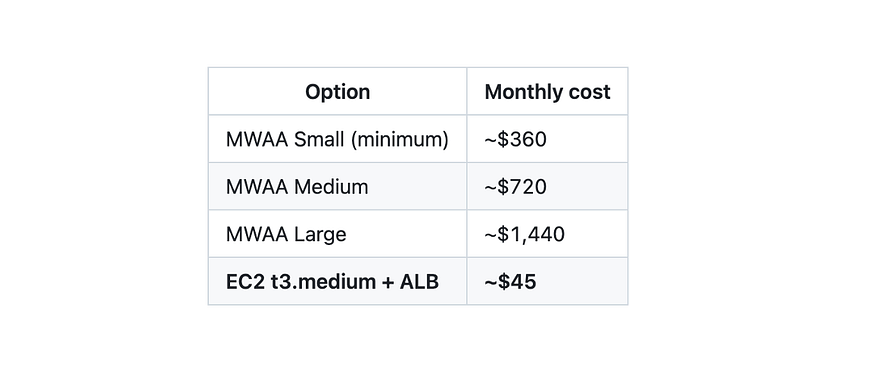
Pricing comparison between MWAA and EC2 Airflow.
MWAA makes sense when you need high availability, auto-scaling workers, or genuinely zero ops overhead. For a data team running nightly batch jobs with a handful of DAGs and no SLA requirements, the cost difference is difficult to justify.
Prices approximate as of mid-2025 for eu-west-1. Check AWS pricing for current rates.
What We’re Building
The architecture is deliberately simple. A single EC2 instance runs Airflow in Docker, sits behind an Application Load Balancer, and pulls secrets from SSM Parameter Store. The whole stack is defined via CloudFormation.
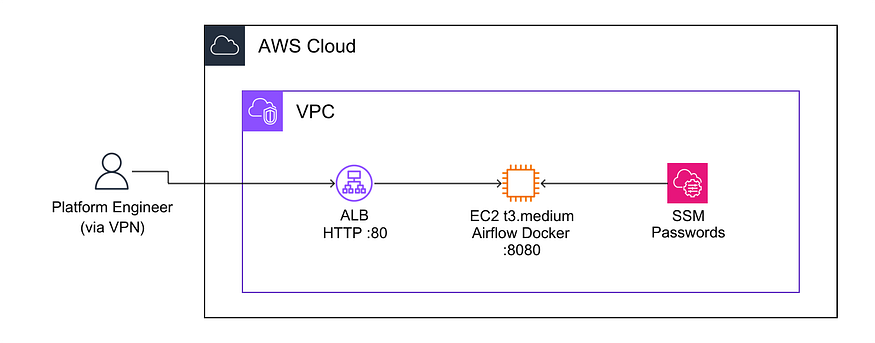
Airflow EC2 deployment on AWS.
A custom entrypoint starts the Airflow scheduler and webserver as separate processes inside the container. There’s no Celery or Redis in the background: just EC2. The EC2 only accepts traffic from the ALB: port 8080 is never directly exposed. Access goes through a VPN, so there’s no public internet exposure at all.
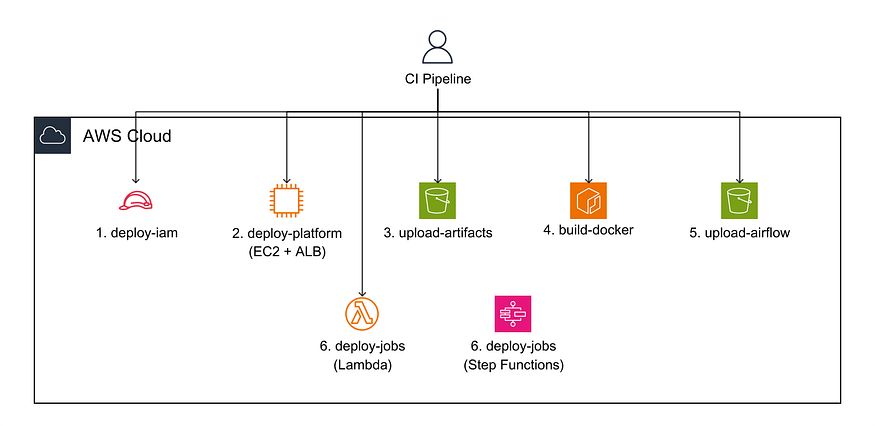
A high-level overview of the deployment pipeline.
The deploy pipeline covers six steps in order: IAM permissions first, then the platform stack (EC2 and ALB), artifact uploads, Docker build, DAG sync, and finally the job stack with Lambda and Step Functions.
Before You Deploy: Seed SSM Parameters
By default, Airflow auto-generates a random admin password on first start and writes it to a local file on the EC2 instance. That works, but it means you have to shell into the instance every time you need the password, which defeats the purpose of having a clean deploy pipeline.
Instead, we store the admin password and the webserver secret key in SSM Parameter Store before the first deploy. The user data script reads them at boot and passes them explicitly to airflow users create, so the password is always retrievable with a single AWS CLI call and never hidden on the instance.
aws ssm put-parameter \
  --name "/your-path/production/airflow-admin-password" \
  --value "YourPassword" --type SecureString

SECRET_KEY=$(python3 -c "import secrets; print(secrets.token_hex(32))")
aws ssm put-parameter \
  --name "/your-path/production/airflow-webserver-secret-key" \
  --value "$SECRET_KEY" --type SecureString
The Docker Image
The Dockerfile extends the official Airflow image and swaps in a custom entrypoint:
FROM apache/airflow:2.9.3

COPY requirements.txt /requirements.txt
RUN pip install --no-cache-dir -r /requirements.txt

COPY entrypoint.sh /entrypoint.sh
RUN chmod +x /entrypoint.sh

ENTRYPOINT ["/entrypoint.sh"]
The entrypoint handles everything the container needs on boot: directory setup, database migration, admin user creation, then starts the scheduler and webserver as separate background processes.
#!/usr/bin/env bash
set -euo pipefail

admin_username="${AIRFLOW_ADMIN_USERNAME:-admin}"
admin_password="${AIRFLOW_ADMIN_PASSWORD:?AIRFLOW_ADMIN_PASSWORD is required}"

mkdir -p \
  /opt/airflow/dags \
  /opt/airflow/include \
  /opt/airflow/logs/scheduler \
  /opt/airflow/plugins

airflow db migrate

airflow users create \
  --username "${admin_username}" \
  --password "${admin_password}" \
  --firstname Admin --lastname User \
  --role Admin --email admin@example.com \
  || airflow users reset-password \
    --username "${admin_username}" \
    --password "${admin_password}"

airflow scheduler &
scheduler_pid="$!"

airflow webserver &
webserver_pid="$!"

trap 'kill "${scheduler_pid}" "${webserver_pid}" 2>/dev/null || true; wait || true' SIGINT SIGTERM

wait -n "${scheduler_pid}" "${webserver_pid}"
Running scheduler and webserver as separate processes rather than using airflow standalone gives clean signal handling. The trap catches SIGINT and SIGTERM from Docker and shuts both processes down gracefully. wait -n exits as soon as either process dies, which surfaces failures immediately rather than keeping a half-alive container running.
The CloudFormation Template
Parameters
Declare all parameters that reference AWS resources as Type: String, not as typed AWS parameters:
Parameters:
  VpcId:
    Type: String  # NOT AWS::EC2::VPC::Id

  AirflowAmiId:
    Type: String  # NOT AWS::EC2::Image::Id — pre-resolved in Makefile

  KeyName:
    Type: String
    Default: ""  # no SSH key in production — use SSM Session Manager
Also resolve the AMI ID before calling cloudformation deploy rather than using a dynamic reference in the template:
AIRFLOW_AMI_ID=$$(aws ssm get-parameter \
  --name "/aws/service/ami-amazon-linux-latest/al2023-ami-kernel-default-x86_64" \
  --query "Parameter.Value" \
  --output text)

aws cloudformation deploy \
  --parameter-overrides "AirflowAmiId=$$AIRFLOW_AMI_ID" ...
Why plain strings? Production accounts often have
AWS::EarlyValidation::ResourceExistenceCheckenabled, a hook that validates every resource reference at changeset creation, before anything is provisioned. Typed parameters trigger extra permission checks your CI user may not have. Dynamic references like{{resolve:ssm:…}}aren’t resolved yet at that point, so the hook sees a raw string and fails. Plain strings with pre-resolved values sidestep both problems.
Security Groups
The EC2 security group only accepts traffic from the ALB. Nothing talks directly to port 8080.
AirflowSecurityGroup:
  SecurityGroupIngress:
    - IpProtocol: tcp
      FromPort: 8080
      ToPort: 8080
      SourceSecurityGroupId: !Ref AlbSecurityGroup

AlbSecurityGroup:
  SecurityGroupIngress:
    - IpProtocol: tcp
      FromPort: 80
      ToPort: 80
      CidrIp: !Ref AirflowWebIngressCidr  # 10.0.0.0/8
ALB
Set UnhealthyThresholdCount to at least 5. Airflow takes 2–3 minutes to start, and the default threshold of 2 will cause the ALB to deregister the instance before Airflow has a chance to come up.
AirflowTargetGroup:
  HealthCheckPath: /health
  HealthCheckIntervalSeconds: 30
  UnhealthyThresholdCount: 5
EC2 User Data
The boot script pulls both secrets from SSM and starts the Airflow container. The entrypoint handles the rest: database migration and user creation happen inside the container. The poll loop waits for the database to be ready before the container’s user creation step runs:
#!/bin/bash
set -e
yum install -y docker && systemctl start docker

AIRFLOW_ADMIN_PASSWORD=$(aws ssm get-parameter \
  --name '/your-path/production/airflow-admin-password' \
  --with-decryption --query Parameter.Value --output text)

AIRFLOW_WEBSERVER_SECRET_KEY=$(aws ssm get-parameter \
  --name '/your-path/production/airflow-webserver-secret-key' \
  --with-decryption --query Parameter.Value --output text)

docker run -d --name airflow --restart unless-stopped -p 8080:8080 \
  -e AIRFLOW__WEBSERVER__SECRET_KEY="$AIRFLOW_WEBSERVER_SECRET_KEY" \
  -e AIRFLOW_ADMIN_PASSWORD="$AIRFLOW_ADMIN_PASSWORD" \
  your-image
Passing secrets via -e flags makes them visible in docker inspect. For a VPN-only instance with a small team this is an acceptable tradeoff, but if you need stricter isolation, mount them from a file you delete after boot.
The Deploy Pipeline
A few things about the deploy order and CI setup matter more than they look.
Lint before deploying. Run cfn-lint on your template before every deploy. It catches misconfigured resource types, invalid parameter types, and missing required fields before CloudFormation sees the template.
pip install cfn-lint
cfn-lint cloudformation/platform.yaml
Deploy the IAM stack first. If your CI user’s permissions are managed by a separate CloudFormation stack, it needs to deploy before the platform stack. Otherwise the platform deploy runs before the CI user has the permissions CloudFormation needs to create resources. We broke the circular dependency between the two stacks by computing the bucket ARN from its naming convention rather than reading it from the platform stack’s outputs.
Make sure the CI user has these permissions. CloudFormation uses the caller’s credentials to create and describe resources, it doesn’t assume a service role unless you configure one. These are the permissions that aren’t obvious until a deploy fails mid-way:
- elasticloadbalancing:DescribeTargetHealth
- elasticloadbalancing:ModifyTargetGroup  # needed when EC2 is replaced
- elasticloadbalancing:RegisterTargets
- elasticloadbalancing:DeregisterTargets
- ec2:DescribeInstances
- ec2:DescribeImages
ModifyTargetGroupis the one to watch. You need it not just at initial creation but any time CloudFormation replaces the EC2 instance: for example when you update the AMI or rename a logical resource ID. If the deploy fails mid-rollback because of this, the stack lands inUPDATE_ROLLBACK_FAILED. Runcontinue-update-rollbackto recover it before redeploying.
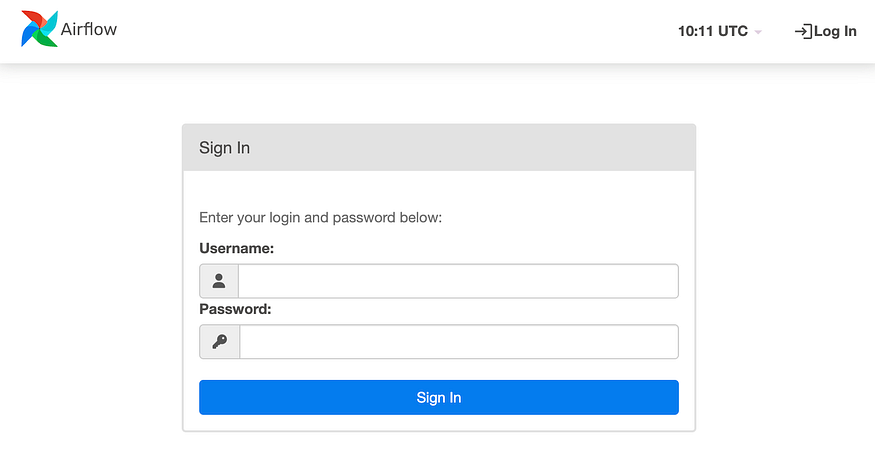
Accessing Airflow
Once the stack is up, get the ALB URL from the stack outputs:
aws cloudformation describe-stacks --stack-name your-stack \
  --query "Stacks[0].Outputs[?OutputKey=='AirflowAlbUrl'].OutputValue" \
  --output text
Open that URL in a browser and you’ll land on the Airflow login page.
Use admin as the username and retrieve the password from SSM:
aws ssm get-parameter \
  --name "/your-path/production/airflow-admin-password" \
  --with-decryption --query Parameter.Value --output text
What We’d Do Differently
The manual SSM seeding step is the biggest footgun in this setup. It’s a one-time manual action that happens outside the deploy pipeline, which means it’s easy to forget when deploying to a new environment, and there’s no obvious failure when you do. We’d replace it with a CloudFormation custom resource backed by a Lambda that generates and stores the secret on stack create, or move to AWS Secrets Manager with auto-generation. Either way, the secret exists before the instance boots.
We didn’t add HTTPS and don’t need to. Our company runs a VPN and Airflow is only accessible through it, so traffic is already encrypted at the network layer. If you need to expose Airflow without a VPN, note that ACM doesn’t issue certificates for *.elb.amazonaws.com: you’ll need a custom domain and Route53 before you can add an HTTPS listener.
On instance sizing: t3.medium with 4GB handles light workloads well. Once you get to 20+ DAGs running concurrently, the scheduler starts to feel the memory pressure. t3.large is the sensible next step. And since the instance type is a CloudFormation parameter, it’s a one-liner change:
AirflowInstanceType:
 Default: t3.large
The infrastructure side of this is straightforward once you know what to look for. The problem is you only learn about the problems by hitting them in production.
If you hit a production CloudFormation failure I didn’t cover, drop it in the comments.
Comments
Loading comments…