
Introduction
As a cloud and DevOps Engineer, I wanted a better workflow for designing AWS architectures before actually deploying infrastructure.
Instead of manually drawing diagrams first and then writing Terraform code separately, I explored Amazon Q CLI with MCP (Model Context Protocol) servers to generate:
- AWS architecture plans
- Terraform infrastructure
- Networking explanations
- Deployment guides
- VPC peering labs
In this blog, I’ll share my complete hands-on setup journey:
- Launching an Ubuntu EC2 instance
- Installing Amazon Q CLI
- Configuring MCP servers
- Fixing setup errors
- Using AI prompts for AWS architecture generation
- Creating a VPC Peering lab using Amazon Q CLI
This is a real-world cloud engineering workflow that combines:
- AWS
- DevOps
- Infrastructure as Code
- AI-assisted architecture planning
- Distributed systems learning
Why I Started Using Amazon Q CLI
While Doing Practice lab for AWS networking and distributed systems, I realized something important:
Real cloud engineers do not directly deploy infrastructure.
They first:
- Design architecture
- Plan networking
- Define CIDR ranges
- Think about routing
- Consider high availability
- Write Infrastructure as Code
- Then deploy
That’s where Amazon Q CLI became extremely useful.
Instead of switching between multiple tools, I could:
- Generate infrastructure ideas
- Create Terraform
- Build deployment guides
- Plan networking
- Understand distributed systems architecture
all from the terminal.
Lab Environment
EC2 Instance
I launched an Ubuntu EC2 instance on AWS.
## Recommended Configuration
| Component | Value |
| — -| — -|
| AMI | Ubuntu Server |
| Instance Type | t2.micro / t3.micro |
| Region | ap-south-1 |
| Storage | 20 GB |
| Access | EC2 Instance Connect |
Step 1 — Connect to EC2
After launching the instance, I connected using:
- EC2 Instance Connect
- Browser terminal
Step 2 — Update the Server
The first step was updating Ubuntu packages.
sudo apt update && sudo apt upgrade -y
Step 3 — Install Required Dependencies
I installed the basic packages required for Amazon Q CLI and MCP servers.
sudo apt install -y curl unzip git build-essential python3 python3-pip python3-venv
These packages are important because:
- Python is required by MCP tooling
- curl downloads installers
- unzip extracts packages
- build-essential helps with dependencies
Step 4 — Install Node.js
Amazon Q CLI workflows work better with a modern Node.js setup.
I installed Node.js 22.
curl -fsSL https://deb.nodesource.com/setup_22.x | sudo -E bash -
sudo apt install -y nodejs
Verify installation:
node -v
npm -v
Step 5 — Install Amazon Q CLI
Next, I installed Amazon Q CLI.
Download
curl --proto '=https' --tlsv1.2 -sSf https://desktop-release.q.us-east-1.amazonaws.com/latest/q-x86_64-linux.zip -o q.zip
Extract
unzip q.zip
Install
sudo ./q/install.sh
Verify installation:
q --version
[Screenshot: Amazon Q CLI installation]
Step 6 — Install uv and uvx
The MCP servers use uvx.
I installed the official uv package manager.
curl -LsSf https://astral.sh/uv/install.sh | sh
Add it to PATH:
echo 'export PATH="$HOME/.local/bin:$PATH"' >> ~/.bashrc
source ~/.bashrc
Verify installation:
uv --version
uvx --version
Step 7 — Understanding MCP Servers
Initially, I tried using:
awslabs.cdk-mcp-server
But the package was deprecated.
The correct and updated MCP server was:
awslabs.aws-iac-mcp-server
This was an important learning moment.
Step 8 — Configure Amazon Q MCP Server
I created the MCP configuration directory:
mkdir -p ~/.aws/amazonq
Then I created the configuration file:
nano ~/.aws/amazonq/mcp.json
Configuration:
{
  "mcpServers": {
    "awslabs.aws-iac-mcp-server": {
      "command": "/home/ubuntu/.local/bin/uvx",
      "args": [
        "awslabs.aws-iac-mcp-server@latest"
      ]
    }
  }
}
[Screenshot: MCP configuration]
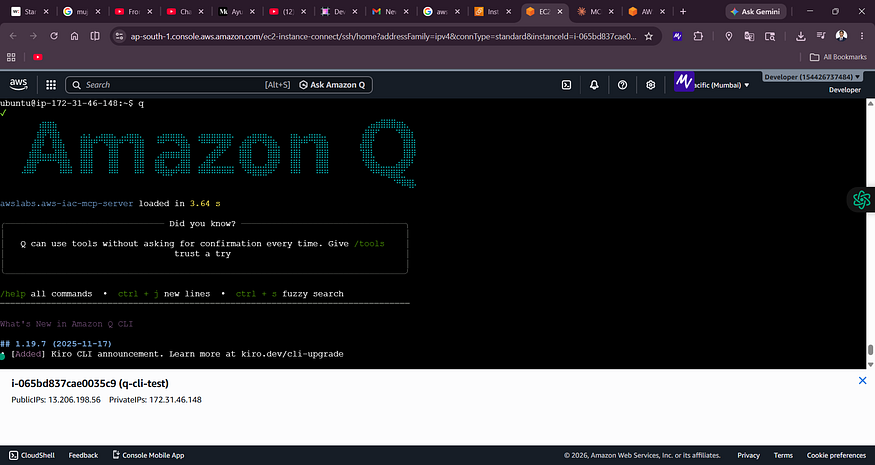
Step 9 — Launch Amazon Q CLI
Now the setup was ready.
I launched Amazon Q CLI:
q
This time the MCP server loaded successfully.
awslabs.aws-iac-mcp-server loaded successfully
Step 10 — My First AWS Architecture Prompt
Now came the most exciting part.
I asked Amazon Q CLI to generate a production-grade AWS VPC peering architecture.
Prompt Used
Design a production-grade Cross-Region VPC Peering architecture on AWS.
Requirements:

* VPC-A in ap-south-1
* VPC-B in us-east-1
* Public and private subnets
* EC2 instances in both VPCs
* Route tables
* Internet gateway
* NAT gateway
* Security groups
* Cross-region VPC peering
* High availability
* CIDR planning
  Generate:

1. AWS architecture diagram
2. Network explanation
3. Terraform code
4. Deployment steps
5. Best practices
[Screenshot: Prompt inside Amazon Q CLI]
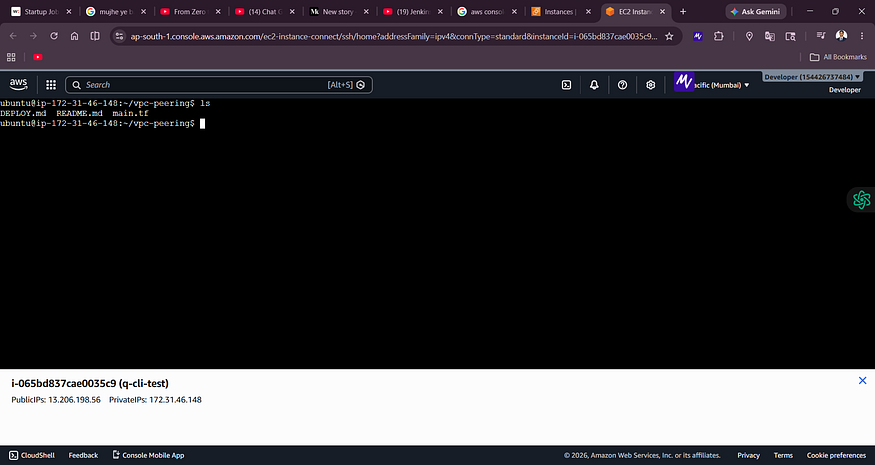
Step 11 — Amazon Q Generated Infrastructure Files
Amazon Q automatically generated:
/home/ubuntu/vpc-peering/README.md
/home/ubuntu/vpc-peering/main.tf
/home/ubuntu/vpc-peering/DEPLOY.md
This was impressive because the CLI generated:
- Architecture explanation
- Terraform infrastructure
- Deployment instructions
all directly from the prompt.
Step 12 — Exploring the Terraform Code
I opened the generated Terraform file:
cd ~/vpc-peering
cat main.tf
The generated infrastructure included:
- Two VPCs
- CIDR planning
- EC2 instances
- Peering configuration
- Route tables
ubuntu@ip-172-31-46-148:~/vpc-peering$ ls
DEPLOY.md  README.md  main.tf
ubuntu@ip-172-31-46-148:~/vpc-peering$ cat main.tf
terraform {
  required_version = ">= 1.0"
  required_providers {
    aws = {
      source  = "hashicorp/aws"
      version = "~> 5.0"
    }
  }
}

provider "aws" {
  region = "us-east-1"
}

# VPC-A
resource "aws_vpc" "vpc_a" {
  cidr_block           = "10.0.0.0/16"
  enable_dns_hostnames = true
  tags = { Name = "vpc-a" }
}

resource "aws_subnet" "subnet_a" {
  vpc_id     = aws_vpc.vpc_a.id
  cidr_block = "10.0.1.0/24"
  tags       = { Name = "subnet-a" }
}

resource "aws_security_group" "sg_a" {
  vpc_id = aws_vpc.vpc_a.id
  ingress {
    from_port   = -1
    to_port     = -1
    protocol    = "icmp"
    cidr_blocks = ["10.1.0.0/16"]
  }
  ingress {
    from_port   = 22
    to_port     = 22
    protocol    = "tcp"
    cidr_blocks = ["10.1.0.0/16"]
  }
  egress {
    from_port   = 0
    to_port     = 0
    protocol    = "-1"
    cidr_blocks = ["0.0.0.0/0"]
  }
  tags = { Name = "sg-a" }
}

resource "aws_instance" "ec2_a" {
  ami                    = data.aws_ami.amazon_linux.id
  instance_type          = "t3.micro"
  subnet_id              = aws_subnet.subnet_a.id
  vpc_security_group_ids = [aws_security_group.sg_a.id]
  private_ip             = "10.0.1.10"
  tags                   = { Name = "ec2-a" }
}

# VPC-B
resource "aws_vpc" "vpc_b" {
  cidr_block           = "10.1.0.0/16"
  enable_dns_hostnames = true
  tags                 = { Name = "vpc-b" }
}

resource "aws_subnet" "subnet_b" {
  vpc_id     = aws_vpc.vpc_b.id
  cidr_block = "10.1.1.0/24"
  tags       = { Name = "subnet-b" }
}

resource "aws_security_group" "sg_b" {
  vpc_id = aws_vpc.vpc_b.id
  ingress {
    from_port   = -1
    to_port     = -1
    protocol    = "icmp"
    cidr_blocks = ["10.0.0.0/16"]
  }
  ingress {
    from_port   = 22
    to_port     = 22
    protocol    = "tcp"
    cidr_blocks = ["10.0.0.0/16"]
  }
  egress {
    from_port   = 0
    to_port     = 0
    protocol    = "-1"
    cidr_blocks = ["0.0.0.0/0"]
  }
  tags = { Name = "sg-b" }
}

resource "aws_instance" "ec2_b" {
  ami                    = data.aws_ami.amazon_linux.id
  instance_type          = "t3.micro"
  subnet_id              = aws_subnet.subnet_b.id
  vpc_security_group_ids = [aws_security_group.sg_b.id]
  private_ip             = "10.1.1.10"
  tags                   = { Name = "ec2-b" }
}

# VPC Peering
resource "aws_vpc_peering_connection" "peering" {
  vpc_id      = aws_vpc.vpc_a.id
  peer_vpc_id = aws_vpc.vpc_b.id
  auto_accept = true
  tags        = { Name = "vpc-a-to-vpc-b" }
}

# Routes
resource "aws_route" "a_to_b" {
  route_table_id            = aws_vpc.vpc_a.main_route_table_id
  destination_cidr_block    = "10.1.0.0/16"
  vpc_peering_connection_id = aws_vpc_peering_connection.peering.id
}

resource "aws_route" "b_to_a" {
  route_table_id            = aws_vpc.vpc_b.main_route_table_id
  destination_cidr_block    = "10.0.0.0/16"
  vpc_peering_connection_id = aws_vpc_peering_connection.peering.id
}

# Data
data "aws_ami" "amazon_linux" {
  most_recent = true
  owners      = ["amazon"]
  filter {
    name   = "name"
    values = ["al2023-ami-*-x86_64"]
  }
}

# Outputs
output "ec2_a_private_ip" {
  value = aws_instance.ec2_a.private_ip
}

output "ec2_b_private_ip" {
  value = aws_instance.ec2_b.private_ip
}

output "peering_connection_id" {
  value = aws_vpc_peering_connection.peering.id
}
ubuntu@ip-172-31-46-148:~/vpc-peering$
Step 13 — Understanding the Architecture
The generated architecture connected:
- VPC-A → ap-south-1
- VPC-B → us-east-1
using:
- Cross-region VPC peering
- Route tables
- Security groups
- Private networking
This helped me understand:
- AWS networking
- Distributed systems communication
- Inter-region connectivity
- Infrastructure design thinking
Key Learning Points
1. Architecture Before Deployment
The biggest learning was:
Think like an architect before acting like a deployer.
2. AI Can Accelerate Cloud Learning
Amazon Q CLI reduced repetitive work and helped me focus more on:
- networking concepts
- routing
- CIDR planning
- infrastructure design
3. Terraform + AI is Powerful
Instead of starting from scratch, I could:
- generate templates
- customize infrastructure
- learn by modifying
- experiment faster
Challenges I Faced
Deprecated MCP Server
Initially, I used:
awslabs.cdk-mcp-server
which was deprecated.
The fix was switching to:
awslabs.aws-iac-mcp-server
Validation Errors
Very large prompts sometimes caused:
ValidationException
Improperly formed request
The solution was:
Why This Workflow Matters for Distributed Systems
This workflow is extremely useful for learning:
- VPC networking
- Multi-region communication
- Routing
- NAT gateways
- High availability
- Infrastructure as Code
- Cloud architecture design
These are foundational skills for:
- DevOps engineers
- Cloud engineers
- Platform engineers
- Distributed systems engineers
Future Labs I Plan to Build
Using Amazon Q CLI, I plan to create:
- Transit Gateway labs
- Multi-region architectures
- Kubernetes networking
- ECS/EKS architectures
- Hybrid cloud networking
- Load balancing labs
- Auto Scaling architectures
- CI/CD infrastructure
- Distributed MERN deployments
Final Thoughts
Amazon Q CLI made AWS architecture learning much more interactive and practical.
Instead of only reading documentation, I could:
- generate infrastructure
- visualize architectures
- create Terraform
- build labs faster
- understand networking deeply
This combination of:
- AWS
- Terraform
- AI
- architecture thinking
- distributed systems
creates an incredibly powerful learning workflow.
Useful Commands Reference
Launch Amazon Q
q
Check uvx
uvx --version
Open Terraform
cat main.tf
Open README
cat README.md


## Architecture Diagram
┌─────────────────────────────────────────────────────────────┐ │ AWS Region │ ├─────────────────────────────────────────────────────────────┤ │ │ │ ┌──────────────────────┐ ┌──────────────────────┐ │ │ │ VPC-A │ │ VPC-B │ │ │ │ 10.0.0.0/16 │ │ 10.1.0.0/16 │ │ │ ├──────────────────────┤ ├──────────────────────┤ │ │ │ │ │ │ │ │ │ Private Subnet │ │ Private Subnet │ │ │ │ 10.0.1.0/24 │ │ 10.1.1.0/24 │ │ │ │ ┌────────────┐ │ │ ┌────────────┐ │ │ │ │ │ EC2-A │ │ │ │ EC2-B │ │ │ │ │ │ 10.0.1.10 │ │ │ │ 10.1.1.10 │ │ │ │ │ └────────────┘ │ │ └────────────┘ │ │ │ │ │ │ │ │ │ └──────────┬───────────┘ └──────────┬───────────┘ │ │ │ │ │ │ │ ┌──────────────────┐ │ │ │ └────┤ VPC Peering ├─────┘ │ │ │ Connection │ │ │ └──────────────────┘ │ │ │ └───────────────────────────────────────────────────────────────┘
## Network Details

**VPC-A:**
- CIDR: 10.0.0.0/16
- Subnet: 10.0.1.0/24
- EC2: 10.0.1.10

**VPC-B:**
- CIDR: 10.1.0.0/16
- Subnet: 10.1.1.0/24
- EC2: 10.1.1.10

**Route Tables:**
- VPC-A: Route 10.1.0.0/16 → Peering Connection
- VPC-B: Route 10.0.0.0/16 → Peering Connection

**Security Groups:**
- Allow ICMP and SSH between VPCs
ubuntu@ip-172-31-46-148:~/vpc-peering$
Open Deployment Guide
cat DEPLOY.md

ubuntu@ip-172-31-46-148:~/vpc-peering$ cat DEPLOY.md
# Deployment Steps

## 1. Initialize Terraform
```bash
cd vpc-peering
terraform init
```

## 2. Deploy Infrastructure
```bash
terraform plan
terraform apply
```

## 3. Test Connectivity
```bash
# Get EC2 IPs from outputs
terraform output

# Connect to EC2-A via Session Manager and ping EC2-B
aws ssm start-session --target <instance-id-a>
ping 10.1.1.10

# Connect to EC2-B and ping EC2-A
aws ssm start-session --target <instance-id-b>
ping 10.0.1.10
```

## 4. Verify Peering
```bash
# Check peering status
aws ec2 describe-vpc-peering-connections

# Check route tables
aws ec2 describe-route-tables
```

## 5. Cleanup
```bash
terraform destroy
```
ubuntu@ip-172-31-46-148:~/vpc-peering$
Conclusion
This was my first real attempt at combining:
- AI-assisted cloud engineering
- Terraform
- AWS networking
- Infrastructure architecture
- Distributed systems learning
And honestly, it completely changed how I approach AWS labs.
Instead of randomly creating resources, I now:
- Design architecture
- Understand networking
- Generate infrastructure
- Validate the design
- Deploy systematically
That’s the workflow I plan to follow moving forward in my cloud and DevOps journey.
Comments
Loading comments…