
In my previous article, we learned how we can create lambda functions using the AWS management console but in this article, we will try to simulate a real and more professional work environment like how professionals work with AWS. To create lambda functions locally we first need to prepare our machine so we can easily work with AWS for that we have to install some software and some packages.
Step — 1 Install AWS SAM CLI
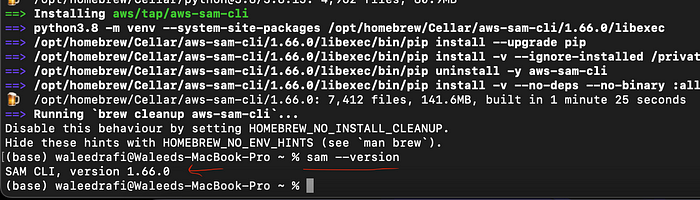
First, we need to install AWS SAM CLI through which we can build applications using infrastructure as code pattern. You can find this definition in AWS documentation: The AWS Serverless Application Model (SAM) is an open-source framework for building serverless applications. It provides shorthand syntax to express functions, APIs, databases, and event source mappings. With just a few lines per resource, you can define the application you want and model it using YAML. During deployment, SAM transforms and expands the SAM syntax into AWS CloudFormation syntax, enabling you to build serverless applications faster. We will discuss SAM in detail when we dive into the code explanation part. If you are using mac you must have homebrew installed, to install homebrew go to the homebrew website and follow the simple steps to install it https://brew.sh Once brew gets installed add brew to the path as well so you can use brew commands from anywhere in the system. Next, we need to install AWS CLI, following are the commands to install SAM CLI:
brew tap aws/tap
brew install aws-sam-cli
Once both commands run successfully you can verify them by checking the SAM version.
 If you are using windows are Linux just click on this link and follow one or two simple steps to install: https://docs.aws.amazon.com/serverless-application-model/latest/developerguide/install-sam-cli.html
Step — 2 Install Docker Desktop
If you are a beginner don’t worry you just need a docker application, for now, docker knowledge is good to have but not required to run lambda functions on your machine. Now you are probably thinking then why do we need docker?
The answer is we just need docker to simulate the AWS runtime in our local environment.
You can install the docker desktop application from the docker official website, here is the link: https://www.docker.com/products/docker-desktop/
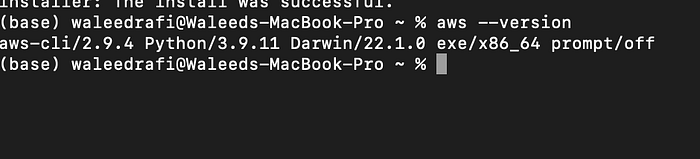
Step — 3 Install AWS CLI
AWS command line interface is different from SAM CLI, using SAM CLI you can do stuff that the SAM framework provides you on top of AWS. Through AWS CLI you can do things like authenticating your AWS account, downloading any file from the AWS S3 bucket, and so on.
You can install AWS CLI from: https://docs.aws.amazon.com/cli/latest/userguide/getting-started-install.html
Once this gets downloaded you can verify it using your terminal by running:
Lets Build:
All installations are completed, now we are going to develop our very first AWS lambda functions locally for that we have to follow these steps:
Authenticating Our AWS Account:
To login our AWS account locally you have to use AWS CLI and run this command in your terminal:
aws configure
Add the following information:
- AWS access key id (required)
- AWS secret access key (required)
- Default region name (optional)
- Default output format like JSON (optional)
Creating a new project:
First create a new folder inside any of your local directories, open that folder inside your favorite editor for me it’s visual studio code, once the folder is open inside the code editor, open the terminal of your editor or open a separate terminal and navigate to the current project directory then run following commands:
sam -h
This command will help you find useful commands while working with AWS SAM or SAM CLI.
sam init
This command will help you create a generic HelloWorld template to start working with AWS serverless application model (SAM) its syntax and the folder structure that SAM follows.
 Choose 1 to get a predefined sam template, if you are already working and using some particular template then you can choose option 2.
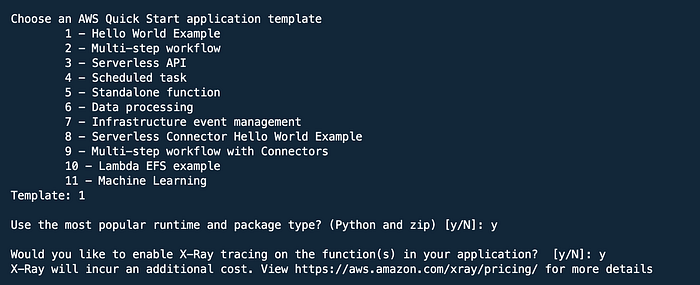 Then you get many options of template, which you can choose based on your requirement, but for simplicity, we are going to choose option 1 then if we need anything complex we can change it using the SAM template without re-running sam init.
Then choose your favorite language, I am using python so I will go with the default option, but you can change it later as well.
I mistakenly allow X-Ray tracing but we don’t need it, for now, so you can select N for X-Ray tracking.
Then you get many options of template, which you can choose based on your requirement, but for simplicity, we are going to choose option 1 then if we need anything complex we can change it using the SAM template without re-running sam init.
Then choose your favorite language, I am using python so I will go with the default option, but you can change it later as well.
I mistakenly allow X-Ray tracing but we don’t need it, for now, so you can select N for X-Ray tracking.
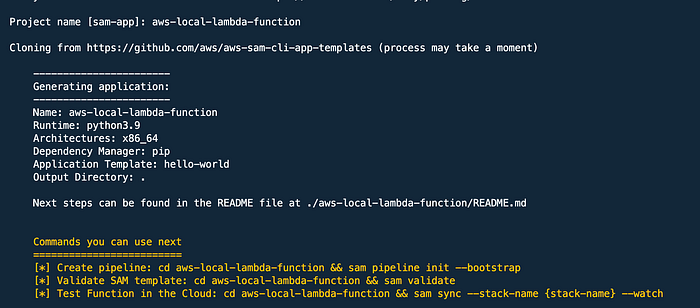 Choose your project name and press enter, our project will get created based on the options we selected, now we just need to change things based on our requirements and business logic.
Folder Structure:
This is the folder structure we get once the template generation process gets completed.
 This is the folder structure we will get after running sam init, In all of these folders and files, template.yml is the most important file which represents all of our infrastructure as code, we can create all our AWS resources inside this file (lambda functions, API gateway, SQS, dynamo DB tables and so on), and when we deploy this template.yml gets converted into cloud formation template and all of our resources get created on AWS.
Code Explanation:
In our template.yaml file we describe our whole application without the business logic.
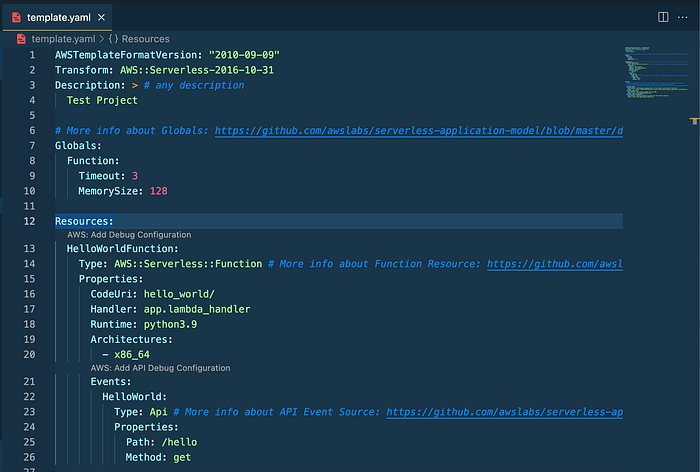 Line — 1: represents the capabilities of the template right now there is only one date available inside SAM’s documentation.
Line — 2: Describes the SAM version this template is using.
Lines — 3 & 4: Any description of the project e.g Ecommerce Application
Lines — 7 to 10: Inside this block, we are defining globals, for example, this template is containing 10 different lambda functions but they are using some common configurations like after how long every lambda gets timeout or what max memory size any lambda function can use.
Line — 12 to 26: This block of template represents the resources we want to create like Lambda functions, and DynamoDb tables, for now, this only represents a Lambda function but we can define any resource under this block and as many as we want.
Line — 1: represents the capabilities of the template right now there is only one date available inside SAM’s documentation.
Line — 2: Describes the SAM version this template is using.
Lines — 3 & 4: Any description of the project e.g Ecommerce Application
Lines — 7 to 10: Inside this block, we are defining globals, for example, this template is containing 10 different lambda functions but they are using some common configurations like after how long every lambda gets timeout or what max memory size any lambda function can use.
Line — 12 to 26: This block of template represents the resources we want to create like Lambda functions, and DynamoDb tables, for now, this only represents a Lambda function but we can define any resource under this block and as many as we want.
In line 13 we are defining a lambda function name and everything that is related to that function should come after that with one more level of indentation.
Line 14 represents what that above name is, now it become a lambda function officially we can’t say it in line 13.
Line — 15 to 20: In this block, we are defining properties of the lambda function like where the code of the lambda function is located (lines 16 and 17) next we are defining which language this lambda function is using (line 18), In the next line we are defining which architecture this lambda function is using there are a total of 2 architectures available as of now, you can see the difference between those two on AWS lambda documentation.
Line — 21 to 26: Represents the events this lambda function is expecting, event can be an API that will trigger this function, the event can be a creation of a new file in the S3 bucket, the event can be a scheduler like running this lambda function after every one hour.
In line 22 we are defining an event name, next in line 23 we are defining event type like whether it’s an API event or some other event, next we are defining properties of an event like path and request method.
Build Your Project:
After creating all the changes, it’s time to build our project so we can test it locally or deploy it to AWS. To create a build of our project we run the following command:
sam build
Note: We have to run this command every time we make any changes and want to test it or deploy it. You can see the build of your project inside the .aws-sam folder of your folder.
Deploy to AWS:
Our build is ready, it’s time to deploy it to AWS, for that we have to run the following commands:
# If you are deploying for the first time run:
sam deploy --guided
When you run this command you get a complete walk-through of your project and get the option of adding and updating things like you can choose a stack name etc.
# If you are deploying for the second time or after
sam deploy
After the first guided deployment, you will see a samconfig.toml file which will save all the configurations like stack name s3_prefix region, etc for all the later deployments.
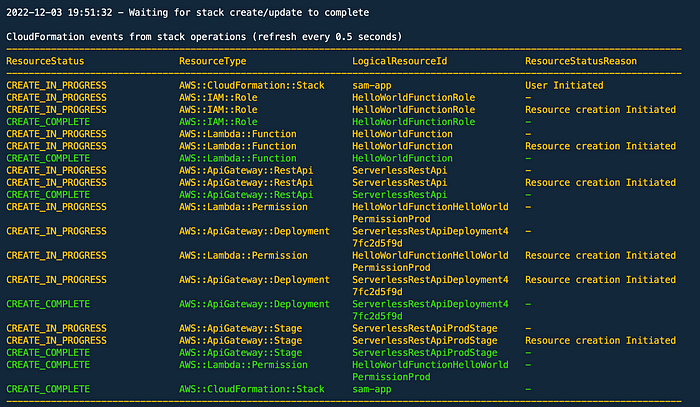 This screenshot represents what cloud formation is doing on the backend.
Local Testing:
If we want to test a particular function locally, we can use the following command to run it: Note: Before running anything locally, please ensure that the docker desktop is up and running in the background.
sam local invoke FunctionName
#Funciton Name which we define inside template.yaml file
Now, what if our lambda function is expecting some input from an event like input from an API request or from any other event?
The answer is we can simulate this locally using local events, for that open events folder that was created after sam init, create a new event.json file and paste any JSON data like:
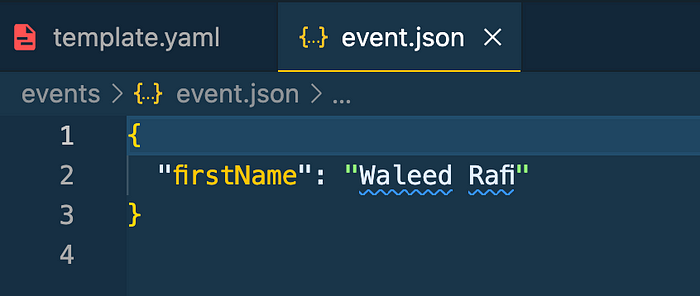 Use the print(event[“firstName”]) statement inside your lambda function to see the output inside your local terminal. Then build your project and run the following command to generate this file as an input event to your lambda function:
sam local invoke FunctionName -e events/eventFileName.json
That’s all you need to know about creating a lambda function locally, if you want to know more about the AWS Lambda function you can check my previous blogs.
Comments
Loading comments…