
Using absolute imports to better organize your React project is a great way. Relative imports are hard to follow and break during refactoring. Absolute imports manage your project easier as it grows. Forget long relative imports after this article. This is my 40th Medium article.
The Problem
What if your project’s folder structure is complex, and you need to go up in it? Inside of your components, you have imports that look like the below example with relative imports.
import {MyComponent} from ‘../../../../components/MyComponent’;
You can break the above import by changing the path of the component from which you are importing your MyComponent. Let’s assume you decide to move MyComponent into its own folder. Then you would need to update all of your imports in your project and add one extra ../ to all of your imports. Relative imports has some more problems.
-
Pretty hard to refactor
-
It becomes worse as you get further deeper into it.
-
You need to change the entire codebase if you need to extract the code to be used externally as an NPM module.
Absolute Imports
By using absolute imports, you can alias some folders to a name like below:
import {MyComponent} from ‘components/MyComponent’;
Absolute imports have some advantages.
-
There is no
../../../../hell. Therefore easier to type out the imports. -
Easily copy-paste the code with imports into another file in the project and not have to tinker with import paths.
-
It is short and sweet
The below example is a file with Relative imports.
import React from "react";
import Button from "../../Button/Button";
import { LINKS, STRINGS } from "../../../utils/constants";
import styles from "./App.module.css";

function App() {
  return (
    <div className={styles.App}>
      <Button>{STRINGS.HELLO}</Button>

      <a href={LINKS.HELP}>Learn more</a>
    </div>
  );
}

export default App;
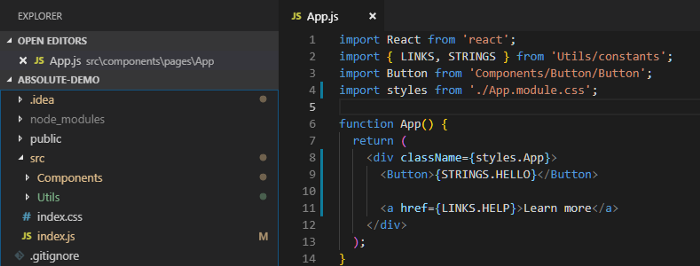
Make the imports in the above file prettier.
import React from "react";
import { LINKS, STRINGS } from "utils/constants";
import Button from "components/Button/Button";
import styles from "./App.module.css";

function App() {
  return (
    <div className={styles.App}>
      <Button>{STRINGS.HELLO}</Button>

      <a href={LINKS.HELP}>Learn more</a>
    </div>
  );
}

export default App;
Therefore, how can you use absolute imports with ReactJS?
Using TypeScript
If you need to set up absolute imports in your TypeScript application add/update your tsconfig.json file in the root directory of the project. Then you need to update the compiler option baseUrl in the file.
{
  "compilerOptions": {
    "baseUrl": "src"
  },
  "include": ["src"]
}
Using JavaScript
Setting up absolute imports to Typescript and setting up absolute imports to JavaScript is pretty much the same process. Create the jsconfig.json file in the root directory of the project. Then you need to update the following snippet.
{
  "compilerOptions": {
    "baseUrl": "src"
  },
  "include": ["src"]
}
Now you can import your components like this.
import {MyComponent} from ‘components/MyComponent’;
You can also use the compiler option paths as well. Perhaps you want to alias your component folder. For that, you need to set up your tsconfig.json, or jsconfig.json as shown in below:
{
  "compilerOptions": {
    "baseUrl": "./",
    "paths": {
      "@component/*": ["src/components/*"],
    }
  }
}
Now you can import the components from your component folder like this:
import {MyComponent} from ‘@component/MyComponent’;
Is that enough?
Well, no… You need to make your IDE smart to understand absolute imports in your files. Here I am going to mention the progress for the top 2 IDEs. Those are VS Code and WebStrom.
For VS Code
VS Code is smart enough to understand the tsconfig.json, or jsconfig.json file. Intellisense and jump-to-source are just working fine with absolute imports.
Therefore, you can follow the above process.
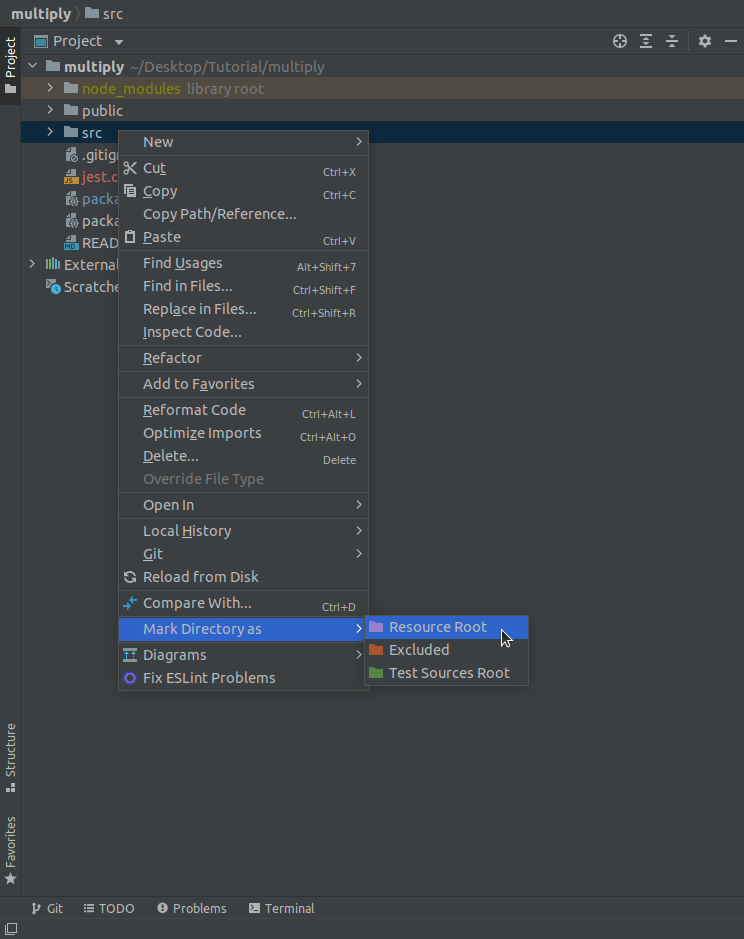
For WebStrom / IntelliJ Idea
Select the src folder in the project window and right-click on it. Select the option Mark Directory as and then select the Resources Root option.
Now go to Settings -> Editor -> Code Style -> JavaScript and select the Imports tab. Then check the Use paths relative to the project, resource or sources roots.

Now WebStrom knows where the absolute imports are pointing. There won’t no warnings and autocomplete/ jump-to-source will work. This means the auto-import mechanism uses absolute imports.
If you are a strict developer like me, use something like Airbnb’s ESLint config.
With ESLint
Create React App also has an ESLint setup but it has a minimal set of rules. eslint-plugin-import is used by Airbnb and this plugin checks undefined imports. When you are going to use Airbnb’s ESLint config it will give you the error shown below:

You can fix the error by add settings prop in your ESLint config. That setting prop point that your imports might be relative to src folder. Therefore, you need to add update your ESLint config in .eslintrc file like this:
"eslintConfig": {
  "extends": ["airbnb", "prettier", "plugin:jsx-a11y/recommended"],
  "settings": {
    "import/resolver": {
      "node": {
        "paths": ["src"],
        "extensions": [".js", ".jsx", ".ts", ".tsx"]
      }
    }
  }
},
You don’t need to install any NPM modules to avoid the ESLint error, adding the settings prop is enough.
By Convention
Absolute imports have been possible for a long time with Webpack. When you are naming your aliased folder, you need to use PascalCase/CamelCase because it is the convention follow in the Webpack.
Conclusion
Absolute imports might befuddle a new developer for a while. If they understand it, then it is pretty easy to use. Therefore, I suggest including a few lines about importing mechanisms in your Readme, or you might link to this article. I am not going to change any content after I publish this article. I hope you enjoyed this small trick to better organize your React project.
Have fun coding! 😃
Comments
Loading comments…