
Product teams already have most of what they need for a product demo video: a release note, product page, screenshots, and a rough screen recording. AI can turn those assets into an editable script, storyboard, product scenes, voiceover, captions, and callouts.
For this walkthrough, we're going to use ngram. We'll add the source material, review the script and storyboard, edit the scenes, and export the finished video.
The short version:
- Add a public product URL or PDF for messaging and terminology.
- Use current screenshots and a clean recording for the interface and action order.
- Review the generated script and storyboard, then refine the product demo video through chat, visual controls, or the timeline.
- Add your brand kit, correct the captions, and export the final demo for its destination.
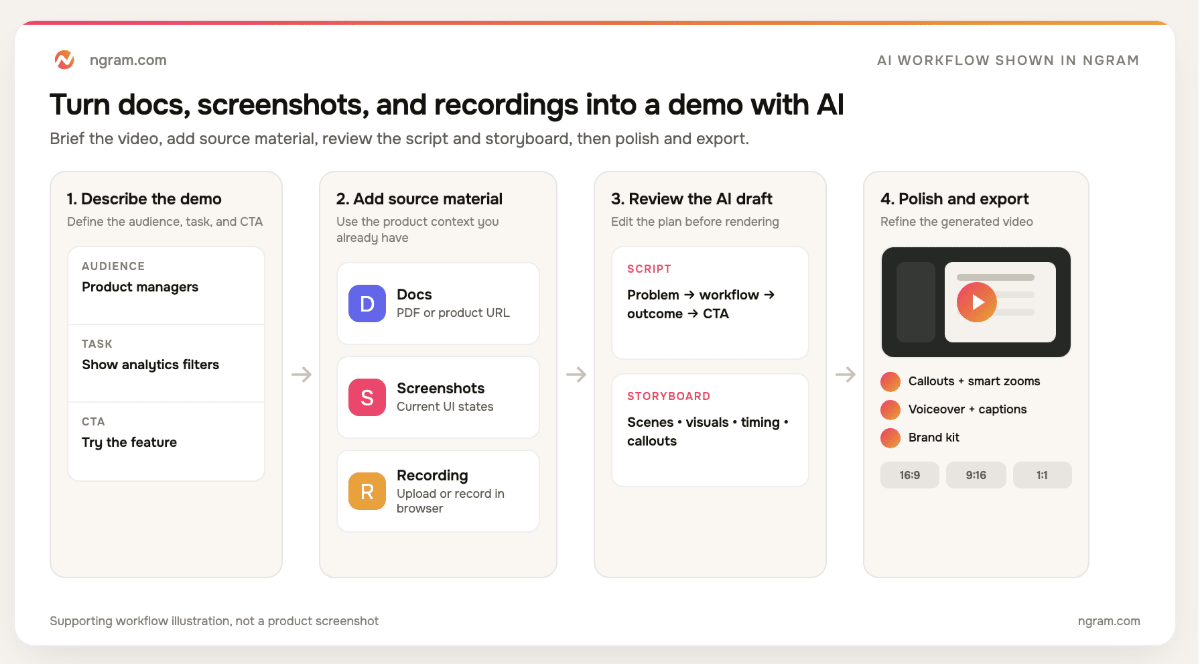
Brief the video, add source material, review the generated plan, and then polish and export the demo.
Match each source to its job
Start with a text prompt, PDF, public URL, or one or more screenshots. You can upload a screen recording or use the built-in screen recorder.
| Input | How it is used | How to prepare it |
|---|---|---|
| Product page, help article, release note, or public doc URL | Extracts the product context, terminology, positioning, and visual references used to draft the script | Use a current page, and list any claims or details to exclude in the prompt |
| Extracts text and uses it as source material for the script | Export a private PRD, launch brief, or internal doc as a current PDF | |
| Screenshots | Uses exact UI states as scene visuals or reference images | Capture one meaningful state per image and remove customer or production data |
| Screen recording | Transcribes the workflow, identifies key moments, and supplies the real interaction sequence | Record one clean task, close unrelated tabs, and disable notifications |
| Prompt | Defines the audience, job, tone, duration, channel, required points, and CTA | Say which source should guide the message and which should guide the UI |
If your source is a private Google Doc or Word file, export the reviewed version to PDF or paste a cleared excerpt into the prompt. If it already lives on a public product page, help article, or release-note page, use the URL. Keep those input paths separate: use a public URL or PDF for the document and the recording tool for video.
Screenshots show an exact UI state. A recording shows the order of actions. Use both when the viewer needs to understand what the interface looks like and how the task unfolds.
Prepare the demo brief
A strong product demo video starts with one viewer and one job. "Show the analytics feature" leaves too much room for a generic feature tour. "Show a product manager finding which release caused a retention change, then sharing that report" defines the workflow, visible result, and finish line.
Collect the current product page or PDF, the screenshots you want viewers to see, and one recording of the task. Decide which claims are approved, which beta or roadmap items are off limits, and what the viewer should do after watching.
Then use a brief like this:
Create a 75-second product demo for [audience].

Goal: Show how [user] completes [one task].
Sources: Use the attached PDF for approved messaging, the screenshots
for exact UI states, and the recording for the workflow order.
Must show: [specific product actions and final state].
Do not claim: [roadmap items, unsupported results, unavailable permissions].
Tone: [clear, technical, conversational, premium].
CTA: [the next action].
Format: 16:9 for [product page, sales follow-up, help center].
If your workspace already has a brand kit, select it when the project starts. The kit supplies the logo, colors, fonts, motion, and screenshot treatment. It can also carry voice and tone rules, approved or blocked phrases, and CTA preferences.
How to create a product demo video using ngram
1. Start a product demo project
Open the AI product demo video maker and sign in. Start with whichever source best defines the project: a prompt, an image or PDF, or a public URL. In the agentic chat, add the remaining source material. If the recording is the backbone, start with the recording tool and use the PDF and screenshots as supporting material.
State which source should guide each kind of detail when they disagree. The PDF or product page can control the messaging, the screenshots can control the current interface, and the recording can control the action order.
The start wizard also asks what kind of video you want. AI Motion Graphics works well when the demo starts from a PDF, URL, and screenshots. Avatar video adds a presenter. Screencast + Avatar keeps uploaded footage central while an avatar guides every scene.
Choose the mode that matches the evidence you have. A product demo video does not need a presenter merely because the option exists.
2. Add the docs, screenshots, and recording
Use the PDF to video workflow for a private launch brief, PRD export, one-pager, or release packet. If the story already lives on a public product or documentation page, use its current URL.
Upload current UI images when the viewer needs to see exact labels, permissions, results, or before-and-after states. Put them in the order they should appear. The screenshot-based video workflow can add narration, pacing, callouts, and motion around the real captures.
For interaction order, upload the actual task or record it in-browser. Use the recording as the main source when the clicks and screen sequence define the story. When the PDF or URL defines the story, use the recording for step order and the screenshots for exact visual states.
When sources disagree, set the hierarchy explicitly:
Use the launch brief for positioning and the current screenshots and
recording for product behavior. Do not recreate the interface with
generated visuals. Use generated visuals only for the opening,
transitions, and closing CTA.
3. Review the generated script
The first draft covers the hook, body, and CTA using the brief and source material. Read it for accuracy before worrying about voice selection or motion.
Check the terminology, permissions, pricing references, feature availability, and promised outcome. The opening should name the viewer's problem, the middle should show the task, and the closing should follow naturally from the result on screen.
You can edit the script directly or ask through chat:
Make the opening more direct and show the product within five seconds.

Use "workspace" instead of "dashboard" throughout. Keep the script
under 75 seconds and remove any mention of the beta feature.
4. Review the storyboard before rendering
The storyboard maps the script into scenes with visual direction, timing, assets, and callout placement. Fix sequencing and asset mistakes here, before rendering.
For every scene, ask four questions:
- Does the narration make one claim the product can support?
- Does the visual show that claim rather than merely decorate it?
- Is the correct screenshot or recording segment attached?
- Does the sequence still follow one coherent user task?
A published guide to educational-video production recommends aligning narration and visuals in a storyboard before production begins (Castillo et al., 2021). Correct the plan before rendering a polished version of the wrong story.
5. Turn the recording into polished product scenes
When a recording is part of the project, upload it as the interaction source. The recording tools transcribe it, find key moments, and trim dead air. They can also smooth the cursor, emphasize clicks, add step labels, apply smart zooms, and insert section transitions.
Use the screen-recording-to-video workflow when the recording is the backbone of the demo. Keep only the path the viewer needs. Failed clicks, setup, loading time, and unrelated navigation rarely improve the explanation.
A useful recording prompt is explicit about what stays:
Keep account setup, integration selection, the test connection, and
the success state. Remove dead air and failed clicks. Smooth the cursor,
emphasize the important clicks, and add short step labels. Keep the
recorded interface as the visual source of truth.
6. Add voiceover, captions, callouts, and brand styling
Generate narration from the final script, choose a voice, and add pronunciation guidance for product names or technical terms. Auto captions are included by default, but they still need a human pass.
The W3C captions guidance recommends correcting automatic captions and including meaningful non-speech audio where it affects understanding. Check product names, acronyms, speaker changes, and caption placement over the interface.
Use callouts only where the viewer might miss the relevant control or state. One arrow on the filter that changes the result is useful. Constant motion around every button is not.
Finally, confirm the selected brand kit. Check the logo treatment, colors, type, intro, outro, voice and tone, and CTA rather than assuming brand consistency happened automatically.
7. Make final edits through chat and the visual editor
ngram calls its project-wide assistant "agentic chat." Use it for changes that affect the script, scene order, audience, or channel. Use visual chat after selecting a scene, callout, text element, or presenter when the change is local.
The AI video editor includes direct script and canvas controls. Use scene regeneration when one scene needs a new direction, or open the timeline to adjust clips, audio, captions, and effects without replacing the whole draft.
Examples of precise edit requests:
Replace scene four with the third uploaded screenshot. Keep the
narration and move the callout to the Export button.

Regenerate only the closing scene with a simpler CTA. Do not change
the other scenes.

Change the narration to a training tone, correct the pronunciation of
"[product name]," and leave the visuals unchanged.
8. Export the version each channel needs
Reframe the finished project for 16:9, 9:16, or 1:1. Export it as MP4, GIF, or WebM, then use the appropriate version on a product page, in a sales follow-up, inside a help center, or as a short social cut.
You can also use a hosted watch page, a share link, or an embed code. Pick the destination first, then watch the exported version on the actual page or device. A callout that works in a widescreen demo may cover the interface after a vertical reframe.
Example: turn a release packet into a 75-second demo
Consider a product team launching a new retention-analysis feature. The source packet contains a feature-page URL, a release-note PDF, three current screenshots, a two-minute recording, and the workspace brand kit.
This is an illustrative workflow, not a customer result or a recording of the actual editor interface.
| Scene | Source used in the project | What the scene proves |
|---|---|---|
| 1. The problem | Feature-page context | The user needs to find which release changed retention |
| 2. Starting state | Dashboard screenshot | Where the workflow begins and which data is visible |
| 3. Product action | Recording segment | How the user selects a release and applies a segment |
| 4. Result | Final screenshot | The retention change appears in the report |
| 5. Next step | Brand kit and approved CTA | The viewer can try the feature or share the report |
The first draft might spend too long restating the problem or show too much navigation. The team can tighten it with three chat edits:
Cut scene one to five seconds and open on the dashboard.

In scene three, keep only the release selection and segment filter.

End on the final report. Use the approved CTA from our brand kit.
Because the script, storyboard, source assets, scenes, and edit stay in one project, the team can replace one bad scene without recording the walkthrough again.
What AI can handle and what your team still reviews
The AI workflow can do much of the production work. It cannot approve its own product claims or decide whether customer data is safe to publish.
| The workflow handles | Your team reviews |
|---|---|
| Drafting the script, CTA, and storyboard | Product terminology, permissions, pricing, and shipped capabilities |
| Transcribing recordings and finding key moments | Whether the selected path is intentional and complete |
| Building scenes, callouts, zooms, voiceover, and captions | Whether each visual proves what the narration says |
| Applying brand rules and generating format variants | Logo use, tone, caption accuracy, and destination-specific layout |
| Rendering, hosting, sharing, embedding, and exporting | Final approval, access settings, distribution, and measurement plan |
The NIST Generative AI Profile notes that generative systems can present false information confidently and recommends human review and risk controls. Treat any fluent AI-generated script as a draft until the product owner approves it.
Privacy starts before upload. The ICO's data-minimization guidance says to use only the personal data needed for the purpose. Record in a demo tenant, disable notifications, and remove customer names, email addresses, tokens, internal URLs, and unreleased features before the source enters the project.
Common questions about AI product demo videos
The answers below describe the ngram workflow used in this tutorial.
Can AI create a product demo video from screenshots?
Yes. Upload current product screenshots and describe what each state represents. The editor can use them as scene visuals or references, then add pacing and callouts around the real captures. Order the images around one task so the result does not feel like a disconnected slideshow.
Can I use a screen recording in an AI product demo video?
Yes. Upload an existing recording or capture the task in-browser. The recording tools can transcribe it, find key moments, trim dead air, smooth the cursor, emphasize clicks, and add zooms or step labels. The cleaned footage then stays connected to the script, storyboard, captions, and brand treatment.
Can AI turn a document into a video?
Use a PDF or public URL as source material, or paste cleared text into the prompt. For a private Word or Google Doc, export the current version to PDF first. That content becomes the basis for the script, storyboard, scenes, narration, and captions.
Can I edit the AI-generated script and storyboard?
Yes. Edit the full script directly or ask for changes through chat. You can revise scene order, timing, visual direction, assets, and callouts before rendering, then regenerate an individual scene or use the canvas and timeline when the first cut needs a more precise correction.
Can I make separate versions for sales, onboarding, and a launch?
Yes. Ask the assistant to adapt the finished project for a different audience, tone, CTA, duration, or channel. You can export 16:9, 9:16, and 1:1 variants. Review each version because the right level of detail and interface framing changes with the viewer and destination.
Can I publish or share the finished demo?
You can publish the finished project to a hosted watch page, generate a direct share link or embed code, and export the video for other destinations. Test the hosted or embedded version before sharing it. Your team still owns final approval, access settings, and the release schedule.
Turn your source material into an AI product demo video
Gather one current product page or PDF, a few screenshots, and a clean recording of the workflow. Decide who the demo is for and what one task it needs to prove.
To follow the steps above, try it in ngram. Start with the source that defines the story, then add the assets that prove it.
Comments
Loading comments…