A while ago, I had to design a secure environment for my company in which the web servers are fully protected from the internet and the databases are completely isolated — no direct access, nothing exposed. I wanted to do the whole thing in Terraform, so the team could spin up the same setup in any environment without touching the console.
The idea sounds simple, but the details matter. Three layers, each protected by its own security group — ALB facing the internet, web servers only reachable through the ALB, and databases only reachable through the web servers. One wrong configuration and the whole chain breaks.
If you’re a cloud or DevOps engineer who wants to build this kind of setup properly and understand why each piece is configured the way it is, this is for you.
What Is an ALB and Why Does It Matter?
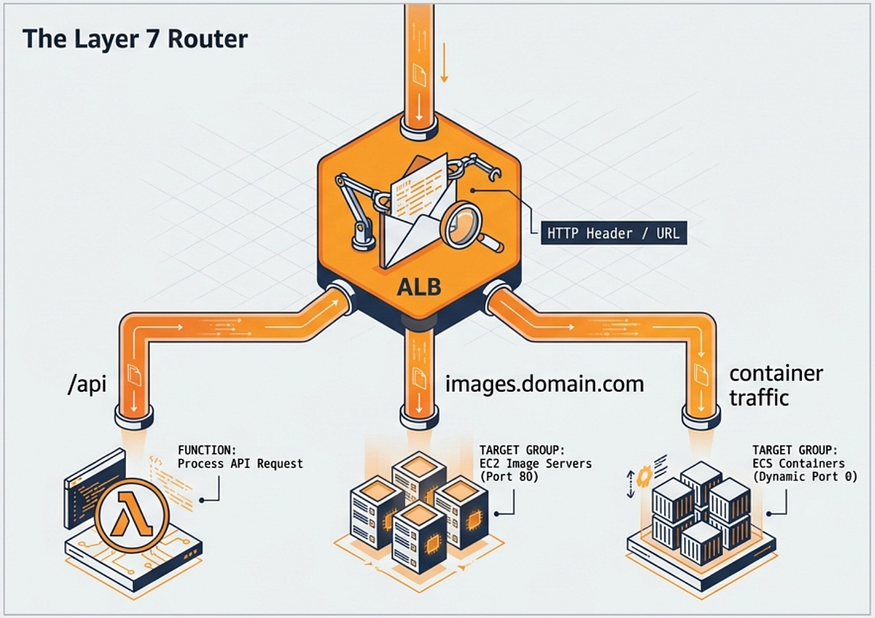
An Application Load Balancer sits in front of your backend and decides where each incoming request should go. It operates at Layer 7 of the OSI model — meaning it reads HTTP and HTTPS traffic and makes routing decisions based on URL path, headers, or hostname. This is what separates it from a Network Load Balancer, which operates at Layer 4 and simply forwards raw TCP packets without inspecting them.
In a 3-tier setup, the ALB is your front door. It’s the only thing the internet ever touches. Everything behind it — your web servers, your databases — stays hidden.
The 4 Components You Need to Understand
Source: https://docs.aws.amazon.com/elasticloadbalancing/latest/application/introduction.html
Before you touch the console or write a single line of Terraform, make sure you understand these four pieces. If one is misconfigured, the whole thing breaks, and the error messages aren’t always helpful.
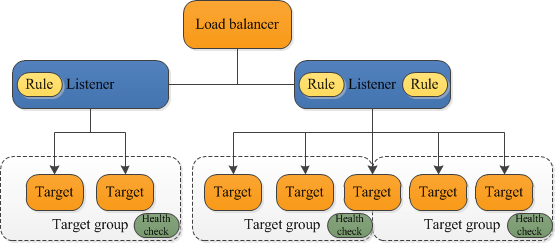
1. Load Balancer — the actual ALB resource. It has a DNS name, lives in a VPC, and requires at least two subnets across different Availability Zones. Security groups attach here.
2. Listener — sits on the load balancer and watches for incoming connections on a specific port, usually 80 for HTTP and 443 for HTTPS. Without a listener, the ALB receives nothing.
3. Listener Rules — tell the listener what to do with a request once it arrives. They have conditions and actions and are evaluated in order of priority.
4. Target Group — this is where your actual web servers live. The ALB forwards traffic here based on the listener rules and health check results.
In our 3-tier setup, the target group is where your web servers sit — and those web servers will only accept traffic from the ALB security group, nothing else. That’s the chain we’re building.
Listeners and How to Configure Them
A listener is a process that constantly checks for connection requests from clients. When you set one up, you define the protocol (HTTP or HTTPS) and the port. If you’re using HTTPS — and you should be in production — this is where you attach your ACM certificate.
This is where most people get stuck the first time. The certificate must be in the same AWS region as your ALB. If you created it, us-east-1 but your ALB is in eu-west-1, it won't show up in the dropdown and won't attach in Terraform either. Also, the certificate status must be "Issued" — if validation is still pending, the listener creation will fail or behave unexpectedly.
Listener Rules and Actions
Think of listener rules as the routing table for your ALB. Each rule has conditions — what pattern to match — and actions — what to do when the condition matches. There is always a default rule at the end that catches anything that didn’t match a previous rule.
Keep your rules simple at the start. It’s easy to create conflicting rules that are hard to debug later. In our 3-tier setup, the default rule forwards all traffic to the web server target group.
Target Groups and Health Checks
Your target group is only as reliable as its health check. A poorly configured health check will either mark healthy servers as unhealthy — causing downtime — or keep unhealthy servers in rotation — causing failed requests.
A few settings to get right:
- Health check path — use a lightweight endpoint like
/health, not your homepage - Healthy threshold — 2 consecutive successes before a target is considered healthy
- Unhealthy threshold — 2 to 3 consecutive failures before it’s removed
- Interval — 30 seconds is the default, don’t go too low
- Timeout — must always be less than the interval
If your targets keep flipping between healthy and unhealthy, check the health check path first. It’s almost always a 404 or a path that requires authentication.
How Traffic Actually Flows Through an ALB
Here’s what happens from the moment a user makes a request to when they get a response:
- The client resolves your domain to the ALB’s DNS name
- The connection hits the listener on port 80 or 443
- The ALB evaluates each listener rule in priority order
- The matching rule forwards the request to the target group
- The ALB picks a healthy web server using round robin by default
- The web server handles the request and sends the response back through the ALB
Notice the user never reaches the web server directly — everything goes through the ALB first. That’s not just architecture, that’s your first layer of security.
Step-by-Step: Creating an ALB in the AWS Console
Before starting, make sure you have:
- A VPC with at least 2 public subnets in different AZs
- EC2 instances or a target group are ready
- An IAM user/role with
elasticloadbalancing:*permissions
Step 1: login to your account
- In the search box, type “EC2”. On the page, select the Load balancers
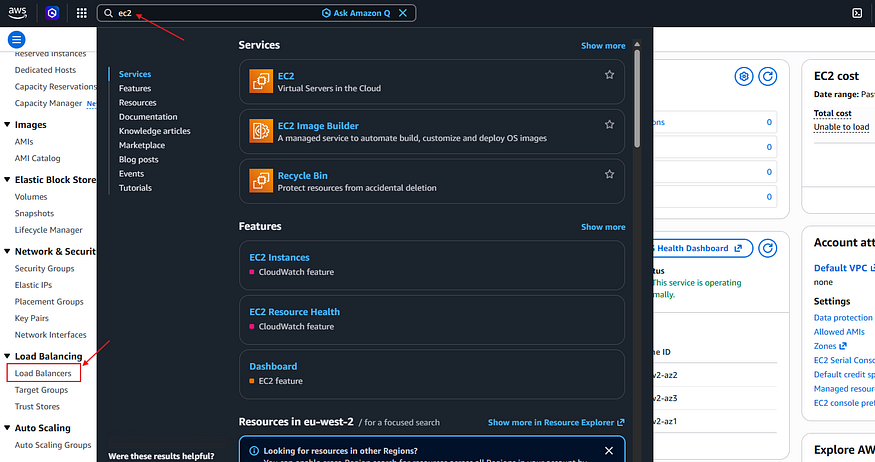
EC2 / Load Balancers
- Press Create Load Balancer.
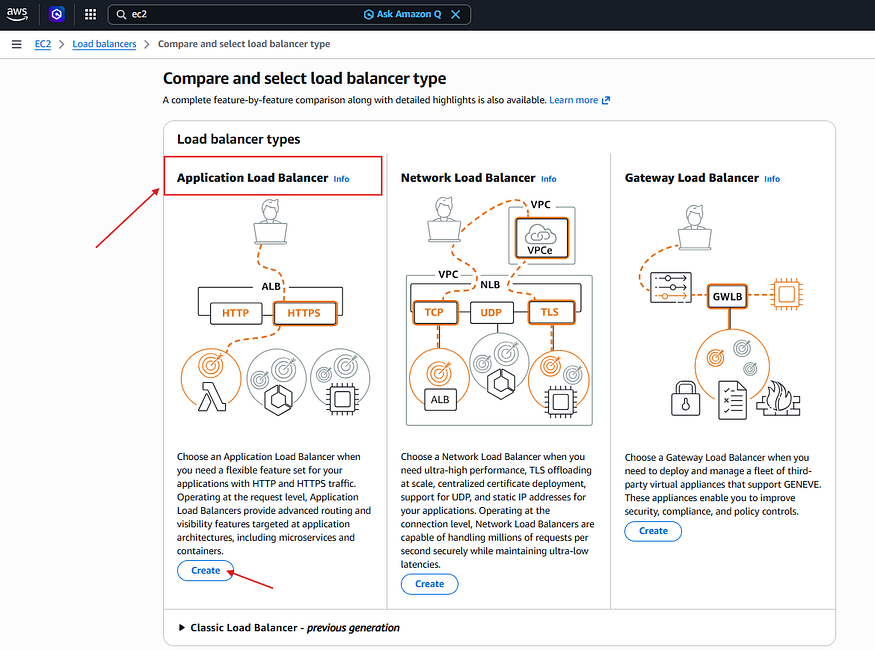
Step 2: Select the Load Balancer type.
- Choose Application Load Balancer and press Create.
Step 3: Basic Configuration
- LoadBalancerName
2. Scheme ( Internet-facing: public OR Internal: private))
3. IP Address type: IPv4 or Dualstack
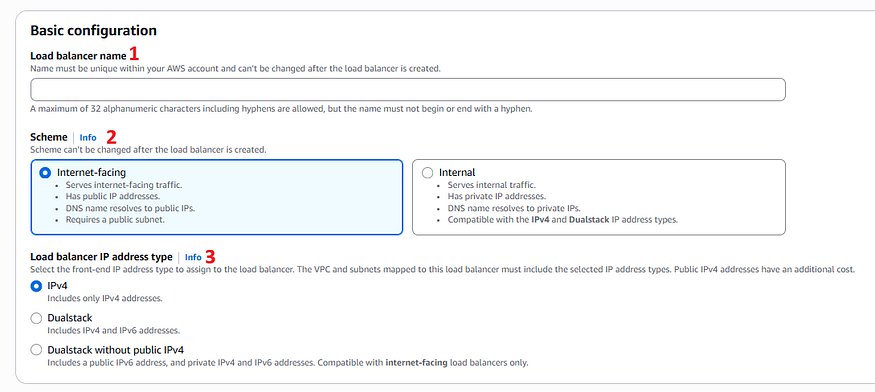
Basic Configuration for ALB
Step 4: Network Mapping (VPC & Subnets)
- Select your VPC (Make sure your subnets exist, and make sure the rules have these permissions)
{
  "Effect": "Allow",
  "Action": [
    "ec2:DescribeVpcs",
    "ec2:DescribeSubnets",
    "ec2:DescribeAvailabilityZones"
  ],
  "Resource": "*"
}
- Select at least 2 Availability Zones (required for ALB)
- For each AZ, choose the appropriate public subnet
Step 5: Security Groups
- Create a dedicated SG for the ALB, and on your EC2 instances’ SG, only allow inbound traffic from the ALB’s SG — never directly from the internet.
Step 6: Configure Listeners & Routing
- A Listener is added by default on port 80
- Click “Create target group” (opens in a new tab):
- Choose target type: Instances, IP, or Lambda
- Set Protocol: HTTP | Port: 80
- Configure Health checks (path:
/healthrecommended) - Register your EC2 instances
3. Return and select your newly created target group
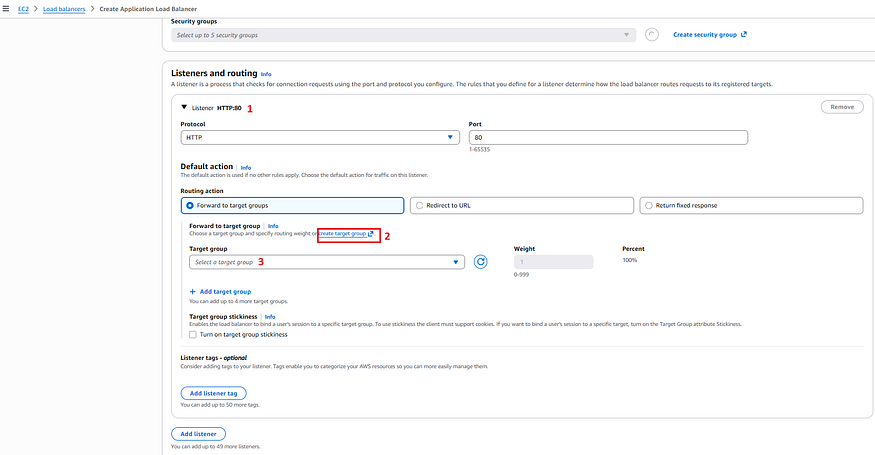
Configure Listeners & Routing
Step 7: Add HTTPS (SSL/TLS) — Optional but Recommended
- Add a listener → Port 443, Protocol HTTPS
- Under Secure listener settings, choose your ACM Certificate
- Set Security Policy — use
ELBSecurityPolicy-TLS13-1-2Res-PQ-2025-09for modern TLS

Secure Listener setting
Secure 3-Tier AWS Infrastructure with ALB and Terraform

Take a closer look at the complete project code here:
https://github.com/mmokhta70/Public_Projects/tree/main/Terraform_Projects/AWS_ALB
If you found it useful, don’t forget to 🔄 share, and 💬 follow for more Network Security, Linux & Windows, and DevOps & Cloud insights.
📲 Follow me on social media: 🔗 LinkedIn: https://www.linkedin.com/in/mmokhta ✍️ Medium: https://medium.com/@mehrdad.mokhtari1370 ♛ Github: https://github.com/mmokhta70 ⛪ GitLab: https://github.com/MMOKHTA
Comments
Loading comments…