
Angular Developers use Angular CLI for local development. One of the most common needs is to set up a proxy in the local dev environment to avoid CORS error when the Angular app sends an HTTP request to an API residing on a different domain. Angular CLI makes the process relatively easy, but it can be tricky in some edge cases.
In this article, I am going to discuss how to set up a dev server proxy for
- proxy to API in localhost
- proxy to external API within a corporate network
- proxy to API using windows authentication (IIS)
- multiple schemes in one WWW-Authenticate header
Setup a proxy to connect to API in localhost
With Angular CLI, we can start the local dev server using the command below.
ng serve
The command invokes the internal dev server based on webpack dev server. By default, the dev server runs on http://localhost:4200
When the Angular app needs to call its backend API, which is also hosted locally at http://localhost:3000 then we will encounter a CORS error because the HTTP call use a different origin (localhost:3000).
this.http.get('http://locahost:3000/api/')
    .subscribe(res => {...});
The CORS issue can be resolved by configuring the Angular dev server proxy. A sample proxy config can be created below
// proxy.conf.json
{
  "/api": {
    "target": "http://localhost:3000",
    "secure": false
  }
}
We then change the Angular http call to remove the domain prefix:
this.http.get('/api/')
    .subscribe(res => {...});
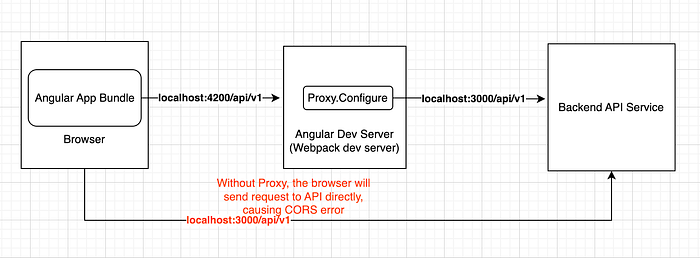
As illustrated by the following diagram, the proxy sits between the Angular app and the backend API and translates the “api/v1” calls to backend API. The CORS error doesn’t happen because the call to API is the same origin (localhost:4200/api) now.
To make the proxy configuration takes effect, it must be passed into the ng serve command.
ng serve --proxy-config proxy.conf.json
Or we can add it to the angular.json configuration
"serve": {
//   ...
  "options": {
    // ...
    "proxyConfig": "proxy.conf.json"
  }
}
Connect to external API behind corporate Proxy
Often we worked within a corporate network, and the Angular app in a local dev environment also need to connect to an external API. Using the previous example, we might need to call http://abc.company.com/api in the Angular app instead of calling http://localhost:3000/api.
Accessing an external API behind a corporate proxy requires the HTTP_PROXY and HTTPS_PROXY environment variables to be configured. If the proxy utilizes an SSL certificate, the secure flag needs to be set to false, to bypass the certificate verification.
To handle corporate proxy, we need to create a proxy.conf.js as below.
const HttpsProxyAgent = require("https-proxy-agent");

const proxyConfig = [
  {
    context: "/api",
    pathRewrite: { "^/api": "" },
    target: "https://api.abc.com",
    changeOrigin: true,
    secure: false,
  },
];

function setupForCorporateProxy(proxyConfig) {
  const proxyServer = process.env.http_proxy || process.env.HTTP_PROXY;

  if (proxyServer) {
    const agent = new HttpsProxyAgent(proxyServer);
    proxyConfig.forEach(c => {
      c.agent = agent;
    });
  }
  return proxyConfig;
}

module.exports = setupForCorporateProxy(proxyConfig);
In the above example, we proxy a request like api/v1/client to an external server https://api.abc.com/v1/client. When a corporate proxy is required, we set up an HTTPS agent object in the proxy based on HTTP_PROXY and HTTPS_PROXY environment variables. The secure:false option is added to handle the custom SSL certificate in the corporate proxy.
To use the new js configuration for the Angular app, run the following:
ng serve --proxy-config proxy.conf.js
It is worth noting that there are two types of agents: HttpsProxyAgent and HttpProxyAgent, it is necessary to choose the appropriate one based on the environment setting.
Proxy to API using windows authentication (IIS)
Windows authentication is widely used by many companies that rely on Microsoft Ecosystem. The situation can be tricky if the Angular App is connecting to an API service hosted with IIS that is protected by windows authentication.
The typical problem is that the call from the Angular app to the API will return 401 when using the proxy setting in the local dev environment.
For example, /api/v1/../login is an Endpoint protected by Windows Authentication, the request to the API from a locally running Angular App receives 401 unauthorized responses. Below is the network tab screenshot in Chrome dev tools.
failed request:

The root cause of the issue is that windows authentication is connection based, but the Proxy break the keep-live connection.
Under the hood of windows authentication, it uses either Kerberos or NTLM, either protocol will require a keep-live connection to keep the authentication state.
When the /api/v1/../login is called, the browser tries to establish a connection with the IIS server via NTLM negotiation handshake which includes 3 parts. They are the Type-1 message, the Type-2, and the Type-3 message. You can find more details of the NTLM handshake here. You may already notice that there are two HTTP calls shown for the same request in the above screenshot. They are the first two parts of the handshake.
Because the request is proxying locally, the 3 handshake messages were sent in 3 separate requests(sockets) through the proxy, thus a keep-live connection can’t be kept in the process. That is the reason the last message didn’t occur.
To fix the issue, We need to configure the proxy to maintain a single connection between the browser and IIS server. The[agentkeepalive](https://github.com/node-modules/agentkeepalive#readme) package can help us to achieve this goal. The updated proxy configuration is shown below:
const Agent = require("agentkeepalive");

const keepaliveAgent = new Agent({
  maxSockets: 1,
  keepAlive: true,
  maxFreeSockets: 10,
  keepAliveMsecs: 1000,
  timeout: 60000,
  keepAliveTimeout: 30000, // free socket keepalive for 30 seconds
});

const PROXY_CONFIG = [
  {
    target: "http://localhost:3000",
    context: "/api",
    secure: false,
    changeOrigin: true,
    loglevel: "debug",
    agent: keepaliveAgent,
  },
];
module.exports = PROXY_CONFIG;
The updated proxy config set the maxSockets to 1, keepAlive flag to true, and sets the timeout to 30 seconds, which is long enough to complete the handshake. This config aims to make http.Agent to maintain a keep-live connection between the browser and IIS server via proxy in the authentication process.
Now, the /api/v1/../login API request should work.
success request:

The above is the network tab logs after successful authentication with the new config. We can see the three requests during the handshake, and the last one return HTTP 200 success status.
Multiple schemes in one WWW-Authenticate header
Another possible cause of the error from windows authentication is the www-authenticate header. According to RFC 7235, it is okay to have multiple authentication schemes in one www-authenticate header field, although it can make the field difficult to be parsed.
agents will need to take special care in parsing the WWW- Authenticate or Proxy-Authenticate header field value if it contains more than one challenge, or if more than one WWW-Authenticate header field is provided, since the contents of a challenge may itself contain a comma-separated list of authentication parameters.
The reality is that the browser support is questionable. Below is an example of the www-authenticate header with two schemes.
WWW-Authenticate: Negotiate, NTLM
Some browsers may not be able to parse the above correctly and this will break the NTLM handshake process. To resolve this issue, we can utilize the proxyRes callback in the [http-proxy-middleware](https://www.npmjs.com/package/http-proxy-middleware) as below:
const onProxyRes = function (proxyRes, req, res) {
  var key = "www-authenticate";
  proxyRes.headers[key] = proxyRes.headers[key] && proxyRes.headers[key].split(",");
};

// add it into the proxy config option
onProxyRes: onProxyRes;
The full proxy configuration looks like below:
const Agent = require("agentkeepalive");

const keepaliveAgent = new Agent({
  maxSockets: 1,
  keepAlive: true,
  maxFreeSockets: 10,
  keepAliveMsecs: 1000,
  timeout: 60000,
  keepAliveTimeout: 30000, // free socket keepalive for 30 seconds
});
const onProxyRes = function (proxyRes, req, res) {
  var key = "www-authenticate";
  proxyRes.headers[key] = proxyRes.headers[key] && proxyRes.headers[key].split(",");
};
const PROXY_CONFIG = [
  {
    target: "http://localhost:3000",
    context: "/api",
    secure: false,
    changeOrigin: true,
    onProxyRes: onProxyRes,
    agent: keepaliveAgent,
  },
];
module.exports = PROXY_CONFIG;
With the new callback added, the multiple schemes in the www-authenticate header will be sent in multiple lines, and the NTLM negotiation handshake will be able to continue.
// From the original response header
www-authenticate: Negotiate, NTLM

// After the onProxRes callback function
www-authenticate: ['Negotiate', 'NTLM']

// It is equivalent to
< WWW-Authenticate: Negotiate
< WWW-Authenticate: NTLM
Summary
In this article, we discuss how to avoid CORS issues by setting up a proxy using Angular CLI for local development. I hope it is useful to you if you’re working on Angular behind a corporate proxy and/or using IIS with windows authentication.
Happy programming!
Comments
Loading comments…