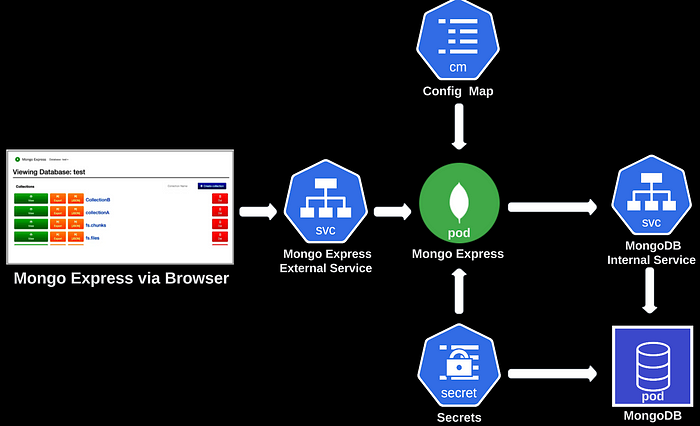
You’ve been tasked with deploying an entire end-to-end application using MongoDB and Mongo Express on Kubernetes. While creating this cluster, we’ll explore and analyze, how various Kubernetes components work together to streamline the deployment of applications. All of this needs to be done locally on your machine. I’ve elected to utilize minikube for this purpose. We’ll dive into minikube functions and features as we go through the setup.
What are MongoDB and Mongo Express?
MongoDB is a platform for general-purpose document databases, and Mongo Express is a web application server framework for Node.js. These can be combined to create a web application that uses MongoDB to store data. You can connect to and query any MongoDB database instance using the MongoDB Node.js driver because Express is a module running on top of Node.js.
Pre-Requisites To Follow Along
- Familiarity with Linux CLI
- DockerHub Account
- Follow the instructions to install minikube based on your: OS, Architecture, Release type, & Installer type.
- Minikube Resource Requirments:
— 2 CPUs or more
— 2GB of free memory
— 20GB of free disk space
— Internet connection
— Containers or virtual machine managers
Sequence of Events:
- Install the following locally:— Hypervisor
— Minikube
— kubectl - Create a Manifest for MongoDB
- Create a Secret Object
- Create an Internal Service for MongoDB
- Create a Manifest for Mongo Express
- Create a ConfigMap for Mongo Express
- Create an External Service for Express
- Test, Debug, and Deploy Your Architecture
Let’s Get Started

STEP 1: Local Setup
Minikube is an open-source tool that allows you to create a local Kubernetes environment on any Linux, Mac, or Windows system. It gives you the capability to test and experiment with Kubernetes deployments locally. It runs on your machine using some form of a hypervisor. Minikube will create a virtual machine on your laptop and the node will run inside that virtual box. By default, it creates a one-node cluster, but you can create a multi-node cluster with a Minikube environment if desired. I’m on macOS; other operating systems may have different commands and steps. At the end of the article, I have provided links to the documentation where you can find the steps for your OS.
Install minikube
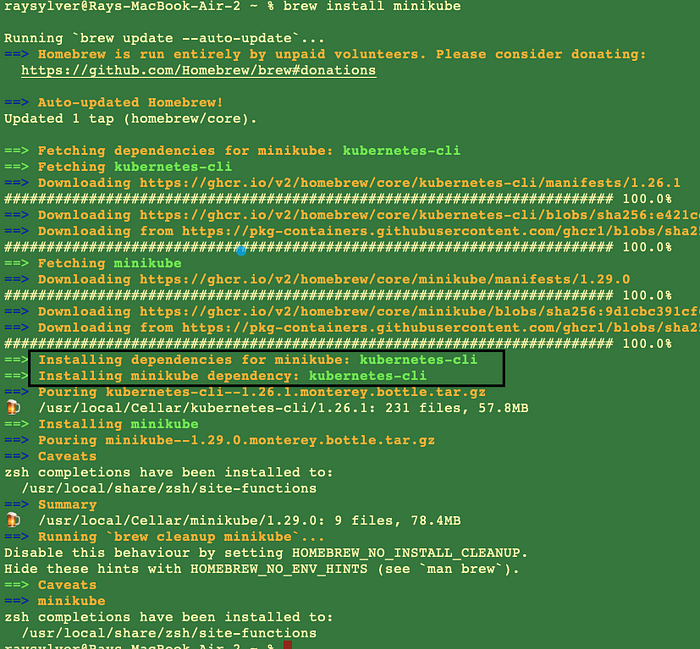
brew install minikube
Install kubectl
Minikube has kubectl as a dependency, so the above command will also install kubectl.
Install hypervisor
brew install hyperkit
Create and Start Cluster:
All you need is Docker (or similarly compatible) container or a Virtual Machine environment, and yo ur K8s cluster is a single command away:
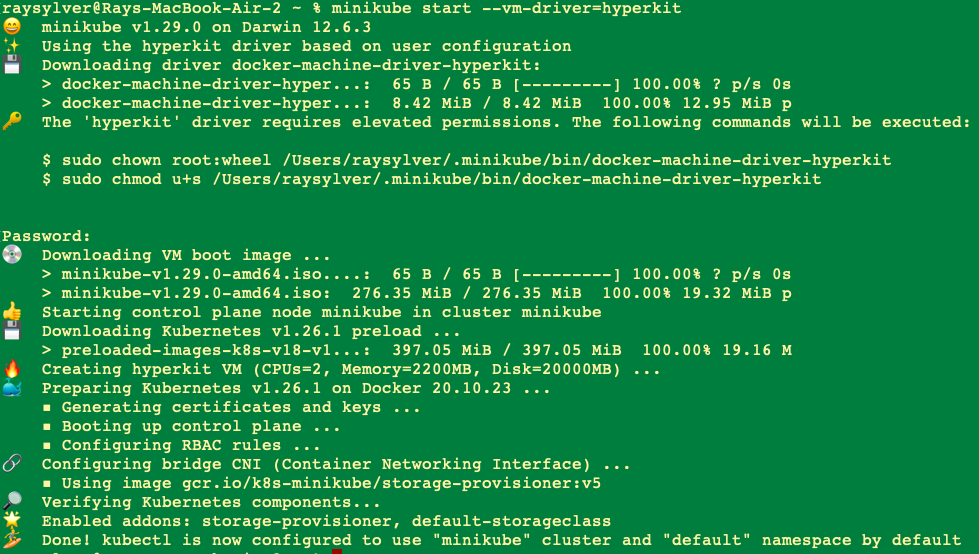
minikube start --vm-driver=hyperkit
To start the cluster, we must instruct Minikube which hypervisor to use since it must run inside a virtual machine. As a result, we mention the Hyperkit Hypervisor in the start command. I have a similar setup on my M1 MacBook but since there are so many issues with virtualization I ended up using docker as my driver when working on that device. The command to use docker as your driver would be minikube start --driver=docker
STEP 2: Create a Manifest for MongoDB
Before we create our manifest, we’ll head to DockerHub to review the documentation. There we will find documentation on how to use this container. We’re looking for port and external configurations. For instance, the MongoDB server in the image listens on the standard MongoDB port, 27017, so connecting via Docker networks will be the same as connecting to a remote database.
vi mongodb-depl.yaml
apiVersion: apps/v1
kind: Deployment
metadata:
  name: mongodb-deployment
  labels:
    app: mongodb
spec:
  replicas: 1
  selector:
    matchLabels:
      app: mongodb
  template:
    metadata:
      labels:
        app: mongodb
    spec:
      containers:
      - name: mongodb
        image: mongo
        ports:
        - containerPort: 27017
        env:
        - name: MONGO_INITDB_ROOT_USERNAME
          valueFrom:
            secretKeyRef:
              name: mongodb-secret
              key: mongo-root-username
        - name: MONGO_INITDB_ROOT_PASSWORD
          valueFrom:
            secretKeyRef:
              name: mongodb-secret
              key: mongo-root-password
In my last article, Kubernetes & MiniKube 101, I did an in-depth breakdown of the main components that make up a manifest. The only new parameters being passed here are the environment variables. When you create a Pod, you can set environment variables for the containers that run in the Pod. To set environment variables, including the **env** field in the configuration file.
In our scenario, we’re passing **MONGO_INITDB_ROOT_USERNAME** and **MONGO_INITDB_ROOT_PASSWORD** These variables, used in conjunction, create a new user and set that user’s password. This user is created in the **admin** authentication database and given the role of the root. **secretKeyRef**.**name** & **secretKeyRef**.**key** specifies the secret and its key name, which we will declare in a subsequent step.
Please note: Secret must be created before the deployment because this deployment step has dependency over the Secret step.
Since the MongoDB manifest will eventually be checked into a repository, this is not an ideal location to place an admin login and password in plain text. The solution is to create a Secret object to reference the values in our manifest. The Secret will live inside our k8 cluster and will not be available in our repo.
“A Secret is an object that contains a small amount of sensitive data such as a password, a token, or a key. Using a Secret means that you don’t need to include confidential data in your application code. Because Secrets can be created independently of the Pods that use them, there is less risk of the Secret (and its data) being exposed during the workflow of creating, viewing, and editing Pods.” — Kubernetes Documentation
STEP 3: Create a Secrets Object
Before we can apply our MongoDB manifest, we need to create our Secret object that our deployment will reference. When creating a secret, the values are not plain text they must be in base64 encoded. You do this by typing the following commands into your terminal:
echo -n 'rootlogin' | base64
cm9vdGxvZ2lu
echo -n 'rootpassword' | base64
cm9vdHBhc3N3b3Jk
Now paste these values into our Secret config file. I’m using vi to edit within the terminal but you could also do this with an IDE like VScode.
vi mongo-secert.yaml
apiVersion: v1
kind: Secret
metadata:
    name: mongodb-secret
type: Opaque
data:
    mongo-root-username: cm9vdGxvZ2lu
    mongo-root-password: cm9vdHBhc3N3b3Jk
Keep in mind we haven’t created anything yet. Everything we’ve done so far has been prep work. If we tried to create a deployment that references a secret that doesn’t exist, you would get an error. Time to apply our secret by running:
kubectl apply -f mongo-secret.yaml
kubectl get service #run this to confirm it was created

Now we’re able to deploy our MongoDB with the following command:
kubectl apply -f mongodb-depl.yaml
STEP 4: Create an Internal Service for MongoDB
The internal service will allow other components or pods to communicate with the MongoDB container. Now we could create a separate YAML file for our service or alternatively add it to our MongoDB deployment. Three dashes**---** in Yaml is interpreted as the syntax for document separation.
apiVersion: apps/v1
kind: Deployment
metadata:
  name: mongodb-deployment
  labels:
    app: mongodb
spec:
  replicas: 1
  selector:
    matchLabels:
      app: mongodb
  template:
    metadata:
      labels:
        app: mongodb
    spec:
      containers:
      - name: mongodb
        image: mongo
        ports:
        - containerPort: 27017
        env:
        - name: MONGO_INITDB_ROOT_USERNAME
          valueFrom:
            secretKeyRef:
              name: mongodb-secret
              key: mongo-root-username
        - name: MONGO_INITDB_ROOT_PASSWORD
          valueFrom:
            secretKeyRef:
              name: mongodb-secret
              key: mongo-root-password
---
apiVersion: v1
kind: Service
metadata:
  name: mongodb-service
spec:
  selector:
    app: mongodb
  ports:
    - protocol: TCP
      port: 27017
      targetPort: 27017
To apply these changes we’ll run the same command that we initially ran to create it it.
kubectl apply -f mongodb-depl.yaml

Run the following commands to confirm that our internal service was successfully created and attached to our MongoDB pod.
kubectl get service
kubectl describe service mongodb-service
kubectl get pod -o wide
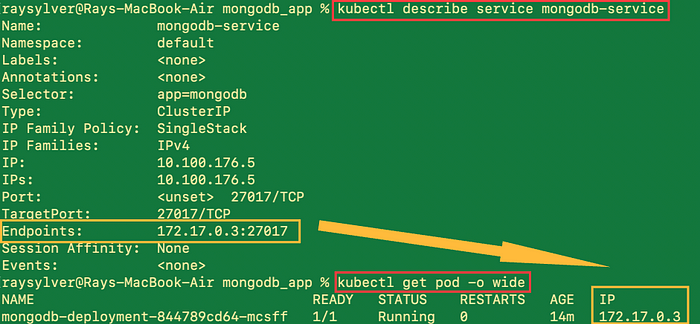
With our current setup, only components with the cluster can access mongoDB. That completes the internal design, and now to move on to our external configuration.
STEP 5: Create a Manifest for Mongo Express
Mongo Express is an interactive lightweight Web-Based Administrative Tool to manage MongoDB Databases effectively. Numerous MongoDB Admin duties can be simplified by using Mongo Express, which was created with Node.js, Express, and Bootstrap 3. You can create, remove, update, or delete databases, collections, and documents using Mongo Express. Similar to MongoDB, we will reference the documentation in docker hub to better understand how to use this image.
mongo-express — Official Image | Docker Hub
We will need to pass mongodb parameters into the mongo-express manifest so it can authenticate and connect.
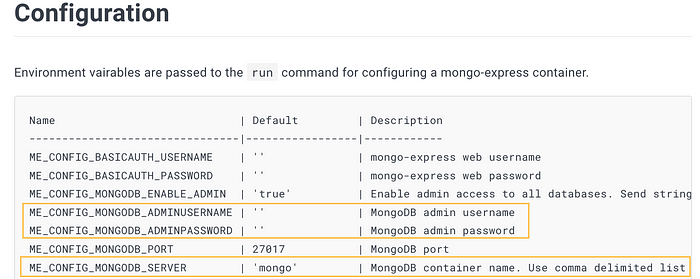
We will reference our mongodb-secret object when accessing the base64 encoded password we assigned to MongoDB. The value for ME_CONFIG_MONGODB_SERVER which the MongoDB URL could be passed right into our deployment but we will create a ConfigMap that will be referenced. A ConfigMap stores configuration settings for your code like non-confidential data, hostnames, and URLs in key-value pairs. It also allows us to separate our configuration from the application.
Caution: ConfigMap does not provide secrecy or encryption. If the data you want to store are confidential, use a Secret rather than a ConfigMap, or use additional (third party) tools to keep your data private. — Kubernetes Documentation
vi mongoexpress-depl.yaml
apiVersion: apps/v1
kind: Deployment
metadata:
  name: mongo-express
  labels:
    app: mongo-express
spec:
  replicas: 1
  selector:
    matchLabels:
      app: mongo-express
  template:
    metadata:
      labels:
        app: mongo-express
    spec:
      containers:
      - name: mongo-express
        image: mongo-express
        ports:
        - containerPort: 8081
        env:
        - name: ME_CONFIG_MONGODB_ADMINUSERNAME
          valueFrom:
            secretKeyRef:
              name: mongodb-secret
              key: mongo-root-username
        - name: ME_CONFIG_MONGODB_ADMINPASSWORD
          valueFrom:
            secretKeyRef:
              name: mongodb-secret
              key: mongo-root-password
        - name: ME_CONFIG_MONGODB_SERVER
          valueFrom:
            configMapKeyRef:
              name: mongodb-configmap
              key: database_url
This image will require a database name to connect, for which we will require a MongoDB address or internal service. We will specify the database URL inside ConfigMap in the next phase.
STEP 6: Create a ConfigMap for Mongo Express
Similar to how Secret needed to be created before it could be referenced in our earlier deployment, Configmap needs to be created before it can be referenced as well.
vi mongo-configmap.yaml
apiVersion: v1
kind: ConfigMap
metadata:
  name: mongodb-configmap
data:
  database_url: mongodb-service
**database_url** : is MongoDB's internal service name, which we specified when we created the internal service in step 4.
Deploy both by running:
kubectl apply -f mongo-configmap.yaml
kubectl apply -f mongo-express.yaml
STEP 8: Create an External Service for Express
Similar to MongoDB, we could add the external service for express within our Mongo Express manifest. However, to showcase that a service can be deployed by itself, we will not merge the two this time.
vi express-service.yaml
apiVersion: v1
kind: Service
metadata:
  name: mongo-express-service
spec:
  selector:
    app: mongo-express
  type: LoadBalancer
  ports:
    - protocol: TCP
      port: 8081
      targetPort: 8081
      nodePort: 30000
Let’s unpack what is going on in this file. We have exposed a service port at 8081.
**targetPort:8081** is where the container port is listening.
**type:LoadBalancer**: makes the service external by assigning the service an external IP address.
**nodePort: 30000** the port on which this pod can be accessed externally. This nodePort has a range between 30000–32767.
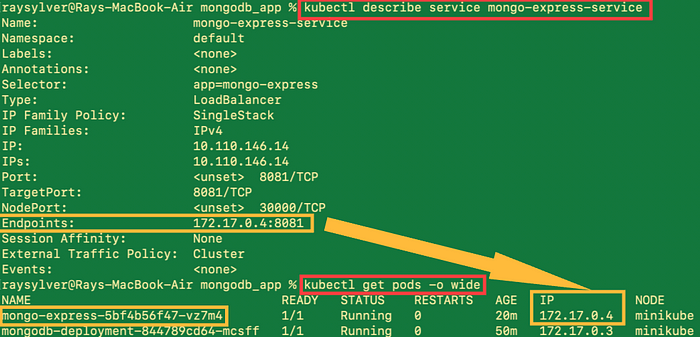
Run the following commands to confirm that our service was successfully created and attached to our pod.
kubectl get service
kubectl describe service mongodb-service
kubectl get pod -o wide
STEP 9: Quality Assurance Check
This command will assign a public IP address to an external service
minikube service mongo-express-service

We can access the application in our browser on port 30000, as given in the external service yaml file.

Deletes a local Kubernetes cluster
When you’re done testing or developing within Minikube, the cleanup is as simple as a single command. This command deletes the VM and removes all associated files.
minikube delete
Conclusion
We set up a complete, end-to-end Mongodb application on Kubernetes and used our browser to access it. Using an internal service, we built a mongodb pod and made it available to the other component. We also developed a single pod for mongo-express to modify mongodb and external service to make it reachable outside the cluster or external sources.
Thank you for taking the time out of your day to read this article. I hope you were able to get some value from the content. If this content interests you, follow my page for more articles on DevOps tools and methodologies. Let’s also connect on LinkedIn, where we can continue the conversation.
DOCUMENTATION & REFERENCES
Don’t forget to push your code and files to your Git repo.
Link to my repo for this project
— Commands
— YAML Files

mongo — Official Image | Docker Hub