
Introduction
It seems the entire world is talking about ChatGPT and it's no wonder. It is an amazing application and certainly unlike anything else I have ever seen before. But like all applications, it is useless unless it can improve other areas of work and productivity.
I have taken a little licence with the heading in this article by using the term ChatGPT3. ChatGPT and GPT3 are two different language models, but the latter has effectively no search activity, hence the reason for using the term ChatGPT3 in the article. GPT3, which is what is actually installed into Obsidian is a more powerful language model than ChatGPT3.* *There are several articles online about the differences between the two models.*
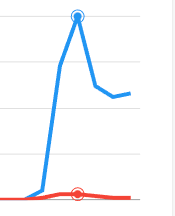
Search comparison for ChatGPT(blue) and GPT3(red)
I have found it particularly useful in Obsidian and it is quite exciting to see that someone has developed a plugin to integrate it directly. This article will guide you through the installation process, which at this stage involves several steps. When Obsidian approves the plugin as a Community Plugin, you will be able to install it directly. It is worth noting here that at the date of writing this article, GPT3 Notes is not official yet. That said, I have installed it and it is doing everything I could have hoped for.
Installation
EDIT 8 Jan 2023: GPT3 Notes has now been released as an official Obsidian Community Plugin. You can now install direct from the Community Plugins without having to use BRAT.
- Open up settings and make sure you have Restricted Mode turned off in Community Plugins.
- Under Community Plugins, hit Browse and search for BRAT. This plugin is used to install beta versions of plugins to test them and will simplify the process for GPT3 Notes.
- Install and enable BRAT
- Once enabled, go to the Command Palette in Obsidian by typing Cmd P or Ctrl P and start typing or select BRAT: Add a beta plugin for testing
- Enter https://github.com/micahke/obsidian-gpt3-notes into the text box. Do not add the .git extension at the end, as BRAT will not work.
- Click on Add Plugin and you will get a message saying that it has registered the plugin with BRAT.
- Go to the BRAT plugin and click on Options. Down near the bottom of the screen, you will see micahke/obsidian-gpt3-notes listed under Beta Plugins Installed. Note that BRAT is indexed under Obsidian BRAT in the Community Plugins or search for BRAT in Installed Plugins on the Community Plugin page.
- This step is unnecessary unless you are curious as you probably won't see the plugin at this stage until you enable it. If you wish to check, have a look in the Plugins folder beneath .obsidian in your vault. Note that this folder is hidden by default. On a Mac, you will need to hit Cmd + Shift + . (period, full stop) or on Windows in File Explorer, click on View --- Show Hidden Items. Click on the .obsidian folder and then Plugins and you should see GPT3 Notes.
- Open the Settings again and in Community Plugins type GPT into the text box "Search Installed Plugins" and you will see GPT3 Notes displayed. Slide the switch to Enabled and click on the Options icon for the plugin.
- Click on "Generate Token". This is to get an API (Application Program Interface) key to create a link between the two programs. You will need to create an account if you don't have one. If you have one, then login and it will take you to the API page. If you have created APIs before, they are no longer accessible and you will have to create a new one.
- Create the API key and paste it into the token box in Obsidian.
- You will now see an icon in the left-hand-side ribbon as shown below.

Source: ChatGPT icon in Obsidian Left Sidebar by author
13. Click on the icon and a chat box will come up where you can ask your question of ChatGPT.
Source: Image by author
14. I find it is always a good idea to put anything from an external source into a callout box. That way you will always know the difference between something generated elsewhere such as a Chat GPT question or a quote you may inadvertently plagiarise.
15. I use the Note callout and the plus (+) after Note means it is always expanded. Default minimises it. Here is the code:-
[!NOTE]+ Type the Chat GPT question here.
Answer goes here.
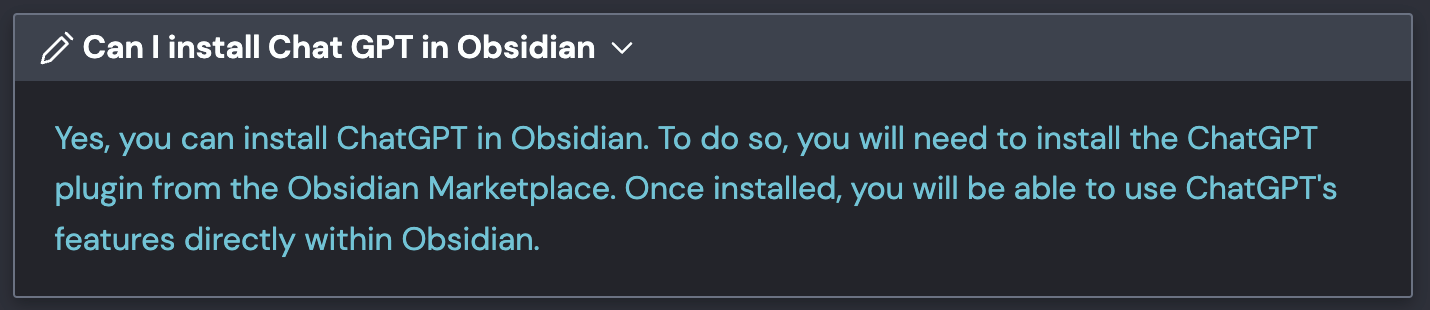
Warning
ChatGPT warns you itself that it can provide inaccurate information. If you hadn't picked it up already, the answer ChatGPT gave us above is not true. ChatGPT is not yet available in the Obsidian Marketplace, as I said at the beginning of this article. It is an excellent example that ChatGPT is not infallible and you should qualify any information you use, particularly in an academic environment. ChatGPT is a tool, and it needs to be used cautiously as you would with a blowtorch.
Conclusion
All in all, ChatGPT is an amazing piece of software and has taken us into the world of science fiction. If this is the beginning, just imagine where things can go from here?
Once concern I have, however, is that there was another piece of software around that I used for quite some time and now it seems they feel it is commercially viable. My view is that they have used people to test and train the dataset and now want to charge those very people for the privilege of using what they helped create. The charge is also quite a prohibitive monthly fee as well that would put it out of the reach of many people. I trust this will not be the case with ChatGPT.
I will write several more articles on Artificial Intelligence platforms, particularly where they can integrate with Obsidian. Sign up for emails below to stay up to date and I trust you will enjoy ChatGPT in Obsidian. If you have any questions about the process, please leave a comment below and I will respond.
THANKS!
Comments
Loading comments…