I've noticed an interesting sentiment brewing on social media lately. Dissatisfaction that essentially boils down to this:
All of my favorite educators, content creators, and industry people are shifting to TypeScript-first for their content! How could they?!
Now, I love TypeScript. For years, it has made React development so much easier for me. But I do see the other side of the argument. In my humble opinion, the cause of this disconnect is not because of "lazy JavaScript devs", or that TypeScript is way too difficult (and therefore, unfair to expect anyone getting into [insert tech stack here] to face it as a barrier-to-entry) - but because most people have the wrong idea about TypeScript and type safety to begin with. Let's clarify:
- TypeScript is not a completely different programming language that you need to learn from scratch.
- TypeScript is not something that you first need to learn front-to-back to even be useful with.
- Building type-safe applications does not mean being back in high school, coding Java, adding return types to everything not bolted down.
This is why the best way to learn TypeScript is by using it as a tool to improve your JavaScript code; not looking up technical specs or taking every online course you can find. To demonstrate how easy this can be, let's build a simple ToDo app in Next.js - something you've coded hundreds of times in JavaScript - except this time, we'll be using TypeScript on both our Server and our Client, and use Prisma and WunderGraph together to ensure end-to-end type safety.
💡 This tutorial assumes you have a basic knowledge of React, state management, and how to build a simple ToDo app using it. A primer on how GraphQL works (and how to write GraphQL queries/mutations) would also help!

How TypeScript Makes You A Better Developer
Before we start, let's get the obvious question out of the way.
"What's the catch? Do I add types to every single variable and function return I come across?!"
Not at all! TypeScript is only a statically-typed superset of JavaScript. You build type-safe applications with TypeScript by only adding enough types to get rid of ambiguities in your code that may lead to bugs, and then let its built-in type inference do 90% of the work.
What do I mean by that? Let's say you had a React component that returned the computed result of a function in a <div> (or some other fancy typography thing).
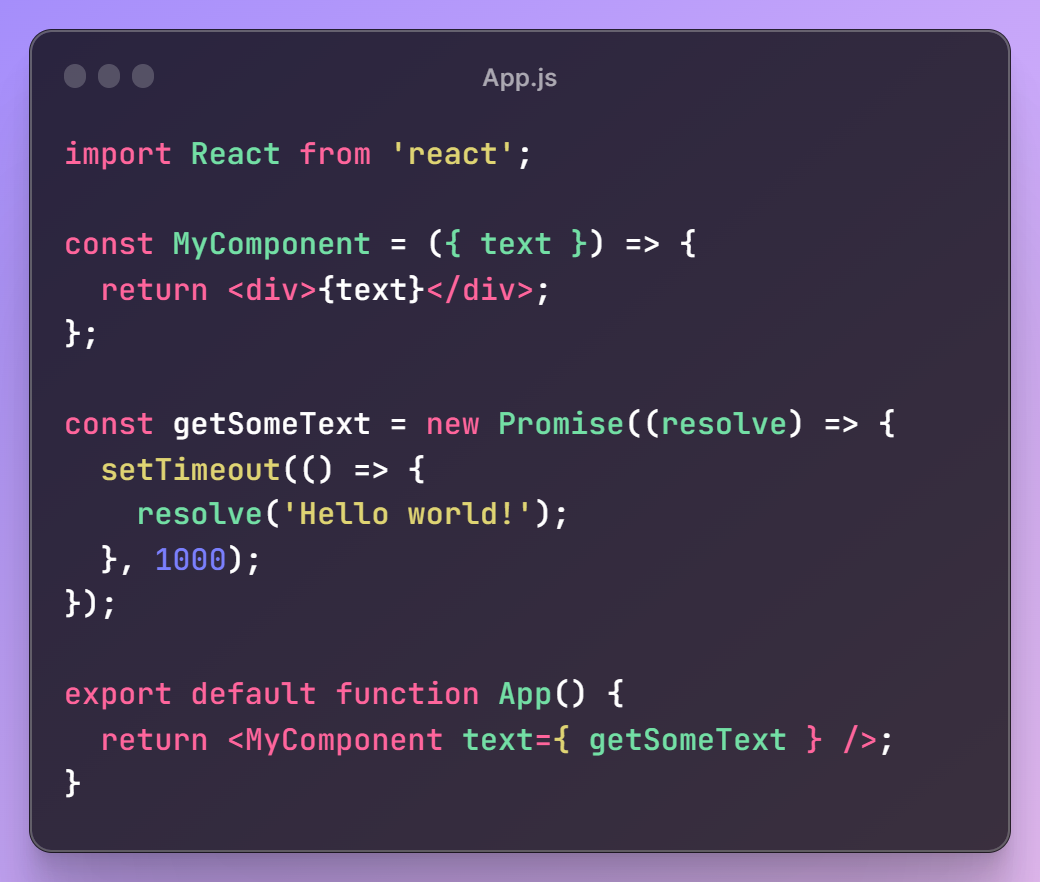
Same app, JavaScript vs TypeScript.
This is an incredibly common scenario. In a large enough app you'll often overlook it when a function (especially if it's a third-party library you don't control) returns a Promise instead of the primitive you want.
In JavaScript, you'd be able to plow right ahead with the code in App.js, and not even realize anything was wrong until you got a runtime error about how you can't render a Promise within a <div>.
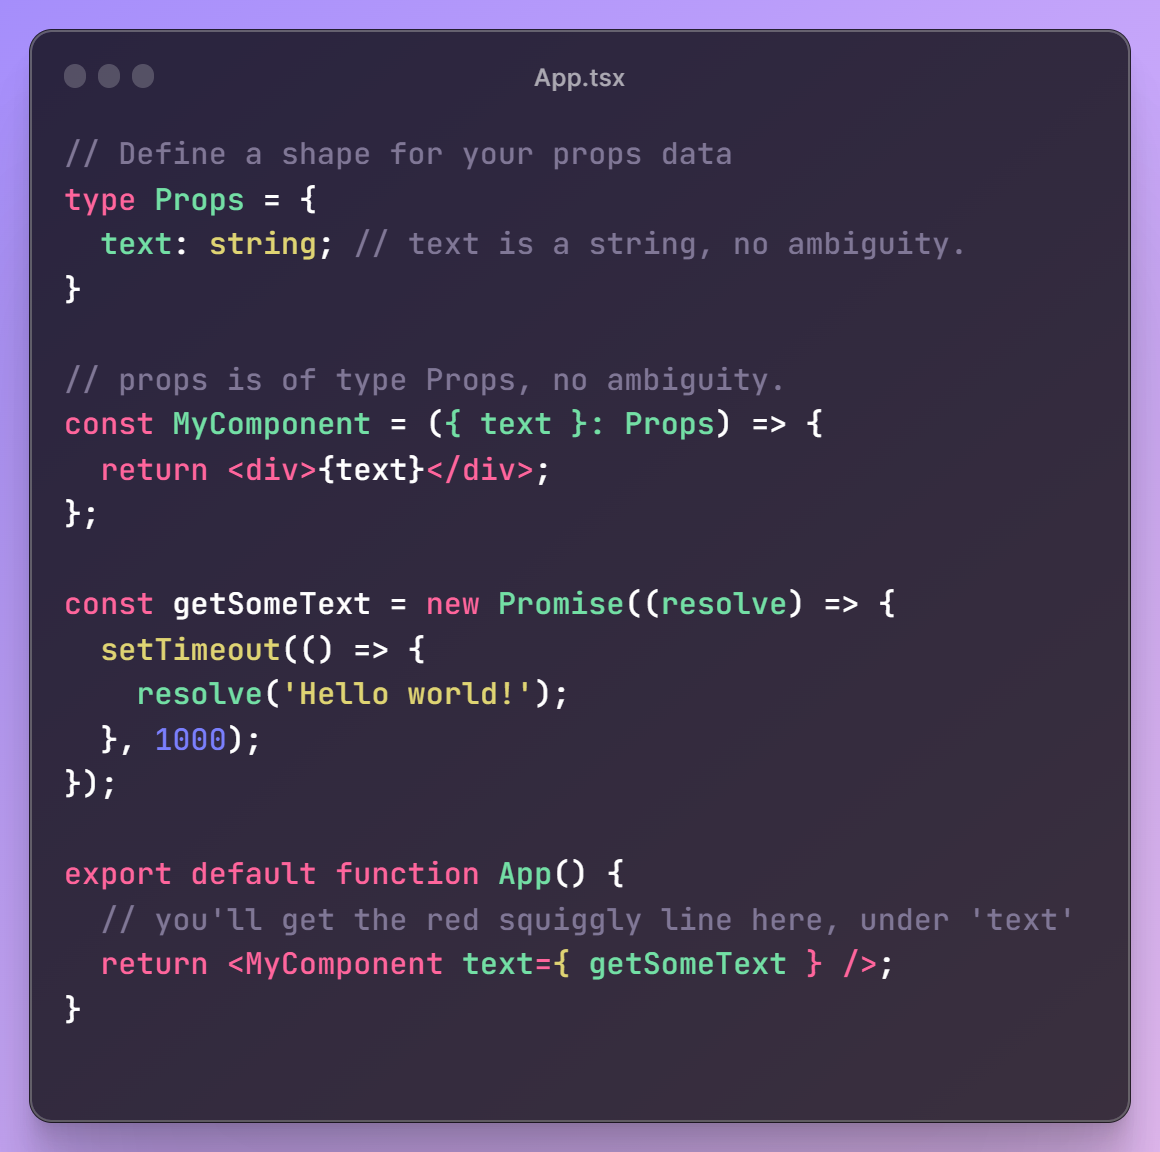
If you were coding in TypeScript, though, specifying a shape for your props that explicitly says text is a string (and nothing else) immediately gets you a red squiggly line under <MyComponent text={returnSomeText} /> while coding, that tells you how Type 'Promise<unknown>' is not assignable to type 'string', preventing your mistake from ever leaving the IDE.
💡You could then fix it by maybe making the type of
textastring | Promise<unknown>, and havingMyComponentreturn a<div> Loading...</div>iftextwas aPromise, or the regular<div> {text} </div>otherwise.
That's it. You won't have to manually add explicit return types to every single variable and function. Everything else gets inferred automatically.
There's that word again, 'inference'. Let's explain it quickly. If you had data like:
const data = [
  {
    id: 1,
    title: "hello",
  },
  {
    id: 2,
    title: "world",
  },
];
Hover your mouse over data, and you'll see in the IDE that its type is automatically 'understood' by TypeScript as:
const data: {
  id: number;
  title: string;
}[];
Then, you could do:
const myTitle = data[1].title
myTitle would automatically be 'understood' as a string, and code completion/IntelliSense will list all string operations you could do on it, letting you do:
console.log(myTitle.toUpperCase())
That's type inference at work. Ambiguity avoided, without ever adding any typing yourself. This is how TypeScript eliminates guesswork so you can code faster. Don't know which functions/values you can access for something? Let your IDE's code completion tell you. Want to know the shape of some data when you're several levels deep in a call stack while debugging? Just hover over, or Ctrl + Click something, and see exactly what it accepts and/or returns.
This is the one and only trick you need to know to get started with TypeScript. Don't use it as a programming language. Use it as an advanced linter for JavaScript.
With that out of the way, let's get started on our Todo App.
The Code
I'll be using a local PostgreSQL datasource for this, using Prisma to access it with type-safe APIs, and then WunderGraph to make that data accessible through JSON-RPC to my Next.js frontend where I render it.
Prisma is an ORM (Object Relational Mapping) tool that allows developers to interact with databases using a type-safe API, and WunderGraph is an open-source dev tool that lets you define your data sources as dependencies in config (think a package manager like NPM, but for data!) which it then introspects into a virtual graph that I can write GraphQL queries (or fully custom resolvers written in TypeScript) to get data out of. Then, WunderGraph turns these operations into simple JSON-over-RPC calls.
Combining the two means you can write database queries in a type-safe way without having to deal with SQL, and have them be easily accessible on the Next.js front-end with auto-generated type-safe hooks. All of it in TypeScript for the best developer experience you can ask for.
Step 0A: Setting Up the Database
First off, the easiest way to get a Postgres database going is with Docker, and that's what I'm doing here. But since these databases use TCP connection strings, you could use literally any Postgres host you want - including DBaaS ones like Railway.
docker run --name mypg -e POSTGRES_USER=myusername -e POSTGRES_PASSWORD=mypassword -p 5432:5432 -d postgres
This will set up a Docker Container named mypg for you, with the username and password you specify, at port 5432 (localhost), using the official postgres Docker Image (it'll download that for you if you don't have it already)
Step 0B: Setting Up WunderGraph + Next.js
Secondly, we can set up both the WunderGraph server and Next.js using WunderGraph's create-wundergraph-app CLI, so let's do just that.
npx create-wundergraph-app my-todos --example nextjs
When that's done, cd into the directory you just created and runnpm i && npm start. Head on over to localhost:3000 and you should see the WunderGraph + Next.js starter splash page pop up with the results of a sample query, meaning everything went well.
Now, it's time to set up Prisma, using it to create the database schema we want.
Step 1: Prisma
First, Install the Prisma CLI via npm:
npm install prisma --save-dev
Then create a basic Prisma setup with:
npx prisma init
This'll create a new prisma directory, with the config file schema.prisma in it. This is your schema. Open it up, and modify it like so:
generator client {
 provider = "prisma-client-js"
}

datasource db {
 provider = "postgresql"
 url = "postgresql://myusername:mypassword@localhost:5432/postgres"
 // ...or just put your database URL in .env and access it here, like so.
 // url = env("DATABASE_URL")
}

model Todo {
 id Int @id @default(autoincrement())
 title String
 completed Boolean @default(false)
}
Save this, then run:
npx prisma db push
...to turn this Prisma schema into a database schema, and create the necessary tables in your Postgres database.
If you want, you could now add some dummy data using Prisma's GUI with:
npx prisma studio
Finally, run:
npm install @prisma/client
And then
npx prisma generate
... to install the Prisma Client package, and then generate an actual Prisma client. You can now start querying your database.
Step 2: WunderGraph
Normally, this is the part where you create a lib/prisma.ts file, with an exported PrismaClient instance within it, and import it wherever you need to do data fetching. However, using WunderGraph, we can ensure a much, much better developer experience without ever compromising on type safety.
Check out wundergraph.config.ts in the .wundergraph directory in your root, and modify it like so.
wundergraph.config.ts
const prismaDB = introspect.prisma({
  apiNamespace: "prisma",
  prismaFilePath: "../prisma/schema.prisma",
  introspection: {
    disableCache: true,
  },
});

// configureWunderGraph emits the configuration
configureWunderGraphApplication({
  apis: [prismaDB],
  // ...
});
That's how easy it is. Create a Prisma schema, introspect said schema with WunderGraph, and add it to your project as a dependency array. This ensures your frontend stays decoupled from your data, making maintaining and iterating on your app much, much easier.
Save this config file, and WunderGraph will consolidate this data into a virtual graph. Now you'll need to define the operations you want to actually get data out of it. WunderGraph makes getting the exact relations you want in one go (as well as cross-source data JOINs!) a cakewalk with GraphQL.
Create an AllTodos.graphql file in .wundergraph/operations.
AllTodos.graphql
query AllTodos {
  todos: prisma_findManyTodo(orderBy: { id: asc }) {
    id
    title
    completed
  }
}
This is pretty self-explanatory - it just gets all of our Todos from the database, in ascending order of ID.
Let's get the rest of our CRUD operations out of the way.
CreateTodo.graphql
mutation createTodo($task: String!) {
  prisma_createOneTodo(data: { title: $task }) {
    id
  }
}
UpdateTodo.graphql
mutation UpdateTodo($id: Int!, $complete: Boolean!) {
  prisma_updateOneTodo(
    where: { id: $id }
    data: { completed: { set: $complete } }
  ) {
    id
    completed
  }
}
DeleteTodo.graphql
mutation DeleteTodo($id: Int!) {
  prisma_deleteOneTodo(where: { id: $id }) {
    id
  }
}
Now, when you hit save in your IDE, the WunderGraph server will build the types required for the queries and mutations you've defined, and generate a custom Next.js client with type-safe hooks you can use in your frontend for those operations.
Step 3: The Next.js Frontend
So, we've gotten all of our backend logic out of the way. What remains is your basic ToDo frontend, and you'd go about building it in TypeScript the exact same as you would with JavaScript. All your muscle memory re: React architecture - components, passing down/lifting up state, event propagation, client vs server state, etc. - can be retained.
Also, I love utility-first CSS, so I'm using Tailwind for styling throughout this tutorial. Install instructions here.
index.tsx
import ToDo from "components/ToDo";
import { NextPage } from "next";
import { useQuery, withWunderGraph } from "../components/generated/nextjs";

const Home: NextPage = () => {
  // Using WunderGraph generate hook to get data
  // This calls the AllTodos.graphql operation!
  const { data } = useQuery({
    operationName: "AllTodos",
    liveQuery: true, // Subscriptions alternative that needs no WebSockets!
  });

  return (
    <div className="flex items-center justify-center h-screen mx-8 text-white ">
      {data ? (
        <>
          {/* Have half of the screen be the JSON response...*/}
          <div className="max-w-1/2 w-full ">
            <pre className="flex items-center justify-center text-slate-800 text-base font-semibold">
              {JSON.stringify(data, null, 3)}
            </pre>
          </div>

          {/* ...and the other half be our ToDo component */}
          <div className="flex items-center justify-center font-mono tracking-tight max-w-1/2 w-full">
            <ToDo todos={data.todos} />
          </div>
        </>
      ) : (
        <>
          {/* Something went wrong and we didn't get any data */}
          <span className=" font-mono text-2xl">No data found!</span>
        </>
      )}
    </div>
  );
};

export default withWunderGraph(Home);
Let's break down what's going on here:
- Remember those type-safe hooks we talked about?
useQueryis one such WunderGraph-generated type-safe data fetching hook we'll be using.
Essentially, you call useQuery with an options object, specifying:
- an operation by name (the filename of the GraphQL operation you created in the previous step),
- Whether we want this to be a Live Query or not. WunderGraph's Live Queries are GraphQL Subscription alternatives that don't need WebSockets (they use HTTP-based polling on the Wundergraph server), and so can work on serverless apps.
- To change the polling interval for these Live Queries, you can modify the
liveQueryproperty inwundergaph.operations.ts.
queries: (config) => ({
//  ...
 liveQuery: {
 enable: true,
 pollingIntervalSeconds: 3,
 },
}),
-
In
data, we get back the output of said query - an array of todos. We don't have to define any types for this ourselves - WunderGraph already generated every possible type for us when it introspected our Prisma schema! -
To make it easier for you to see what's going on, we're splitting the screen in half. On the left, we render the JSON output of our live query in a
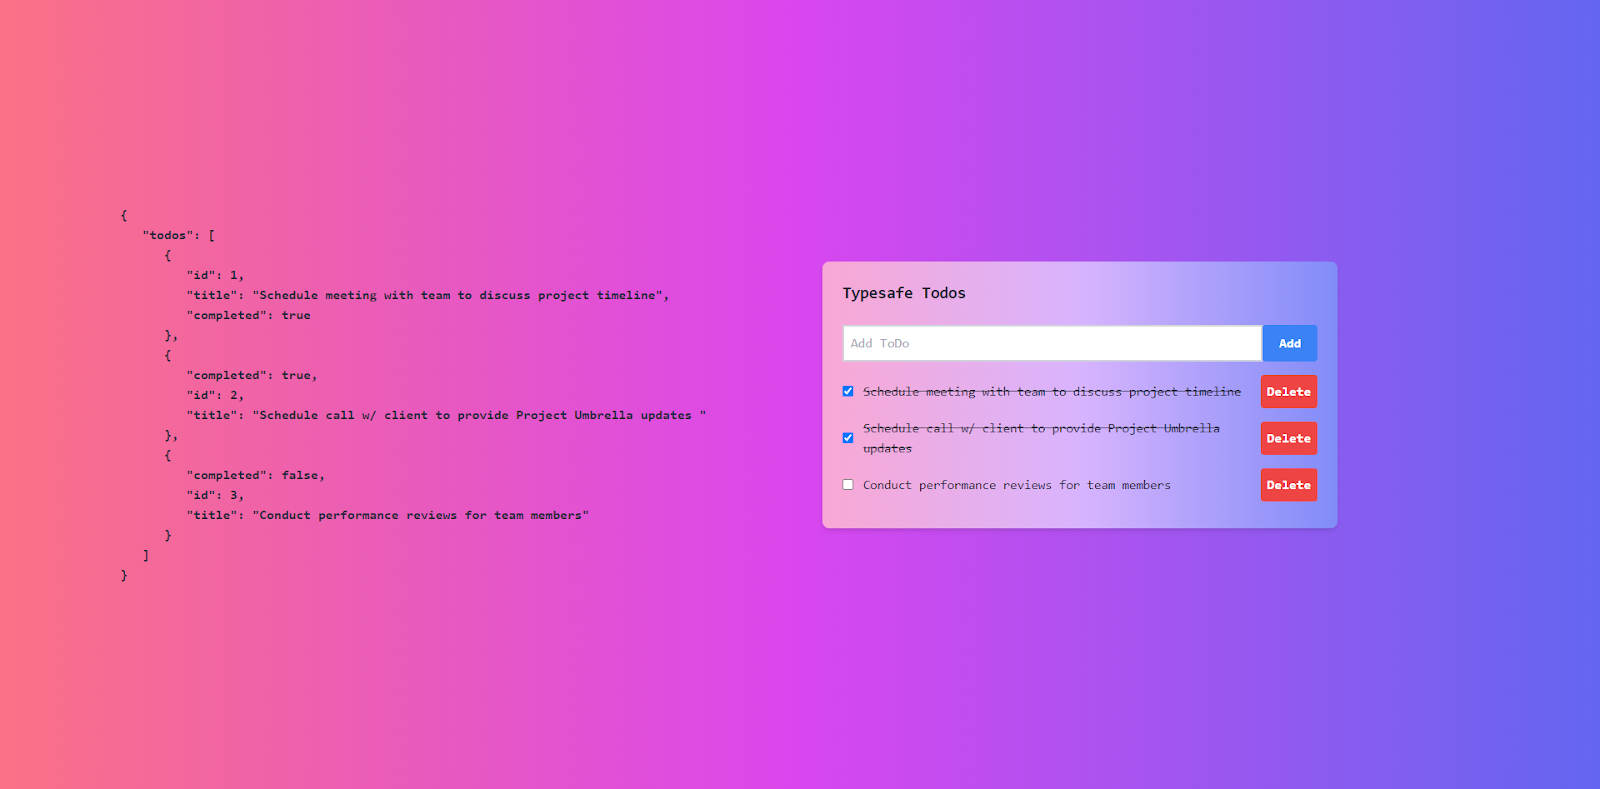
<pre>tag (feel free to get rid of this one if you want), and on the right, we render our actual<ToDo>component.
/components/ToDo.tsx
import React, { useState } from "react";
import { useMutation } from "../components/generated/nextjs";
import { AllTodosResponseData } from ".wundergraph/generated/models";

/** This just translates to...
type Todo = {
  id: number;
  title: string;
  completed: boolean;
};
*/
type Todo = AllTodosResponseData["todos"][number];

// Typing our (destructured) props again. You’ve seen this before.
const ToDo = ({ todos }: AllTodosResponseData) => {
  /* State variables */
  const [todosList, setTodosList] = useState(todos);
  // for client state management, keep a track of the highest ID seen so far
  const [highestId, setHighestId] = useState(
    todos?.reduce((maxId, todo) => Math.max(maxId, todo.id), 0)
  );
  const [task, setTask] = useState("Some task");

  /*  useSWRMutation Triggers */
  const { error: errorOnCreate, trigger: createTrigger } = useMutation({
    operationName: "CreateTodo",
  });

  const { error: errorOnDelete, trigger: deleteTrigger } = useMutation({
    operationName: "DeleteTodo",
  });

  const { error: errorOnUpdate, trigger: updateTrigger } = useMutation({
    operationName: "UpdateTodo",
  });

  /* Event handlers */
  const handleSubmit = (e: React.FormEvent<HTMLFormElement>) => {
    e.preventDefault();
    // update client state
    const newTodo: Todo = {
      id: highestId + 1,
      title: task as string,
      completed: false,
    };
    setTodosList([...todosList, newTodo]);
    // update server state
    createTrigger({
      task: task as string,
    });
    // stuff to do after
    setTask(""); // reset task
    setHighestId(highestId + 1); // set new highest id value
  };

  const handleDelete = (id: number) => {
    // update client state
    const updatedList = todosList.filter((todo) => todo.id !== id);
    setTodosList(updatedList);
    // update server state
    deleteTrigger({
      id: id,
    });
  };

  const handleCheck = (changedTodo: Todo) => {
    // update client state
    const updatedList = todosList.map((todo) => {
      if (todo.id === changedTodo.id) {
        return {
          ...todo,
          completed: !todo.completed,
        };
      }
      return todo;
    });
    setTodosList(updatedList);
    // update server state
    updateTrigger({
      id: changedTodo.id,
      complete: !changedTodo.completed,
    });
  };

  return (
    <div className="md:w-10/12 lg:w-8/12 lg:mr-64 bg-gradient-to-r from-pink-300 via-purple-300 to-indigo-400 text-slate-800 p-6 rounded-lg shadow-md">
      <h1 className="text-xl font-bold mb-6">Typesafe Todos</h1>
      <form onSubmit={handleSubmit} className="flex mb-4">
        <input
          className="border-2 border-gray-300 p-2 w-full"
          type="text"
          placeholder="Add ToDo"
          value={task}
          onChange={(e) => setTask(e.target.value)}
        />
        <button
          className="bg-blue-500 hover:bg-blue-700 text-white font-bold py-1 px-5 rounded"
          type="submit"
        >
          Add
        </button>
      </form>
      <ul className="list-none list-inside mt-4">
        {todosList?.map((todo) => (
          <li className="mb-2 flex justify-between items-center " key={todo.id}>
            <label className="inline-flex items-center">
              <input
                type="checkbox"
                className="cursor-pointer"
                checked={todo.completed}
                onChange={() => handleCheck(todo)}
              />
              <span
                className={`cursor-pointer hover:underline p-1 ml-2 ${
                  todo.completed ? "line-through" : ""
                }`}
              >
                {todo.title}
              </span>
            </label>
            <button
              className="ml-2 bg-red-500 hover:bg-red-700 text-white font-bold py-2 px-2 rounded"
              onClick={() => handleDelete(todo.id)}
            >
              Delete
            </button>
          </li>
        ))}
      </ul>
    </div>
  );
};

export default ToDo;
Here's what's happening here:
- Remember how I said you don't have to define your own types for the data you're working with, because WunderGraph generated it for you automatically? Well, you get to import and use one of those auto-generated types now!
import { AllTodosResponseData } from ".wundergraph/generated/models";
AllTodosResponseData is literally just this type/interface (hover or Ctrl + click to see its definition in models.ts):
export interface AllTodosResponseData {
  todos: {
    id: number;
    title: string;
    completed: boolean;
  }[];
}
So if you wanted the type of each todo in this array (because we'll need that too, later), all you'd have to do is:
type Todo = AllTodosResponseData["todos"][number];
or
type Todo = AllTodosResponseData["todos"][0]; // any number
- Hello again, type-safe hooks! WunderGraph's default implementation of the Next.js client uses a wrapper around Vercel's SWR for these. Specifically, useMutation in WunderGraph uses SWR's useSWRMutation hook.
This means we get access to deferred or remote mutations - which are not executed until explicitly called with each trigger function (for Create, Update, and Delete) via event handlers (and those should be self-explanatory).
- For event handlers in TypeScript, you can just inline them and let TS type inference figure it out.
<button
  onClick={(event) => {
    // /_ type inference will type 'event' automatically _/;
  }}
/>
If you can't (because of code readability, or if performance is a concern), you'll have to be explicit with the type for your custom event handlers.
const handleSubmit = (e: React.FormEvent<HTMLFormElement>) => {
  // handle submit logic here
};
If you don't, they'll default to the 'any' type, implicitly, which adds ambiguity - and thus a big no-no. There are ways of getting around this by turning off/changing some safeguards in tsconfig.json, but I'd recommend against it when you're just learning TypeScript.
Wondering which type to use, and where? That's simple! Just hover over the onChange/onSubmit/onClick etc. in your JSX, and the IDE will tell you.
- In keeping with best practices, we do not directly manage server state by making database transactions for each mutation, but have a separate client state that we optimistically update the UI with (and that's why we need to track the highest ID seen so far), and periodically sync it with server state.
To know more about server vs. client state and why you shouldn't be managing the former, I suggest checking out this excellent blog post by Dominik Dorfmeister. Reading this was a revelation.
We're done! Head on over to http://localhost:3000 in a browser, and you should be able to add, delete, and check Todos as complete, and see the resulting server data live on the left.
In Summary
It's 2023, and type safety is no longer a thing that only library maintainers have to worry about. It's time to stop being scared, and realize that it can actually make your life as a dev much, much easier.
And using TypeScript, WunderGraph, and Prisma together to build your apps could be the perfect "lightbulb moment" for this.
- TypeScript ensures that the codebase is correctly typed,
- Prisma ensures that the interactions with your data are also type-safe,
- WunderGraph plays the perfect matchmaker by ensuring that the API interfaces that facilitate this 2-way data communication are also type-safe, with reduced boilerplate/glue code, optimized network calls (perks of using GraphQL at build time), and improved development speed and efficiency.
This is an exceptionally powerful stack that will get you through most of your projects. End-to-end type safety, no additional dependencies, with fantastic devex to boot. You could literally change something on the Server/backend and immediately see the changes reflected in the Client. You won't spend more time coding in TypeScript. On the contrary, you'll spend much less, now that a supercharged IDE can help you.
Comments
Loading comments…