PDF annotations are exactly what they sound like — comments, callouts, watermarks/stamps, hyperlinks, or even freeform drawings embedded in a PDF.
What makes them really handy is that they don’t touch the core content of the PDF. Annotations are only added as a layer on top, allowing you to freely add, edit, or remove them without altering the original document.
And if you can annotate PDFs using just NodeJS? That opens up a world of possibilities. You could automate highlighting key trends in reports, tagging revisions in drafts, or dynamically linking references. It’s perfect for reviews, research, compliance, or any other bulk workflow you could imagine.
Easier said than done, though. You need precise element positioning, support for various annotation types, and more. In a server environment, this is even worse; now you’ll need to consider I/O, storage, and concurrency, too.
So, how do we make this easier? Let’s find out.
Prerequisites
Ensure you have Node.js 18+ installed, then init a new Node.js project.
You’ll need to install these:
- Apryse — formerly known as PDFTron. This gives us a comprehensive server-side API that makes it easy to add, modify, style, and accurately place all common types of annotations. It abstracts much of the complexity, letting us focus on functionality instead of tinkering with low-level PDF.
dotenvfor managing environment variables
Use your package manager of choice.
npm install @pdftron/pdfnet-node dotenv
Finally, for your free trial API key, visit dev.apryse.com.
Put it in a .env file in your project folder. Here’s what mine looks like.
APRYSE_API_KEY = apryse_trial_api_key_here
Apryse requires a commercial license for production use, but for this tutorial, we’ll only need the free, unlimited use trial key, with the only catch being a watermark added to output PDFs.
I’ll be using this sample PDF. We’re going to automate the annotation of this four-page financial report with three types of annotations: stamps, hyperlinks, and text comments.
We’ll go step by step, introducing one type of annotation at a time, so you can see how each piece works without being overwhelmed.
Get the full code, together with the sample PDF used, here.
Step 1: Adding an Approval Stamp
Stamps are just like rubber stamps; they’re commonly used in official documents to indicate approval, review, or rejection.
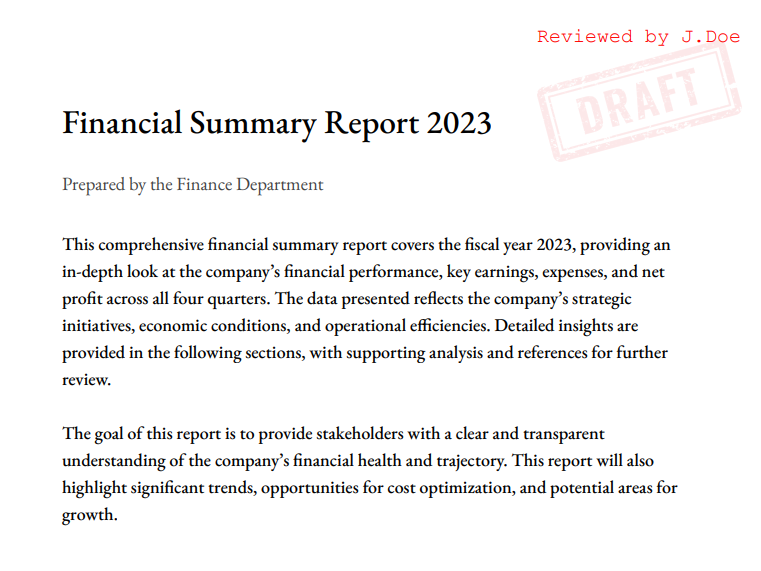
Let’s start by adding a “Reviewed by J.Doe” text stamp and a draft watermark to our financial report.
require('dotenv').config()
const { PDFNet } = require('@pdftron/pdfnet-node');

// Part 1: Adding Stamp Annotations
async function addStampAnnotation(doc) {
    const stamper = await PDFNet.Stamper.create(
        PDFNet.Stamper.SizeType.e_relative_scale,
        0.25, // Width as a percentage of the page width
        0.25  // Height as a percentage of the page height
    );

    // Align the stamp to the top-right corner with a slight offset
    await stamper.setAlignment(
        PDFNet.Stamper.HorizontalAlignment.e_horizontal_right,
        PDFNet.Stamper.VerticalAlignment.e_vertical_top
    );
    await stamper.setPosition(0.05, 0.05, true);

    // Add a text stamp
    const textFont = await PDFNet.Font.create(doc, PDFNet.Font.StandardType1Font.e_courier);
    await stamper.setFont(textFont);
    await stamper.setFontColor(await PDFNet.ColorPt.init(1, 0, 0)); // Red
    await stamper.setTextAlignment(PDFNet.Stamper.TextAlignment.e_align_right);
    await stamper.setAsBackground(false); // Ensure it's above other content

    const pages = await PDFNet.PageSet.createRange(1, 4); // Apply to pages 1-4
    await stamper.stampText(doc, "Reviewed by J.Doe", pages);

    // Add an image stamp
    const image = await PDFNet.Image.createFromFile(doc, './draft-stamp.png');
    await stamper.setOpacity(0.1); // 10% opacity
    await stamper.stampImage(doc, image, pages); // Same page range
}
(Draft Stamp PNGs by Vecteezy)
If you’re wondering about the doc that this receives as an argument, it’s from our main function, which created a PDFDoc instance from a file and sent it over.
const doc = await PDFNet.PDFDoc.createFromFilePath(‘./finance-report.pdf’);
But we’ll cover this later. For now, here’s what’s happening:
- The
Stamperclass allows us to stamp text or images. - We position the stamp at the top-right corner with a slight offset (5%, to be exact).
- The text stamp is styled in red, while the image stamp is semi-transparent (only 10% opacity) for a watermark effect.
Adjust the alignment, position, and styling to suit your needs.
Instead of using static text or images, you could dynamically generate stamp content based on metadata or external inputs**.** Like:
- Using current date and time via
Intl.DateTimeFormator a library likedate-fnsormomentto create real-time “Approved on [Date]” stamps. - Pulling reviewer names from a database.
Feel free to play around with the stamp size to suit your needs.
Step 2: Adding Link Annotations
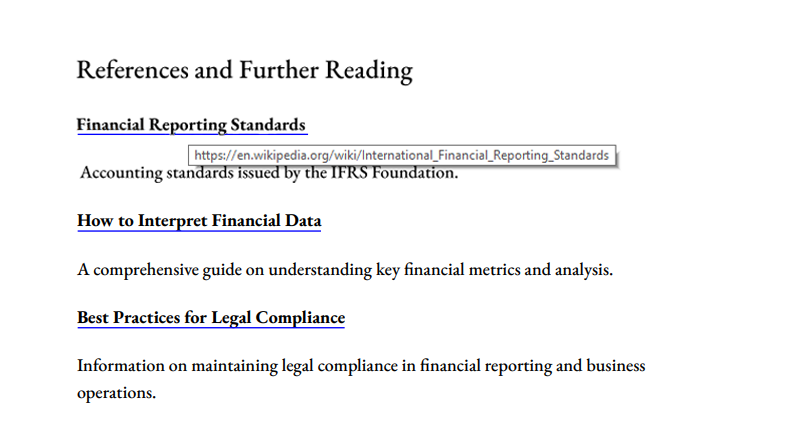
Next, we’ll add hyperlinks to specific sections of the document. Specifically, linking phrases like “Financial Reporting Standards” to their official website for immediate context.
To do this, we’ll extract text line by line, check for specific phrases, get their coordinates, and overlay clickable link annotations using said coordinates.
// Imports already here if you’re following this article sequentially
require('dotenv').config()
const { PDFNet } = require('@pdftron/pdfnet-node');

// Part 2: Adding Link Annotations
async function addLinkAnnotations(doc) {
    // Get the total number of pages in the document
    const pageCount = await doc.getPageCount();

    for (let pageNum = 1; pageNum <= pageCount; pageNum++) {
        // Get current page
        const page = await doc.getPage(pageNum);

        // Extract text from page
        const textExtractor = await PDFNet.TextExtractor.create();
        await textExtractor.begin(page); // Begin extraction

        // Start with the first line on page
        let line = await textExtractor.getFirstLine();

        // Loop through all lines
        while (await line.isValid()) {
            let lineText = '';
            const numWords = await line.getNumWords();

            // Extract and concatenate the text of all words in line
            for (let i = 0; i < numWords; i++) {
                const word = await line.getWord(i);
                lineText += (i > 0 ? ' ' : '') + (await word.getString());
            }

            // Get the bounding box/coords of line
            const bbox = await line.getBBox();

            // Check for specific keywords; add hyperlinks if found
            if (lineText.includes("Financial Reporting Standards")) {
                await addHyperlinkToLine(doc, page, bbox, 'https://en.wikipedia.org/wiki/International_Financial_Reporting_Standards');
            } else if (lineText.includes("How to Interpret Financial Data")) {
                await addHyperlinkToLine(doc, page, bbox, 'https://example.com/financial-data');
            } else if (lineText.includes("Best Practices for Legal Compliance")) {
                await addHyperlinkToLine(doc, page, bbox, 'https://example.com/legal-compliance');
            }

            // Move to next line
            line = await line.getNextLine();
        }
    }
}
Here’s what’s happening here:
- Lines are extracted, one by one, and checked for specific phrases. We use
getFirstLine()andgetNextLine()to iterate through lines on each page. Each line’s text is reconstructed by iterating through its words and combining their strings (i.elineText). - Its coordinates are obtained using**
getBBox()on the line object, this gives us the bounding box of the line of text. - The matching logic isn’t part of the Apryse library — you can get creative with this, using plaintext, regex, or even bringing your own machine learning models for advanced pattern recognition and context-aware matches.
- If a line contains any of the target phrases, the
addHyperlinkToLinefunction is called. This overlays aLinkAnnotobject on the bounding box of the matched line.
This relies on a helper function (addHyperlinkToLine) to add the actual link, so let’s just go ahead and add that:
// previous code
async function addHyperlinkToLine(doc, page, bbox, url) {
    // Create a “URI” action that links to the specified URL
    const gotoURI = await PDFNet.Action.createURI(doc, url);

    // Define clickable area for link annotation, based on the bounding box (bbox) of target text
    const linkRect = new PDFNet.Rect(bbox.x1, bbox.y1, bbox.x2, bbox.y2);

    // Then create a hyperlink annotation in the defined area
    const hyperlink = await PDFNet.LinkAnnot.create(doc, linkRect);

    // Hyperlink styling; add underline, set color to blue
    const borderStyle = await PDFNet.AnnotBorderStyle.create(PDFNet.AnnotBorderStyle.Style.e_underline, 1, 0, 0);
    await hyperlink.setBorderStyle(borderStyle);
    await hyperlink.setColor(await PDFNet.ColorPt.init(0, 0, 1)); // Blue color

    // Attach the URI action to the hyperlink annotation so clicking it opens the URL
    await hyperlink.setAction(gotoURI);

    // Generate visuals of hyperlink
    await hyperlink.refreshAppearance();

    // Add this hyperlink annotation to the page
    await page.annotPushBack(hyperlink);
}
TextExtractor for text parsing, and the ability to get bounding boxes/coordinates (BBox) for any matching eliminates the guesswork in placing annotations. This is incredibly useful for consistent output, especially in automated workflows
Of course, you could add links only to individual words, if that’s what you need.
Also, link annotations aren’t just for referencing external URLs — you can also use them for navigation within a PDF:
// Get a target page for the link
const page = await doc.getPage(3);

// Create a "GoTo" action to navigate to said page
const gotoPage = await PDFNet.Action.createGoto(await PDFNet.Destination.createFitH(page, 0)); // Ensures the target page is displayed horizontally aligned (FitH) at the top of the page

// Define clickable area for the link annotation, as usual
const link = await PDFNet.LinkAnnot.create(doc, (new PDFNet.Rect(x1, y1, x2, y2))); // Obtain these coordinates using your method of choice

// Attach the "GoTo" action to the link annotation.
await link.setAction(gotoPage);
// Add this intra-document link
await page.annotPushBack(hyperlink);
Step 3: Adding Sticky Notes
Finally, let’s move on to adding contextual notes — a practical way to provide feedback or highlight areas for review directly on a PDF. These notes are implemented as sticky note annotations, which can be placed anywhere on the document.
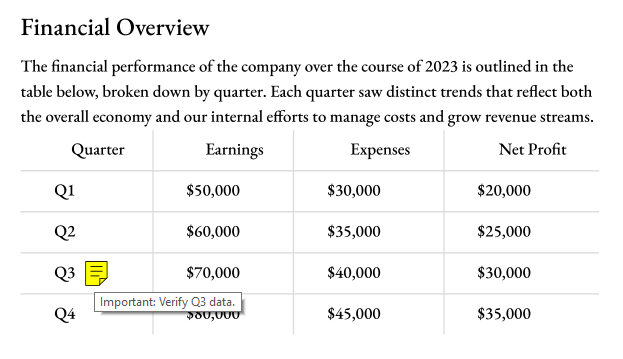
In this example, we’ll search for the first occurrence of the word “Q3” in a financial report and attach a yellow sticky note to it, prompting a reviewer to verify the data.
// Imports already here if you're following this article sequentially
require('dotenv').config()
const { PDFNet } = require('@pdftron/pdfnet-node');

// Part 3 : Adding Sticky Notes
async function addStickyNote(doc) {
    const pageCount = await doc.getPageCount();

    for (let pageNum = 1; pageNum <= pageCount; pageNum++) {
        const page = await doc.getPage(pageNum); // Get current page
        // Create a text extractor to extract text from the page
        const textExtractor = await PDFNet.TextExtractor.create();
        await textExtractor.begin(page);

        // Start with first line and loop through them all
        let line = await textExtractor.getFirstLine();
        while (await line.isValid()) {
            const numWords = await line.getNumWords();

            // For each line, loop through each word in it
            for (let wordIndex = 0; wordIndex < numWords; wordIndex++) {
                const word = await line.getWord(wordIndex);
                const wordText = await word.getString();

                // Does this word match "Q3"?
                // (Bring your own matching logic here)
                if (wordText === "Q3") {
                    // If so, get bounding box/coords for word
                    const bbox = await word.getBBox();

                     // Create a text annotation at that position
                    const annotation = await PDFNet.TextAnnot.create(doc, new PDFNet.Rect(bbox.x1 + 25, bbox.y1, bbox.x2 + 25, bbox.y2)); // ...With slight offset to prevent overlap.
                    // Set content of the sticky note annotation
                    await annotation.setContents('Important: Verify Q3 data.');
                    // Styling
                    await annotation.setColor(await PDFNet.ColorPt.init(1, 1, 0)); // Yellow
                     // Generate visuals of annotation
                    await annotation.refreshAppearance();
                     // Add annotation to page
                    await page.annotPushBack(annotation);

                    return; // Early exit once the first occurrence is annotated
                }
            }
            line = await line.getNextLine(); // Move on to the next line
        }
    }
}
Here’s what’s happening here:
- The function iterates through all pages and lines of the PDF, using a nested loop to scan each word of a given line for the string “Q3”.
- Once found, it fetches the coordinates of the word to determine where to place the annotation (using
getBBox(), again) - As with the previous annotation, bring your own matching strategy.
- A sticky note (
TextAnnot) is created and positioned slightly offset (+25) from the word “Q3”. - As soon as the first occurrence of “Q3” is found and annotated, the function exits early.
I’m only adding one note, but you can expand the logic to annotate multiple occurrences by removing the early return.
Step 4: Bringing it all together
Once you’ve defined these three functions, they can be combined in your main function like so:
// previous code here
const main = async () => {
    const doc = await PDFNet.PDFDoc.createFromFilePath('./finance-report.pdf');
    await addStampAnnotation(doc); // Add review/approval stamps
    await addLinkAnnotations(doc); // Add link to references
    await addStickyNote(doc);      // Add sticky note to 'Q3'
    await doc.save('./finance-report-annotated.pdf', PDFNet.SDFDoc.SaveOptions.e_linearized);
    console.log('Saved.');
};

PDFNet.runWithCleanup(main, process.env.APRYSE_API_KEY)
    .catch(error => console.error("Apryse library failed to initialize:", error))
    .then(function () {
        PDFNet.shutdown();
    });
Here’s what’s happening here:
- The
createFromFilePathfunction reads a PDF file from the filesystem (./finance-report.pdf), and loads it into memory as a PDFDoc object, which provides easy-to-use APIs to access, modify, and annotate our loaded PDF. - But you don’t have to use a file on disk. There’s also
createFromBuffercreateFromFilterFilter, which can be a stream of data — a random-access file, memory buffer, or a slow-loading resource i.e. an HTTP connection). - The save operation here uses the
e_linearizedoption, which optimizes the PDF for fast web viewing. Linearized PDFs allow the first page to load quickly while the rest streams in the background. PDFNet.runWithCleanupruns our code inside a safe execution context provided by the Apryse library. It takes the function you need to run (just main, here) and your Apryse API key, and usesPDFNet.shutdown()to clean up memory/temp files used.
And that’s all, folks!
Final Thoughts
The ability to annotate PDFs server side is a huge win — it’s a scalable, secure, streamlined way to automate workflows, whether that be adding approval stamps in a contract management system, embedding feedback notes in educational materials, or linking references in financial reports.
With Apryse, you do this with high performance, and minimal complexity.
Apryse provides SDKs for not just the server, but clients, mobiles, desktops, and more — making PDF annotation a cakewalk with its flexible and well-documented API. It especially handles server-side challenges well via flexible read/write options from either local storage or streams, thread-safe processing, and more.
For more details, find the Apryse documentation here.


