The diagram below shows you what exactly I will create in this tutorial. I will create a cluster in one region spreading instances across three availability zones. All instances will be isolated inside a private subnet and will be accessible from the internet only by the load balancer or SSH.
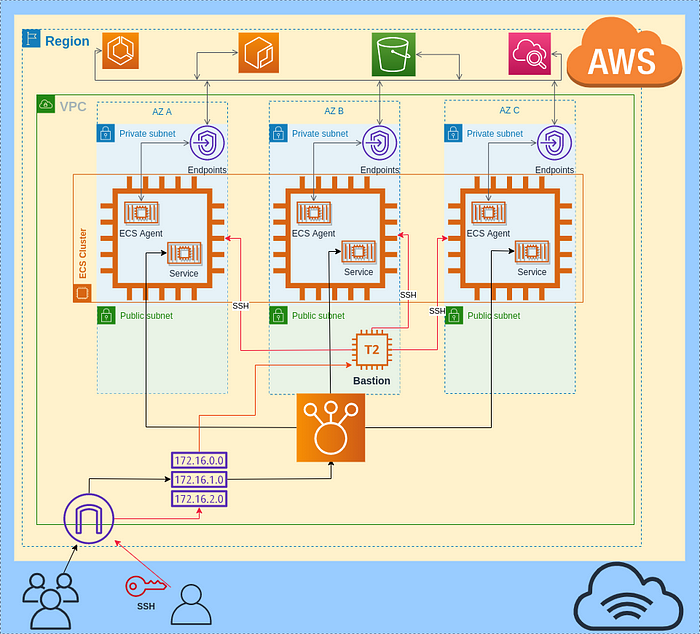
Cluster diagram
1. Create VPC
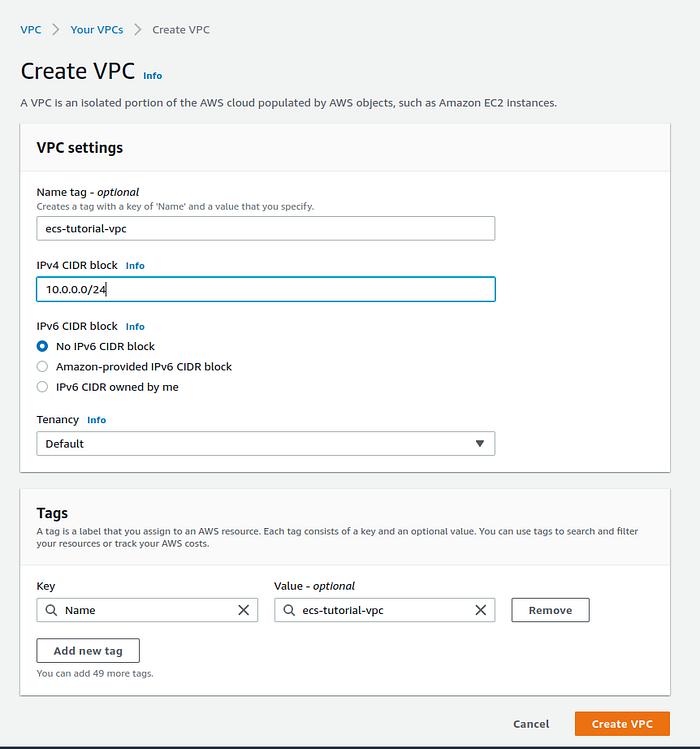
The first step is to create a VPC. AWS VPC is a logically isolated virtual network. Go to AWS Console -> VPC -> Your VPCs then press the button Create VPC. Give the name for your VPC, and then choose the IPv4 CIDR block, after press the button create VPC.
VPC creation page
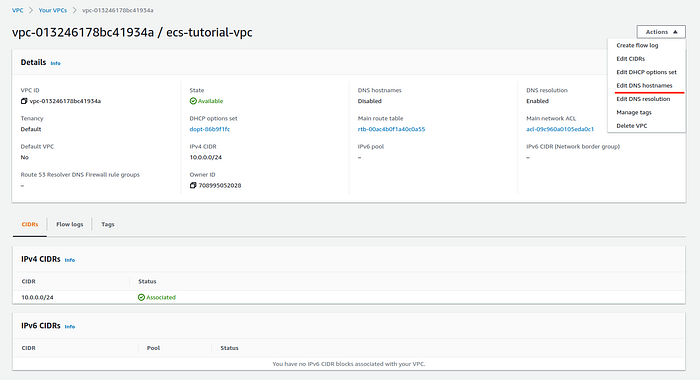
When VPC creation is done, we have to enable DNS Hostnames. Without this option, the EC2 instances in our cluster won't be able to register themselves in ECS. In the VPCs list click on created VPC it will open the description page of a VPC and then press Actions -> Edit DNS hostnames.
VPC description page
Then check Enable flag and press Save changes.

Edit DNS hostname page
2. Create an Internet Gateway
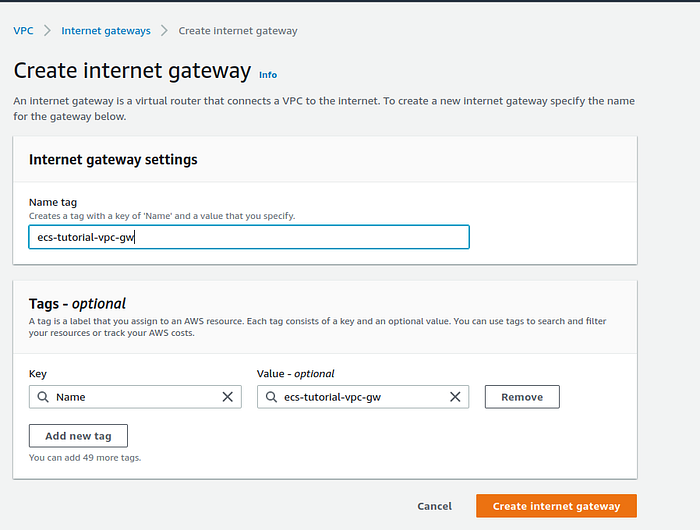
To make our VPC accessible from the Internet, our VPC needs an Internet Gateway. Go to AWS Console VPC -> Your GW press Create Internet Gateway, fill up the name then save it.
Internet Gateway creation page
After that attach your Internet Gateway to your VPC. Go to Actions, select Attach to VPC.

Internet Gateway description page
From the dropdown list select your VPC and press Attach internet gateway.

Internet Gateway attachment page
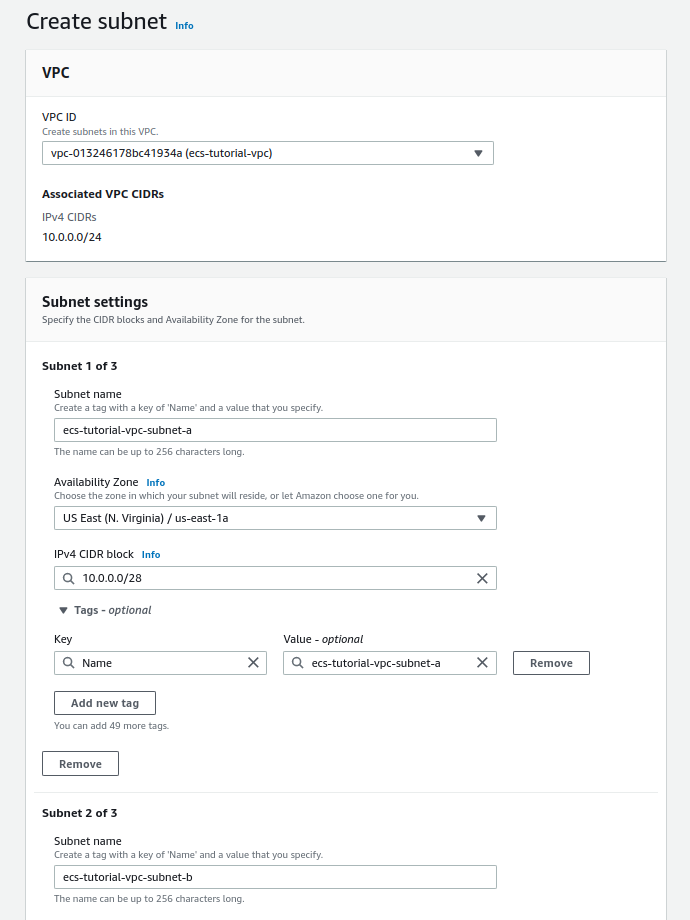
3. Create subnets in VPC
In this step, we will create a total of six subnets, one private and one public in each AZ. Go to VPC -> Subnets, select your VPC which will contain subnets, fill up the name, select AZ, choose IP4 CIDR block. To better understand about subnets CIDR range please check here.
Subnet creation page
In the same way, create the rest of the subnets. For convenience, my public subnets have the word “public” in their names. My subnets list looks like this.
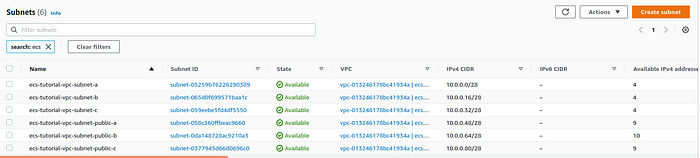
List of subnets
Now we have to make the public subnet accessible from the internet. For this, we will create a route table. Go to VPC -> Rout tables -> Create rout table, fill in the name of a table,choose your VPC and press Create rout table.
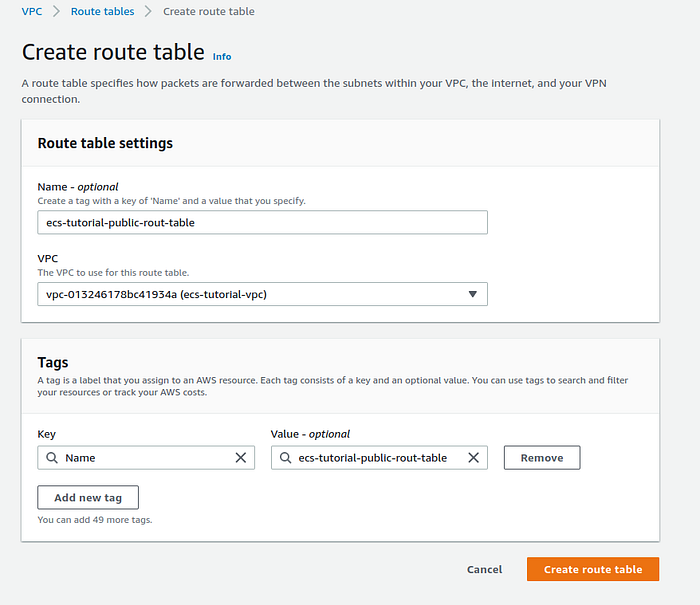
Route table creation page
After route table creation we have to add in route table the new route to Internet Gateway. In the route table description page press Edit routes.
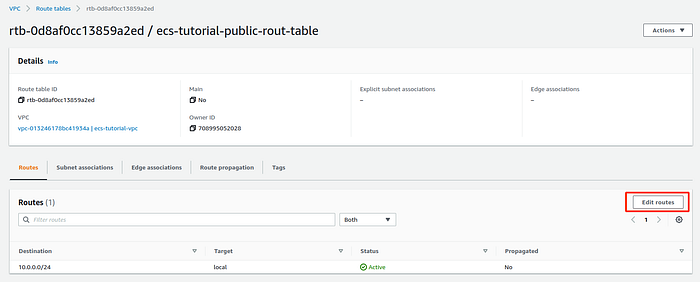
Route table description page
I've used the default route (0.0.0.0/0) for the destination, but you can put a more specific one depending on your case. For the target, select from the list the Internet Gateway created in step 2 of this tutorial and press Save changes.
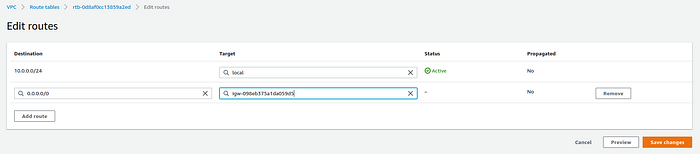
Edit routes in route table page
Now we will associate public subnets with a route table, that has a route to the Internet Gateway. On a subnet description page go to Route table -> Edit route table association.
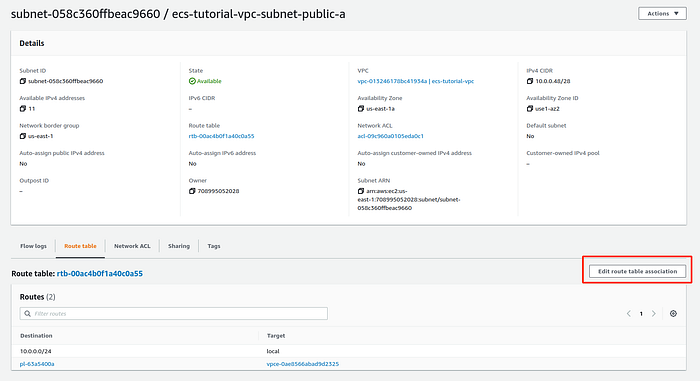
Subnet description page
From a list select a route table and press Save.
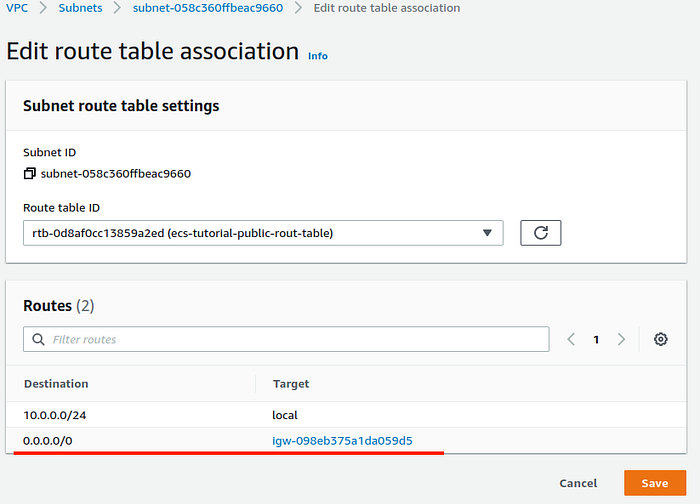
Edit route table association page.
Do this for the rest of the two public subnets.
For each public subnet add auto-assign public IP. Select a subnet, then go to Action -> Modify auto-assign IP settings, check to Enable auto-assign public IPv4 address, and Save.
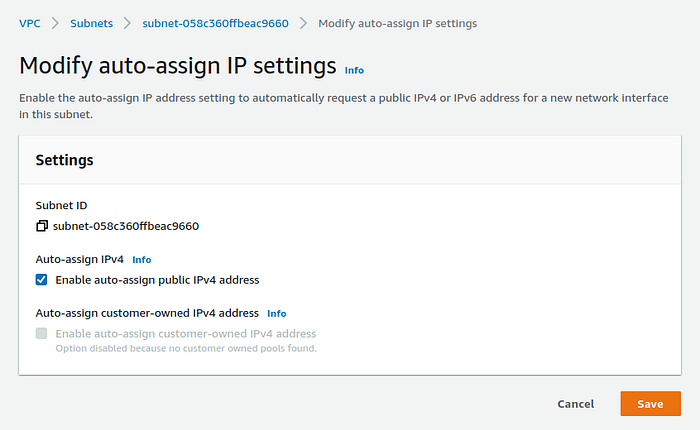
Modify auto-assign IP settings
6. Create Security groups
I this step we will create a total of 3 security groups. In AWS Console go to EC2 -> Network & Security -> Security Groups -> Create Security Group. First, we will create a Security Group for a Load Balancer. The load balancer will be created later in this tutorial. Choose the name for Security Group, fill up the description, select VPC created in step 1 of this tutorial.
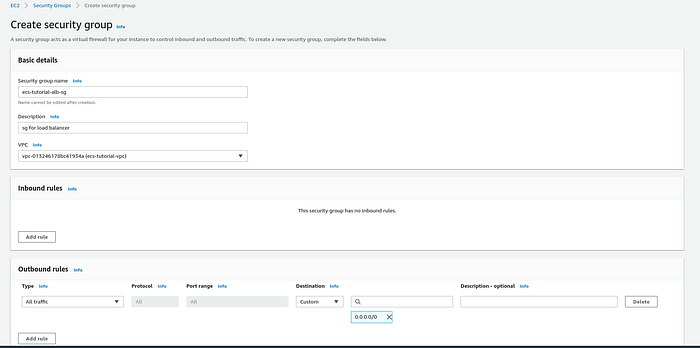
Security group creation page
Then click on Add rule and add a new Inbound rule that will allow all inbound traffic to the load balancer and then press the Save rules button. In this example, I allow all traffic but you can limit it to a specific IP.
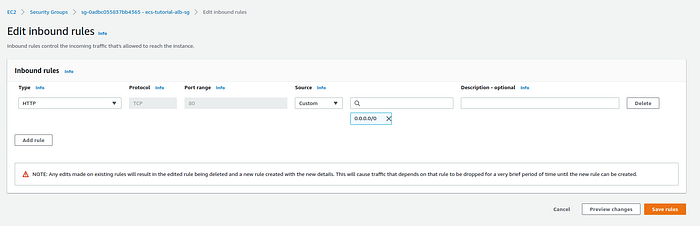
Edit inbound rules page
In the same way, create one security group for EC2 instances that will make a part of the ECS cluster.
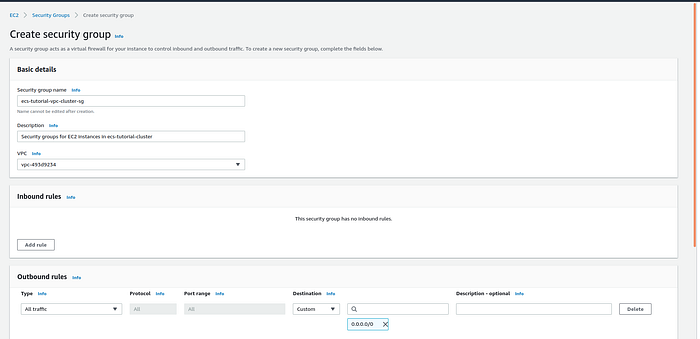
Security group creation page
After creation modify this Security group inbound rule to allow all traffic coming from the load balancer security group.
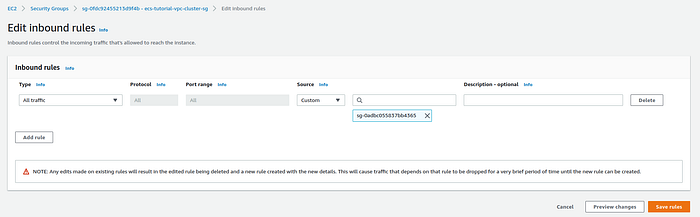
Edit inbound rules page
Then create one more security group for VPC endpoints. We will create them in the next step.
Security group creation page
After the creation update, this security group, allowing the inbound connections on port 443 from the EC2 instances security group, was created earlier.
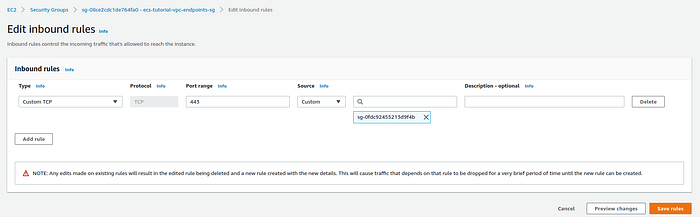
Edit inbound rules page
7. Create Endpoint VPC
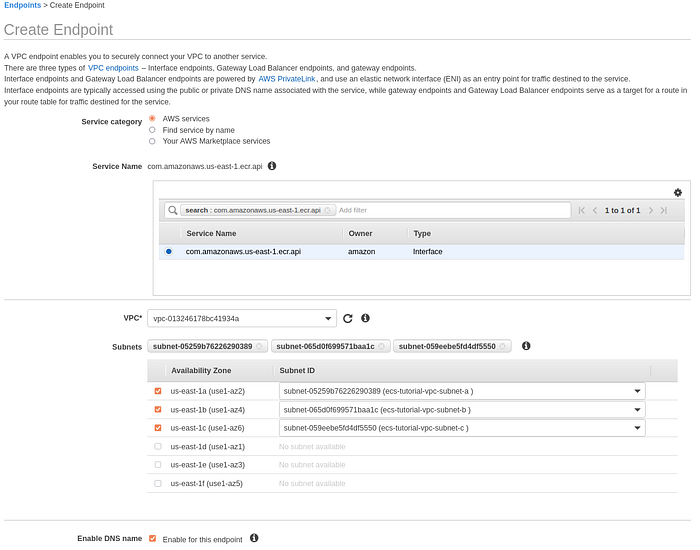
Because EC2 container instances are located inside the private subnets, they do not have any connectivity to the outside world. Each EC2 instance has an ECS container running called the ECS container agent. The container agent allows container instances to connect to your cluster, pull the image from Amazon ECR, get image definition files from S3, send logs to CloudWatch. We will now create a total of 7 VPC endpoints that will provide connectivity between EC2 container instances inside private subnets and the AWS services. The ECS cluster located in private subnets is required to have all 7 endpoints. More information about VPC endpoints and ECS you can find here. If you use a Free tier AWS account VPC endpoints my cost you some money, about $5 in my case. It depends on how long you will use it. As an alternative, you can use NAT Gateway.
Go to VPC ->Endpoints->Create endpoint, select Service category as AWS services, search for AWS service in your region, then select VPC and private subnetworks, mark Enable DNS name.
Create VPC endpoint page part-1
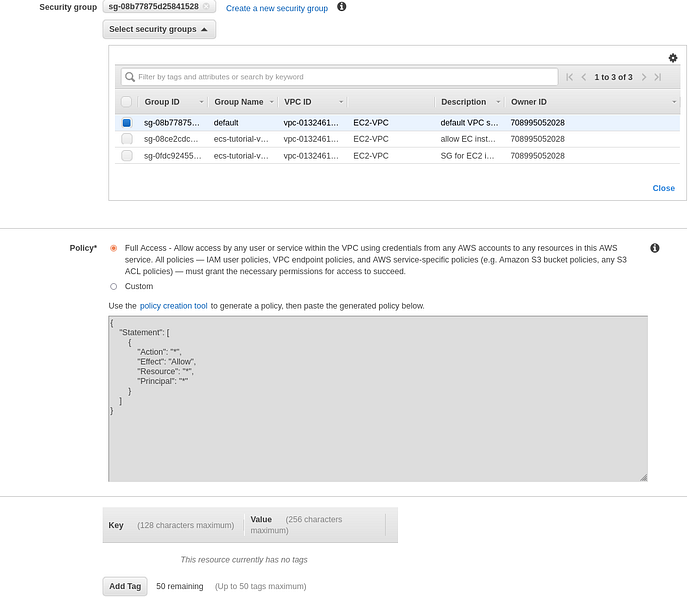
Select security group for VPC Endpoints created in a previous step of this tutorial, after press Create endpoint.
Create VPC endpoint page part-2
Then create 5 more endpoints in the same way changing only the name of the service. In addition to the first endpoint you have to create a VPC endpoint for each of the services listed below:
com.amazonaws.us-east-1.ecr.dkr, com.amazonaws.us-east-1.ecs, com.amazonaws.us-east-1.ecs, com.amazonaws.us-east-1.ecs-agent, com.amazonaws.us-east-1.ecs-agent, com.amazonaws.us-east-1.ecs-agent.
The last one is of type Gateway, not an Interface. So when you will select it, you have to select a Gateway.

Create VPC endpoint page part-1
Eventually, your list of endpoints should look like the list below.
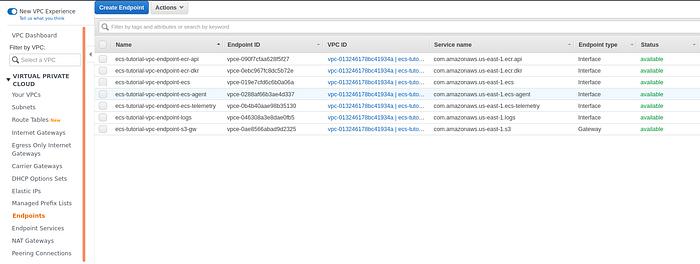
VPC endpoint list page
8. Create a Load balancer
The first step is to create a target group. Go to EC2 -> Target groups -> Create target group. Select target type as Instances, fill up the name, and select VPC. The rest of the configuration leave as is, press Next -> Create target group.
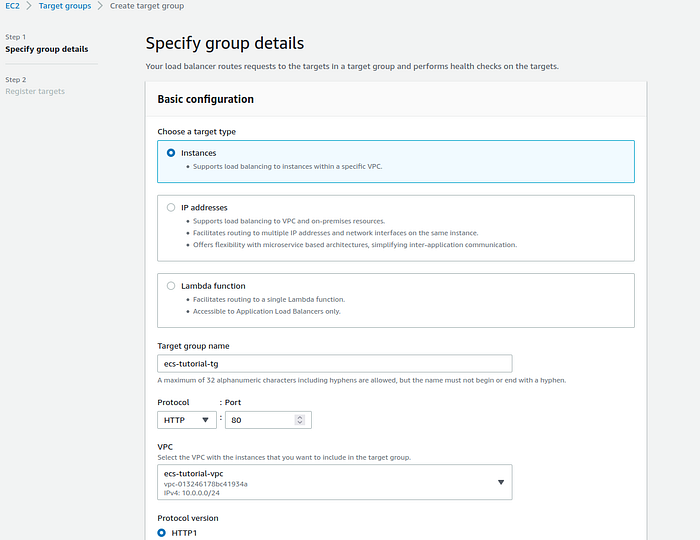
Create a target group page
Now that the target group is created create the load balancer. Go to EC2 -> Load Balancing -> Load Balancers -> Create Load Balancer. Select Application Load Balancer and press Create. Give it a name, and select public subnets created in step 3 of this tutorial, and press Next.

Configure load balancer
Then select the Security group created for Load Balancer in step 6 of this tutorial and press Next.
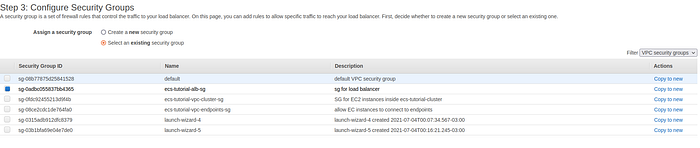
Configure security group for load balancer page
On the Configure Routing step select the target group previously created and press Next.
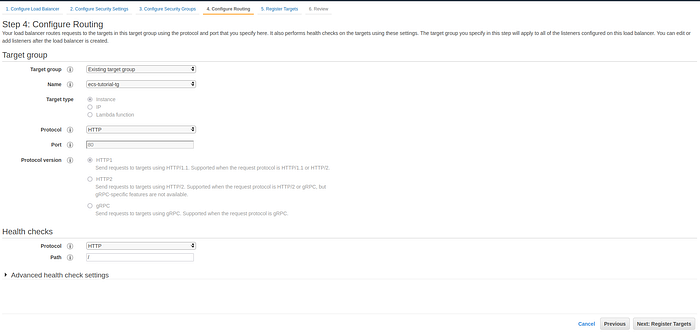
Configure Routing for the load balancer page
On the Register Targets step we won’t register any targets as we will register instances on cluster creation so simply press Next -> Create.
9. Create SSH key (optional)
This step is optional. In case you need to SSH into EC2 instances in an ECS Cluster you will need to create an SSH key. Go to EC2 ->Network & Security -> Key pairs -> Create key pair. Give a name for the key, select the key type, press Create key pair, anddownload the key.
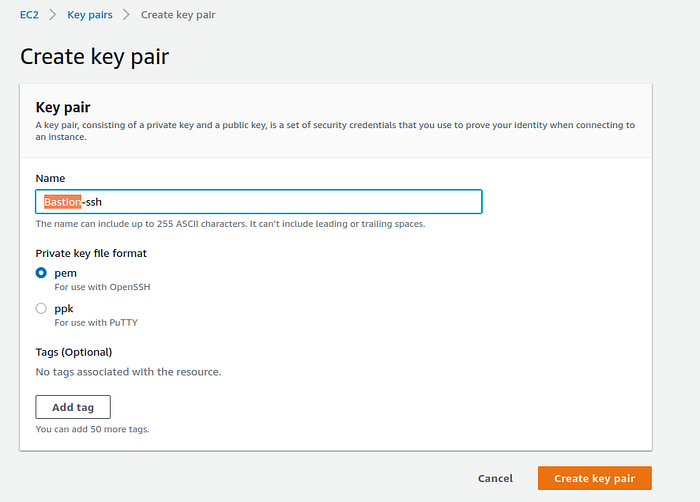
Create SSH key page
10. Create an ECS cluster
Go to ECS -> Create cluster select EC2 Linux + Networking and press Next step.
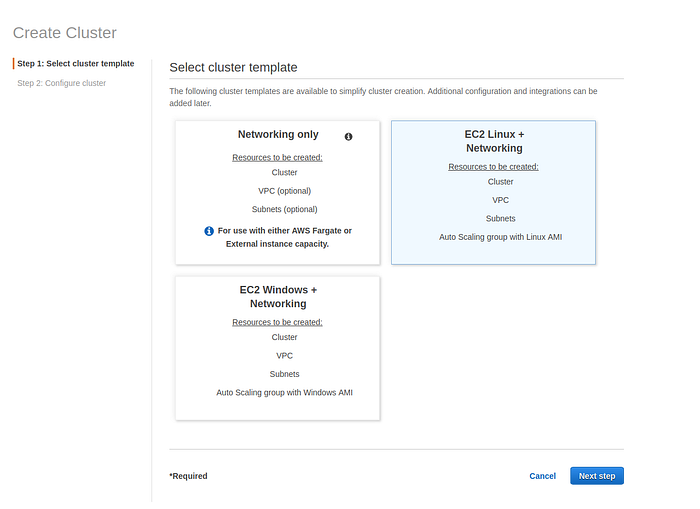
The select cluster template page
Give a name for the cluster, select Provisioning model and instance type. For this example, I will use 3 On-Demand t2.micro EC2 instances. Select SSH key pair if you want to have access to instances in the cluster.
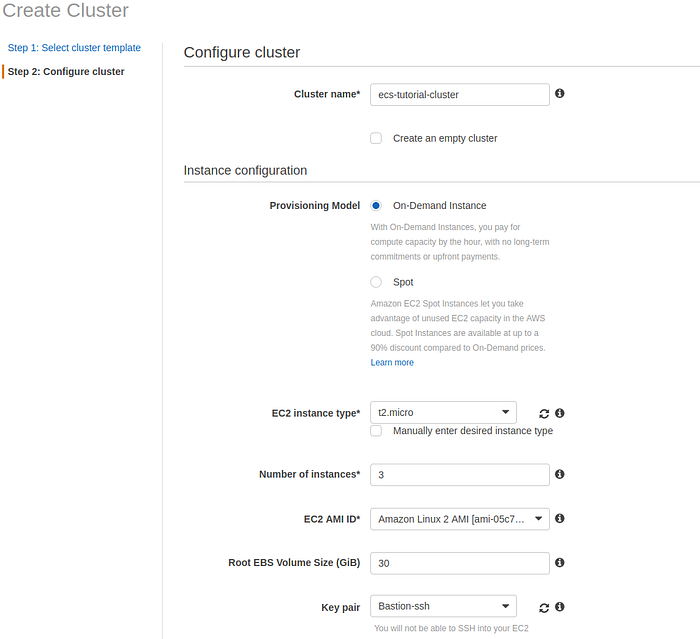
Configure cluster page
In the networking section select VPC and 3 private subnets, then select security group created for the cluster then press Create.
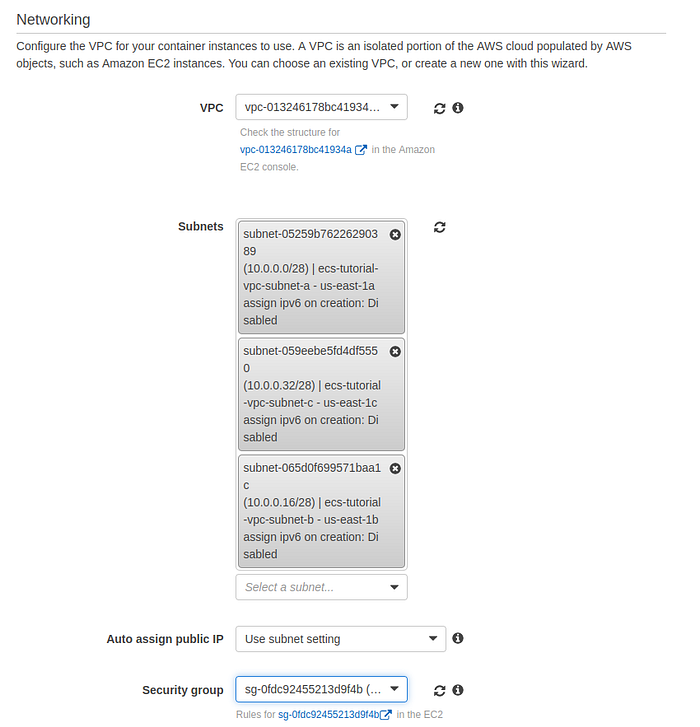
Networking section of creating cluster page
AWS ECS will spread EC2 instances in your cluster over 3 AZ. You can check a list of instances on the EC2 instances page.

EC2 instances list page
11. Create task definition
Now we need to create a task definition. Go to ECS -> Clusters -> Task Definition -> Create new Task Definition, select EC2 type and press Next step.
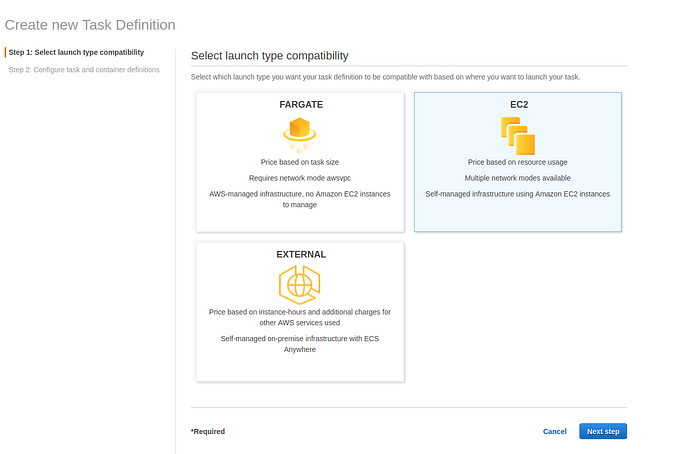
Select launch type compatibility page
Give it a name and select defaults for Task Role and Task execution role.

Configure task and container definitions page
Define a Task memory and Task CPU. Thesetwo configurations depending on the requirements of the application running inside the container. Then press Add container.
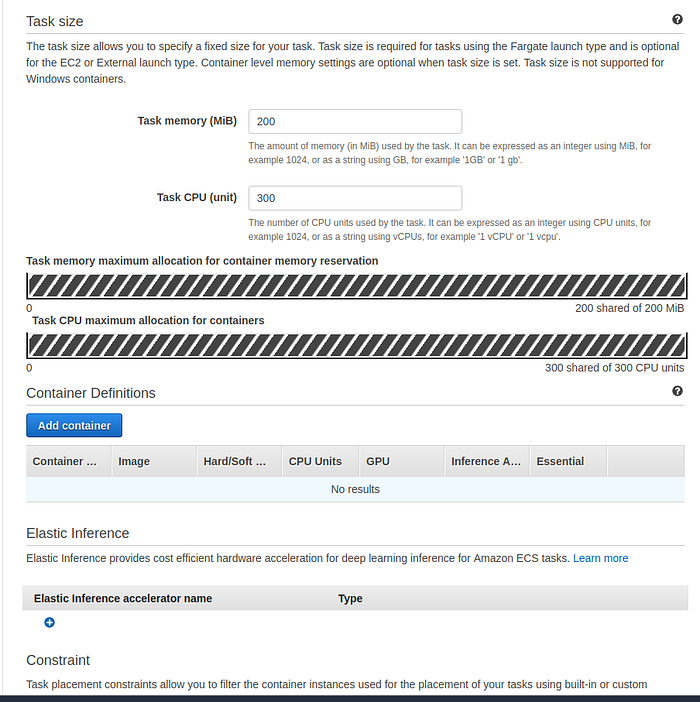
Task size and container definitions sections
The new window will open. Give the name for the container, for the image past URI of your image. The image used for this tutorial is located in AWS ECR. How to upload an image to ECR you can check in my tutorial here. This image has a Node.js app that listens on port 8080 and displays its host/container name. The source code you can check here.
Set the memory limit. In Port, mappings fill only the Container port and omit the Host port (or set it to 0) and your container automatically receives a port in the ephemeral port range for your container instance. The rest of the configurations live as default.

Edit container page
12. Create service
On the cluster level on the Service tab press Create. Select Launch type as EC2, select previously created task definition, fill-up service name, select service type as Replica, number of tasks put at least 3, so all of EC2 in a cluster will have at least one container.
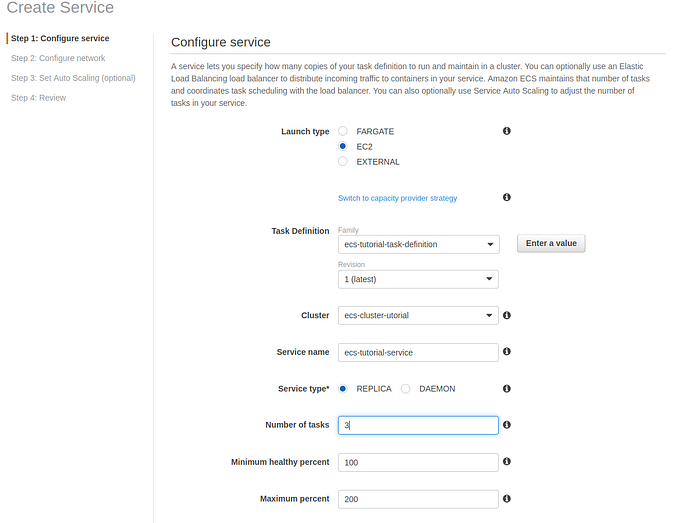
Configure service section of Create service page
Then select Deployment type as Rolling update. More about deployments you can find in my tutorials on Rolling Update and Blue/green.
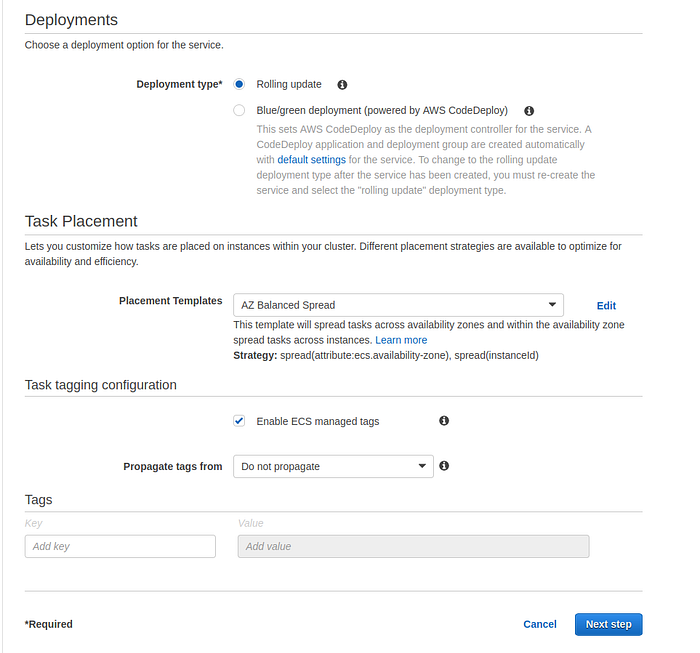
Deployments and Task placement section of Create service page
Select Load balancer type as the Application load balancer.
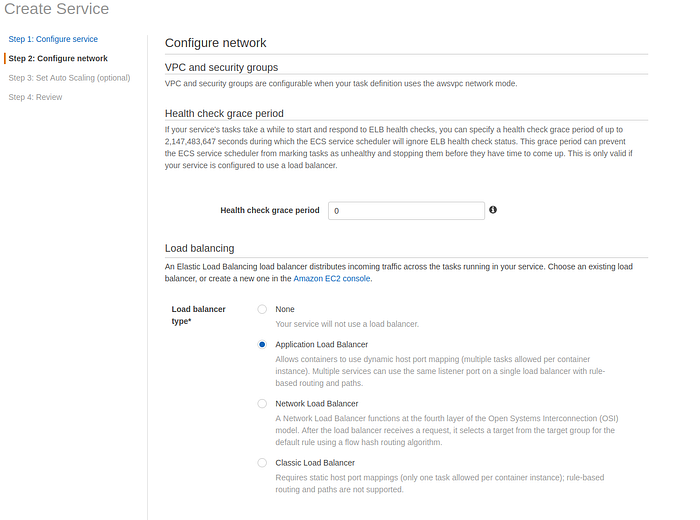
VPC and security group of configure network page
On the Set Auto Scaling step leave default configuration and press Next.
Then select default service role and load balancer and target group, previously created in step 8 of this tutorial, and press Create.
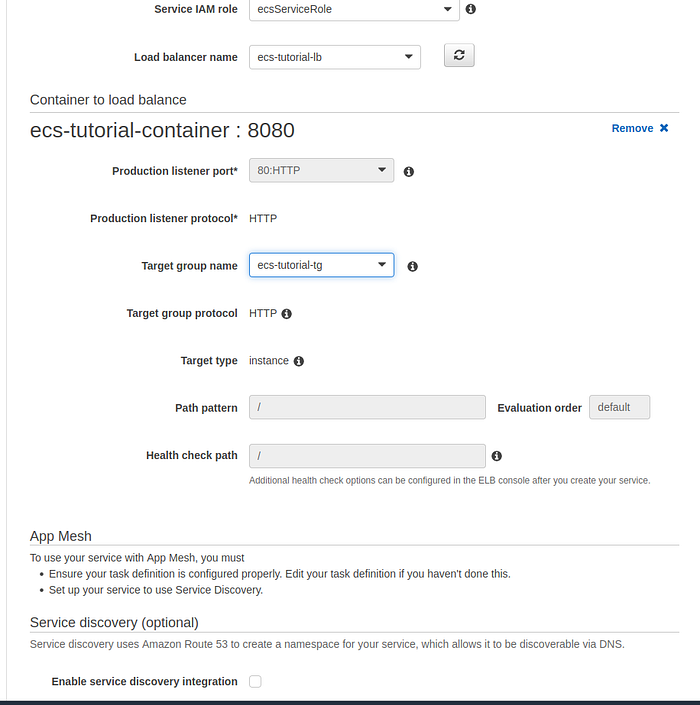
Container to load balance section of configure network page
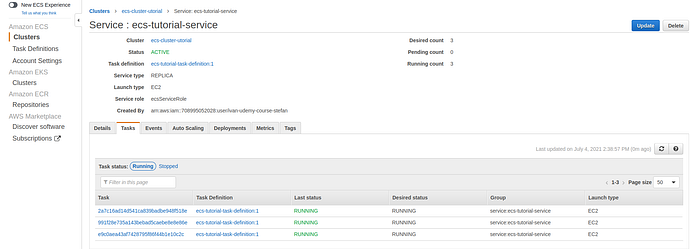
To check the tasks of this service go to Clusters -> Cluster-name ->Tasks tab.
List of tasks
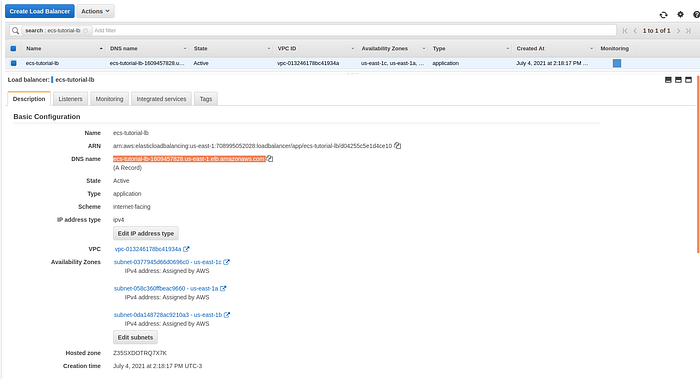
To check the app go to EC2 -> Load Balancing -> Load Balancers Open a load balancer of a cluster on a Description Tab copy a DNS name.
Load balancer description page
Then paste it into a browser and you will see the output.
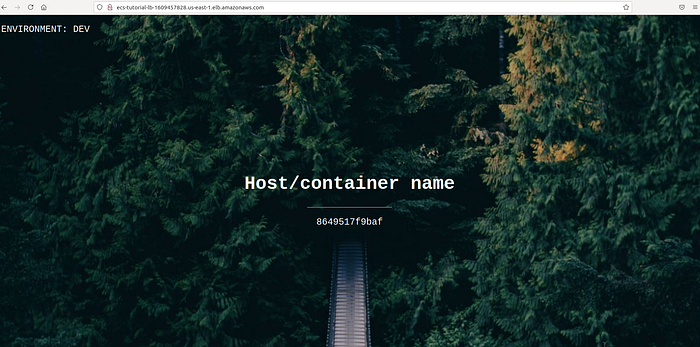
The output of an app hosted on a cluster
13. SSH into an instance in a private subnet (optional)
To be able to SSH into an EC2 instance in a private subnet we have to lunch another EC2 instance in any of the public subnets in the same VPC. This instance is usually called bastion. Launch a new EC2 instance in any of the public subnets within the VPC of the ECS cluster. On the Configure Security Group step of the EC2 launch wizard, select the option to create a new security group, give it a name, for example, bastion-ssh-security-group. This security group will only allow the traffic over SSH protocol on port 22. For higher security you can set your IP as a source, in this way access to this instance will be limited to your PC only.
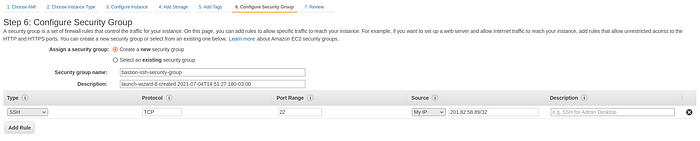
Configure Security Group step of EC2 launch wizard
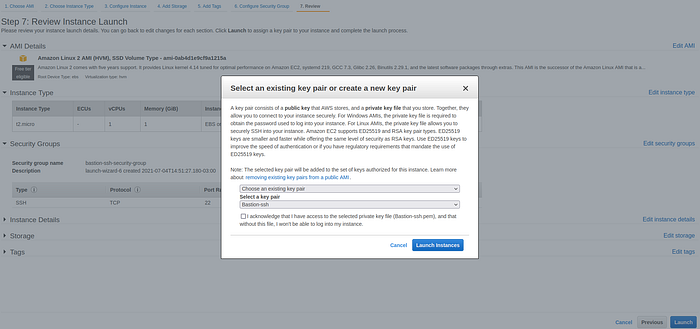
When you press the Launch button the pop-up window will appear that will ask you to select the key. Select the key created in step 9 of this tutorial and press Launch instance.
Select ssh key pop-up window
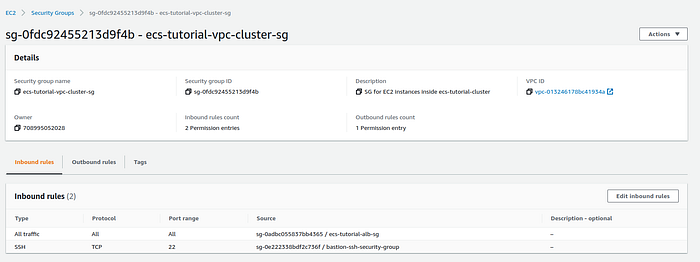
Go to Cluster Security group and add a new Inbound rule, that allows bastion-ssh-security-group as the source on port 22 and save it.
Security group description page
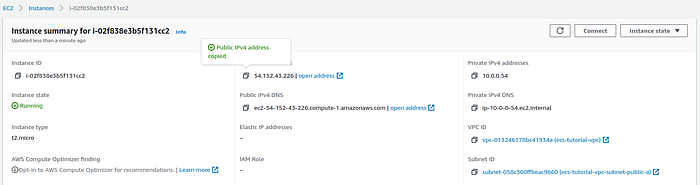
Go to the description page of the newly created EC2 instance and copy the public IP address.
Public EC2 instance summary page
Then go to any EC2 instance participating in a cluster and copy the private IP address.
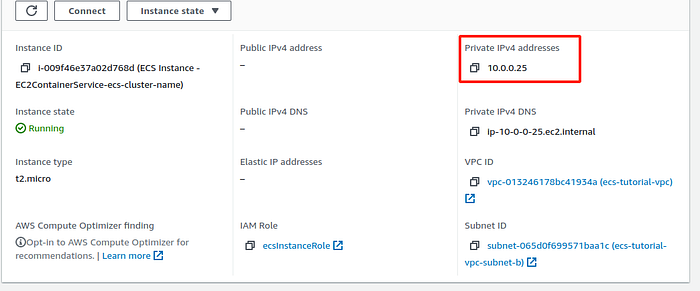
Private EC2 instance summary page
On your PC open terminal go to the directory where the SSH key is located and execute the command below:
Then you will successfully SSH into the instance in the private subnet.

Example in the terminal
Summary:
In this tutorial, I explained step by step how to create AWS ECS cluster using the EC2 launch type from scratch. The cluster has the EC2 instances spread across 3 availability zones, which provides high availability. All instances are located in the private subnetworks and accessible only from the load balancer or the SSH protocol. Thank you for reading! If you have any questions or suggestions, please feel free to write me on my LinkedIn account.
Comments
Loading comments…