In this tutorial, we will learn to integrate MongoDB with a Spring Boot application and perform different CRUD operations.
What is MongoDB?
MongoDB is a document-oriented NoSQL database that stores JSON-like documents with dynamic schemas. It is commonly used for high-volume data storage.
Few advantages of a NoSQL database over a SQL database are listed below;
- Schemaless
- No complex joins.
- Ease of scale-out − NoSQL databases are easy to scale.
- Conversion/mapping of application objects to database objects not needed.
- Uses internal memory for storing the (windowed) working set, enabling faster access to data.
What is Spring boot?
Spring Boot is an open-source popular Java-based framework for building web and enterprise applications maintained by a company called Pivotal. Spring boot reduces lots of development time and increases productivity. It has many advantages & with its help, it is easier to avoid writing lots of boilerplate Code, Annotations, and XML Configuration. It also has a built-in configuration for Spring JDBC, Spring ORM, Spring Data, Spring Security, etc.
Prerequisites
In order to complete this tutorial, you should have knowledge of beginner or intermediate Java 8 programming skills, some familiarity with Spring Boot, and also you should have a general familiarity with the Windows command prompt.
Tools Used in this Tutorial
- Java 8
- Spring Boot
- Gradle
- MongoDB
- Postman
Step 1. Install and Launch MongoDB
To start working with MongoDB, first, we have to install it on our local machines. Go to the MongoDB website and download the MongoDB installer from the downloads section.
Once the download is complete double click the file and follow the prompts to install Mongo. Mongo is most likely to be installed in the “C:\Program Files\MongoDB..” directory unless you specify a custom path.
Open a command prompt window and direct it to the bin folder inside the MongoDB folder path.

MongoDB bin folder path
Create the directory where MongoDB will store its files. NOTE: If you do not create the directory to store MongoDB files it will prompt an error like below. It will be fixed once you create empty folders as it prompts in the error message.

Error: Data directory not found.
Start the MongoDB daemon by running “mongod” in the Command Prompt. Open another Command prompt window while the MongoDB daemon is running and type “mongo” to connect to MongoDB using the Mongo Shell. Now you are all set up to use MongoDB!
Step 2. Spring boot Project Setup
We will make use of the Spring Initializr tool for quickly setting up the project. Don’t forget to add the dependencies Spring WEB & Spring Data MongoDB.
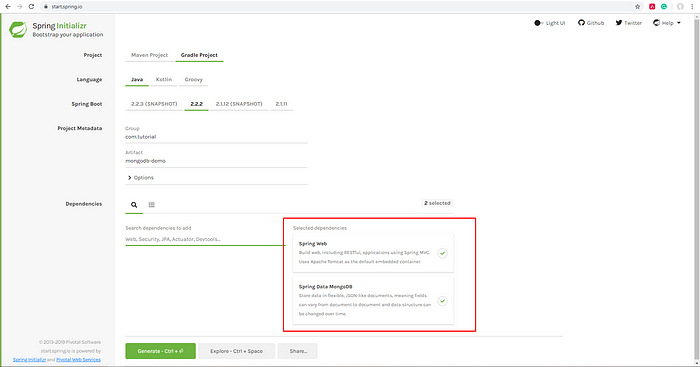
Spring Initializr
Download the project and unzip it. Then import it into your favorite IDE.
Step 3. Configure MongoDB
To configure our MongoDB in Spring boot, we will need to add connection details of our DB to the application.properties file, located in the “src/main/resources” folder. Add the following lines to the property file and replace the information in brackets with the information specific to your MongoDB instance:
spring.data.mongodb.host=[host]
spring.data.mongodb.port=[port]
spring.data.mongodb.username=[username]
spring.data.mongodb.password=[password]
spring.data.mongodb.database=[database_name]
Enabling Access Control
Enabling access control on a MongoDB deployment enforces authentication, requiring users to identify themselves. When accessing a MongoDB that has access control enabled, users can only perform actions as determined by their roles. Without giving access to our database we will get authentication errors when trying to perform the API calls. To avoid that let’s give our database access to control.

Switching to our database
In the Mongo shell, type “use db_name”, & add the following access control roles to it.
db.createUser({ user: "root",pwd: "root", roles: [ { role: "readWrite", db: "movies" }]})
Now you have enabled access control for your database and you will not be getting authentication errors when trying to perform API calls.

Enabling Access Control
Spring Boot MongoDB APIs
We will have the following functionalities and Database interactions in our app.
- Get all movies
- Get a movie with ID
- Add a movie
- Update a movie
- Delete a movie
Step 4. Adding Model to Spring boot Project
Let’s start by creating a simple Model class.
package com.tutorial.mongodbdemo;
import org.springframework.data.annotation.Id;
import org.springframework.data.mongodb.core.mapping.Document;
@Document
public class Movie {
@Id
private String id;
private String name;
private String category;
private String rating;
public Movie() {}
public String getId() {return id;}
public void setId(String id) {this.id = id;}
public String getName() {return name;}
public void setName(String name) {this.name = name;}
public String getCategory() {return category;}
public void setCategory(String category) {this.category = category;}
public String getRating() {return rating;}
public void setRating(String rating) {this.rating = rating;}
}
Here you have a Movie class with four attributes: id, name, category, and rating. The @Document annotation marks a class as being a domain object that we want to persist to the database. Note: This annotation is the Mongo equivalent of @Entity in JPA.
The id is mostly for internal use by MongoDB. The @Id annotation tells spring that the id field will be used as the primary identifier. The rest of the class contains the basic constructors, getters, and setters for the Movie object.
Step 5. Spring Data MongoDB — MongoRepository
We will now create a repository by making an interface.
package com.tutorial.mongodbdemo;
import org.springframework.data.mongodb.repository.MongoRepository;
public interface MovieRepository extends MongoRepository<Movie, String> {
   Movie findMovieById(String movieId);
}
MovieRepository extends the MongoRepository interface and plugs in the type of values and ID that it works with: Movie and Integer, respectively. This will give us access to all the CRUD (create, read, update, and delete) operations around the MongoDB collection.
You can define other queries by declaring their method signatures. In this case, findByMovieId, will find the movie that matches the given id.
Step 6. Defining the REST Controller
Finally, we will create the REST controller. The APIs which we will be creating will access the movieRepository dependency, which will internally use Spring Data MongoRepository API. NOTE: We do not have to write any database interaction code in the interface as Spring Data does it all for us ;).
Adding the REST Endpoints
The @Autowired annotation creates an instance of the movieRepository object that will allow us to access and modify the movies database.
@Autowired
private MovieRepository movieRepository;
GET - Get all movies & Get movie by ID
@GetMapping(value = "/")
public List<Movie> getAllMovies() {
   logger.info("Getting all movies.");
   return movieRepository.findAll();
}
@GetMapping(value = "/{movieId}")
public Movie getMovieById(@PathVariable String movieId) {
   logger.info("Getting movie with ID: {}", movieId);
   return movieRepository.findMovieById(movieId);
}
findAll() is a method which Spring Data MongoRepository provides internally.
POST - Add a movie
@PostMapping(value = "/create")
public Movie addMovie(@RequestBody Movie movie) {
   logger.info("Saving movie.");
   return movieRepository.save(movie);
}
Save() is a method which Spring Data MongoRepository provides internally.
PUT - Update a movie
@PutMapping(value = "/update/{movieId}")
public Movie updateMovie(@PathVariable String movieId, @RequestBody Movie movie) {
   logger.info("Updating movie with ID: {}", movieId);
   return movieRepository.save(movie);
}
DELETE - Delete a movie
@DeleteMapping(value = "/delete/{movieId}")
public void deleteMovie(@PathVariable String movieId) {
   logger.info("Deleting movie with ID: {}", movieId);
   movieRepository.deleteById(movieId);
}
Delete() is a method which Spring Data MongoRepository provides internally.
Completed Controller
Here is the completed REST controller with all the methods added to it.
package com.tutorial.mongodbdemo;import java.util.List;
import org.slf4j.Logger;
import org.slf4j.LoggerFactory;
import org.springframework.beans.factory.annotation.Autowired;
import org.springframework.web.bind.annotation.DeleteMapping;
import org.springframework.web.bind.annotation.GetMapping;
import org.springframework.web.bind.annotation.PathVariable;
import org.springframework.web.bind.annotation.PostMapping;
import org.springframework.web.bind.annotation.PutMapping;
import org.springframework.web.bind.annotation.RequestBody;
import org.springframework.web.bind.annotation.RestController;
@RestController
public class MovieController {
private Logger logger =
LoggerFactory.getLogger(MovieController.class);
@Autowired
private MovieRepository movieRepository;
@GetMapping(value = "/")
public List<Movie> getAllMovies() {
   logger.info("Getting all movies.");
   return movieRepository.findAll();
}
@GetMapping(value = "/{movieId}")
public Movie getMovieById(@PathVariable String movieId) {
   logger.info("Getting movie with ID: {}", movieId);
   return movieRepository.findMovieById(movieId);
}
@PostMapping(value = "/create")
public Movie addMovie(@RequestBody Movie movie) {
   logger.info("Saving movie.");
   return movieRepository.save(movie);
}
@PutMapping(value = "/update/{movieId}")
public Movie updateMovie(@PathVariable String movieId, @RequestBody Movie movie) {
   logger.info("Updating movie with ID: {}", movieId);
   return movieRepository.save(movie);
}
@DeleteMapping(value = "/delete/{movieId}")
public void deleteMovie(@PathVariable String movieId) {
   logger.info("Deleting movie with ID: {}", movieId);
   movieRepository.deleteById(movieId);
}
}
Step 7. Running the Project and Testing with Postman
Now let’s test our API calls using postman. Right-click on the project and select Run as a Spring boot App.
Adding a Movie
Request URL - POST : [http://localhost:8080/create](http://localhost:8080/create)
Request Body :
                {
                    "name":"Frozen",
                    "category": "Drama",
                    "rating": "3"
                }
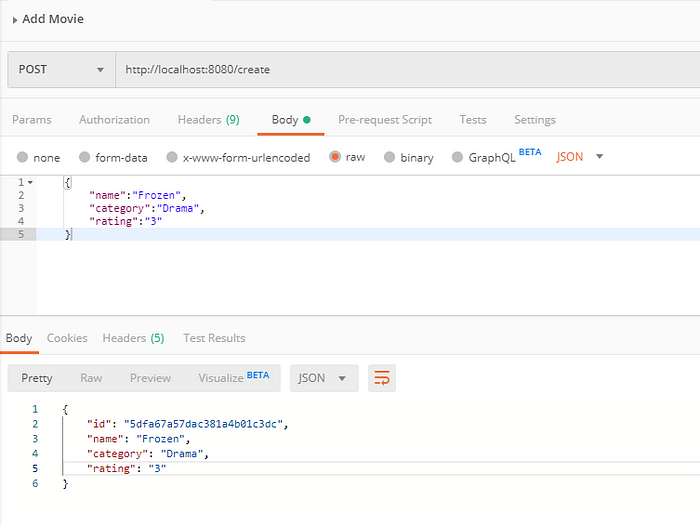
Add Movie POST Request
Getting All Movies
Request URL - GET : http://localhost:8080/
Request Body : NONE

All Movies GET Request
Getting a Movie
Request URL - GET : http://localhost:8080/{movieId}
Request Body : NONE
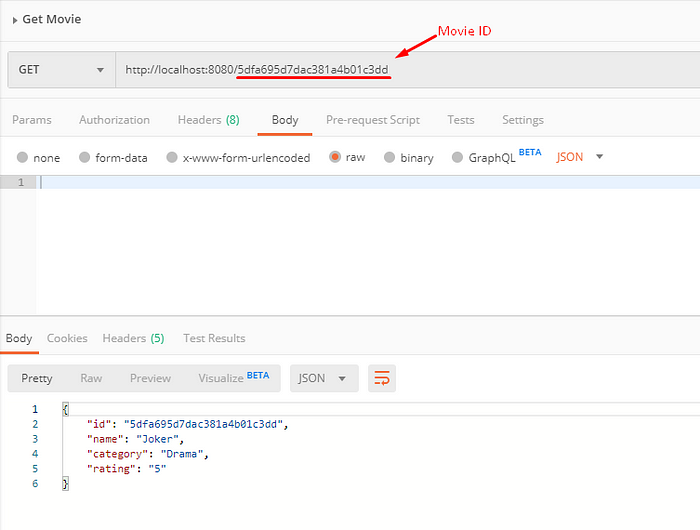
Getting A Movie GET Request
Updating a Movie
Request URL - PUT : http://localhost:8080/{movieId}
Request Body :
                {
                    "name":"Frozen 2",
                    "category": "Cartoon",
                    "rating": "4"
                }
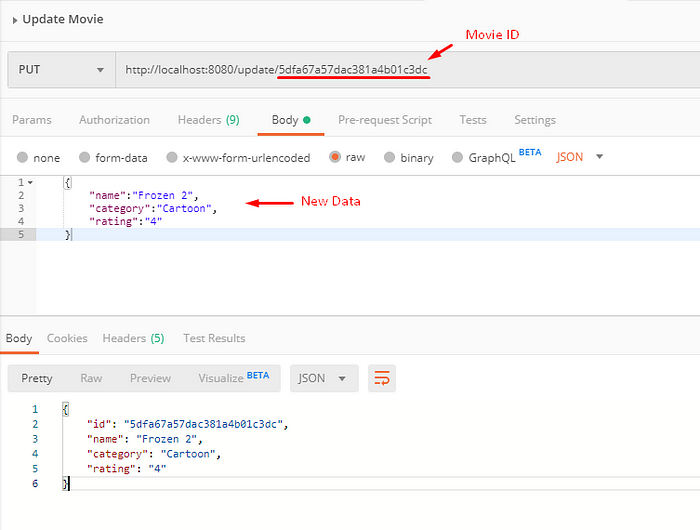
Updating A Movie PUT Request
Deleting a Movie
Request URL - DELETE : http://localhost:8080/{movieId}
Request Body : NONE
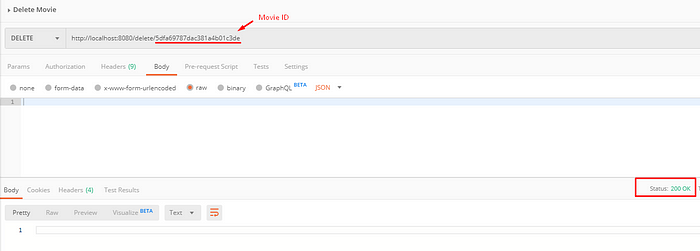
Deleting A Movie DELETE Request
You can now check the MongoDB database we created using the MongoDB Compass.

MongoDB Compass
Congratulations! You have now created a simple REST API using Java Spring Boot and MongoDB to save objects and fetch them from a database, all without writing a concrete repository implementation.
You can click here to download the source code from GitHub.
I hope you have found this article useful.