https://a0.awsstatic.com/libra-css/images/logos/aws_logo_smile_1200x630.png
Introduction
In this guide, we’ll walk you through the process of configuring a Python environment to automatically run on Amazon EC2 instance startup. This setup allows you to execute a Python script as soon as your EC2 is launched, making it a convenient solution for various automation tasks.
We’ll start by connecting to your EC2 instance and proceed to set up the necessary tools, clone a repository, create a Python virtual environment, and craft a custom startup script customized to your needs.
Additionally, we’ll explore a use case that highlights the potential of this automated setup in a broader architectural context. By integrating AWS Glue and EC2 instances, you can achieve a powerful combination for orchestrating complex data workflows, thereby leveraging the scalability and flexibility of Amazon Web Services.
Steps to Configure the EC2
Step 1: Connect to the EC2 Instance
Before you begin, make sure you’ve created an EC2 instance, for this demonstration, we’ll use a t2.medium Amazon Linux instance.
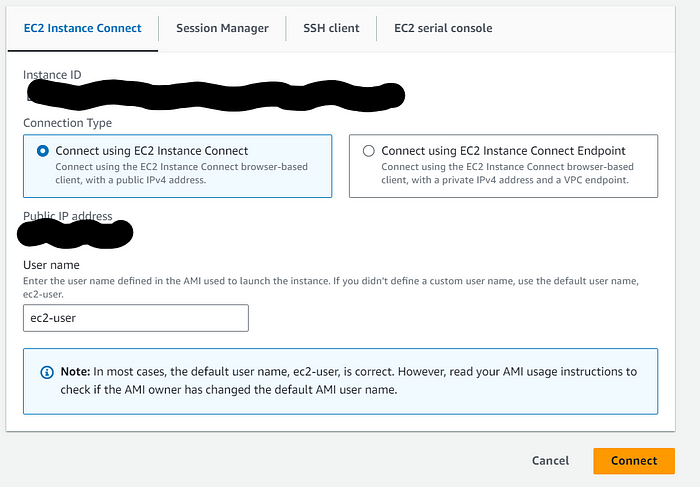
Connect to your EC2 instance using the AWS Management Console’s “Connect” feature. This method simplifies the connection process and allows you to access your EC2 instance with ease:

Once connected to the instance, execute all the code from the following steps.
Step 2: Install Required Packages
Install the necessary tools for setting up your environment:
sudo yum install git -y
sudo yum install python3-pip -y
pip3 install git-remote-codecommit
Note that in this example, we are using AWS CodeCommit, which is a managed source control service provided by Amazon Web Services. However, you can substitute this with other Git repository URLs or providers, depending on your project’s requirements.
Step 3: Clone the Repository
Clone the desired repository using the git command:
git clone codecommit::us-east-1://YourRepositoryName
cd YourRepositoryName
Be sure to replace YourRepositoryName with your repository's name.
It’s essential to note that the repository you are cloning should include the necessary Python files (.py) and a requirements.txt file.
- Python Executable Files (
.py): The Python scripts that you intend to run during the EC2 instance startup should be present in the repository. requirements.txt: This file lists the Python packages and libraries required for your scripts.
Step 4: Create a Python Virtual Environment
Create a Python virtual environment to isolate your project’s dependencies and install all packages and libraries required:
python3 -m venv /home/ec2-user/venv
source /home/ec2-user/venv/bin/activate
pip3 install -r requirements.txt
Step 5: Create and Configure the Startup Script
Create and configure a script named startup.sh in the /home/ec2-user directory:
cd ..
vim startup.sh
Copy and paste the following content into the startup.sh file:
#!/bin/bash

source /home/ec2-user/venv/bin/activate
cd /home/ec2-user/YourRepositoryName
git pull

python3 your_script.py

# Check if the "Shutdown" tag is set to "True" to determine whether to shut down the instance
Shutdown="$(aws ec2 describe-tags --region "us-east-1" --filters "Name=resource-id,Values=your_instance_id" "Name=key,Values=Shutdown" --query 'Tags[*].Value' --output text)"
if [ $Shutdown == "True" ]
then
   sudo shutdown now -h
fi
To stop the instance, you need to create a ‘shutdown’ tag in the EC2 instance setup. Its value is used to determine whether the instance should shut down automatically.
Step 6: Make the Script Executable
Make the startup.sh script executable:
sudo chmod +x /home/ec2-user/startup.sh
Step 7: Configure the System Startup Script
Open the /etc/rc.d/rc.local file to configure the system's startup script:
sudo vim /etc/rc.d/rc.local
Copy and paste the following content into the /etc/rc.d/rc.local file:
#!/bin/bash

exec 1>/tmp/rc.local.log 2>&1
set -x
touch /var/lock/subsys/local
sh /home/ec2-user/startup.sh

exit 0
Step 8: Make the System Startup Script Executable
Make the /etc/rc.local file executable:
sudo chmod +x /etc/rc.d/rc.local
Step 9: Create the Log File
Create the log file /tmp/rc.local.log:
sudo touch /tmp/rc.local.log
Step 10: Reboot Manually
restart the instance to test:
sudo reboot
Step 11: Check the Log
Check the log generated by the startup script to ensure everything works as expected:
cat /tmp/rc.local.log
Use case

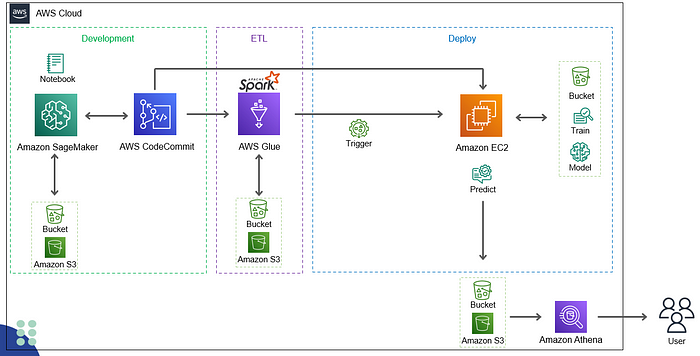
Now, let’s consider a broader architectural perspective. Imagine a scenario where a product deployment workflow is orchestrated using a combination of AWS Glue and EC2 instances.
AWS Glue:
Initially, AWS Glue performs the Extract, Transform, Load (ETL) process, working with data stored in Amazon S3. It processes, transforms, and aggregates this data as required, effectively preparing it for analysis.
Using this method in the end of the Glue job, you can trigger the EC2 instance:
def ec2_activate(instance_id, region):

    ec2 = boto3.client('ec2', region_name=region)
    cond = True
    while cond == True:
        response = ec2.describe_instances(InstanceIds=instance_id)
        instances = response['Reservations'][0]['Instances']
        instance_state = instances[0]['State']['Name']
        if (instance_state == 'running') or (instance_state == 'pending') or (instance_state == 'stopping'):
            continue
        else:
            ec2.start_instances(InstanceIds=instance_id)
            break

ec2_activate(instance_id, region)
EC2 Instance:
AWS Glue, after completing the ETL process, triggers the launch of an EC2 instance. This EC2 instance serves as the computing engine for more complex tasks.
This architecture offers a robust and streamlined approach to handling complex data workflows. By integrating AWS Glue and EC2 instances for specialized computations, you create an end-to-end solution that efficiently manages data, processes, and delivers valuable results while taking full advantage of AWS’s scalable and flexible infrastructure.
Conclusion
By following the steps outlined in this guide, you’ve successfully set up an automated Python environment to run on Amazon EC2 instance startup.
The advantage of running Python in this manner is the ability to leverage EC2 instance tags, allowing you to turn instances on and off as needed. By doing so, you can efficiently manage costs and resources across different areas and products.
This method represents a practical way to achieve this automation. Thank you for reading!