More and more business processes are getting automated. In an earlier blog post I explained how to start with Robotic Process Automation using the Python module Pyautogui.
The Python module Pyautogui is great for getting started, but if you need to automate web browser automation scripts then have an additional look at the Selenium module — this will enable you to do huge time saving tasks like inputting data into CMS's much faster than ever before!
Selenium is a module that knows how to interpret HTML code and can navigate easily within the web. Selenium does not take over your mouse or keyboard like Pyautogui, but instead it runs in the background and lets you control navigation with easy scripts.
On the video below, you can see that bots are really good at executing specific tasks. Let's use them to our advantage!
Robot doing a specific task really well
Getting started with Selenium in Python
- Installing, importing and starting the driver
Install Selenium and import the webdriver to launch the Google Chrome browser.
!pip install selenium
!apt-get update
!apt install chromium-chromedriver
from selenium import webdriver
from selenium.webdriver.common.keys import Keys
chrome_options = webdriver.ChromeOptions()
chrome_options.add_argument(' — headless')
chrome_options.add_argument(' — no-sandbox')
chrome_options.add_argument(' — disable-dev-shm-usage')
driver =webdriver.Chrome('chromedriver',chrome_options=chrome_options)
2. Open a webpage
This code will open the url and print out its source
code.driver.get("https://www.google.com/")
print(driver.page_source)
3. Selecting elements on the page
You can use element ID or xpath to select form fields, buttons, hyperlinks, text, images actually all elements on the page.
Select any element of your choosing is as simple as typing in an ID (if the element has an ID): xpath.driver.find_element_by_id("element_id")
You can also use XPath to select elements. The XPath for the search field is a lot easier to find than you may think. All that you need to do in order to locate it is bring up the developer console and right click on your browser's address bar, which will result in an output like this: //*[@id='tsf']/div[2]/div[1]/div][ ]//input, copy “XPATH” from there..
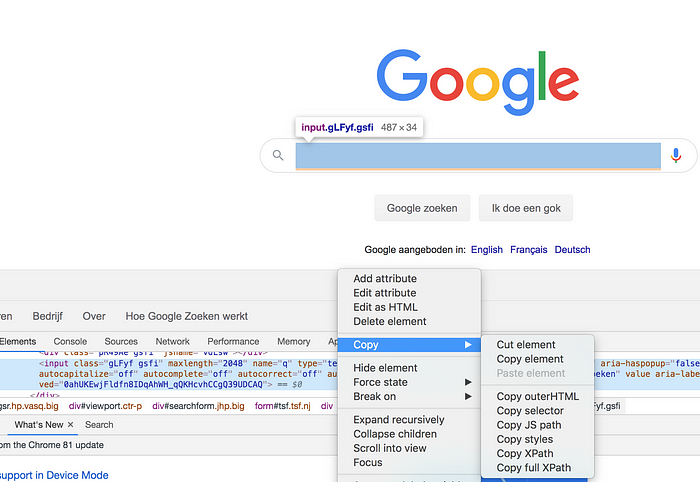
xpathsearch = "//*[@id='tsf']/div[2]/div[1]/div[1]/div/div[2]/input"
searchinput = driver.find_element_by_xpath(xpathsearch)
So we've selected the search element on Google.com, now let's actually try making a google search using Selenium to see how it works!
4. Keyboard input
Once you selected an element you can manipulate this element with your keyboard and your mouse.
Use the send_keys function to write your search text to the search field on Google.com and the ENTER key to start the search.
searchinput.send_keys("Barack Obama age")
searchinput.send_keys(Keys.ENTER)
5. Reading the result
Finding the div which contains your result is as easy as executing a search. Once you find it, all that's left to do is read the text property of the xpath element of the div.
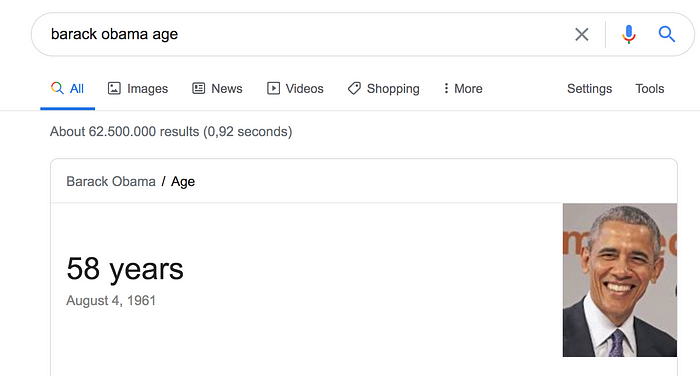
xpathresult = "//*[@id='rso']/div[1]/div[1]/div[1]/div[1]/div/div[2]/div/div[1]/div/div/div[1]"
resultdiv = driver.find_element_by_xpath(xpathresult)
age = resultdiv.text
print("Barack Obama is getting old. Currently, his age is",age)
Caution: Google can be a little tricky when it comes to bots, so tread carefully. You may find that Google blocks your script if you execute the same request multiple times in a row! To avoid this, we recommend running your scripts once and then waiting for at least 15 seconds before executing them again.
Case: Automating CMS input

Time for a practical example. You have created optimized meta descriptions. You have just sent them to the customer, and he liked them so much that he's already suggesting you put those new keywords in the CMS!
Now you can do this manually one-by-one, but with a little help from Python it will be that much faster.
The code for this process is short and easy to write. By automating the task, you save time that would otherwise be wasted on pressing buttons one by one.
Imagine the possibilities. You can automate tedious tasks that would take hours to complete by hand, and instead spend your time on more creative tasks.
Comments
Loading comments…