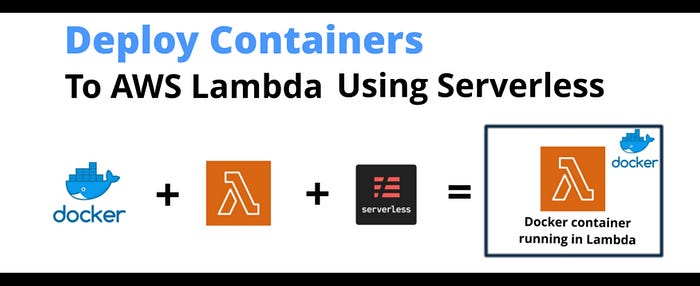
Image Created By: Varun Singh using Da Vinci. Icons Taken from Google Images
Lambda can now run your containers as a function with base runtimes provided by AWS or even with custom runtimes. With time, containerized apps became a hit and now the problem was how to deploy docker images on AWS Lambda as functions. Because we all know, using Lambda you pay only when you run the functions.
A wise man once said: Docker container is like a bullet proof jacket to prevent you from facing dependency issues. By — Varun Singh 😎 Now that, we have established that I am a wise man, let me tell you a brief about what this article entails. I am going to show you how to deploy your containers as Lambda Functions using a serverless framework called SERVERLESS in 5 easy steps. Also, in this article, we will be using only Free Tier usage resources only. Just to be sure with that, at the end of this article I have mentioned one command that will remove all resources that got created during this article for you. This article will work for macOS/Linux and windows. Below are a few pre-requisites —
- AWS Free Tier Account
- Docker Version 20.x+ installed
- NPM and Node12.x+ installed
- Your Favorite Editor to write some lambda handler code
Step 1: Create IAM User and Configure AWS Credentials
Login to your AWS account using root user. Now go to IAM Service —
- Click on Add User under IAM -> Users.
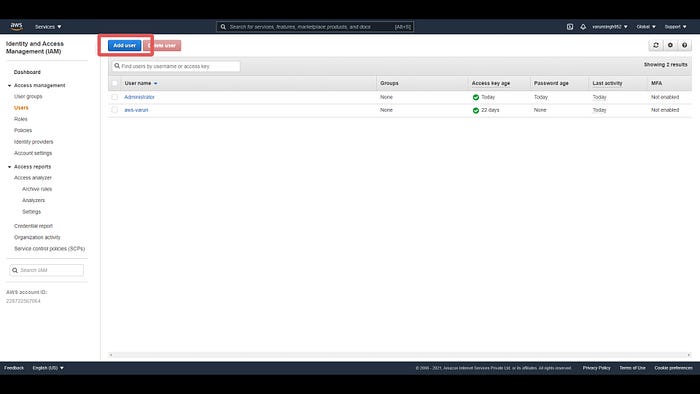
Click on Add User
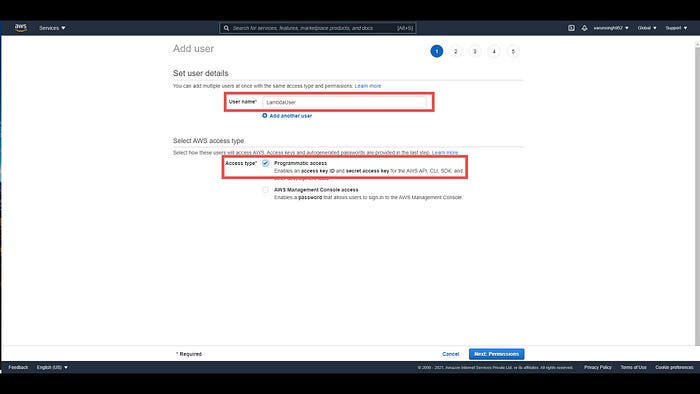
2. Add the name of the user and select Programmatic access under Access Type.
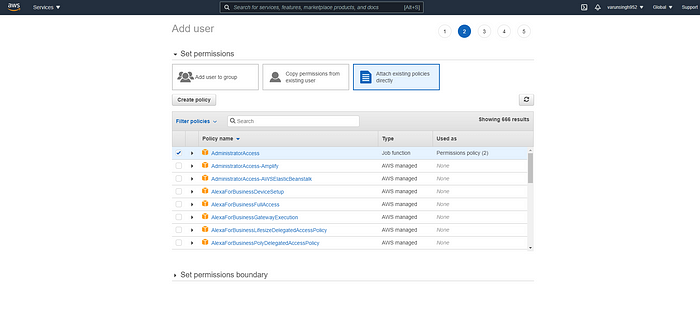
 3. Attach Administrator Policy.
Policy Page
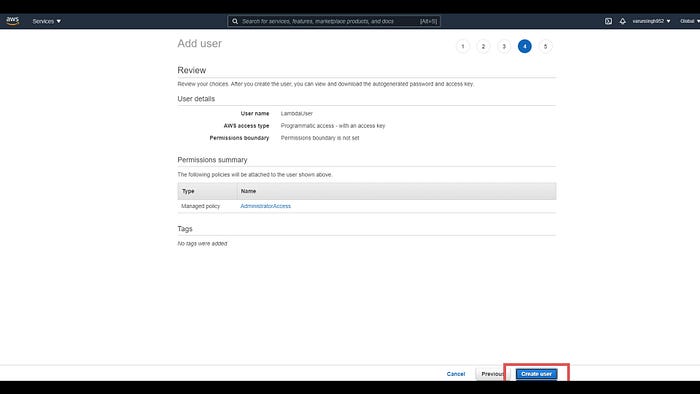
4. Skip adding Tags and go to the next step and click on Create User.
Create User Last Page
On clicking Create User, credentials will be listed and you can download the JSON file for future references. This file contains the IAM user credentials that we will need to set up AWS Credentials on our machine. Now, install AWS CLI below links for your OS-specific:
- Windows
- Mac If you are using Linux, you shall install by below link OR you can run the following command to install AWS CLI —
$ sudo apt update && sudo apt install awscli
3. Linux Check the version installed to see everything works fine —
$ aws --versionOutput:-
    aws-cli/1.18.69
Now, let us configure AWS CLI with the credentials of the IAM user we created in this step. Run below command:
$ aws configureOutput:-
   AWS Access Key ID: ****************XYXE
   AWS Secret Access Key: ****************+lk2
   Default region name: us-east-1
   Default output format: json
Now that we have set up AWS CLI, let us set up Serverless CLI, which will help us to create our very first containerized serverless project.
Step 2: Install Serverless CLI
We begin with installing Serverless CLI. This will allow us to create CloudFormation stacks and hence initiate the creation of necessary resources in AWS infrastructure. Run the command below to install Serverless CLI —
$ npm install -f serverless
Check the version installed to see everything works fine —
$ serverless --versionOutput:-
    Framework Core: 2.40.0 (standalone)
    Plugin: 4.5.3
    SDK: 4.2.2
    Components: 3.9.2
Step 3: Create A Serverless Project
Now that, we have serverless CLI installed, you shall proceed to create a serverless project that utilizes a docker image as a base. Run the following command —
$ serverless create --template aws-python-docker --path tomato-ws
Let’s now understand what the above command does. Serverless CLI will create a default project with python runtime and initialized Dockerfile under the folder named tomato-ws. The project structure will look something like the below:
├── Dockerfile
├── README.md
├── app.py
└── serverless.yml
Let us understand what is there inside Dockerfile:
# Fetch python3.8 docker base image from AWS ECR
FROM public.ecr.aws/lambda/python:3.8COPY app.py ./# You can overwrite command in `serverless.yml` template
CMD ["app.handler"]
As you can see, what this Dockerfile does is — Pulls a base image with Python3.8 runtime for us and then copies the app.py handler inside the docker once we run the docker create command. Now, let’s have a look inside serverless.yml:
service: aws-container-lambda
framework Version: "2"
provider:
  name: aws
  lambdaHashingVersion: 20201221
  ecr:
    images:
      appimage:
        path: ./
functions:
  hello:
    image:
      name: appimage
This file aims to help us create the necessary stack and resources to build, deploy, and run the containerized lambda function. If you notice, ecr is the tag where serverless framework gets to know where to pick up Dockerfile to build the image. functions tag in serverless.yml is telling serverless framework where to look for the lambda handler code i.e. inside appimage.
Step 4: Create an API to list all Tomatoes
Let’s start adding some code inside the app.py. Following is the code:
import jsondef handler(event, context):
    tomatoes = [{"name": "Red Tomato", "price": "30 Rs"},
            {"name": "Yellow Tomato", "price": "35 Rs"},
            {"name": "Small Tomato", "price": "20 Rs"}]
    tomatoesList = {"tomatoes": tomatoes}
    response = {"statusCode": 200, "body": json.dumps(tomatoesList)}
    return response
So this handler will return us a list of tomatoes of different colors. Let’s now move to the final stage of deploying it.
Step 5: Deploy the containerized app to Lambda
This is why I chose SERVERLESS. While one can deploy containers using AWS ECR and then create a Lambda function via console and select the upload container image from ECR, I tend towards doing this completely not using the console. That is where Serverless CLI shines. So here we go, run this command to deploy our handler:
$ serverless deploy -vOutput:-
  Serverless: Packaging service...
  Sending build context to Docker daemon  13.31kB
  Step 1/3 : FROM public.ecr.aws/lambda/python:3.8
   ---> 601da80bf214
  Step 2/3 : COPY app.py ./
   ---> Using cache
   ---> 50fbd47b7250
  Step 3/3 : CMD ["app.handler"]
   ---> Using cache
   ---> 4a8d6f26cf18
  Successfully built 4a8d6f26cf18
  Successfully tagged serverless-aws-container-lambda-dev:appimage
  Serverless: Creating Stack...
  Serverless: Checking Stack create progress...
  .
  .
  .
  Serverless: Stack update finished...
If we have done everything right, you will also see an output as above. As you can notice, the serverless framework deploys our app by first building the image, then packaging it, creating CloudFormation stack, and finally updating the stack. Serverless performs these tasks under the hood:
- Builds the container using Dockerfile.
- Creates an ECR entry for the container image to be pushed.
- Packages the image in zip format.
- Creates a new CloudFormation stack to record all resource creation.
- Updates the stack for various create events.
- Creates an S3 bucket and uploads the package for deployment.
- Creates a Lambda function and links the container image with it
- Pushes the zip to created AWS Lambda container. Let’s now invoke our lambda function:
$ serverless invoke -f helloOutput:
{
   "statusCode": 200,
   "body": {
            "tomatoes": [
                 {"name": "Red Tomato", "price": "30 Rs"},
                 {"name": "Yellow Tomato", "price": "35 Rs"},
                 {"name": "Small Tomato", "price": "20 Rs"}
                ]
           }
}
With the power of Serverless CLI, we were able to deploy containers as a microservice to AWS Lambda and even invoke it for development purposes. This truly shows the potential serverless paradigm consists. If you do not wish to keep these resources in AWS, run the following command that will automatically delete all the resources created —
$ serverless remove -**v**
WARNING: The above command will remove all the resources — S3 bucket, lambda function, ECR entry, etc that we created when we ran the deploy command, and finally, it will remove the CloudFormation stack entry as well. So, overall you don’t have to go and remove one by one. You should see output something like blow:
Serverless: Getting all objects in S3 bucket...
Serverless: Removing objects in S3 bucket...
Serverless: Removing Stack...
Serverless: Checking Stack delete progress...
CloudFormation - DELETE_IN_PROGRESS - AWS::CloudFormation::Stack - aws-container-lambda-dev
CloudFormation - DELETE_IN_PROGRESS - AWS::S3::BucketPolicy - ServerlessDeploymentBucketPolicy
CloudFormation - DELETE_SKIPPED - AWS::Lambda::Version - Hello1LambdaVersionHF98GwYTtRqcv7KEm1bTRmExHvhbActEyItsqf8u6V0
CloudFormation - DELETE_COMPLETE - AWS::S3::BucketPolicy - ServerlessDeploymentBucketPolicy
CloudFormation - DELETE_IN_PROGRESS - AWS::Lambda::Function - Hello1LambdaFunction
CloudFormation - DELETE_IN_PROGRESS - AWS::S3::Bucket - ServerlessDeploymentBucket
CloudFormation - DELETE_COMPLETE - AWS::S3::Bucket - ServerlessDeploymentBucket
Serverless: Stack delete finished...
Serverless: Stack delete finished...
Serverless: Removing ECR repository...
Well, that is all from my side for this article. I will be coming back with more on Serverless and Lambda. Till then keep learning.
More about the Author
I am a full-time software engineer with 3.5+ years of experience in Python, AWS, and many more technologies. I have started writing recently as it helps me to read more. I am looking forward to sharing technical knowledge and my life experiences with people out there. Follow me for more interesting articles on Python and AWS. You can read more of my blogs and findings on Medium — Varun Singh.
Comments
Loading comments…