
In this project, we will use another article’s objectives that I wrote, and automate the process by creating a template in CloudFormation. This was a challenging project, to say the least, as I had no experience in Yaml or CloudFormation. I will explain the challenges I faced and how to not make the same mistakes as I did, but first let’s take a look at our tasks for the project.
Tasks
All of the tasks listed below will be completed in a template.
- Create a VPC with a CIDR block of 10.10.0.0/16
- Create three public subnets with 10.10.1.0/24 & 10.10.2.0/24 & 10.10.3.0/24
- Create an autoscaling group using t2.micro instances. All instances should have apache installed with a Public IP address.
- The autoscaling min and max should be 2 and 5.
- Create an Application Load Balancer to distribute traffic to the autoscaling group.
- Create a web server security group that allows inbound traffic from HTTP from your Application Load Balancer.
- Create a load balancer security group that allows inbound traffic from HTTP from 0.0.0.0/0.
- Add a target policy for the ASG to scale after CPU utilization is above 50%
- Find a stress tool to be able to stress an instance above 50%.
Lessons Learned
In this section, I will discuss some of the mistakes I made to help you further understand what not to do, and what to do.
When looking at documentation for Syntax I went to the correct AWS resources however, I spent a lot of my time trying to understand all of the syntax associated with each section of the template. This is a huge task, and not really necessary.
After some help from a mentor, I was recommended a video, I suggest you watch this to get up to speed and understand how to easily search for the answers that you will need for this project.
Another mistake that I made was a pretty obvious one, but a mistake none the least. As this was my first time using Yaml, I should have done a little more research on how the code actually works. I didn’t and I paid for it in the end when debugging my code.
Take a look at this quick tutorial to give you a basic understanding of Yaml.
I also recommend using a code validator when you are ready to test your code. This will speed up the debugging process.
Alright, now you have some tools to make this project go smoothly.
Step:1 Create a template
In this section, we will create a template, or you can simply use my template if you are crunched for time. This is where the majority of the work will be done. Depending on the resources that you may need this template might not be appropriate for your project. In the comments of the code, I explain what we are building at each portion.
AWSTemplateFormatVersion:  2010-09-09
Resources:
#Creating the VPC
VPC:
Type:  'AWS::EC2::VPC'
Properties:
CidrBlock:  10.10.0.0/16
EnableDnsSupport:  yes
EnableDnsHostnames:  yes

#Creating Internet Gateway
InternetGateway:
Type:  'AWS::EC2::InternetGateway'

#Attaching the ITG to the VPC
InternetGatewayAttachment:
Type:  'AWS::EC2::VPCGatewayAttachment'
Properties:
VpcId:  !Ref  VPC
InternetGatewayId:  !Ref  InternetGateway

#Creaating Public Subnet 1
PublicSubnet1:
Type:  'AWS::EC2::Subnet'
Properties:
VpcId:  !Ref  VPC
AvailabilityZone:  us-east-1a
CidrBlock:  10.10.1.0/24
MapPublicIpOnLaunch:  yes

#Creating Public Subnet 2
PublicSubnet2:
Type:  'AWS::EC2::Subnet'
Properties:
VpcId:  !Ref  VPC
AvailabilityZone:  us-east-1b
CidrBlock:  10.10.2.0/24
MapPublicIpOnLaunch:  yes

#Creating Public Subnet 3
PublicSubnet3:
Type:  'AWS::EC2::Subnet'
Properties:
VpcId:  !Ref  VPC
AvailabilityZone:  us-east-1c
CidrBlock:  10.10.3.0/24
MapPublicIpOnLaunch:  yes

#Creating a Public Route Table
PublicRouteTable:
Type:  'AWS::EC2::RouteTable'
Properties:
VpcId:  !Ref  VPC

#Configuring Public Route
PublicRoute:
Type:  'AWS::EC2::Route'
Properties:
RouteTableId:  !Ref  PublicRouteTable
DestinationCidrBlock:  0.0.0.0/0
GatewayId:  !Ref  InternetGateway

#Associating Subnet 1 and Route Table
PublicSubnet1RouteTableAssociation:
Type:  'AWS::EC2::SubnetRouteTableAssociation'
Properties:
RouteTableId:  !Ref  PublicRouteTable
SubnetId:  !Ref  PublicSubnet1

#Associating Subnet 2 and Route Table
PublicSubnet2RouteTableAssociation:
Type:  'AWS::EC2::SubnetRouteTableAssociation'
Properties:
RouteTableId:  !Ref  PublicRouteTable
SubnetId:  !Ref  PublicSubnet2

#Associating Subnet 3 and Route Table
PublicSubnet3RouteTableAssociation:
Type:  'AWS::EC2::SubnetRouteTableAssociation'
Properties:
RouteTableId:  !Ref  PublicRouteTable
SubnetId:  !Ref  PublicSubnet3

#Creating Security Group
InstanceSecurityGroup:
Type:  'AWS::EC2::SecurityGroup'
Properties:
GroupName:  SecurityGroup7
GroupDescription:  Enable  SSH  access  and  HTTP
VpcId:  !Ref  VPC
SecurityGroupIngress:
-  IpProtocol:  tcp
FromPort:  22
ToPort:  22
CidrIp:  0.0.0.0/0
-  IpProtocol:  tcp
FromPort:  80
ToPort:  80
CidrIp:  0.0.0.0/0

#Configuring launch template
LaunchTemplate:
Type:  'AWS::EC2::LaunchTemplate'
Properties:
LaunchTemplateName:  LaunchTemplate7
LaunchTemplateData:
NetworkInterfaces:
-  DeviceIndex:  0
AssociatePublicIpAddress:  yes
DeleteOnTermination:  yes
Groups:
-  !Ref  InstanceSecurityGroup
ImageId:  ami-0b5eea76982371e91
InstanceType:  t2.micro
UserData:
'Fn::Base64':  !Sub  |
#!/bin/bash
yum update -y
yum install httpd -y
systemctl start httpd
systemctl enable httpd
amazon-linux-extras install epel -y
yum install stress -y

#Create an Auto Scaling Group
AutoScalingGroup:
Type:  'AWS::AutoScaling::AutoScalingGroup'
Properties:
LaunchTemplate:
LaunchTemplateId:  !Ref  LaunchTemplate
Version:  !GetAtt  LaunchTemplate.LatestVersionNumber
MaxSize:  '5'
MinSize:  '2'
DesiredCapacity:  '2'
VPCZoneIdentifier:
-  !Ref  PublicSubnet1
-  !Ref  PublicSubnet2
-  !Ref  PublicSubnet3

#Creating an Application Load Balancer
ApplicationLoadBalancer :
Type :  'AWS::ElasticLoadBalancingV2::LoadBalancer'
Properties :
SecurityGroups:
-  !Ref  InstanceSecurityGroup
Subnets :
-  !Ref  PublicSubnet1
-  !Ref  PublicSubnet2
-  !Ref  PublicSubnet3

#Configuring Application Load Balancer Target Group
ALBTargetGroup :
Type :  'AWS::ElasticLoadBalancingV2::TargetGroup'
Properties :
HealthCheckIntervalSeconds :  '30'
HealthCheckTimeoutSeconds :  '5'
Port :  '80'
Protocol :  HTTP
VpcId:  !Ref  VPC

#Scaling Policy
ScalingPolicy:
Type:  'AWS::AutoScaling::ScalingPolicy'
Properties:
AdjustmentType:  ChangeInCapacity
AutoScalingGroupName:  !Ref  AutoScalingGroup
ScalingAdjustment:  '1'

#Alarm for testing
CloudWatchAlarm:
Type:  'AWS::CloudWatch::Alarm'
Properties:
EvaluationPeriods:  '1'
Statistic:  Average
Threshold:  '50'
AlarmDescription:  Alarm  set  fo  50%  of  CPU  utilization
Period:  '60'
AlarmActions:
-  !Ref  ScalingPolicy
Namespace:  AWS/EC2
Dimensions:
-  Name:  AutoScalingGroupName
Value:
Ref:  AutoScalingGroup
ComparisonOperator:  GreaterThanThreshold
MetricName:  CPUUtilization
Alternatively, you can fork the Yaml file from my GitHub account.
Step 2: Create the stack
We will need to navigate to the CloudFormation service in the AWS console. To do this simply search “CloudFormation” in the search bar at the top.
Once at the landing page, we can simply click “Create stack”

Next, we will be uploading an existing file which will be the template that you created or a template that you forked from my GitHub repository.
Select the “Template is ready” radio button along with the “Upload a template file”.
Go ahead and Click “Choose file” and find the file that you would like to upload for this project.
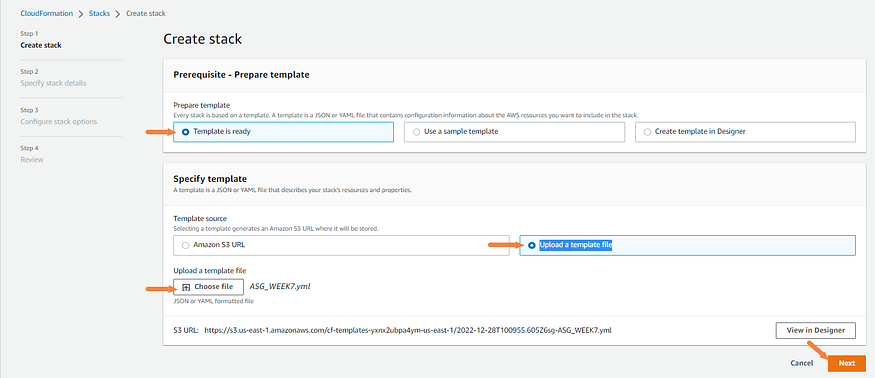
Then click “Next.”
We will then create a name for the stack that we will be creating. Go ahead and choose a name and click “Next.”

On the following page, leave everything as default and click “Next.”
When everything is configured correctly on the last page go ahead and click “Submit.”
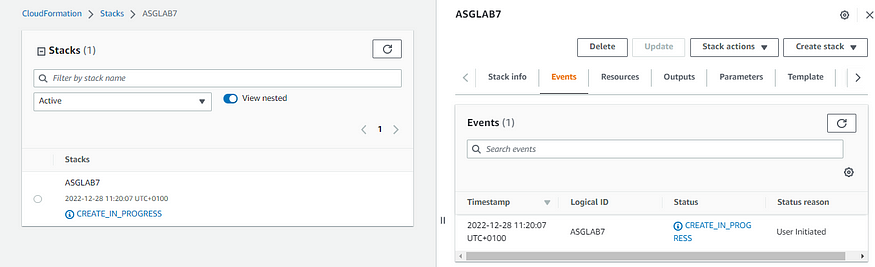
After you click “Submit” you can see that the new stack is being created. This may take a few minutes, so sit back and relax.
Step 3: Verify EC2 instances
In this section, we will need to verify that our configurations were successful. To do this, we will check the public IP addresses of the instances we created in the template and see if they are in working order.
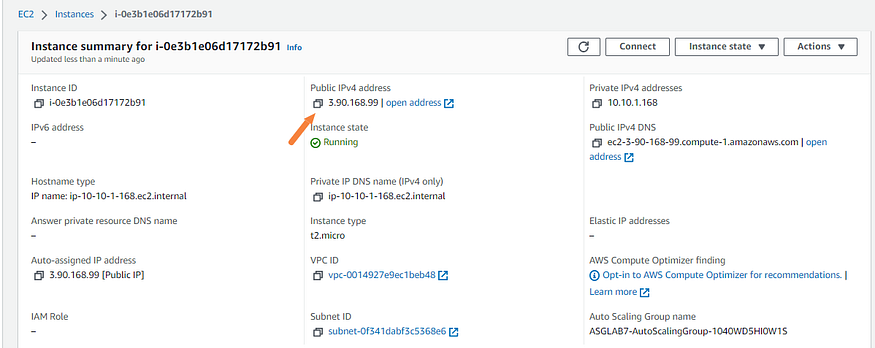
Once you have the Public IP address go ahead and paste it into your browser.
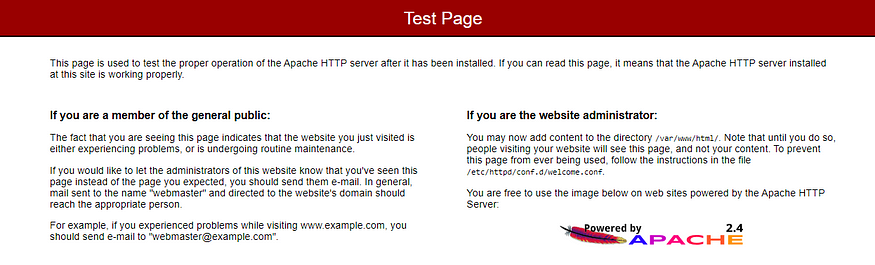
The photo above is the Apache test page. If you are seeing this congratulations the web server was successfully installed.
Step 4: Stress Test
In this step, we will perform a stress test to check that our ALB is working correctly, along with all of the configurations that we have set. At the bottom of the user data section, we added a service to stress test our instances.
Navigate to one of your instances that was created with the CloudFormation template. We will be using the EC2 instance connect, as it’s the fastest way to run a command in this case.
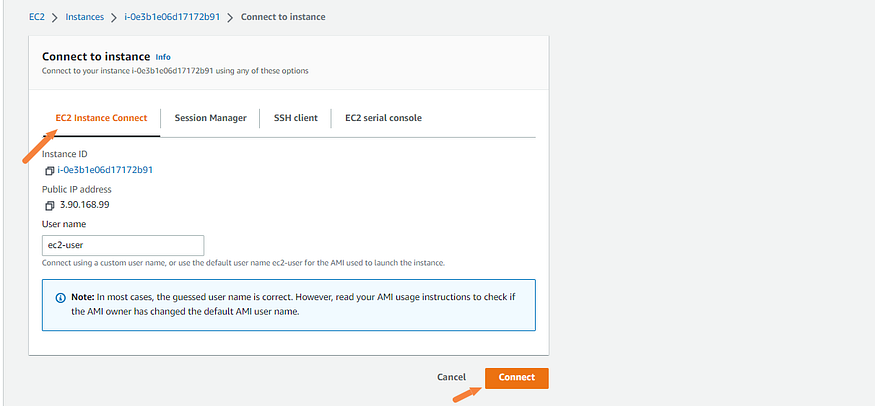
You will have a tab open up directly in your browser with the instance CLI present.
Enter the following command to stress the instance:
stress --cpu 90 --timeout 600
After entering the command, simply wait a few minutes, then check the CloudWatch service to see if the Alarm we created is in the alarm state.
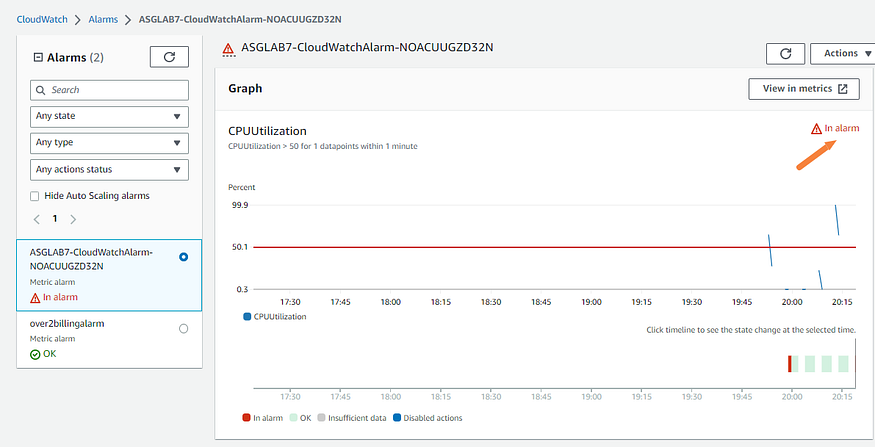
As you can see in the photo above, the alarm has been triggered.
Now that we know the alarm is working let’s check to see if there has been another instance initiated in the EC2 dashboard.

There you have it, a third instance has been created which means your configuration was successful. Congratulations!
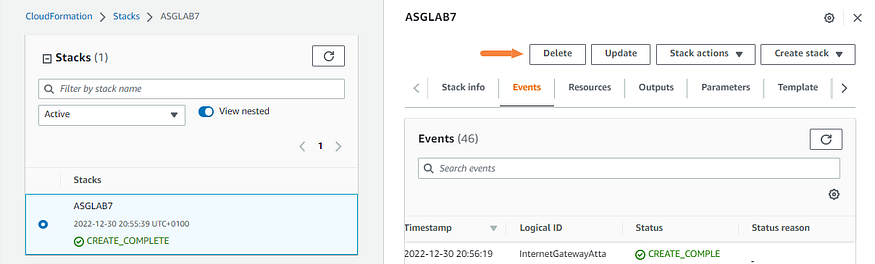
Step 5: Delete the stack
To ensure that we don’t inquire any costs, make sure to delete the resources right after you finish the project. To do this, simply go back to the CloudFormation dashboard and to your stack and click “Delete.”
That’s all there is to it. CloudFormation can have a steep learning curve and can be frustrating at times when dealing with errors. In the end, you will be saving time however as you can automate your infrastructure with a click of a button.

As always, feel free to join me on this journey of discovery. Whether you come back to this blog, follow me on social media, or reach out to me directly, I would love to continue the conversation, and help you learn more about the exciting world of cloud computing.
Thank you for reading, and I look forward to hearing from you soon.
Comments
Loading comments…