Introduction to APIs
APIs (application programming interfaces) are a way of communication between two or more computers, with the intention of passing requested data from one computer to another. APIs can share a piece of document that can later be accordingly reacted to by the requesting computer.

A document can represent a private piece of data that can be securely transferred (authorization techniques) from one computer to another.
Why is it important that companies should make use of APIs?
APIs are a great way to create a data-driven management system that can take care of itself without constant observation from its developers since we can create our data-handling systems.
The endpoint's response can vary depending on the request's body (POST request), URL parameters or URL queries, if present. This means that there are numerous ways data can be returned in the response object.
APIs solve a lot of real-world problems that companies can face, one of which is data automation. Developers use data automation to create automatic processing of requests so that it does not need separate partial or third-party services to process a request.
Who can benefit from the existence of an API?
The benefits that come with creating an API can be a true help for companies and personal projects with managing data.
We can use APIs for data integration amongst all companies' applications so that retrieved data from an endpoint is real-time everywhere a request was made. They provide a clear way for retrieving and managing data in one place, and we can use the final product for multiple data-consuming platforms in a company.
Another great feature is the developer experience, implementing changes and keeping an eye on API from the developers' point of view is simple because every feature has a corresponding place where changes can be implemented and tested before release.
Finally, making use of an API can help companies extract data to better understand customer trends which can help to produce better customer analysis benefits.
Scraping amazon.com
Web scraping is used for data extraction from websites' DOM element values. Scrapers, who scrape the web, can be given a direct path to certain elements in the DOM structure and extract the element's value. Collected values can be then passed onto the API's response.
For example, if a company wants to display popular products on their website, we can make a scraping API for Amazon's website. Some products on there have a "bestseller" indication tag and once we have collected all those products, we can then return them in a response object.
Where can you get the API data from?
We need a tool that can scrape Amazon's website with a specific product search and then return all the products that meet the search requirements as well as their titles, reviews, ratings and prices.
There are a variety of options on the web that we can use for scraping websites, but we will use Bright Data's data collector service, which can do even more. Bright Data uses bots to scrape the web with a set of specific instructions that we can define. Bots follow these instructions in order and then return a list of scraped values.
Data collectors
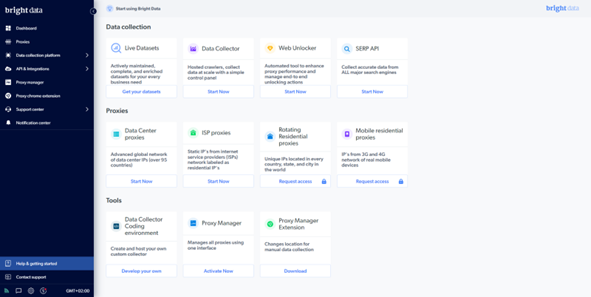
Go to BrightData.com and click on the Sign up button and register a new account. After your registration, you will be redirected to your home page, where you will select the Start now button under the Data Collector section.
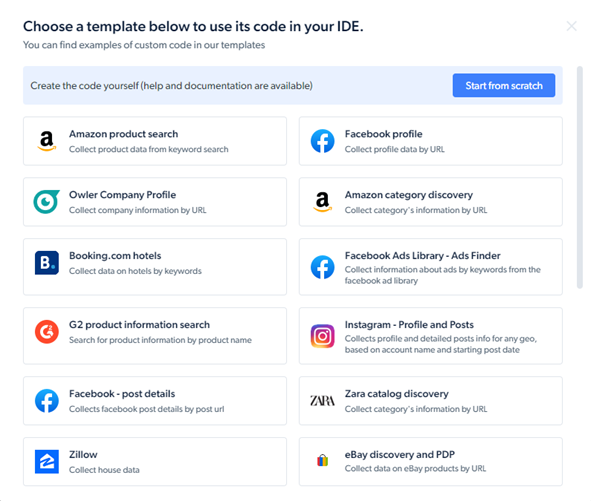
Here, we can manage all of our data collectors. To create a new one, click on the Develop a self-managed collector and a pop-up will appear with all sorts of pre-built templates. If we want to create a custom scraper, click on the Start from scratch button, but in this case, we will use the Amazon product search template. There are all sorts of templates for social media, hotels and shops that we can use.
Creating the API in Node.js
In this tutorial, we will use Node.js (with Express and Axios packages) to create an API server. This server will have only one endpoint with a custom parameter that will indicate the product that we want to search for.
Creating the application
We are going to start with an empty directory and open the command line there. Assuming we have Node.js installed on our computer, we will run the command npm init -y to initiate a new Node.js project.
npm init -y
Once a directory is initiated, we need to install the Express and Axios packages to it. Express is used for creating servers with custom endpoints and Axios is used for creating REST requests to the web.
npm i express express axios
Now, we can create an index.js file which will hold the server information. First, we need to import the previously installed packages into our project.
const express = require("express");

const axios = require("axios").default;
After importing the packages, we need to establish an Express server app by calling the imported package as a function and listening to it at a custom port.
const express = require("express");

const axios = require("axios").default;

const app = express();

app.listen(8080, () => console.log("Listening on port 8080."));
Now, we will finally create an async-await endpoint with a custom product parameter. We need to first get the parameter from the URL and then make a GET request to Bright Data's server data collector to initiate a new scraping action. The request needs to contain a product keyword and an authorization header with an API token. Once the request is done, we get a response with collection_id entry object and store it into a variable.
const express = require("express");

const axios = require("axios").default;

const app = express();

app.get("/:product", async (req, res) => {
  const { product } = req.params;

  const collector = await axios.post(
    "https://api.brightdata.com/dca/trigger?collector=ID",

    [{ keyword: product }],

    { headers: { Authorization: "Bearer API_TOKEN" } }
  );
});

app.listen(8080, () => console.log("Listening on port 8080."));
Now, we can create our second request, which will be of type POST and will be directed to the specific dataset that holds the data of this API search. From the previous request, we need to extract the collection_id entry and pass it to the second request's URL. This request will contain only the authorization header with the same API token.
const express = require("express");

const axios = require("axios").default;

const app = express();

app.get("/:product", async (req, res) => {
  const { product } = req.params;

  const collector = await axios.post(
    "https://api.brightdata.com/dca/trigger?collector=ID",

    [{ keyword: product }],

    { headers: { Authorization: "Bearer API_TOKEN" } }
  );

  const dataset = await axios.get(
    `https://api.brightdata.com/dca/dataset?id=${collector.data.collection_id}`,

    { headers: { Authorization: "Bearer API_TOKEN" } }
  );
});

app.listen(8080, () => console.log("Listening on port 8080."));
At the end of each of the requests' URLs, we need to replace the ID with our data collector's ID, we can find that information in the last query in the URL. In the authorization headers, we also need to replace the API_TOKEN with an API token to your account, we can create one in the settings of your account under the API tokens section.
Now, we need to return the values that our data collector has scraped from the product search at the end of the endpoint with res.json().
const express = require("express");

const axios = require("axios").default;

const app = express();

app.get("/:product", async (req, res) => {
  const { product } = req.params;

  const collector = await axios.post(
    "https://api.brightdata.com/dca/trigger?collector=ID",

    [{ keyword: product }],

    { headers: { Authorization: "Bearer API_TOKEN" } }
  );

  const dataset = await axios.get(
    `https://api.brightdata.com/dca/dataset?id=${collector.data.collection_id}`,

    { headers: { Authorization: "Bearer API_TOKEN" } }
  );

  return res.json(dataset.data);
});

app.listen(8080, () => console.log("Listening on port 8080."));
Deploying an API
Deploying an API is a process of uploading your data management system to the internet. Once it is all uploaded, your data-consuming platforms can reach your API and finally make real-world requests.
Is it legal to scrape the web?
You may be wondering if scraping information from the web is legal, it may sound like a "Cambridge Analytica" situation, but I can assure you it is not. According to the U.S. appeals court ruling, any information that is publicly available on the web can be collected for different purposes.
On the other hand, actions that can get you in trouble are when you try to scrape any private or personal information with a harmful intention.
Where to deploy and monetize your API?
Deploying your API to the web is crucial for correct reachability from your requesting applications. Once it is existent on the web, only then your applications can reach and make requests to your API (unless purposely running it locally).
We can host our API for free on the Heroku.com platform, to create an application there, you will first need to register. On your dashboard then click the New button and select the Create new app option. Fill out the information and click on Create. Now, if you have your API repository on GitHub, select that option, connect it and at the bottom of the page, select Deploy Branch.
There are numerous options on the web for monetizing access to your API, but the most popular one is RapidAPI.com. After another registration, you can head to the My APIs tab, create a new project and follow the steps from there to integrate it with your API.
Conclusion
Creating your API with the power of scraping information from the web is making your business a lot more powerful in the side of transferring information, collecting it and in developer experience.
There are many reasons why you should create an API for your company or yourself, but keeping it simple, one word - integration.
I hope that this article was valuable enough for you to try creating an API for yourself and that you will take some advice from this.

