The Apple M2 Mac device is a powerful, next-generation Mac featuring Apple's advanced M2 chip for enhanced performance and efficiency. Despite offering such great features, you may encounter data loss issues on your M2 Mac. Data loss can occur due to various reasons, and knowing how to recover data from M2 Mac is very crucial.
This guide will provide various data recovery methods, including manual workarounds and third-party Mac data recovery software. Go with the recovery workarounds mentioned in this article to regain your deleted data.
What Causes Data Loss on M2 Mac?
Before you perform any method for data recovery on a Mac, it is important to find the exact reason for your data loss. There are several reasons why data usually gets deleted on M2 Mac, some of them are:
- Accidental Deletion: One of the most common reasons for the deletion of files on any device, including M2 Mac is when you unintentionally delete important files.
- Hardware Failures: Failures in the hard drive or SSD can cause sudden data loss. Over time, storage components can wear out and malfunction.
- Software Malfunctions: Bugs, glitches, or crashes in apps or OS installed on your M2 Mac can sometimes result in lost data.
- Malware or Virus Attacks: Malicious software can corrupt, encrypt, or delete files on your Mac, leading to data loss.
- File System Corruption: Issues with the file system, which mainly occur due to improper shutdowns, power failures, or other system errors, can make data inaccessible or lost.
- Formatting Errors: Reformatting a drive without proper backups can lead to complete data loss from the storage medium.
Quick Recovery Methods to Restore Data on M2 Mac
Now that you are familiar with the reasons for data loss on M2 Mac, it's time to apply proper methods for data recovery for Mac. In this part of the blog, we've outlined some commonly used methods that you can try to easily restore lost or deleted data:
Method 01: Recover Deleted Data using Stellar Data Recovery Professional for Mac
If you are looking for the easiest and quickest approach to recover lost data on Mac, then a Mac data recovery software will definitely be the best choice. Tools like Stellar Data Recovery Professional for Mac allow you to recover data from any macOS device, including M2 Mac in a few simple clicks. Whether your data is deleted due to accidental deletion, formatting, virus or malware attacks, or any other reason, this versatile software can easily recover your lost data.
Here are some key features of Stellar Data Recovery Professional for Mac tool which make it perfect for your data recovery:
- Supports recovery of lost data of any type, including photos, videos, documents, and many more.
- The software offers 'Pause and Resume' scan to restore files while the scan is in progress.
- Supports recovery of data from the latest macOS Sonoma 14 and M3-powered Mac systems.
- 100% safe and secure tool for quick recovery of deleted data.
- The software is available in multiple versions which vary in features and prices. The Windows OS version is also available which supports recovery of files from Windows devices.
Here's how to recover data from M2 Mac using the Stellar Data Recovery Professional for Mac:
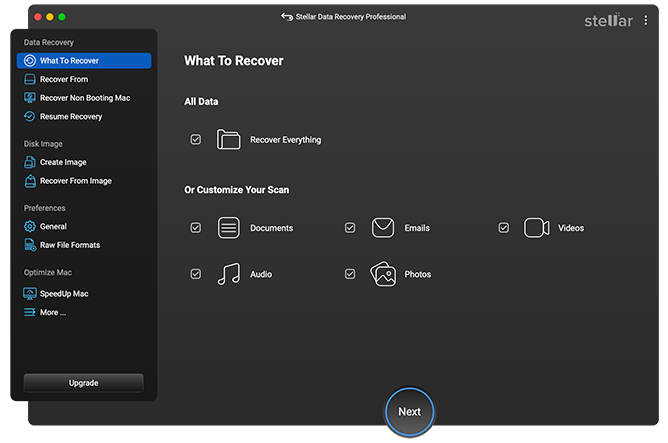
Step 1: Download and install the Stellar Data Recovery Professional tool on your Mac. Launch the software and from the What to Recover window, choose the type of file you need to recover and click Next.
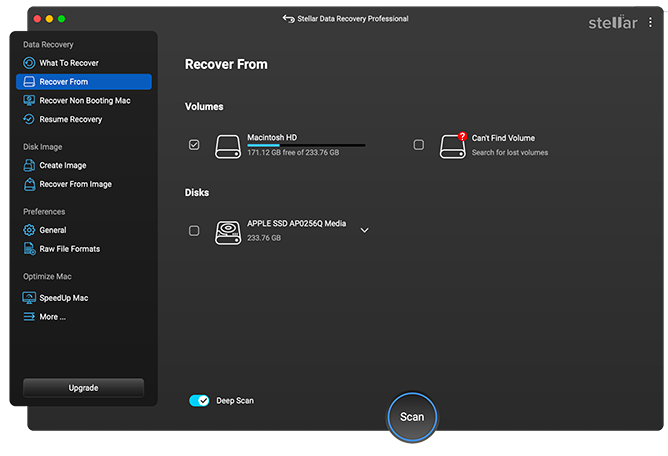
Step 2: Select the storage drive where your deleted data was stored before deletion. If you are not sure, click the Can't Find Volume option and click Scan.
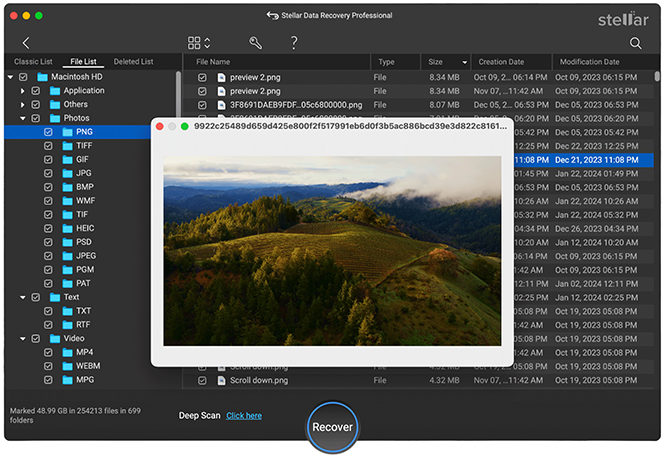
Step 3: Wait till the scanning process is complete. After that, preview the recoverable files and choose the files you need to recover, click the Recover button to save selected files at the desired location.
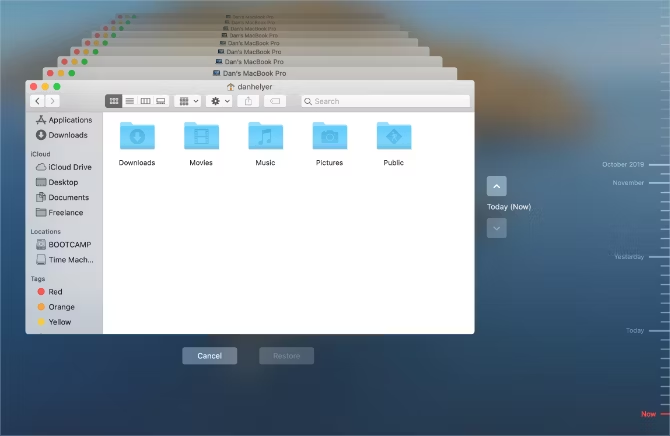
Method 02: Use Time Machine Backups
If you have a habit of maintaining regular backups of important data, you can use these backups to restore when data loss occurs. MacOS's in-built Time Machine backup utility allows you to create regular backups of your entire system, including files, applications, and system settings. Follow the below steps to recover your lost data using Time Machine backups:
- Firstly, connect your Time Machine backup drive to your M2 Mac.
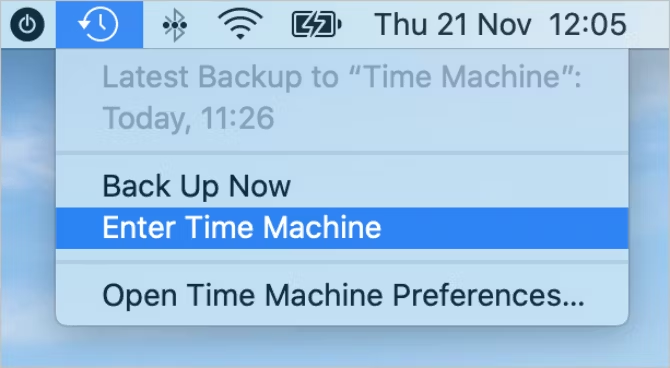
- Now, click on the Time Machine icon in the menu bar and select "Enter Time Machine."
- Browse through the timeline on the right side of the screen to find the backup containing the lost data.
- Select the files or folders you need to recover and click Restore to save them back to your device.
Method 03: Use iCloud Backups
iCloud offers cloud-based storage and backup options for easy data recovery for Mac users. If you have been using iCloud to back up your files, follow the below steps to restore your lost data:
- Open Finder and click "iCloud Drive" from the sidebar.
- Browse through the folders to locate the deleted files you want to recover.
- Drag the files from iCloud Drive to your local drive to restore them.
Tips to Avoid Data Loss on M2 Mac
Though the above methods to recover lost data on M2 Mac are quite easy to implement, but it is important to avoid such data loss scenarios from your end. Below are some common preventive measures that can help you to avoid data loss on your M2 Mac:
- Regular Backups: Use Time Machine or other backup solutions such as external hard drives or cloud backups to regularly back up your data.
- Use Reliable Antivirus Software: Protect your Mac from malware and viruses.
- Avoid Sudden Shutdowns: Ensure your Mac shuts down properly to prevent data corruption.
- Keep Software Updated: Regularly update macOS and applications to avoid bugs and compatibility issues.
- Handle Hardware Carefully: Avoid physical damage to your Mac and its components.
Conclusion
Data loss on an M2 Mac can be a stressful experience, but with the above-mentioned Mac data recovery methods and manual methods, you can recover your valuable files. Whether you use Time Machine, iCloud or any third-party data recovery software, just carefully follow the mentioned instructions to retrieve lost data. Additionally, implementing preventive measures can help you avoid data loss in the future, ensuring your M2 Mac remains a reliable and secure device for your needs.
Comments
Loading comments…
